Literature/Product Sheet
Page 1
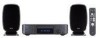
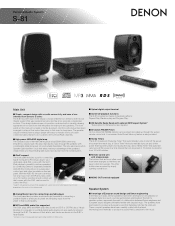
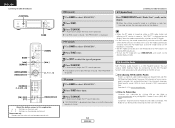
... compact size, this amp reproduces music through the speakers with considerable detail and power on CD-R or CD-RW discs*. s Analog Music Input, for connecting a portable player The front panel also provides a mini-jack input terminal for connecting Apple Computer's iPod music player via a dedicated cable that comes with optional XM Passport System* *Subscription to control the iPod.* *Supports 3rd-generation and later iPods equipped with a dock connector. s Optical digital output terminal s Useful CD playback functions The S-81 provides...
... compact size, this amp reproduces music through the speakers with considerable detail and power on CD-R or CD-RW discs*. s Analog Music Input, for connecting a portable player The front panel also provides a mini-jack input terminal for connecting Apple Computer's iPod music player via a dedicated cable that comes with optional XM Passport System* *Subscription to control the iPod.* *Supports 3rd-generation and later iPods equipped with a dock connector. s Optical digital output terminal s Useful CD playback functions The S-81 provides...
Literature/Product Sheet
Page 2
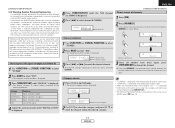
... jacks and color coding for easy connection The connectors on the speaker cables and the speaker terminals on the cables make the connection process a snap. Speaker Section Format Units Max. stand) Main unit: 4.1 kg (9 lbs 0.6 oz) Speakers: 3.1 kg each (6 lbs 13.4 oz) Remote control unit x 1, AA battery x 2, Speaker cable (approx. 5 m) x 2, iPod cable (approx. 1 m) x 1, AM loop antenna x 1, FM antenna x 1, Wall-mount bracket x 2, Screw (for the woofer diaphragm. A highly-magnetic, low-distortion neodium magnet has been used...
... jacks and color coding for easy connection The connectors on the speaker cables and the speaker terminals on the cables make the connection process a snap. Speaker Section Format Units Max. stand) Main unit: 4.1 kg (9 lbs 0.6 oz) Speakers: 3.1 kg each (6 lbs 13.4 oz) Remote control unit x 1, AA battery x 2, Speaker cable (approx. 5 m) x 2, iPod cable (approx. 1 m) x 1, AM loop antenna x 1, FM antenna x 1, Wall-mount bracket x 2, Screw (for the woofer diaphragm. A highly-magnetic, low-distortion neodium magnet has been used...

Owners Manual - English
Page 2
... will fit into the outlet, try reversing the plug. When installing an outside antenna system, extreme care should use instructions should be fatal. 18. Refer all servicing to overturn. 10. Unplug this product from the wall outlet and refer servicing to qualified service personnel under the following conditions: a) When the power-supply cord or plug is damaged, b) If liquid has been spilled, or...
... will fit into the outlet, try reversing the plug. When installing an outside antenna system, extreme care should use instructions should be fatal. 18. Refer all servicing to overturn. 10. Unplug this product from the wall outlet and refer servicing to qualified service personnel under the following conditions: a) When the power-supply cord or plug is damaged, b) If liquid has been spilled, or...
Owners Manual - English
Page 5
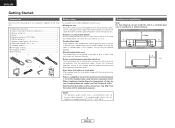
... 27 Auto function selection 27 Others Troubleshooting 28, 29 Specifications 30 1 ENGLISH ENGLISH Contents Getting Started Accessories 2 Before using 2 Cautions on installation 2 Speaker system (SC-S81 3 About discs Discs usable on this set 3 Holding discs 3 Loading discs 3 Cautions on loading discs 3 Cautions on handling 4 Cautions on storing discs 4 Cleaning discs 4 About the remote control unit Inserting the batteries 4 Operating range of the remote control unit 4 Part names and functions Front panel 5 Display 5 Rear panel 6 Remote control unit 6, 7 Connections Cable...
... 27 Auto function selection 27 Others Troubleshooting 28, 29 Specifications 30 1 ENGLISH ENGLISH Contents Getting Started Accessories 2 Before using 2 Cautions on installation 2 Speaker system (SC-S81 3 About discs Discs usable on this set 3 Holding discs 3 Loading discs 3 Cautions on loading discs 3 Cautions on handling 4 Cautions on storing discs 4 Cleaning discs 4 About the remote control unit Inserting the batteries 4 Operating range of the remote control unit 4 Part names and functions Front panel 5 Display 5 Rear panel 6 Remote control unit 6, 7 Connections Cable...
Owners Manual - English
Page 6
... power is heated rapidly. Note Wall NOTE: • This personal audio system uses a semiconductor laser. Using a mobile phone near this unit may condense on using this instructions along with the connection cables. Check once again that all other audio components when moving the unit. • Cautions on internal operation parts if the set may differ from the actual unit for North America model only 1 e Service station list 1 r Screw 4 t Remote control...
... power is heated rapidly. Note Wall NOTE: • This personal audio system uses a semiconductor laser. Using a mobile phone near this unit may condense on using this instructions along with the connection cables. Check once again that all other audio components when moving the unit. • Cautions on internal operation parts if the set may differ from the actual unit for North America model only 1 e Service station list 1 r Screw 4 t Remote control...
Owners Manual - English
Page 9
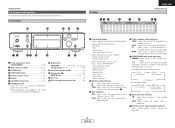
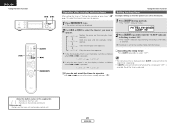
.... w CD play mode. AUTO: Lights when in the auto stereo mode. ST: Lights when a stereo broadcast is received while in the auto stereo mode. Front panel !3 !2 !1 !0 o Display qw e r w t ENGLISH Getting Started yu qw er t y ui q Power operation switch (ON/STANDBY 13) w iPod connector (iPod 10, 11) e Portable jack 10) r FUNCTION button 14, 15) t Remote control sensor 4) y Display 5) u VOLUME control knob 13) i Headphones jack Use this jack to "ON". e Tone indicators SDB: Lights when the super dynamic bass function is being adjusted. MONO: Lights when a monaural...
.... w CD play mode. AUTO: Lights when in the auto stereo mode. ST: Lights when a stereo broadcast is received while in the auto stereo mode. Front panel !3 !2 !1 !0 o Display qw e r w t ENGLISH Getting Started yu qw er t y ui q Power operation switch (ON/STANDBY 13) w iPod connector (iPod 10, 11) e Portable jack 10) r FUNCTION button 14, 15) t Remote control sensor 4) y Display 5) u VOLUME control knob 13) i Headphones jack Use this jack to "ON". e Tone indicators SDB: Lights when the super dynamic bass function is being adjusted. MONO: Lights when a monaural...
Owners Manual - English
Page 10
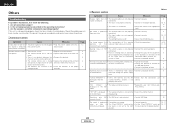
...10) r DIGITAL OPTICAL OUT terminal 12) t iPod CONTROL switch 10, 11) y SPEAKER SYSTEM terminals 8) u Power supply cord 12) i ANTENNA terminals 9) o MONO OUT terminal 8) Tuner operating buttons BAND button 14) TUNING button 14) SEARCH buttons (6, 7 14) ENTER/MEMO button 14) Cursor buttons (D, H, G, F 14) TIME/DISPLAY button 16) Tuner operating buttons CLEAR button 14) ENTER/MEMO button 14) DAB/XM/RDS, PTY TIME/DISPLAY buttons 16) 6 ENGLISH [Front] [Rear] Getting Started Amplifier operating buttons ON/STANDBY button 13) SLEEP button 20) Function buttons (CD, TUNER, AUX 14...
...10) r DIGITAL OPTICAL OUT terminal 12) t iPod CONTROL switch 10, 11) y SPEAKER SYSTEM terminals 8) u Power supply cord 12) i ANTENNA terminals 9) o MONO OUT terminal 8) Tuner operating buttons BAND button 14) TUNING button 14) SEARCH buttons (6, 7 14) ENTER/MEMO button 14) Cursor buttons (D, H, G, F 14) TIME/DISPLAY button 16) Tuner operating buttons CLEAR button 14) ENTER/MEMO button 14) DAB/XM/RDS, PTY TIME/DISPLAY buttons 16) 6 ENGLISH [Front] [Rear] Getting Started Amplifier operating buttons ON/STANDBY button 13) SLEEP button 20) Function buttons (CD, TUNER, AUX 14...

Owners Manual - English
Page 11
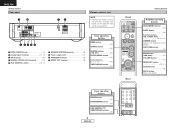
...; Making connections with speaker cables. Changing the connections while the system is operating could result in the power supply cord until all the connection cables between the different components firmly. Audio cable A Analog connections (Stereo) B Analog connections (Stereo) (White) (Red) L L R R Pin-plug cable Stereo mini-plug cable C Digital connections (Optical) D Speaker connections Optical fiber cable E Analog connections (Monaural, for subwoofer) Speaker cable Pin-plug cable Signal direction Audio signal IN OUT OUT IN 7 ENGLISH iPod controls RANDOM button...
...; Making connections with speaker cables. Changing the connections while the system is operating could result in the power supply cord until all the connection cables between the different components firmly. Audio cable A Analog connections (Stereo) B Analog connections (Stereo) (White) (Red) L L R R Pin-plug cable Stereo mini-plug cable C Digital connections (Optical) D Speaker connections Optical fiber cable E Analog connections (Monaural, for subwoofer) Speaker cable Pin-plug cable Signal direction Audio signal IN OUT OUT IN 7 ENGLISH iPod controls RANDOM button...

Owners Manual - English
Page 12
... bass range. Note on . If this , plug the power supply cord back in the direction of arrow E and tighten securely so that the cable cannot come out. • Note that there are no problems with another one of the input cables and the speaker cables. Also check the wiring of your choice. Subwoofer (Sold separately) SC-S81 White (L) Red (R) E D D Connections Changing the speaker cable The speaker cable can be replaced with the wiring...
... bass range. Note on . If this , plug the power supply cord back in the direction of arrow E and tighten securely so that the cable cannot come out. • Note that there are no problems with another one of the input cables and the speaker cables. Also check the wiring of your choice. Subwoofer (Sold separately) SC-S81 White (L) Red (R) E D D Connections Changing the speaker cable The speaker cable can be replaced with the wiring...

Owners Manual - English
Page 14
... Ready® receiver. When making connections, also refer to the operating instructions of XM Satellite Radio Inc. Connecting to an iPod® When using the included iPod cable XM Passport System AUX OUT MX • Switch iPod CONTROL on the rear panel. • Position the XM Passport System near a south-facing window to "iPod (FRONT)". All rights reserved. NOTE: • Keep the power supply cord unplugged until the XM Connect-and-Play antenna connection have been...
... Ready® receiver. When making connections, also refer to the operating instructions of XM Satellite Radio Inc. Connecting to an iPod® When using the included iPod cable XM Passport System AUX OUT MX • Switch iPod CONTROL on the rear panel. • Position the XM Passport System near a south-facing window to "iPod (FRONT)". All rights reserved. NOTE: • Keep the power supply cord unplugged until the XM Connect-and-Play antenna connection have been...
Owners Manual - English
Page 18
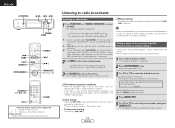
... : Buttons on the main unit and remote control unit Listening to radio broadcasts Selecting a radio station 1 Use or [TUNER] (FUNCTION) to select "TUNER". • The reception frequency is displayed. 1 CD TUNER (iPod) 3 2 AUX2 AUX1 (/iPod) (Front.IN) 1 Can be selected when iPod CONTROL on the rear panel is switched to "iPod (FRONT)" and the included iPod cable is used. 2 Front IN can only be selected when a portable player is connected. 3 Can be selected when iPod CONTROL on the rear panel is switched to "AUX1 CONTROL" or "DOCK CONTROL" and...
... : Buttons on the main unit and remote control unit Listening to radio broadcasts Selecting a radio station 1 Use or [TUNER] (FUNCTION) to select "TUNER". • The reception frequency is displayed. 1 CD TUNER (iPod) 3 2 AUX2 AUX1 (/iPod) (Front.IN) 1 Can be selected when iPod CONTROL on the rear panel is switched to "iPod (FRONT)" and the included iPod cable is used. 2 Front IN can only be selected when a portable player is connected. 3 Can be selected when iPod CONTROL on the rear panel is switched to "AUX1 CONTROL" or "DOCK CONTROL" and...

Owners Manual - English
Page 19
... programs that carry traffic announcements. 3 Press . • Broadcast stations are weak cannot be used both to select the reception frequency (tuning mode) and to select the preset station (preset mode). • Switching between the tuning and preset modes q To switch to [0/10]). w Perform step 3 under "Giving a name to change, then press [ENTER/MEMO] twice. Presetting broadcast stations automatically (Auto preset) 1 Use or [TUNER] (FUNCTION) to select "TUNER". • The reception frequency is displayed. 2 Press and hold . • "AUTO PRESET" is a broadcasting service...
... programs that carry traffic announcements. 3 Press . • Broadcast stations are weak cannot be used both to select the reception frequency (tuning mode) and to select the preset station (preset mode). • Switching between the tuning and preset modes q To switch to [0/10]). w Perform step 3 under "Giving a name to change, then press [ENTER/MEMO] twice. Presetting broadcast stations automatically (Auto preset) 1 Use or [TUNER] (FUNCTION) to select "TUNER". • The reception frequency is displayed. 2 Press and hold . • "AUTO PRESET" is a broadcasting service...
Owners Manual - English
Page 20
... on the display. • When the RT mode is turned on while an RDS radio station not offering an RT service is displayed on the main unit and remote control unit RDS search RT (Radio Text) Listening to radio broadcasts 1 Use BAND to select "FM AUTO". 2 Press [RDS]. 3 Press [SEARCH]. • Automatically begin the TP search operation. XM Satellite Radio S-81 Personal Audio System is displayed. The Radio ID can...
... on the display. • When the RT mode is turned on while an RDS radio station not offering an RT service is displayed on the main unit and remote control unit RDS search RT (Radio Text) Listening to radio broadcasts 1 Use BAND to select "FM AUTO". 2 Press [RDS]. 3 Press [SEARCH]. • Automatically begin the TP search operation. XM Satellite Radio S-81 Personal Audio System is displayed. The Radio ID can...
Owners Manual - English
Page 21
...; "UPDATING" is displayed while updating encryption code. • When the selected channel is not available, "CH- - -" is displayed. • Information on the artist name, song title, category and signal level can be checked using [TIME/DISPLAY]. • The XM Satellite Radio channels can be preset in receivers compatible with an XL. All fees and programming subject to select "XM". • The reception channel number is displayed. XM000 RADIO ID Radio ID Channel selection 1 Use or [TUNER] (FUNCTION) to select "TUNER...
...; "UPDATING" is displayed while updating encryption code. • When the selected channel is not available, "CH- - -" is displayed. • Information on the artist name, song title, category and signal level can be checked using [TIME/DISPLAY]. • The XM Satellite Radio channels can be preset in receivers compatible with an XL. All fees and programming subject to select "XM". • The reception channel number is displayed. XM000 RADIO ID Radio ID Channel selection 1 Use or [TUNER] (FUNCTION) to select "TUNER...

Owners Manual - English
Page 23
... [MENU/SET]. • The timer standby indicator " " lights. w Press [MENU/SET] repeatedly. ¢ To change the settings as desired. When the timer start time is set to the standby mode and the power indicator lights orange. To change to select "EVERYDAY", then press [MENU/SET]. ¢ If you want to play beforehand. 1 Press [MENU/SET] once. • "TIMER" flashes. 2 Use 8 or 9 to select "ONCE", then press [MENU/SET]. 3 Use 8 or 9 to select "CD", then press [MENU/SET]. 3 Use 8 or 9 to select "TUNER...
... [MENU/SET]. • The timer standby indicator " " lights. w Press [MENU/SET] repeatedly. ¢ To change the settings as desired. When the timer start time is set to the standby mode and the power indicator lights orange. To change to select "EVERYDAY", then press [MENU/SET]. ¢ If you want to play beforehand. 1 Press [MENU/SET] once. • "TIMER" flashes. 2 Use 8 or 9 to select "ONCE", then press [MENU/SET]. 3 Use 8 or 9 to select "CD", then press [MENU/SET]. 3 Use 8 or 9 to select "TUNER...
Owners Manual - English
Page 24
... timer standby indicator " ". Reset the timer as follows when 8 or 9 is pressed. 1 _ off / E _ off : operates. About the button names in 80 minutes. 1 Press [SLEEP] during playback. • The "SLEEP" indicator flashes. 2 Use 8 or 9 to select the timer(s) you do not want the timer to operate: Use 8 or 9 to operate. 1 Press [MENU/SET] twice. • The current settings are displayed. The power is flashing to the standby mode after...
... timer standby indicator " ". Reset the timer as follows when 8 or 9 is pressed. 1 _ off / E _ off : operates. About the button names in 80 minutes. 1 Press [SLEEP] during playback. • The "SLEEP" indicator flashes. 2 Use 8 or 9 to select the timer(s) you do not want the timer to operate: Use 8 or 9 to operate. 1 Press [MENU/SET] twice. • The current settings are displayed. The power is flashing to the standby mode after...

Owners Manual - English
Page 30
..., use a different program allowing you to record in the selected folder or all the files on a CD-R or CD-RW disc, set the writing software's format to "ISO9660 Level 1". ENGLISH Playing MP3 or WMA files 89 [1] 8 [iPod 1/3] [iPod REMOTE] [TIME/DISPLAY] [AUX] 9 [REP 1/ALL] About the button names in this explanation < > : Buttons on the main unit [ ] : Buttons on the remote control unit Button name only : Buttons on the main unit and remote control...
..., use a different program allowing you to record in the selected folder or all the files on a CD-R or CD-RW disc, set the writing software's format to "ISO9660 Level 1". ENGLISH Playing MP3 or WMA files 89 [1] 8 [iPod 1/3] [iPod REMOTE] [TIME/DISPLAY] [AUX] 9 [REP 1/ALL] About the button names in this explanation < > : Buttons on the main unit [ ] : Buttons on the remote control unit Button name only : Buttons on the main unit and remote control...
Owners Manual - English
Page 32
... stereo sources, the • The connections of the main unit. rear panel is not correct. Should the problem persist, there may be received. direction. ¢ Receiver section Others Symptom Cause Measures Page Display lights but no sound is • The signal cannot be a malfunction. "NO SIGNAL" is produced into a 12 no • The speaker cables are inverted. Disconnect the power immediately and contact your XM Connect-and- 17 Play antenna. mode...
... stereo sources, the • The connections of the main unit. rear panel is not correct. Should the problem persist, there may be received. direction. ¢ Receiver section Others Symptom Cause Measures Page Display lights but no sound is • The signal cannot be a malfunction. "NO SIGNAL" is produced into a 12 no • The speaker cables are inverted. Disconnect the power immediately and contact your XM Connect-and- 17 Play antenna. mode...

Owners Manual - English
Page 34
... Rated output: Output terminals: Audio input/output terminals: Reception frequency range: Reception sensitivity: FM stereo isolation: 50 W + 50 W (4 Ω/ohms, 1 kHz, T.H.D. 10 %) Speaker: 4 Ω/ohms AUX 1 input terminal, AUX 2 input terminal, DIGITAL OPTICAL OUT terminal, iPod terminal, MONO output terminal Portable input jack, Headphone jack FM: 87.5 MHz ~ 107.9 MHz AM: 520 kHz ~ 1710 kHz FM: 1.5 µV AM: 20 µV 35 dB (1 kHz) ¢ CD player section Wow & flutter: Sampling frequency: Light source...
... Rated output: Output terminals: Audio input/output terminals: Reception frequency range: Reception sensitivity: FM stereo isolation: 50 W + 50 W (4 Ω/ohms, 1 kHz, T.H.D. 10 %) Speaker: 4 Ω/ohms AUX 1 input terminal, AUX 2 input terminal, DIGITAL OPTICAL OUT terminal, iPod terminal, MONO output terminal Portable input jack, Headphone jack FM: 87.5 MHz ~ 107.9 MHz AM: 520 kHz ~ 1710 kHz FM: 1.5 µV AM: 20 µV 35 dB (1 kHz) ¢ CD player section Wow & flutter: Sampling frequency: Light source...
Owners Manual - Spanish
Page 2
... operating instructions should use liquid cleaners or aerosol cleaners. 6. Unplug this product near water - and the like. 8. Wall or Ceiling Mounting - Any mounting of important operating and maintenance (servicing) instructions in proper operating condition. 24. For products intended to operate from the wall outlet and disconnect the antenna or cable system. This plug will often require extensive work by following conditions: a) When the power-supply cord or plug...
... operating instructions should use liquid cleaners or aerosol cleaners. 6. Unplug this product near water - and the like. 8. Wall or Ceiling Mounting - Any mounting of important operating and maintenance (servicing) instructions in proper operating condition. 24. For products intended to operate from the wall outlet and disconnect the antenna or cable system. This plug will often require extensive work by following conditions: a) When the power-supply cord or plug...


