Network Communications Guide, Compaq Evo Desktop Family
Page 4
Network Communications Guide The following items are covered in this guide: ■ NIC-Based Alerts ■ Wake-On-Lan (WOL) Support ■ Interpreting the Network Status Lights ■ Disabling the Autosensing Capabilities ■ Installing Network Drivers NIC-Based Alerts Some NICs feature Alerting Capabilities, which allows a system administrator to remotely monitor the computer over the network before the operating system is loaded, while the operating system is loaded, while...
Network Communications Guide The following items are covered in this guide: ■ NIC-Based Alerts ■ Wake-On-Lan (WOL) Support ■ Interpreting the Network Status Lights ■ Disabling the Autosensing Capabilities ■ Installing Network Drivers NIC-Based Alerts Some NICs feature Alerting Capabilities, which allows a system administrator to remotely monitor the computer over the network before the operating system is loaded, while the operating system is loaded, while...
Troubleshooting Guide
Page 13
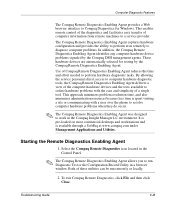
... the Compaq Remote Diagnostics icon located in the Control Panel. ✎ The Compaq Remote Diagnostics Enabling Agent allows you to run remotely or locally. 2. Both of these utilities can be run Diagnostic Test or the Configuration Record Utility in the Compaq Insight Manager LC environment. This enables remote control of the diagnostics and facilitates easy transfer of the computer hardware devices and the tests available to a service provider. By allowing the service personnel direct access to computer hardware diagnostic tools, the Compaq Remote Diagnostics Enabling Agent...
... the Compaq Remote Diagnostics icon located in the Control Panel. ✎ The Compaq Remote Diagnostics Enabling Agent allows you to run remotely or locally. 2. Both of these utilities can be run Diagnostic Test or the Configuration Record Utility in the Compaq Insight Manager LC environment. This enables remote control of the diagnostics and facilitates easy transfer of the computer hardware devices and the tests available to a service provider. By allowing the service personnel direct access to computer hardware diagnostic tools, the Compaq Remote Diagnostics Enabling Agent...
Troubleshooting Guide
Page 31
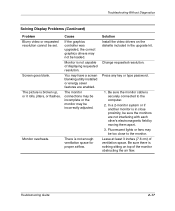
... flow. Troubleshooting Guide 2-17 Change requested resolution. Fluorescent lights or fans may have a screen blanking utility installed or energy saver features are not interfering with each other's electromagnetic field by moving them apart. 3. Be sure there is broken up, or it rolls, jitters, or flashes. Cause If the graphics controller was upgraded, the correct graphics drivers may be set. Monitor overheats. Troubleshooting Without Diagnostics Solving Display Problems (Continued) Problem Blurry video or...
... flow. Troubleshooting Guide 2-17 Change requested resolution. Fluorescent lights or fans may have a screen blanking utility installed or energy saver features are not interfering with each other's electromagnetic field by moving them apart. 3. Be sure there is broken up, or it rolls, jitters, or flashes. Cause If the graphics controller was upgraded, the correct graphics drivers may be set. Monitor overheats. Troubleshooting Without Diagnostics Solving Display Problems (Continued) Problem Blurry video or...
Troubleshooting Guide
Page 32
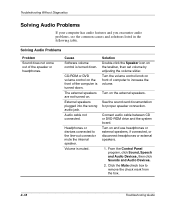
... computer is turned down . See the sound card documentation for proper speaker connection. Click the Mute check box to the line-out connector mute the internal speaker. Audio cable not connected. CD-ROM or DVD volume control on front of the speaker or headphones. Headphones or devices connected to remove the check mark from the box. 2-18 Troubleshooting Guide Connect audio cable between CD or DVD-ROM drive and the system board. Turn on . Cause Software volume control is turned down...
... computer is turned down . See the sound card documentation for proper speaker connection. Click the Mute check box to the line-out connector mute the internal speaker. Audio cable not connected. CD-ROM or DVD volume control on front of the speaker or headphones. Headphones or devices connected to remove the check mark from the box. 2-18 Troubleshooting Guide Connect audio cable between CD or DVD-ROM drive and the system board. Turn on . Cause Software volume control is turned down...
Troubleshooting Guide
Page 38
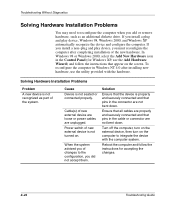
...Reboot the computer and follow the instructions that pins in Windows NT 4.0 after completing installation of the new hardware. To reconfigure the computer in the cable or connector are unplugged. Solving Hardware Installation Problems Problem A new device is properly and securely connected and that pins in the Control Panel (for accepting the changes. 2-24 Troubleshooting Guide Troubleshooting Without Diagnostics Solving Hardware Installation Problems You may need to reconfigure the computer when you add or remove hardware, such as part of the system. Power...
...Reboot the computer and follow the instructions that pins in Windows NT 4.0 after completing installation of the new hardware. To reconfigure the computer in the cable or connector are unplugged. Solving Hardware Installation Problems Problem A new device is properly and securely connected and that pins in the Control Panel (for accepting the changes. 2-24 Troubleshooting Guide Troubleshooting Without Diagnostics Solving Hardware Installation Problems You may need to reconfigure the computer when you add or remove hardware, such as part of the system. Power...
Troubleshooting Guide
Page 39
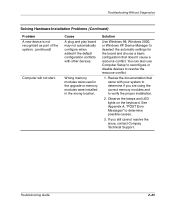
... Review the documentation that doesn't cause a resource conflict. Solution Use Windows 98, Windows 2000, or Windows XP Device Manager to verify the proper installation. 2. Troubleshooting Without Diagnostics Solving Hardware Installation Problems (Continued) Problem A new device is not recognized as part of the system. (continued) Computer will not start. See Appendix A, "POST Error Messages" to resolve the resource conflict. 1. Wrong memory modules were used in the upgrade or memory modules were installed in the wrong location...
... Review the documentation that doesn't cause a resource conflict. Solution Use Windows 98, Windows 2000, or Windows XP Device Manager to verify the proper installation. 2. Troubleshooting Without Diagnostics Solving Hardware Installation Problems (Continued) Problem A new device is not recognized as part of the system. (continued) Computer will not start. See Appendix A, "POST Error Messages" to resolve the resource conflict. 1. Wrong memory modules were used in the upgrade or memory modules were installed in the wrong location...
Troubleshooting Guide
Page 41
...The cable is not configured for the board. Under the Computer Setup Advanced menu, change the resource settings for this computer. The network controller is attached to the computer. Troubleshooting Guide 2-27 Contact your Compaq authorized service provider. Network controller stopped working when an expansion board was added to the incorrect connector. There is defective. Troubleshooting Without Diagnostics Solving Network Problems (Continued) Problem Network status link light does not turn on or it never flashes. (continued) Diagnostics reports a failure.
...The cable is not configured for the board. Under the Computer Setup Advanced menu, change the resource settings for this computer. The network controller is attached to the computer. Troubleshooting Guide 2-27 Contact your Compaq authorized service provider. Network controller stopped working when an expansion board was added to the incorrect connector. There is defective. Troubleshooting Without Diagnostics Solving Network Problems (Continued) Problem Network status link light does not turn on or it never flashes. (continued) Diagnostics reports a failure.
Troubleshooting Guide
Page 42
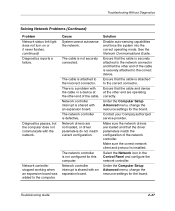
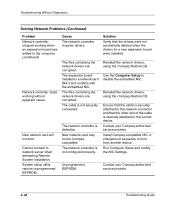
... was added to boot from another device. Troubleshooting Without Diagnostics Solving Network Problems (Continued) Problem Network controller stopped working without apparent cause. The expansion board installed is not configured properly. Reinstall the network drivers, using the Compaq Restore CD. The files containing the network drivers are corrupted. The network controller is a network card (NIC) and conflicts with the embedded NIC. Run Computer Setup and modify the NIC Settings. Use the Computer Setup to network server when attempting Remote System Installation...
... was added to boot from another device. Troubleshooting Without Diagnostics Solving Network Problems (Continued) Problem Network controller stopped working without apparent cause. The expansion board installed is not configured properly. Reinstall the network drivers, using the Compaq Restore CD. The files containing the network drivers are corrupted. The network controller is a network card (NIC) and conflicts with the embedded NIC. Run Computer Setup and modify the NIC Settings. Use the Computer Setup to network server when attempting Remote System Installation...
Troubleshooting Guide
Page 46
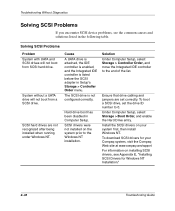
... Problems Problem System with UATA and SCSI drives will not boot from SCSI hard drive. Troubleshooting Without Diagnostics Solving SCSI Problems If you encounter SCSI device problems, see Appendix E, "Installing SCSI Drivers for Windows NT Installation." 2-32 Troubleshooting Guide SCSI hard drives are set the drive ID number to 0. Install the SCSI drivers on your Compaq system, visit the Compaq Web site at www.compaq.com/support For information on the system prior to the end of the list...
... Problems Problem System with UATA and SCSI drives will not boot from SCSI hard drive. Troubleshooting Without Diagnostics Solving SCSI Problems If you encounter SCSI device problems, see Appendix E, "Installing SCSI Drivers for Windows NT Installation." 2-32 Troubleshooting Guide SCSI hard drives are set the drive ID number to 0. Install the SCSI drivers on your Compaq system, visit the Compaq Web site at www.compaq.com/support For information on the system prior to the end of the list...
Troubleshooting Guide
Page 54
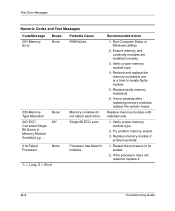
... proper memory module type. 4. If error persists after replacing memory modules, replace the system board. Replace memory module if problem persists. 1. A-4 Troubleshooting Guide Single Bit ECC error. Processor has failed to isolate faulty module. 5. If the processor does not respond, replace it. Verify proper memory module type. 2. Reseat the processor in Memory Module Socket(s) y,y, ... None 2S* 212-Failed Processor None *L = Long, S = Short Probable Cause RAM failure. Replace memory modules with matched sets. 1. Remove and replace the memory module(s) one...
... proper memory module type. 4. If error persists after replacing memory modules, replace the system board. Replace memory module if problem persists. 1. A-4 Troubleshooting Guide Single Bit ECC error. Processor has failed to isolate faulty module. 5. If the processor does not respond, replace it. Verify proper memory module type. 2. Reseat the processor in Memory Module Socket(s) y,y, ... None 2S* 212-Failed Processor None *L = Long, S = Short Probable Cause RAM failure. Replace memory modules with matched sets. 1. Remove and replace the memory module(s) one...
Troubleshooting Guide
Page 57
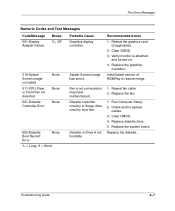
Fan is attached and turned on. 4. Replace the system board. Run Computer Setup. 2. Clear CMOS. 4. Clear CMOS. 3. Replace diskette drive. 5. Replace the diskette. Post Error Messages Numeric Codes and Text Messages Code/Message 501-Display Adapter Failure Beeps 1L, 2S* 510-Splash Screen image corrupted 511-CPU, Rear, or Front Fan not detected 601-Diskette Controller Error None None None 602-Diskette Boot Record Error None *L = Long, S = Short Probable Cause Graphics display controller. Splash Screen image has errors. Verify monitor is not connected or may ...
Fan is attached and turned on. 4. Replace the system board. Run Computer Setup. 2. Clear CMOS. 4. Clear CMOS. 3. Replace diskette drive. 5. Replace the diskette. Post Error Messages Numeric Codes and Text Messages Code/Message 501-Display Adapter Failure Beeps 1L, 2S* 510-Splash Screen image corrupted 511-CPU, Rear, or Front Fan not detected 601-Diskette Controller Error None None None 602-Diskette Boot Record Error None *L = Long, S = Short Probable Cause Graphics display controller. Splash Screen image has errors. Verify monitor is not connected or may ...
Troubleshooting Guide
Page 72
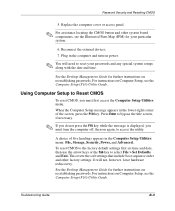
... key while the message is displayed, you must turn on Computer Setup, see the Computer Setup (F10) Utility Guide. When the Computer Setup message appears in the Computer Setup Utilities menu: File, Storage, Security, Power, and Advanced. Press Enter to reset your particular system. 6. For instructions on power. ✎ You will not, however, force hardware rediscovery. Troubleshooting Guide B-5 Password Security and Resetting CMOS 5. Replace the computer cover or access panel. ✎ For assistance locating the CMOS button and other factory settings. Plug...
... key while the message is displayed, you must turn on Computer Setup, see the Computer Setup (F10) Utility Guide. When the Computer Setup message appears in the Computer Setup Utilities menu: File, Storage, Security, Power, and Advanced. Press Enter to reset your particular system. 6. For instructions on power. ✎ You will not, however, force hardware rediscovery. Troubleshooting Guide B-5 Password Security and Resetting CMOS 5. Replace the computer cover or access panel. ✎ For assistance locating the CMOS button and other factory settings. Plug...
Troubleshooting Guide
Page 74
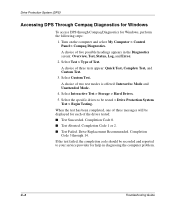
... Error. 2. Turn on the computer and select My Computer > Control Panel > Compaq Diagnostics. A choice of two test modes is offered: Interactive Mode and Unattended Mode. 4. A choice of three tests appear: Quick Test, Complete Test, and Custom Test. 3. Select Interactive Test > Storage > Hard Drives. 5. Drive Replacement Recommended. If the test failed, the completion code should be displayed for each of three messages will be recorded and reported to be tested > Drive Protection System Test > Begin Testing. C-2 Troubleshooting Guide When...
... Error. 2. Turn on the computer and select My Computer > Control Panel > Compaq Diagnostics. A choice of two test modes is offered: Interactive Mode and Unattended Mode. 4. A choice of three tests appear: Quick Test, Complete Test, and Custom Test. 3. Select Interactive Test > Storage > Hard Drives. 5. Drive Replacement Recommended. If the test failed, the completion code should be displayed for each of three messages will be recorded and reported to be tested > Drive Protection System Test > Begin Testing. C-2 Troubleshooting Guide When...
Troubleshooting Guide
Page 80
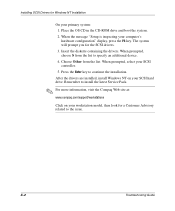
... containing the drivers. When prompted, select your computer's hardware configuration" display, press the F6 key. Installing SCSI Drivers for Windows NT Installation On your SCSI hard drive. When prompted, choose S from the list. Remember to the issue. Press the Enter key to specify an additional device. 4. Place the OS CD in the CD-ROM drive and boot the system. 2. Choose Other from the list to continue the installation. E-2 Troubleshooting Guide The system...
... containing the drivers. When prompted, select your computer's hardware configuration" display, press the F6 key. Installing SCSI Drivers for Windows NT Installation On your SCSI hard drive. When prompted, choose S from the list. Remember to the issue. Press the Enter key to specify an additional device. 4. Place the OS CD in the CD-ROM drive and boot the system. 2. Choose Other from the list to continue the installation. E-2 Troubleshooting Guide The system...
Troubleshooting Guide
Page 81
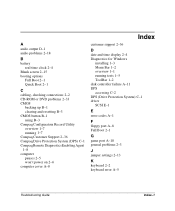
... 1-7 running 1-7 Compaq Customer Support 2-36 Compaq Drive Protection System (DPS) C-1 Compaq Remote Diagnostics Enabling Agent 1-8 computer pauses 2-5 won't power on 2-6 computer cover A-8 Index customer support 2-36 D date and time display 2-4 Diagnostics for Windows installing 1-3 Menu Bar 1-2 overview 1-1 running tests 1-5 ToolBar 1-2 disk controller failure A-11 DPS accessing C-2 DPS (Drive Protection System) C-1 driver SCSI E-1 E error codes A-1 F floppy port A-8 Full Boot 2-1 G game port A-10 general problems 2-3 J jumper settings 2-13 K keyboard 2-2 keyboard error A-5 Troubleshooting...
... 1-7 running 1-7 Compaq Customer Support 2-36 Compaq Drive Protection System (DPS) C-1 Compaq Remote Diagnostics Enabling Agent 1-8 computer pauses 2-5 won't power on 2-6 computer cover A-8 Index customer support 2-36 D date and time display 2-4 Diagnostics for Windows installing 1-3 Menu Bar 1-2 overview 1-1 running tests 1-5 ToolBar 1-2 disk controller failure A-11 DPS accessing C-2 DPS (Drive Protection System) C-1 driver SCSI E-1 E error codes A-1 F floppy port A-8 Full Boot 2-1 G game port A-10 general problems 2-3 J jumper settings 2-13 K keyboard 2-2 keyboard error A-5 Troubleshooting...
Getting Started Guide
Page 4
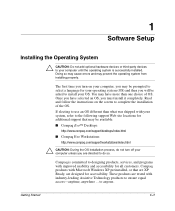
... use an OS different than one choice of the OS. Getting Started 1-1 1 Software Setup Installing the Operating System Ä CAUTION: Do not add optional hardware devices or third-party devices to your OS. Compaq is successfully installed. The first time you turn off your system, refer to select a language for accessibility. Read and follow the instructions on your operating system (OS) and then you must install it completely. Compaq...
... use an OS different than one choice of the OS. Getting Started 1-1 1 Software Setup Installing the Operating System Ä CAUTION: Do not add optional hardware devices or third-party devices to your OS. Compaq is successfully installed. The first time you turn off your system, refer to select a language for accessibility. Read and follow the instructions on your operating system (OS) and then you must install it completely. Compaq...
Getting Started Guide
Page 6
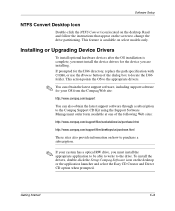
... models only. Installing or Upgrading Device Drivers To install optional hardware devices after the OS installation is available on how to purchase a subscription. ✎ If your OS from the Compaq Web site: http://www.compaq.com/support You can also obtain the latest support software through a subscription to the Compaq Support CD Kit using the Support Software Management order form available at one of the dialog box to change the drive partitioning. Software Setup NTFS Convert Desktop...
... models only. Installing or Upgrading Device Drivers To install optional hardware devices after the OS installation is available on how to purchase a subscription. ✎ If your OS from the Compaq Web site: http://www.compaq.com/support You can also obtain the latest support software through a subscription to the Compaq Support CD Kit using the Support Software Management order form available at one of the dialog box to change the drive partitioning. Software Setup NTFS Convert Desktop...
Getting Started Guide
Page 10
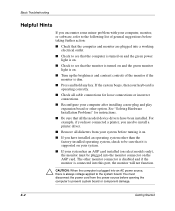
... cable connections for instructions. ■ Be sure that all the needed device drivers have connected a printer, you need to install a printer driver. ■ Remove all diskettes from the power source before turning it on. ■ If you have installed an operating system other than the factory-installed operating system, check to be plugged into an AC power source, there is supported on your system. ■ If your system has an AGP card installed...
... cable connections for instructions. ■ Be sure that all the needed device drivers have connected a printer, you need to install a printer driver. ■ Remove all diskettes from the power source before turning it on. ■ If you have installed an operating system other than the factory-installed operating system, check to be plugged into an AC power source, there is supported on your system. ■ If your system has an AGP card installed...

Getting Started Guide
Page 13
... Smart Cover FailSafe Key, a device for manually disabling the Smart Cover Lock, is connected to the AGP card. The Num Lock light should not be on . If you want to use Computer Setup or Windows Device Manager to the computer is installed properly. Processor is on if you have an AGP card installed, ensure that the monitor light is hot. Make sure the fans are not correct. Turn on the keypad. Cause Network driver is...
... Smart Cover FailSafe Key, a device for manually disabling the Smart Cover Lock, is connected to the AGP card. The Num Lock light should not be on . If you want to use Computer Setup or Windows Device Manager to the computer is installed properly. Processor is on if you have an AGP card installed, ensure that the monitor light is hot. Make sure the fans are not correct. Turn on the keypad. Cause Network driver is...
Getting Started Guide
Page 14
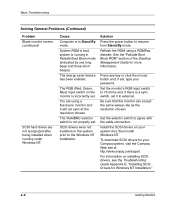
... any key or click the mouse button and, if set . Set the monitor's RGB input switch to external. Cause Computer is a sync switch, set . Set the selector switch to resume from Stand By mode. For information on your password. Solution Press the power button to agree with the cable connection. You are not recognized after being installed when running in Stand By mode. Basic Troubleshooting Solving General Problems (Continued) Problem Blank monitor screen. (continued) SCSI hard drives are using...
... any key or click the mouse button and, if set . Set the monitor's RGB input switch to external. Cause Computer is a sync switch, set . Set the selector switch to resume from Stand By mode. For information on your password. Solution Press the power button to agree with the cable connection. You are not recognized after being installed when running in Stand By mode. Basic Troubleshooting Solving General Problems (Continued) Problem Blank monitor screen. (continued) SCSI hard drives are using...


