Hardware Guide
Page 3
... 1-6 Serial Number Location 1-7 2 Hardware Upgrades Installation Sequence 2-1 Drawer Installation Method 2-2 Smart Cover Lock 2-3 Using the Smart Cover FailSafe Key 2-3 Removing the Computer Cover 2-5 Installing Additional Memory 2-7 DIMMs 2-7 DDR-SDRAM DIMMs 2-7 Installing DDR-SDRAM DIMMs 2-8 Removing the Expansion Card Cage 2-11 Installing an Expansion Card 2-12 Removing the AGP Card 2-15 Drive...
... 1-6 Serial Number Location 1-7 2 Hardware Upgrades Installation Sequence 2-1 Drawer Installation Method 2-2 Smart Cover Lock 2-3 Using the Smart Cover FailSafe Key 2-3 Removing the Computer Cover 2-5 Installing Additional Memory 2-7 DIMMs 2-7 DDR-SDRAM DIMMs 2-7 Installing DDR-SDRAM DIMMs 2-8 Removing the Expansion Card Cage 2-11 Installing an Expansion Card 2-12 Removing the AGP Card 2-15 Drive...
Hardware Guide
Page 19
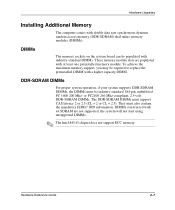
...rate synchronous dynamic random access memory (DDR-SDRAM) dual inline memory modules (DIMMs). DIMMs constructed with x4 SDRAM are populated with industry-standard DIMMs. These memory module slots are not ...system supports DDR-SDRAM DIMMs, the DIMMs must be populated with at least one preinstalled memory module. or PC2100 266 Mhz-compliant, 2.5 volt DDR-SDRAM DIMMs. The DDR-SDRAM... Intel 845-G chipset does not support ECC memory. Hardware Upgrades Installing Additional Memory The computer comes with a higher capacity DIMM. DIMMs The memory sockets on the system board can be industry...
...rate synchronous dynamic random access memory (DDR-SDRAM) dual inline memory modules (DIMMs). DIMMs constructed with x4 SDRAM are populated with industry-standard DIMMs. These memory module slots are not ...system supports DDR-SDRAM DIMMs, the DIMMs must be populated with at least one preinstalled memory module. or PC2100 266 Mhz-compliant, 2.5 volt DDR-SDRAM DIMMs. The DDR-SDRAM... Intel 845-G chipset does not support ECC memory. Hardware Upgrades Installing Additional Memory The computer comes with a higher capacity DIMM. DIMMs The memory sockets on the system board can be industry...
Hardware Guide
Page 20
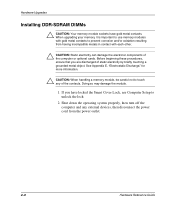
... contact with each other. Ä CAUTION: Static electricity can damage the electronic components of the contacts. When upgrading your memory, it is important to use Computer Setup to unlock the lock. 2. See Appendix E, "Electrostatic Discharge," for more information. Ä ...CAUTION: When handling a memory module, be careful not to prevent corrosion and/or oxidation resulting from the power outlet. 2-8 Hardware Reference Guide Before beginning these...
... contact with each other. Ä CAUTION: Static electricity can damage the electronic components of the contacts. When upgrading your memory, it is important to use Computer Setup to unlock the lock. 2. See Appendix E, "Electrostatic Discharge," for more information. Ä ...CAUTION: When handling a memory module, be careful not to prevent corrosion and/or oxidation resulting from the power outlet. 2-8 Hardware Reference Guide Before beginning these...
Hardware Guide
Page 21
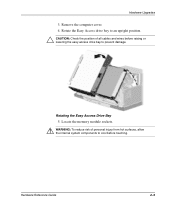
Hardware Reference Guide 2-9 Rotating the Easy Access Drive Bay 5. Remove the computer cover. 4. Locate the memory module sockets. Å WARNING: To reduce risk of all cables and wires before touching. Rotate the Easy Access drive bay to an upright position. Ä CAUTION: Check the position of personal injury from hot surfaces, allow the internal system components to cool before raising or lowering the easy access drive bay to prevent damage. Hardware Upgrades 3.
Hardware Reference Guide 2-9 Rotating the Easy Access Drive Bay 5. Remove the computer cover. 4. Locate the memory module sockets. Å WARNING: To reduce risk of all cables and wires before touching. Rotate the Easy Access drive bay to an upright position. Ä CAUTION: Check the position of personal injury from hot surfaces, allow the internal system components to cool before raising or lowering the easy access drive bay to prevent damage. Hardware Upgrades 3.
Hardware Guide
Page 22
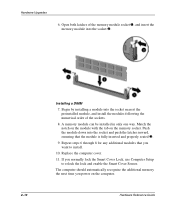
... Begin by installing a module into the socket 2. Hardware Upgrades 6. Replace the computer cover. 11. The computer should automatically recognize the additional memory the next time you normally lock the Smart Cover Lock, use Computer Setup to install. 10. Open both latches of the... memory module socket 1, and insert the memory module into the socket nearest the preinstalled module, and install the modules following the numerical order of the sockets. 8. Repeat steps 6 ...
... Begin by installing a module into the socket 2. Hardware Upgrades 6. Replace the computer cover. 11. The computer should automatically recognize the additional memory the next time you normally lock the Smart Cover Lock, use Computer Setup to install. 10. Open both latches of the... memory module socket 1, and insert the memory module into the socket nearest the preinstalled module, and install the modules following the numerical order of the sockets. 8. Repeat steps 6 ...
Hardware Guide
Page 62
...components front panel 1-2 rear panel 1-3 computer care F-1 computer cover removing 2-5 D DDR-SDRAM (double data rate synchronous dynamic random access memory) 2-7 DIMMs (dual inline memory modules) 2-7 drawer installation 2-2 drive positions 2-17 DVD-ROM drive 2-22, 2-24 E Easy Access Buttons customizing 1-5 electrostatic discharge E-1 ... CD-ROM drive 2-22 expansion card 2-12 K keyboard Easy Access keyboard 1-4 identifying keys 1-4 Windows Logo Key 1-6 M memory 2-7 DDR-SDRAM 2-7 mouse 1-6 MultiBay hot-plugging or hot-swapping drives 2-25 inserting drives 2-26 Hardware Reference Guide Index-1
...components front panel 1-2 rear panel 1-3 computer care F-1 computer cover removing 2-5 D DDR-SDRAM (double data rate synchronous dynamic random access memory) 2-7 DIMMs (dual inline memory modules) 2-7 drawer installation 2-2 drive positions 2-17 DVD-ROM drive 2-22, 2-24 E Easy Access Buttons customizing 1-5 electrostatic discharge E-1 ... CD-ROM drive 2-22 expansion card 2-12 K keyboard Easy Access keyboard 1-4 identifying keys 1-4 Windows Logo Key 1-6 M memory 2-7 DDR-SDRAM 2-7 mouse 1-6 MultiBay hot-plugging or hot-swapping drives 2-25 inserting drives 2-26 Hardware Reference Guide Index-1

Troubleshooting Guide
Page 3
Contents 1 Computer Diagnostic Features Compaq Diagnostics for Windows 1-1 Installing Compaq Diagnostics for Windows 1-3 Using Categories in Compaq Diagnostics for Windows 1-4 Running Diagnostic Tests in Compaq Diagnostics for Windows 1-5 Compaq Configuration Record Utility 1-7 Running Configuration Record Utility 1-7 Compaq Remote Diagnostics Enabling Agent 1-8 Starting the... 2-24 Solving Network Problems 2-26 Solving Processor Problems 2-29 Solving Memory Problems 2-30 Solving SCSI Problems 2-32 Solving CD-ROM and DVD Problems 2-33 Solving Software Problems 2-35 ...
Contents 1 Computer Diagnostic Features Compaq Diagnostics for Windows 1-1 Installing Compaq Diagnostics for Windows 1-3 Using Categories in Compaq Diagnostics for Windows 1-4 Running Diagnostic Tests in Compaq Diagnostics for Windows 1-5 Compaq Configuration Record Utility 1-7 Running Configuration Record Utility 1-7 Compaq Remote Diagnostics Enabling Agent 1-8 Starting the... 2-24 Solving Network Problems 2-26 Solving Processor Problems 2-29 Solving Memory Problems 2-30 Solving SCSI Problems 2-32 Solving CD-ROM and DVD Problems 2-33 Solving Software Problems 2-35 ...
Troubleshooting Guide
Page 6
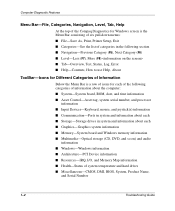
Computer Diagnostic Features Menu Bar-File, Categories, Navigation, Level, Tab, Help At the top of the Compaq Diagnostics for Windows screen is the Menu Bar consisting of six pull-down menus: ■ File-Save As, Print, Printer Setup, Exit &#... in system and information about each ■ Storage-Storage drives in system and information about each ■ Graphics-Graphics system information ■ Memory-System board and Windows memory information ■ Multimedia-Optical storage (CD, DVD, and so on) and audio information ■ Windows-Windows information ■ Architecture-PCI Device...
Computer Diagnostic Features Menu Bar-File, Categories, Navigation, Level, Tab, Help At the top of the Compaq Diagnostics for Windows screen is the Menu Bar consisting of six pull-down menus: ■ File-Save As, Print, Printer Setup, Exit &#... in system and information about each ■ Storage-Storage drives in system and information about each ■ Graphics-Graphics system information ■ Memory-System board and Windows memory information ■ Multimedia-Optical storage (CD, DVD, and so on) and audio information ■ Windows-Windows information ■ Architecture-PCI Device...
Troubleshooting Guide
Page 11
...run this program: 1. Click Start > Compaq Information Center > Compaq Configuration Record. You can be saved as the ROM, asset tag, processor, physical drives, PCI devices, memory, graphics, operating system version number, ...operating system parameters, and the operating system startup files and displays it. It gathers information on the hardware and operating system software to deliver a comprehensive view of your desktop...
...run this program: 1. Click Start > Compaq Information Center > Compaq Configuration Record. You can be saved as the ROM, asset tag, processor, physical drives, PCI devices, memory, graphics, operating system version number, ...operating system parameters, and the operating system startup files and displays it. It gathers information on the hardware and operating system software to deliver a comprehensive view of your desktop...
Troubleshooting Guide
Page 15
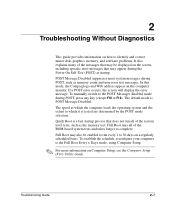
Troubleshooting Guide 2-1 In this mode, the Compaq logo and Web address appear on Computer Setup, see the Computer Setup (F10) Utility Guide. To establish the schedule, reconfigure your computer to the Full ... a regularly scheduled basis. Quick Boot is POST Message Disabled. 2 Troubleshooting Without Diagnostics This guide provides information on how to identify and correct minor disk, graphics, memory, and software problems. It also explains many of the messages that may be displayed on the screen, including specific error messages that does not run...
Troubleshooting Guide 2-1 In this mode, the Compaq logo and Web address appear on Computer Setup, see the Computer Setup (F10) Utility Guide. To establish the schedule, reconfigure your computer to the Full ... a regularly scheduled basis. Quick Boot is POST Message Disabled. 2 Troubleshooting Without Diagnostics This guide provides information on how to identify and correct minor disk, graphics, memory, and software problems. It also explains many of the messages that may be displayed on the screen, including specific error messages that does not run...
Troubleshooting Guide
Page 35
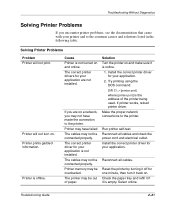
... your printer and to the common causes and solutions listed in the following table. The cables may be out of the printer being used. Printer memory may not be connected properly. Install the correct printer driver for your application. 2. Try printing using the DOS command: DIR C:\ > [printer port] where [printer port...
... your printer and to the common causes and solutions listed in the following table. The cables may be out of the printer being used. Printer memory may not be connected properly. Install the correct printer driver for your application. 2. Try printing using the DOS command: DIR C:\ > [printer port] where [printer port...
Troubleshooting Guide
Page 39
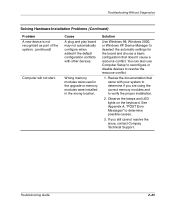
... reconfigure or disable devices to determine possible causes. 3. If you are using the correct memory modules and to determine if you still cannot resolve the issue, contact Compaq Technical Support. Wrong memory modules were used in the upgrade or memory modules were installed in the wrong location. Troubleshooting Guide 2-25 Cause A plug and play...
... reconfigure or disable devices to determine possible causes. 3. If you are using the correct memory modules and to determine if you still cannot resolve the issue, contact Compaq Technical Support. Wrong memory modules were used in the upgrade or memory modules were installed in the wrong location. Troubleshooting Guide 2-25 Cause A plug and play...
Troubleshooting Guide
Page 44
... Lights" section of devices, and manufacturer. In addition, the system will be empty. Cause Memory module is installed in the following table. Ä CAUTION: Some models support ECC memory and non-ECC memory. Check to see that all RIMM sockets contain either RIMMs or CRIMMs and replace them . ... beep followed by 2 long beeps. If the RIMM pairs are identical in pairs that do support ECC memory, Compaq does not support mixing ECC and non-ECC memory. On a single-channel Rambus memory system, the RIMM sockets may not be mixed. For those systems that are not identical, replace them...
... Lights" section of devices, and manufacturer. In addition, the system will be empty. Cause Memory module is installed in the following table. Ä CAUTION: Some models support ECC memory and non-ECC memory. Check to see that all RIMM sockets contain either RIMMs or CRIMMs and replace them . ... beep followed by 2 long beeps. If the RIMM pairs are identical in pairs that do support ECC memory, Compaq does not support mixing ECC and non-ECC memory. On a single-channel Rambus memory system, the RIMM sockets may not be mixed. For those systems that are not identical, replace them...
Troubleshooting Guide
Page 45
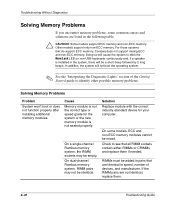
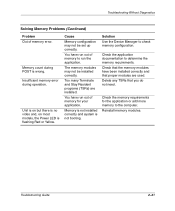
... you do not need. Troubleshooting Without Diagnostics Solving Memory Problems (Continued) Problem Out of memory for the application or add more memory to the computer. Check the memory requirements for your application. Insufficient memory error during POST is wrong. Memory is not installed correctly and system is flashing Red... or Yellow. Solution Use the Device Manager to determine the memory requirements. Check that the memory modules have run the application. Unit is on but there is no video and, on most models, the ...
... you do not need. Troubleshooting Without Diagnostics Solving Memory Problems (Continued) Problem Out of memory for the application or add more memory to the computer. Check the memory requirements for your application. Insufficient memory error during POST is wrong. Memory is not installed correctly and system is flashing Red... or Yellow. Solution Use the Device Manager to determine the memory requirements. Check that the memory modules have run the application. Unit is on but there is no video and, on most models, the ...
Troubleshooting Guide
Page 49
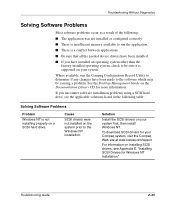
... a result of the following table: Solving Software Problems Problem Windows NT is not installing properly on a SCSI hard drive. See the Desktop Management Guide on installing SCSI drivers, see the applicable solutions listed in the following : ■ The application was not installed or configured... correctly. ■ There is insufficient memory available to run the Compaq Configuration Record Utility to determine if any changes have been made to the software which may be sure it is a conflict...
... a result of the following table: Solving Software Problems Problem Windows NT is not installing properly on a SCSI hard drive. See the Desktop Management Guide on installing SCSI drivers, see the applicable solutions listed in the following : ■ The application was not installed or configured... correctly. ■ There is insufficient memory available to run the Compaq Configuration Record Utility to determine if any changes have been made to the software which may be sure it is a conflict...
Troubleshooting Guide
Page 53
... the problem persists, replace the RTC battery. Make sure your Compaq authorized dealer or reseller for proper placement of the CMOS jumper if applicable. 1. If third party memory has been added, test using Compaq-only memory. 4. Battery life is approximately 3-5 years. Run Computer Setup ...or Microsoft Windows utilities. 2. Verify proper memory module type. System board jumper improperly set. RTC (real-time...
... the problem persists, replace the RTC battery. Make sure your Compaq authorized dealer or reseller for proper placement of the CMOS jumper if applicable. 1. If third party memory has been added, test using Compaq-only memory. 4. Battery life is approximately 3-5 years. Run Computer Setup ...or Microsoft Windows utilities. 2. Verify proper memory module type. System board jumper improperly set. RTC (real-time...
Troubleshooting Guide
Page 54
... Computer Setup or Windows utilities. 2. If the processor does not respond, replace it. Verify proper memory module type. 2. Verify proper memory module type. 4. Try another memory socket. 3. Replace memory module if problem persists. 1. Replace faulty memory module(s). 6. Reseat the processor in Memory Module Socket(s) y,y, ... None 2S* 212-Failed Processor None *L = Long, S = Short Probable Cause RAM failure...
... Computer Setup or Windows utilities. 2. If the processor does not respond, replace it. Verify proper memory module type. 2. Verify proper memory module type. 4. Try another memory socket. 3. Replace memory module if problem persists. 1. Replace faulty memory module(s). 6. Reseat the processor in Memory Module Socket(s) y,y, ... None 2S* 212-Failed Processor None *L = Long, S = Short Probable Cause RAM failure...
Troubleshooting Guide
Page 55
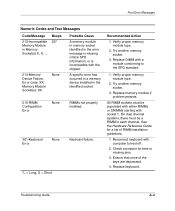
.... 301-Keyboard Error None Keyboard failure. *L = Long, S = Short Recommended Action 1. Try another memory socket. 3. Reconnect keyboard with a module conforming to the SPD standard. 1. Ensure that none of RIMM installation guidelines. 1. Error code: ...XX, Memory Module Socket(s): XX None Probable Cause A memory module in memory socket identified in Memory Socket(s) X, X, ... Replace DIMM with computer turned off. 2. Verify proper memory module type. 2. Replace keyboard. Replace memory module if problem persists. All RIMM sockets ...
.... 301-Keyboard Error None Keyboard failure. *L = Long, S = Short Recommended Action 1. Try another memory socket. 3. Reconnect keyboard with a module conforming to the SPD standard. 1. Ensure that none of RIMM installation guidelines. 1. Error code: ...XX, Memory Module Socket(s): XX None Probable Cause A memory module in memory socket identified in Memory Socket(s) X, X, ... Replace DIMM with computer turned off. 2. Verify proper memory module type. 2. Replace keyboard. Replace memory module if problem persists. All RIMM sockets ...
Troubleshooting Guide
Page 63
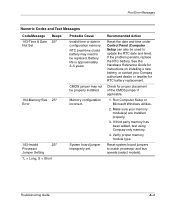
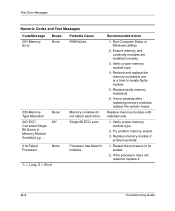
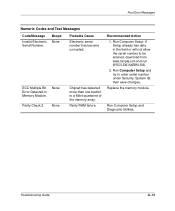
Run Computer Setup and try to be entered, download from www.compaq.com and run SP5572.EXE (SNZERO.EXE). 2. None Chipset has detected more than one bad bit in Memory Module. Recommended Action 1. If Setup already has data in the field or will not allow the ... Computer Setup. Beeps None Probable Cause Electronic serial number has become corrupted. ECC Multiple Bit Error Detected in a 64bit quadword of the memory array. Run Computer Setup and Diagnostic Utilities. None Parity Check 2. Parity RAM failure. Post Error Messages Numeric Codes and Text Messages Code...
Run Computer Setup and try to be entered, download from www.compaq.com and run SP5572.EXE (SNZERO.EXE). 2. None Chipset has detected more than one bad bit in Memory Module. Recommended Action 1. If Setup already has data in the field or will not allow the ... Computer Setup. Beeps None Probable Cause Electronic serial number has become corrupted. ECC Multiple Bit Error Detected in a 64bit quadword of the memory array. Run Computer Setup and Diagnostic Utilities. None Parity Check 2. Parity RAM failure. Post Error Messages Numeric Codes and Text Messages Code...
Troubleshooting Guide
Page 65
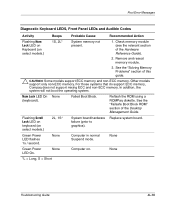
... LED on keyboard (on select models.) 1S, 2L* System memory not present. 1. Check memory module (see the relevant section of the Desktop Management Guide. None Green Power LED On. For those systems that do support ECC memory, Compaq does not support mixing ECC and non-ECC memory. See the "Failsafe Boot Block ROM" section of the... Failed Boot Block. None Computer in normal Suspend mode. None Computer on. In addition, the system will not boot the operating system. See the "Solving Memory Problems" section of this guide. Ä CAUTION: Some models support ECC...
... LED on keyboard (on select models.) 1S, 2L* System memory not present. 1. Check memory module (see the relevant section of the Desktop Management Guide. None Green Power LED On. For those systems that do support ECC memory, Compaq does not support mixing ECC and non-ECC memory. See the "Failsafe Boot Block ROM" section of the... Failed Boot Block. None Computer in normal Suspend mode. None Computer on. In addition, the system will not boot the operating system. See the "Solving Memory Problems" section of this guide. Ä CAUTION: Some models support ECC...


