Hardware Guide
Page 14
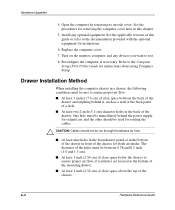
... a desk. The diameter of the holes must be immediately behind it, such as a wall or the back panel of the drawer and anything behind the power supply for exhaust air, and the other should be used for fresh air intake. See the applicable sections of the chassis. 2-2 Hardware Reference Guide One hole...
... a desk. The diameter of the holes must be immediately behind it, such as a wall or the back panel of the drawer and anything behind the power supply for exhaust air, and the other should be used for fresh air intake. See the applicable sections of the chassis. 2-2 Hardware Reference Guide One hole...
Hardware Guide
Page 15
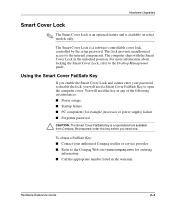
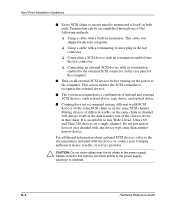
... Key: I Forgotten password Ä CAUTION: The Smart Cover FailSafe Key is a specialized tool available from Compaq. This lock prevents unauthorized access to the Desktop Management guide. The computer ships with the Smart Cover Lock in the warranty. order this key before you ...a Smart Cover FailSafe Key to the Compaq Web site (www.compaq.com) for example, processor or power supply) failure I Contact your password to disable the lock, you need the key in any of the following circumstances: I Power outage I Startup failure I PC component (for ordering information. I Call...
... Key: I Forgotten password Ä CAUTION: The Smart Cover FailSafe Key is a specialized tool available from Compaq. This lock prevents unauthorized access to the Desktop Management guide. The computer ships with the Smart Cover Lock in the warranty. order this key before you ...a Smart Cover FailSafe Key to the Compaq Web site (www.compaq.com) for example, processor or power supply) failure I Contact your password to disable the lock, you need the key in any of the following circumstances: I Power outage I Startup failure I PC component (for ordering information. I Call...
Hardware Guide
Page 23
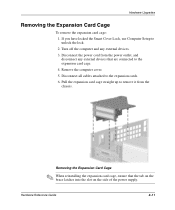
... off the computer and any external devices that the tab on the brace latches into the slot on the side of the power supply. Remove the computer cover. 5. Disconnect the power cord from the chassis. If you have locked the Smart Cover Lock, use Computer Setup to the expansion cards. 6. Disconnect all cables...
... off the computer and any external devices that the tab on the brace latches into the slot on the side of the power supply. Remove the computer cover. 5. Disconnect the power cord from the chassis. If you have locked the Smart Cover Lock, use Computer Setup to the expansion cards. 6. Disconnect all cables...

Hardware Guide
Page 30
...inserting or removing a hard drive, shut down the operating system properly, then turn off the computer and any external devices. 3. The Compaq supplied metric screws are discharged of the computer. le: Upgrading the Hard Drive The 3.5-inch hard drive is on the right side of ...computer has two external drive bays. When installing additional drives, follow these guidelines: I Handle a drive carefully; Disconnect the power cord from the power outlet. 2-18 Hardware Reference Guide I For optimal performance, connect hard drives to the secondary controller using an 80-conductor IDE...
...inserting or removing a hard drive, shut down the operating system properly, then turn off the computer and any external devices. 3. The Compaq supplied metric screws are discharged of the computer. le: Upgrading the Hard Drive The 3.5-inch hard drive is on the right side of ...computer has two external drive bays. When installing additional drives, follow these guidelines: I Handle a drive carefully; Disconnect the power cord from the power outlet. 2-18 Hardware Reference Guide I For optimal performance, connect hard drives to the secondary controller using an 80-conductor IDE...
Hardware Guide
Page 41
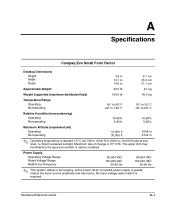
... power factor corrected power supply to 3000 m (10,000 ft) above sea level, no direct sustained sunlight. The upper limit may be limited by the type and number of change is required. No input voltage select switch is 10° C/Hr. Maximum rate of options installed. Hardware Reference Guide A-1 A Specifications Compaq Evo Small Form Factor Desktop...
... power factor corrected power supply to 3000 m (10,000 ft) above sea level, no direct sustained sunlight. The upper limit may be limited by the type and number of change is required. No input voltage select switch is 10° C/Hr. Maximum rate of options installed. Hardware Reference Guide A-1 A Specifications Compaq Evo Small Form Factor Desktop...
Hardware Guide
Page 46
...devices. I Compaq does not recommend mixing different-width SCSI devices on the same SCSI chain or on the rear panel of the computer. Cables routed in this manner can be terminated (closed) at both ends. This action enables the SCSI controller to the power supply. It ... with any device type other than another narrow device. Termination can block airflow to the power supply, causing it to the computer. I The system accommodates a combination of different widths on the power to overheat. Mixing devices of internal and external SCSI devices, such as hard drives, tape...
...devices. I Compaq does not recommend mixing different-width SCSI devices on the same SCSI chain or on the rear panel of the computer. Cables routed in this manner can be terminated (closed) at both ends. This action enables the SCSI controller to the power supply. It ... with any device type other than another narrow device. Termination can block airflow to the power supply, causing it to the computer. I The system accommodates a combination of different widths on the power to overheat. Mixing devices of internal and external SCSI devices, such as hard drives, tape...

Troubleshooting Guide
Page 3
... for Windows 1-4 Running Diagnostic Tests in Compaq Diagnostics for Windows 1-5 Compaq Configuration Record Utility 1-7 Running Configuration Record Utility 1-7 Compaq Remote Diagnostics Enabling Agent 1-8 Starting the Remote Diagnostics Enabling Agent 1-9 Protecting Your Software 1-10 Restoring Your Software 1-10 2 Troubleshooting Without Diagnostics Helpful Hints 2-2 Solving General Problems 2-3 Solving Power Supply Problems 2-6 Solving Diskette Problems 2-8 Solving Hard Drive...
... for Windows 1-4 Running Diagnostic Tests in Compaq Diagnostics for Windows 1-5 Compaq Configuration Record Utility 1-7 Running Configuration Record Utility 1-7 Compaq Remote Diagnostics Enabling Agent 1-8 Starting the Remote Diagnostics Enabling Agent 1-9 Protecting Your Software 1-10 Restoring Your Software 1-10 2 Troubleshooting Without Diagnostics Helpful Hints 2-2 Solving General Problems 2-3 Solving Power Supply Problems 2-6 Solving Diskette Problems 2-8 Solving Hard Drive...
Troubleshooting Guide
Page 17
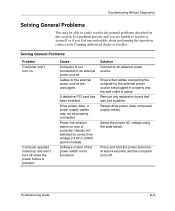
... are plugged in this section. Troubleshooting Guide 2-3 Drive power, data, or power supply cables may be properly connected. Ensure that was just installed. If a problem persists and you feel uncomfortable about performing the operation, contact your Compaq authorized dealer or reseller. Cables to an external power source. Select the proper AC voltage using the slide...
... are plugged in this section. Troubleshooting Guide 2-3 Drive power, data, or power supply cables may be properly connected. Ensure that was just installed. If a problem persists and you feel uncomfortable about performing the operation, contact your Compaq authorized dealer or reseller. Cables to an external power source. Select the proper AC voltage using the slide...
Troubleshooting Guide
Page 18
... vents are not blocked and internal fans are running (such as the power supply fan, chassis fan, and/or the processor fan). 3. Contact Compaq authorized reseller or service provider. Computer powered off automatically and the Power LED is approximately 3-5 years. Battery life is : 1. The unit temperature...processor. Let it cool down before attempting to turn on installing a new battery, or contact your Compaq authorized dealer or reseller for instructions on power to replace the processor or system fan. 2-4 Troubleshooting Guide Air Baffle (if required) is properly seated. 4.
... vents are not blocked and internal fans are running (such as the power supply fan, chassis fan, and/or the processor fan). 3. Contact Compaq authorized reseller or service provider. Computer powered off automatically and the Power LED is approximately 3-5 years. Battery life is : 1. The unit temperature...processor. Let it cool down before attempting to turn on installing a new battery, or contact your Compaq authorized dealer or reseller for instructions on power to replace the processor or system fan. 2-4 Troubleshooting Guide Air Baffle (if required) is properly seated. 4.
Troubleshooting Guide
Page 20
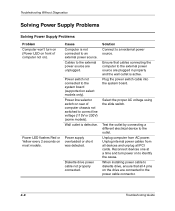
... not connected to the system board (supported on to the power cable connector. 2-6 Troubleshooting Guide Diskette drive power cable not properly connected. Troubleshooting Without Diagnostics Solving Power Supply Problems Solving Power Supply Problems Problem Computer won't turn power on select models only). Power LED flashes Red or Yellow every 2 seconds on ). Solution Connect to the outlet. Unplug computer...
... not connected to the system board (supported on to the power cable connector. 2-6 Troubleshooting Guide Diskette drive power cable not properly connected. Troubleshooting Without Diagnostics Solving Power Supply Problems Solving Power Supply Problems Problem Computer won't turn power on select models only). Power LED flashes Red or Yellow every 2 seconds on ). Solution Connect to the outlet. Unplug computer...
Troubleshooting Guide
Page 21
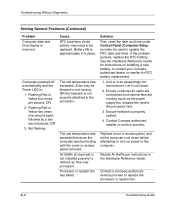
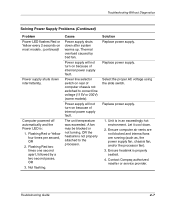
... every 2 seconds on because of internal power supply fault. Power supply will not turn on rear of internal power supply fault. Unit is not properly attached to correct line voltage (115V or 230V) (some models). Contact Compaq authorized reseller or service provider. Thermal overload caused by a two second pause, OR 3. Replace power supply. 1. Power supply will not turn on most models...
... every 2 seconds on because of internal power supply fault. Power supply will not turn on rear of internal power supply fault. Unit is not properly attached to correct line voltage (115V or 230V) (some models). Contact Compaq authorized reseller or service provider. Thermal overload caused by a two second pause, OR 3. Replace power supply. 1. Power supply will not turn on most models...
Troubleshooting Guide
Page 66
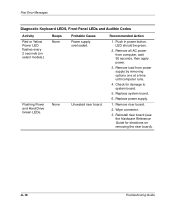
... LEDs and Audible Codes Activity Red or Yellow Power LED flashes every 2 seconds (on removing the riser board). Recommended Action 1. Remove all AC power from power supply by removing options one at a time until computer runs. 4. Push in power button. LED should be green. 2. Check... for directions on select models.) Beeps None Flashing Power and Hard Drive Green LEDs. A-16 Troubleshooting ...
... LEDs and Audible Codes Activity Red or Yellow Power LED flashes every 2 seconds (on removing the riser board). Recommended Action 1. Remove all AC power from power supply by removing options one at a time until computer runs. 4. Push in power button. LED should be green. 2. Check... for directions on select models.) Beeps None Flashing Power and Hard Drive Green LEDs. A-16 Troubleshooting ...
Troubleshooting Guide
Page 69
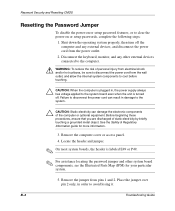
...electrical shock and/or hot surfaces, be sure to disconnect the power cord from the wall outlet, and allow the internal system components to cool before touching. Ä CAUTION: When the computer is plugged in, the power supply always has voltage applied to avoid losing it. Failure to ...disconnect the power cord can damage the electronic components of the computer or optional equipment. Remove the jumper from the...
...electrical shock and/or hot surfaces, be sure to disconnect the power cord from the wall outlet, and allow the internal system components to cool before touching. Ä CAUTION: When the computer is plugged in, the power supply always has voltage applied to avoid losing it. Failure to ...disconnect the power cord can damage the electronic components of the computer or optional equipment. Remove the jumper from the...
Troubleshooting Guide
Page 70
...password information and information about the computer's configuration. Troubleshooting Guide B-3 Using the CMOS Button 1. Failure to disconnect the power cord can result in , the power supply always has voltage applied to the system board even when the unit is turned off the computer and any external ...devices, and disconnect the power cord from the power outlet. 2. Password Security and Resetting CMOS 6. Allow the operating system ...
...password information and information about the computer's configuration. Troubleshooting Guide B-3 Using the CMOS Button 1. Failure to disconnect the power cord can result in , the power supply always has voltage applied to the system board even when the unit is turned off the computer and any external ...devices, and disconnect the power cord from the power outlet. 2. Password Security and Resetting CMOS 6. Allow the operating system ...
Troubleshooting Guide
Page 82
...22 N network problems 2-26 P parallel port A-6 password features B-1 password jumper resetting B-2 passwords clearing B-1 power-on B-1 setup B-1 POST 2-1 Post Error Messages A-1 power supply 2-7 power-on password B-1 Power-On Self-Test (POST) 2-1, A-1 error messages A-1 printer problems 2-21 problems audio 2-18 CD-ROM ...2-8 display 2-15 general 2-3 hard drive 2-12 installing hardware 2-24 keyboard 2-22 memory 2-30 minor 2-2 mouse 2-23 network 2-26 power supply 2-6 printer 2-21 SCSI 2-32 software 2-35 processor failed A-4 processor heatsink A-9 Q Quick Boot 2-1 R Rambus memory 2-30 Remote Wakeup...
...22 N network problems 2-26 P parallel port A-6 password features B-1 password jumper resetting B-2 passwords clearing B-1 power-on B-1 setup B-1 POST 2-1 Post Error Messages A-1 power supply 2-7 power-on password B-1 Power-On Self-Test (POST) 2-1, A-1 error messages A-1 printer problems 2-21 problems audio 2-18 CD-ROM ...2-8 display 2-15 general 2-3 hard drive 2-12 installing hardware 2-24 keyboard 2-22 memory 2-30 minor 2-2 mouse 2-23 network 2-26 power supply 2-6 printer 2-21 SCSI 2-32 software 2-35 processor failed A-4 processor heatsink A-9 Q Quick Boot 2-1 R Rambus memory 2-30 Remote Wakeup...

Getting Started Guide
Page 11
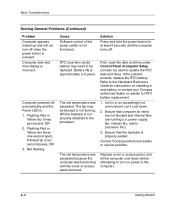
... Contact Compaq authorized reseller or service provider. Select the proper AC voltage using the slide switch. Solving General Problems Problem Computer will not turn on rear of computer chassis is not connected to an external power source. Drive power, data, or power supply cables... may not be blocked. Getting Started 2-3 Ensure that was exceeded. Reseat drive power, data, and power supply cables. 1. Basic Troubleshooting Solving General Problems You may be...
... Contact Compaq authorized reseller or service provider. Select the proper AC voltage using the slide switch. Solving General Problems Problem Computer will not turn on rear of computer chassis is not connected to an external power source. Drive power, data, or power supply cables... may not be blocked. Getting Started 2-3 Ensure that was exceeded. Reseat drive power, data, and power supply cables. 1. Basic Troubleshooting Solving General Problems You may be...
Getting Started Guide
Page 12
... fan may need to be blocked or not turning, OR the heatsink is pressed. If the problem persists, replace the RTC battery. power supply fan, chassis fan, and/or processor fan). 3. Replace cover or access panel, and let the computer cool down . 2. Cause Software control ... on installing a new battery, or contact your Compaq authorized dealer or reseller for RTC battery replacement. 1. Computer date and time display is approximately 3-5 years. Flashing Red or Yellow four times per second, OR 2. Solution Press and hold the power button for at least 4 seconds until the computer...
... fan may need to be blocked or not turning, OR the heatsink is pressed. If the problem persists, replace the RTC battery. power supply fan, chassis fan, and/or processor fan). 3. Replace cover or access panel, and let the computer cool down . 2. Cause Software control ... on installing a new battery, or contact your Compaq authorized dealer or reseller for RTC battery replacement. 1. Computer date and time display is approximately 3-5 years. Flashing Red or Yellow four times per second, OR 2. Solution Press and hold the power button for at least 4 seconds until the computer...
Getting Started Guide
Page 18
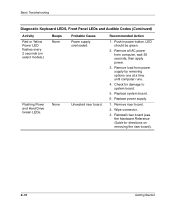
... 1. LED should be green. 2. Replace system board. 6. Wipe connector. 3. Replace power supply. 1. Reinstall riser board (see the Hardware Reference Guide for damage to system board. 5. Push in power button. None Probable Cause Power supply overloaded. Check for directions on select models.) Beeps None Flashing Power and Hard Drive Green LEDs. Basic Troubleshooting Diagnostic Keyboard LEDS, Front...
... 1. LED should be green. 2. Replace system board. 6. Wipe connector. 3. Replace power supply. 1. Reinstall riser board (see the Hardware Reference Guide for damage to system board. 5. Push in power button. None Probable Cause Power supply overloaded. Check for directions on select models.) Beeps None Flashing Power and Hard Drive Green LEDs. Basic Troubleshooting Diagnostic Keyboard LEDS, Front...

