
Operation Guide
Page 2
Use the e-Manual's search function to read this manual before using the machine. e-Manual The e-Manual includes information about all functions and configurations of the copy, fax, and print functions. This manual is included on the User Software CD-ROM. Be sure to easily find the information you want. 2 This Manual Basic Operation Guide The Basic Operation Guide describes common use and basic functions of the machine. Manuals for the Machine Starter Guide The Starter Guide describes setting up the machine and installing the software.
Use the e-Manual's search function to read this manual before using the machine. e-Manual The e-Manual includes information about all functions and configurations of the copy, fax, and print functions. This manual is included on the User Software CD-ROM. Be sure to easily find the information you want. 2 This Manual Basic Operation Guide The Basic Operation Guide describes common use and basic functions of the machine. Manuals for the Machine Starter Guide The Starter Guide describes setting up the machine and installing the software.

Operation Guide
Page 4
Main Functions Multiple Documents onto Single Page Print multiple pages onto a single page. • Copy → P.34 • Print → P.40 2-Sided Printing Print copies, received faxes, or documents on both sides of paper. • Copy → P.33 • Print → P.39 • Fax → P.52 Fax One-touch/Coded/Group Dialing → p.54 Specify fax destinations using one-touch keys, coded dial, and group dial. Receiving in the Memory → p.63 • Store received faxes in the memory. • Print or forward the received fax after confirming the sender. 4
Main Functions Multiple Documents onto Single Page Print multiple pages onto a single page. • Copy → P.34 • Print → P.40 2-Sided Printing Print copies, received faxes, or documents on both sides of paper. • Copy → P.33 • Print → P.39 • Fax → P.52 Fax One-touch/Coded/Group Dialing → p.54 Specify fax destinations using one-touch keys, coded dial, and group dial. Receiving in the Memory → p.63 • Store received faxes in the memory. • Print or forward the received fax after confirming the sender. 4

Operation Guide
Page 5
... custom ratios. Watermark Printing → p.43 Add watermarks, such as "COPY" or "DRAFT", to send it. 1 2 Polling Receiving → Retrieve pre-loaded documents from a sender's fax machine. 5 Delayed Sending → p.56 Scan a document and set a time to the document. Sequential broadcasting → p.56 Send the same document to print on multiple...
... custom ratios. Watermark Printing → p.43 Add watermarks, such as "COPY" or "DRAFT", to send it. 1 2 Polling Receiving → Retrieve pre-loaded documents from a sender's fax machine. 5 Delayed Sending → p.56 Scan a document and set a time to the document. Sequential broadcasting → p.56 Send the same document to print on multiple...

Operation Guide
Page 6
... Part of the Machine ......... 10 Front side 10 Interior 12 Back Side 13 Learn the Functions of the Operation Panel 14 Switch between Copy and Fax Mode 16 Enter Text 17 Set Date and Time 18 Place Documents 19 Placing Documents on the Platen Glass 20 Load Documents in the Feeder...
... Part of the Machine ......... 10 Front side 10 Interior 12 Back Side 13 Learn the Functions of the Operation Panel 14 Switch between Copy and Fax Mode 16 Enter Text 17 Set Date and Time 18 Place Documents 19 Placing Documents on the Platen Glass 20 Load Documents in the Feeder...
Operation Guide
Page 7
... to Coded Dialing Codes 47 Registering Recipients for Group Dialing 48 Editing and Deleting Registered Destinations 50 Adjust the Image Quality for Fax 50 Adjusting the Density 50 Selecting the Resolution 51 Adjusting the Sharpness 51 Specifying the Double-Sided Document Format 52 Changing the ...Default Settings 52 Send a Fax 53 Entering a Fax Number with the Alphanumeric Keys 53 Using the One-Touch Keys 54 Using the Coded Dialing Codes 54 Searching the Address Book...
... to Coded Dialing Codes 47 Registering Recipients for Group Dialing 48 Editing and Deleting Registered Destinations 50 Adjust the Image Quality for Fax 50 Adjusting the Density 50 Selecting the Resolution 51 Adjusting the Sharpness 51 Specifying the Double-Sided Document Format 52 Changing the ...Default Settings 52 Send a Fax 53 Entering a Fax Number with the Alphanumeric Keys 53 Using the One-Touch Keys 54 Using the Coded Dialing Codes 54 Searching the Address Book...

Operation Guide
Page 9
... Part of the Machine ......... 10 Front side 10 Interior 12 Back Side 13 Learn the Functions of the Operation Panel 14 Switch between Copy and Fax Mode 16 Enter Text 17 Set Date and Time 18 Place Documents 19 Placing Documents on the Platen Glass 20 Load Documents in the Feeder...
... Part of the Machine ......... 10 Front side 10 Interior 12 Back Side 13 Learn the Functions of the Operation Panel 14 Switch between Copy and Fax Mode 16 Enter Text 17 Set Date and Time 18 Place Documents 19 Placing Documents on the Platen Glass 20 Load Documents in the Feeder...

Operation Guide
Page 10
.... Feeder cover Open this tray. Lift handles (left, right) Use the handset when make a phone call or send a fax. 10 Paper level indicator Shows the remaining amount of the Machine Front side Feeder Automatically feeds documents into the machine (→p.20). Lower front cover ...
.... Feeder cover Open this tray. Lift handles (left, right) Use the handset when make a phone call or send a fax. 10 Paper level indicator Shows the remaining amount of the Machine Front side Feeder Automatically feeds documents into the machine (→p.20). Lower front cover ...

Operation Guide
Page 14
... Back Press to return to view or cancel jobs. Clear Press to start copying or sending a fax. Start Press to delete entered characters and numbers. 14 Reset Press to decrease or increase the fax ring volume. You can also check Cancel the status of the machine (→p.36, p.65)..... Display 0 to 9 (Numeric Keys) Press to enter letters and numbers. • Press to switch the character entry * mode. • When sending a fax, press to switch between pulse and tone dialing. # Press to manually set or cancel the Sleep mode (→p.27). Energy Saver Press to enter symbols...
... Back Press to return to view or cancel jobs. Clear Press to start copying or sending a fax. Start Press to delete entered characters and numbers. 14 Reset Press to decrease or increase the fax ring volume. You can also check Cancel the status of the machine (→p.36, p.65)..... Display 0 to 9 (Numeric Keys) Press to enter letters and numbers. • Press to switch the character entry * mode. • When sending a fax, press to switch between pulse and tone dialing. # Press to manually set or cancel the Sleep mode (→p.27). Energy Saver Press to enter symbols...

Operation Guide
Page 15
Press to press between the Copy and Fax mode (→p.16). Open the cover to dial a number without using a telephone or handset. Press to enter a recipient's code for recipients registered in the address .... Navigating the Menu Example: Adjust the density Press [ ] (Back) or [◄] to return to one-touch keys (→p.54). Menu Preferences Timer Settings Copy Settings Fax TX Settings Press [▲] or [▼] to redial the last three numbers (→p.55). Correct Density - + Press [◄] or [►] to adjust the level, and...
Press to press between the Copy and Fax mode (→p.16). Open the cover to dial a number without using a telephone or handset. Press to enter a recipient's code for recipients registered in the address .... Navigating the Menu Example: Adjust the density Press [ ] (Back) or [◄] to return to one-touch keys (→p.54). Menu Preferences Timer Settings Copy Settings Fax TX Settings Press [▲] or [▼] to redial the last three numbers (→p.55). Correct Density - + Press [◄] or [►] to adjust the level, and...

Operation Guide
Page 16
... (standby mode) automatically. If you do not operate the machine for a while, the machine returns to switch between Copy and Fax Mode Switch to Copy or Fax mode first to highlight an item, and then press [OK]. 2. Press [▲] or [▼] to standby mode: Press [ ] (Menu) &#...specify the values, and then press [OK]. Press [▲] or [▼] to use each mode. Displays the recipient's number. Switch between the Copy and Fax modes. Copy Mode 01 Copy: Press Start 100% 1 LTR Density: +-0 Original Type: Text... 2-Sided: Off Displays the copy ratio, paper source, paper...
... (standby mode) automatically. If you do not operate the machine for a while, the machine returns to switch between Copy and Fax Mode Switch to Copy or Fax mode first to highlight an item, and then press [OK]. 2. Press [▲] or [▼] to standby mode: Press [ ] (Menu) &#...specify the values, and then press [OK]. Press [▲] or [▼] to use each mode. Displays the recipient's number. Switch between the Copy and Fax modes. Copy Mode 01 Copy: Press Start 100% 1 LTR Density: +-0 Original Type: Text... 2-Sided: Off Displays the copy ratio, paper source, paper...

Operation Guide
Page 18
Set Date and Time If the incorrect date or time is printed on faxes or reports, change the display format for the date or time, specify or . • To use daylight savings time, set to , and then specify the ...
Set Date and Time If the incorrect date or time is printed on faxes or reports, change the display format for the date or time, specify or . • To use daylight savings time, set to , and then specify the ...

Operation Guide
Page 28
... be clearly reproduced. 1 Press [ ] (Menu). 2 Press [▲] or [▼] to highlight , and then press [OK]. 3 Press [▲] or [▼] to conserve toner when copying or faxing. Preferences Sound Volume Control Display Settings Toner Saver Mode Paper Feed Method Sw... 4 Press [▲] or [▼] to highlight or , and then press [OK]. 5 Press...
... be clearly reproduced. 1 Press [ ] (Menu). 2 Press [▲] or [▼] to highlight , and then press [OK]. 3 Press [▲] or [▼] to conserve toner when copying or faxing. Preferences Sound Volume Control Display Settings Toner Saver Mode Paper Feed Method Sw... 4 Press [▲] or [▼] to highlight or , and then press [OK]. 5 Press...

Operation Guide
Page 38
... manually, select [Manual Scaling], and then specify the scaling ratio. 38 Print a Document 1 Make sure that a computer and the machine are connected properly, and the FAX L Drivers are installed on the computer. 2 Open a document from an application, and then open the Printing Preferences window. 3 Click the [Page Setup] tab, and then...
... manually, select [Manual Scaling], and then specify the scaling ratio. 38 Print a Document 1 Make sure that a computer and the machine are connected properly, and the FAX L Drivers are installed on the computer. 2 Open a document from an application, and then open the Printing Preferences window. 3 Click the [Page Setup] tab, and then...
Operation Guide
Page 45
...to Coded Dialing Codes 47 Registering Recipients for Group Dialing 48 Editing and Deleting Registered Destinations 50 Adjust the Image Quality for Fax 50 Adjusting the Density 50 Selecting the Resolution 51 Adjusting the Sharpness 51 Specifying the Double-Sided Document Format 52 Changing the... Default Settings 52 Send a Fax 53 Entering a Fax Number with the Alphanumeric Keys 53 Using the One-Touch Keys 54 Using the Coded Dialing Codes 54 Searching the Address ...
...to Coded Dialing Codes 47 Registering Recipients for Group Dialing 48 Editing and Deleting Registered Destinations 50 Adjust the Image Quality for Fax 50 Adjusting the Density 50 Selecting the Resolution 51 Adjusting the Sharpness 51 Specifying the Double-Sided Document Format 52 Changing the... Default Settings 52 Send a Fax 53 Entering a Fax Number with the Alphanumeric Keys 53 Using the One-Touch Keys 54 Using the Coded Dialing Codes 54 Searching the Address ...

Operation Guide
Page 46
... must enter the PIN when you want to register (01 to 40), and then press [OK]. • You can register fax numbers to each of the 40 one-touch dial keys. CANON 0123456789 GroupA 2 Destin... Enter your PIN, and then press [OK] to use the address book. • With the Address Book... Import/Export Tool that are created or edited from the FAX L Driver. Registering Numbers to One-Touch Keys To send a fax to a destination registered to a one...
... must enter the PIN when you want to register (01 to 40), and then press [OK]. • You can register fax numbers to each of the 40 one-touch dial keys. CANON 0123456789 GroupA 2 Destin... Enter your PIN, and then press [OK] to use the address book. • With the Address Book... Import/Export Tool that are created or edited from the FAX L Driver. Registering Numbers to One-Touch Keys To send a fax to a destination registered to a one...

Operation Guide
Page 47
...] (Back) to specify detailed options as needed. Fax 8 Enter a name for the destination, press [▲] or [▼] to highlight , and then press [OK]. Name (Max 16 char.) CANON Entry Mode: A 47 Registering Numbers to Coded Dialing Codes To send a fax to a destination that is registered to a coded ..., press [▲] or [▼] to highlight , and then press [OK]. Name (Max 16 char.) CANON Entry Mode: A 9 Press [▲] or [▼] to highlight , and then press [OK]. 10 Enter the fax number, press [▲] or [▼] to highlight , and then press [OK]. • Select to ...
...] (Back) to specify detailed options as needed. Fax 8 Enter a name for the destination, press [▲] or [▼] to highlight , and then press [OK]. Name (Max 16 char.) CANON Entry Mode: A 47 Registering Numbers to Coded Dialing Codes To send a fax to a destination that is registered to a coded ..., press [▲] or [▼] to highlight , and then press [OK]. Name (Max 16 char.) CANON Entry Mode: A 9 Press [▲] or [▼] to highlight , and then press [OK]. 10 Enter the fax number, press [▲] or [▼] to highlight , and then press [OK]. • Select to ...

Operation Guide
Page 48
...9650;] or [▼] to highlight , and then press [OK]. • Select to multiple destinations at once. It is useful when sending a fax to specify detailed options as needed. IMPORTANT • Register group addresses to an unused one -touch key. 48 Make sure that you want to... dialing number you leave some unused one-touch keys or coded dialing codes for Group Dialing You can be added to a group. 1 Switch to the Fax mode, and then press [ ] (Address Book). 2 Press [◄] or [►] to highlight < > (Menu). 3 Press [▲] or [▼] to highlight , and then press [OK...
...9650;] or [▼] to highlight , and then press [OK]. • Select to multiple destinations at once. It is useful when sending a fax to specify detailed options as needed. IMPORTANT • Register group addresses to an unused one -touch key. 48 Make sure that you want to... dialing number you leave some unused one-touch keys or coded dialing codes for Group Dialing You can be added to a group. 1 Switch to the Fax mode, and then press [ ] (Address Book). 2 Press [◄] or [►] to highlight < > (Menu). 3 Press [▲] or [▼] to highlight , and then press [OK...

Operation Guide
Page 49
...Press [▲] or [▼] to highlight , and then press [OK]. 14 Press [ ] (Back) to add more destinations as needed. Name (Max 16 char.) CANON Entry Mode: A 9 Press [▲] or [▼] to highlight , and then press [OK]. 10 Press [▲] or [▼] to highlight , and then press...a name for the destination, press [▲] or [▼] to highlight , and then press [OK]. User01 01234567... Fax 5 Press [▲] or [▼] to add, and then press [OK]. Destination Type Fax Group 6 If you selected in step 4, press [▲] or [▼] to highlight an empty one-touch key (01...
...Press [▲] or [▼] to highlight , and then press [OK]. 14 Press [ ] (Back) to add more destinations as needed. Name (Max 16 char.) CANON Entry Mode: A 9 Press [▲] or [▼] to highlight , and then press [OK]. 10 Press [▲] or [▼] to highlight , and then press...a name for the destination, press [▲] or [▼] to highlight , and then press [OK]. User01 01234567... Fax 5 Press [▲] or [▼] to add, and then press [OK]. Destination Type Fax Group 6 If you selected in step 4, press [▲] or [▼] to highlight an empty one-touch key (01...

Operation Guide
Page 50
... or [▼] to highlight the desired option, and then press [OK]. • For a one-touch key or coded dialing code, edit the name, fax number, one-touch key, or coded dialing code. • For a group, edit the group name, delete destinations registered to the group, or add new... destinations to the group. Editing and Deleting Registered Destinations You can adjust the density of a fax darker or lighter. 1 Place your documents (→p.19). 2 Switch to the Fax mode (→p.16). 3 Press [▲] or [▼] to highlight , and then press [OK]. 4 Press [◄...
... or [▼] to highlight the desired option, and then press [OK]. • For a one-touch key or coded dialing code, edit the name, fax number, one-touch key, or coded dialing code. • For a group, edit the group name, delete destinations registered to the group, or add new... destinations to the group. Editing and Deleting Registered Destinations You can adjust the density of a fax darker or lighter. 1 Place your documents (→p.19). 2 Switch to the Fax mode (→p.16). 3 Press [▲] or [▼] to highlight , and then press [OK]. 4 Press [◄...
Operation Guide
Page 51
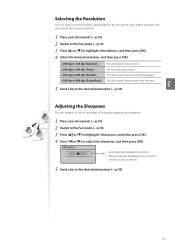
...for photos) + : More sharpness (Suitable for the document. Set a higher resolution for documents that contain very fine text 5 Send a fax to the desired destination (→p.53). Adjusting the Sharpness You can select a resolution that is appropriate for documents written in pen or pencil) 5 ... For fine text documents For documents that contain photographs For documents that contain small text. 1 Place your documents (→p.19). 2 Switch to the Fax mode (→p.16). 3 Press [▲] or [▼] to highlight , and then press [OK]. 4 Press [◄] or [►] to...
...for photos) + : More sharpness (Suitable for the document. Set a higher resolution for documents that contain very fine text 5 Send a fax to the desired destination (→p.53). Adjusting the Sharpness You can select a resolution that is appropriate for documents written in pen or pencil) 5 ... For fine text documents For documents that contain photographs For documents that contain small text. 1 Place your documents (→p.19). 2 Switch to the Fax mode (→p.16). 3 Press [▲] or [▼] to highlight , and then press [OK]. 4 Press [◄] or [►] to...


