Operation Guide
Page 8
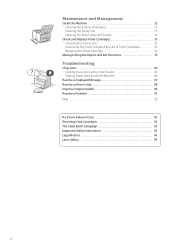
... 72 Cleaning the Fixing Unit 73 Cleaning the Platen Glass and Feeder 74 Check and Replace Toner Cartridges 75 Checking the Toner Level 75 Conserving the Toner to Extend the Life of Toner Cartridges 76 Replacing the Toner Cartridge 76 Manage Using the Report and List Functions 79 Troubleshooting Clear Jams 82 Clearing Document Jams ... Message 87 Resolve an Error Code 88 Improve Output Quality 89 Resolve a Problem 91 FAQ 92 If a Power Failure Occurs 93 Recycling Used Cartridges 93 The Clean Earth Campaign 93 Important Safety Instructions 94 Legal Notices 96 Laser Safety 99 8
... 72 Cleaning the Fixing Unit 73 Cleaning the Platen Glass and Feeder 74 Check and Replace Toner Cartridges 75 Checking the Toner Level 75 Conserving the Toner to Extend the Life of Toner Cartridges 76 Replacing the Toner Cartridge 76 Manage Using the Report and List Functions 79 Troubleshooting Clear Jams 82 Clearing Document Jams ... Message 87 Resolve an Error Code 88 Improve Output Quality 89 Resolve a Problem 91 FAQ 92 If a Power Failure Occurs 93 Recycling Used Cartridges 93 The Clean Earth Campaign 93 Important Safety Instructions 94 Legal Notices 96 Laser Safety 99 8

Operation Guide
Page 12
Toner guides When inserting the toner cartridge, fit the protrusions on the toner cartridge into these guides. 12 Interior Toner cover Open this cover to access the toner cartridge or clear paper jams. Paper exit guide Open this guide to clear paper jams. (→p.84) Transfer roller Transfers toner onto paper.
Toner guides When inserting the toner cartridge, fit the protrusions on the toner cartridge into these guides. 12 Interior Toner cover Open this cover to access the toner cartridge or clear paper jams. Paper exit guide Open this guide to clear paper jams. (→p.84) Transfer roller Transfers toner onto paper.

Operation Guide
Page 71
Maintenance and Management This chapter describes how to Extend the Life of Toner Cartridges 76 Replacing the Toner Cartridge 76 Manage Using the Report and List Functions 79 71 Clean the Machine 72 Cleaning the Exterior and Interior 72 Cleaning the Fixing Unit 73 Cleaning the Platen Glass and Feeder 74 Check and Replace Toner Cartridges 75 Checking the Toner Level 75 Conserving the Toner to clean the machine, replace the toner cartridge, and explains the report and list functions used for managing the machine.
Maintenance and Management This chapter describes how to Extend the Life of Toner Cartridges 76 Replacing the Toner Cartridge 76 Manage Using the Report and List Functions 79 71 Clean the Machine 72 Cleaning the Exterior and Interior 72 Cleaning the Fixing Unit 73 Cleaning the Platen Glass and Feeder 74 Check and Replace Toner Cartridges 75 Checking the Toner Level 75 Conserving the Toner to clean the machine, replace the toner cartridge, and explains the report and list functions used for managing the machine.
Operation Guide
Page 72
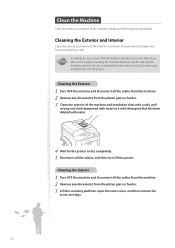
.... 5 Reconnect all the cables from the machine. 2 Remove any documents from the platen glass or feeder. 3 Lift the scanning platform, open the toner cover, and then remove the toner cartridge. 72 Cleaning the Interior 1 Turn OFF the machine and disconnect all the cables, and then turn ON the power. Cleaning the Exterior and.... IMPORTANT For safety, be sure to dry completely before cleaning the machine. Clean the Machine Clean the exterior and interior of the machine to prevent toner powder and paper dust from accumulating inside.
.... 5 Reconnect all the cables from the machine. 2 Remove any documents from the platen glass or feeder. 3 Lift the scanning platform, open the toner cover, and then remove the toner cartridge. 72 Cleaning the Interior 1 Turn OFF the machine and disconnect all the cables, and then turn ON the power. Cleaning the Exterior and.... IMPORTANT For safety, be sure to dry completely before cleaning the machine. Clean the Machine Clean the exterior and interior of the machine to prevent toner powder and paper dust from accumulating inside.
Operation Guide
Page 73
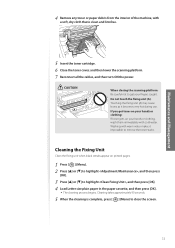
Do not touch the fixing unit (A). Maintenance and Management 5 Insert the toner cartridge. 6 Close the toner cover, and then lower the scanning platform. 7 Reconnect all the cables, and then turn ON the power. Washing with warm water makes it becomes very ... 90 seconds. 5 When the cleaning is clean and lint-free. Touching the fixing unit (A) may cause burns as it impossible to get toner on your hands or clothing: If toner gets on printed pages. 1 Press [ ] (Menu). 2 Press [▲] or [▼] to highlight , and then press [OK]. 3 Press [▲] or [▼] to close...
Do not touch the fixing unit (A). Maintenance and Management 5 Insert the toner cartridge. 6 Close the toner cover, and then lower the scanning platform. 7 Reconnect all the cables, and then turn ON the power. Washing with warm water makes it becomes very ... 90 seconds. 5 When the cleaning is clean and lint-free. Touching the fixing unit (A) may cause burns as it impossible to get toner on your hands or clothing: If toner gets on printed pages. 1 Press [ ] (Menu). 2 Press [▲] or [▼] to highlight , and then press [OK]. 3 Press [▲] or [▼] to close...

Operation Guide
Page 75
...Auto RX Mode: Auto Resolution: 200 X 1... Cart. Check the toner level, and replace the toner cartridge if necessary. Maintenance and Management Check and Replace Toner Cartridges Toner cartridges are consumable products. When the toner has almost run out, a message appears in display, or print result... is not improved, replace the toner cartridge (→p.76). If the message still appears...
...Auto RX Mode: Auto Resolution: 200 X 1... Cart. Check the toner level, and replace the toner cartridge if necessary. Maintenance and Management Check and Replace Toner Cartridges Toner cartridges are consumable products. When the toner has almost run out, a message appears in display, or print result... is not improved, replace the toner cartridge (→p.76). If the message still appears...
Operation Guide
Page 76
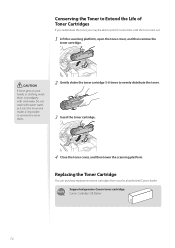
... time until the toner runs out. 1 Lift the scanning platform, open the toner cover, and then remove the toner cartridge. Conserving the Toner to Extend the Life of Toner Cartridges If you redistribute the toner, you may be able to evenly distribute the toner. 3 Insert the toner cartridge. 4 Close the toner cover, and then lower the scanning platform. Supported genuine Canon toner cartridge: Canon Cartridge 128 Starter...
... time until the toner runs out. 1 Lift the scanning platform, open the toner cover, and then remove the toner cartridge. Conserving the Toner to Extend the Life of Toner Cartridges If you redistribute the toner, you may be able to evenly distribute the toner. 3 Insert the toner cartridge. 4 Close the toner cover, and then lower the scanning platform. Supported genuine Canon toner cartridge: Canon Cartridge 128 Starter...

Operation Guide
Page 77
...sealing tape at midpoint, pull it out of the packing materials according to evenly distribute the toner. Maintenance and Management 1 Open the operation panel and the toner cover, and then remove the toner cartridge. 2 Prepare a new toner cartridge. • Store the protective bag. If you are using the Fax, please note that...required when you can only print the received data once, because the received data is deleted once it may result in the toner cartridge, this may not be pulled out completely. • Even if the sealing tape stops at an angle or up and down. Place...
...sealing tape at midpoint, pull it out of the packing materials according to evenly distribute the toner. Maintenance and Management 1 Open the operation panel and the toner cover, and then remove the toner cartridge. 2 Prepare a new toner cartridge. • Store the protective bag. If you are using the Fax, please note that...required when you can only print the received data once, because the received data is deleted once it may result in the toner cartridge, this may not be pulled out completely. • Even if the sealing tape stops at an angle or up and down. Place...

Operation Guide
Page 78
...open flames. This may cause the toner remaining inside the cartridges to static discharge. If toner gets into your used toner cartridge in burns or a fire. WARNING Do not dispose of the sealing tape removed from the new toner cartridge. • Canon will collect and recycle your eyes or... mouth, flush them immediately with a soft, damp cloth in the e-Manual. 78 3 Insert the toner cartridge. 4 Close the toner cover, and then lower the scanning platform. Washing ...
...open flames. This may cause the toner remaining inside the cartridges to static discharge. If toner gets into your used toner cartridge in burns or a fire. WARNING Do not dispose of the sealing tape removed from the new toner cartridge. • Canon will collect and recycle your eyes or... mouth, flush them immediately with a soft, damp cloth in the e-Manual. 78 3 Insert the toner cartridge. 4 Close the toner cover, and then lower the scanning platform. Washing ...
Operation Guide
Page 84
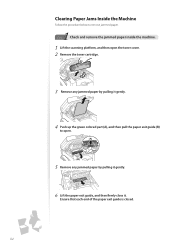
Ensure that each end of the paper exit guide is closed. 84 Clearing Paper Jams Inside the Machine Follow the procedure below to remove jammed paper. 1 Step Check and remove the jammed paper inside the machine. 1 Lift the scanning platform, and then open the toner cover. 2 Remove the toner cartridge. 3 Remove any jammed paper by pulling it gently. 4 Push up the green colored part (A), and then pull the paper exit guide (B) to open. (A) (B) 5 Remove any jammed paper by pulling it gently. 6 Lift the paper exit guide, and then firmly close it.
Ensure that each end of the paper exit guide is closed. 84 Clearing Paper Jams Inside the Machine Follow the procedure below to remove jammed paper. 1 Step Check and remove the jammed paper inside the machine. 1 Lift the scanning platform, and then open the toner cover. 2 Remove the toner cartridge. 3 Remove any jammed paper by pulling it gently. 4 Push up the green colored part (A), and then pull the paper exit guide (B) to open. (A) (B) 5 Remove any jammed paper by pulling it gently. 6 Lift the paper exit guide, and then firmly close it.
Operation Guide
Page 85
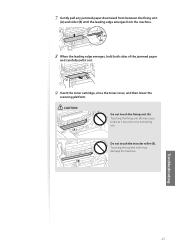
Touching the transfer roller may cause burns as it out. 9 Insert the toner cartridge, close the toner cover, and then lower the scanning platform. Troubleshooting 85 7 Gently pull any jammed paper downward from between the fixing unit (A) and roller (B) until the leading ...
Touching the transfer roller may cause burns as it out. 9 Insert the toner cartridge, close the toner cover, and then lower the scanning platform. Troubleshooting 85 7 Gently pull any jammed paper downward from between the fixing unit (A) and roller (B) until the leading ...
Operation Guide
Page 87
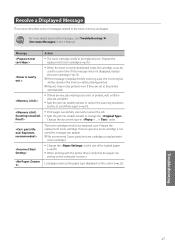
... • Split the job into smaller subsets or reduce the scanning resolution and try to be replaced soon. We recommend Canon genuine toner cartridges as the paper type displayed on the computer is displayed while receiving a fax, the incoming fax will be replaced soon...If this message is correct. Load paper same as replacement toner cartridges. • Change the to the size of messages related to be stored in the memory without being printed. If Canon genuine toner cartridge is evenly distributed inside the cartridge, it can appear. For more details about other messages,...
... • Split the job into smaller subsets or reduce the scanning resolution and try to be replaced soon. We recommend Canon genuine toner cartridges as the paper type displayed on the computer is displayed while receiving a fax, the incoming fax will be replaced soon...If this message is correct. Load paper same as replacement toner cartridges. • Change the to the size of messages related to be stored in the memory without being printed. If Canon genuine toner cartridge is evenly distributed inside the cartridge, it can appear. For more details about other messages,...
Operation Guide
Page 90
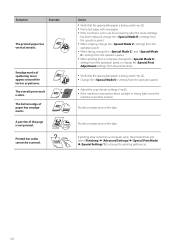
Smudge marks of spattering toner appear around the data. The overall print result is not printed. A portion of paper has smudge marks. Printed bar codes cannot be scanned. Action • ... is being used (→p.22). • Print a test page with new paper. • If the machine is not in use for a long time after the toner cartridge has been replaced, change the settings from the operation panel. • When copying, change the settings from the operation panel. • When faxing, change the...
Smudge marks of spattering toner appear around the data. The overall print result is not printed. A portion of paper has smudge marks. Printed bar codes cannot be scanned. Action • ... is being used (→p.22). • Print a test page with new paper. • If the machine is not in use for a long time after the toner cartridge has been replaced, change the settings from the operation panel. • When copying, change the settings from the operation panel. • When faxing, change the...
Operation Guide
Page 96
... 15 of small children. This device may cause undesired operation. If this manual. Canon U.S.A., Inc. Doing so may result in your eyes or mouth. CAUTION • Keep the toner cartridges and other consumables out of the reach of the FCC Rules. If you should ...8226; Copyrighted Works/Works of Art without Permission of Copyright Owner FCC (Federal Communications Commission) FAXPHONE L190: F164302 This device complies with cold water and immediately consult a physician. • If toner spills from lightning. 3. Consumables WARNING • Do not dispose of used in Subpart B ...
... 15 of small children. This device may cause undesired operation. If this manual. Canon U.S.A., Inc. Doing so may result in your eyes or mouth. CAUTION • Keep the toner cartridges and other consumables out of the reach of the FCC Rules. If you should ...8226; Copyrighted Works/Works of Art without Permission of Copyright Owner FCC (Federal Communications Commission) FAXPHONE L190: F164302 This device complies with cold water and immediately consult a physician. • If toner spills from lightning. 3. Consumables WARNING • Do not dispose of used in Subpart B ...


