
Operation Guide
Page 5
Delayed Sending → p.56 Scan a document and set a time to print at a time. Enlarging and Reducing → p.31 Enlarge or reduce data to fit the paper size automatically or to ...
Delayed Sending → p.56 Scan a document and set a time to print at a time. Enlarging and Reducing → p.31 Enlarge or reduce data to fit the paper size automatically or to ...

Operation Guide
Page 10
... indicator Shows the remaining amount of the Machine Front side Feeder Automatically feeds documents into the machine (→p.20). Document return tray Returns documents after scanning. Feeder cover Open this tray. Front cover Open the cover to control the machine (→p.14). Document feeder tray Place your documents in this cover...
... indicator Shows the remaining amount of the Machine Front side Feeder Automatically feeds documents into the machine (→p.20). Document return tray Returns documents after scanning. Feeder cover Open this tray. Front cover Open the cover to control the machine (→p.14). Document feeder tray Place your documents in this cover...

Operation Guide
Page 11
...Platen glass Use to hold the small size paper. 11 Output tray Printed documents are output here. Small paper guide Attach this guide to scan non-standard size paper or books, as well as standard size paper (→p.19). Paper guides Adjust these guides to escape from inside of... the machine. Paper stopper Use the paper stopper to prevent paper from the feeder. Scanning area Scans documents from falling out of space around the machine. Leave more than 4" (10 cm) of the output tray. Power button Turn the power...
...Platen glass Use to hold the small size paper. 11 Output tray Printed documents are output here. Small paper guide Attach this guide to scan non-standard size paper or books, as well as standard size paper (→p.19). Paper guides Adjust these guides to escape from inside of... the machine. Paper stopper Use the paper stopper to prevent paper from the feeder. Scanning area Scans documents from falling out of space around the machine. Leave more than 4" (10 cm) of the output tray. Power button Turn the power...

Operation Guide
Page 14
... Press to manually print reports and lists (→p.79). Press to delete letters and numbers. Press to select the image quality for copy or the scanning resolution for the paper cassette (→p.26).
... Press to manually print reports and lists (→p.79). Press to delete letters and numbers. Press to select the image quality for copy or the scanning resolution for the paper cassette (→p.26).
Operation Guide
Page 21
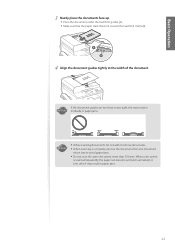
... that the paper stack does not exceed the load limit marks (B). " # 4 Align the document guides tightly to avoid paper jams. • Do not scan the same document more than 30 times. If the document guides are too loose or too tight, this may result in IMPORTANT misfeeds or paper... jams. IMPORTANT • While scanning documents, do not add or remove documents. • When scanning is complete, remove the document from the document return tray to the width of the document.
... that the paper stack does not exceed the load limit marks (B). " # 4 Align the document guides tightly to avoid paper jams. • Do not scan the same document more than 30 times. If the document guides are too loose or too tight, this may result in IMPORTANT misfeeds or paper... jams. IMPORTANT • While scanning documents, do not add or remove documents. • When scanning is complete, remove the document from the document return tray to the width of the document.

Operation Guide
Page 32
... highlight the appropriate document type, and then press [OK]. Sharpness - : Less Sharpness (Suitable for photos) + : More Sharpness (Suitable for documents that contain text and photos (Scanned documents are at a low resolution at high speed). Suitable for documents written in pen or pencil) 5 Press [ ] (Start). 32 Adjusting the Sharpness You can sharpen...
... highlight the appropriate document type, and then press [OK]. Sharpness - : Less Sharpness (Suitable for photos) + : More Sharpness (Suitable for documents that contain text and photos (Scanned documents are at a low resolution at high speed). Suitable for documents written in pen or pencil) 5 Press [ ] (Start). 32 Adjusting the Sharpness You can sharpen...

Operation Guide
Page 33
... documents. When placing your documents in the feeder When placing your documents on the platen glass, and then press [ ] (Start). • Press [ ] (Start) for every scanning. 2. Specifying the orientation If you select at step 4 above, you may specify the orientation of documents. 33 Place the next page on the platen glass...
... documents. When placing your documents in the feeder When placing your documents on the platen glass, and then press [ ] (Start). • Press [ ] (Start) for every scanning. 2. Specifying the orientation If you select at step 4 above, you may specify the orientation of documents. 33 Place the next page on the platen glass...

Operation Guide
Page 34
N on 1 Off 2 on 1 4 on 1 ID Card Copy 5 Press [▲] or [▼] to highlight the desired scan size, and then press [OK]. • For example, set scan size to to scan the entire page of multiple documents. 1 Place your documents (→p.19). 2 Switch to the Copy mode (→p.16). 3 Press [▲] or [▼] to highlight...
N on 1 Off 2 on 1 4 on 1 ID Card Copy 5 Press [▲] or [▼] to highlight the desired scan size, and then press [OK]. • For example, set scan size to to scan the entire page of multiple documents. 1 Place your documents (→p.19). 2 Switch to the Copy mode (→p.16). 3 Press [▲] or [▼] to highlight...

Operation Guide
Page 52
Changing the Default Settings You can set the document format to scan double-sided documents automatically. 1 Place your documents (→p.19). 2 Switch to the Fax mode (→p.16). 3 Press [▲] or [▼] to highlight , and then press [...
Changing the Default Settings You can set the document format to scan double-sided documents automatically. 1 Place your documents (→p.19). 2 Switch to the Fax mode (→p.16). 3 Press [▲] or [▼] to highlight , and then press [...

Operation Guide
Page 53
... starts. Send a Fax Entering a Fax Number with the alphanumeric keys. The fax is sent after the scanning is busy or an error occurs, the machine automatically redials the last destination. To change the default settings, press [ ] (Menu) &#... to . If the recipient's line is finished. 1. The default number of the original document, and then press [OK]. 2. Fax If the document guides are scanned completely, press [▲] or [▼] to the Fax mode (→p.16). 3 Enter the recipient's fax number with the Alphanumeric Keys 1 Place your documents ...
... starts. Send a Fax Entering a Fax Number with the alphanumeric keys. The fax is sent after the scanning is busy or an error occurs, the machine automatically redials the last destination. To change the default settings, press [ ] (Menu) &#... to . If the recipient's line is finished. 1. The default number of the original document, and then press [OK]. 2. Fax If the document guides are scanned completely, press [▲] or [▼] to the Fax mode (→p.16). 3 Enter the recipient's fax number with the Alphanumeric Keys 1 Place your documents ...

Operation Guide
Page 56
... destinations, press [▲] or [▼] to highlight , and then press [OK]. 6 Press [ ] (Start). Sending a Fax to Multiple Destinations (Sequential Broadcast) You can automatically send a pre-scanned fax at once. 1 Place your documents (→p.19). 2 Switch to the Fax mode (→p.16). 3 Adjust the image quality of the documents as needed (→...
... destinations, press [▲] or [▼] to highlight , and then press [OK]. 6 Press [ ] (Start). Sending a Fax to Multiple Destinations (Sequential Broadcast) You can automatically send a pre-scanned fax at once. 1 Place your documents (→p.19). 2 Switch to the Fax mode (→p.16). 3 Adjust the image quality of the documents as needed (→...
Operation Guide
Page 72
... power. When you finish cleaning the machine, wait for the printer to dry completely. 5 Reconnect all cables from the platen glass or feeder. 3 Lift the scanning platform, open the toner cover, and then remove the toner cartridge. 72 IMPORTANT For safety, be sure to dry completely before cleaning the machine. Cleaning...
... power. When you finish cleaning the machine, wait for the printer to dry completely. 5 Reconnect all cables from the platen glass or feeder. 3 Lift the scanning platform, open the toner cover, and then remove the toner cartridge. 72 IMPORTANT For safety, be sure to dry completely before cleaning the machine. Cleaning...
Operation Guide
Page 73
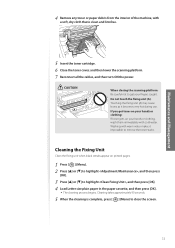
... water. Maintenance and Management 5 Insert the toner cartridge. 6 Close the toner cover, and then lower the scanning platform. 7 Reconnect all the cables, and then turn ON the power. CAUTION ʢ"ʣ When closing the scanning platform: Be careful not to remove the toner stains. Touching the fixing unit (A) may cause burns as...
... water. Maintenance and Management 5 Insert the toner cartridge. 6 Close the toner cover, and then lower the scanning platform. 7 Reconnect all the cables, and then turn ON the power. CAUTION ʢ"ʣ When closing the scanning platform: Be careful not to remove the toner stains. Touching the fixing unit (A) may cause burns as...

Operation Guide
Page 74
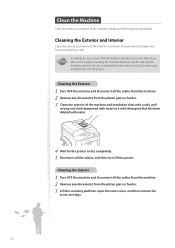
... glass. 3 Open the feeder. 4 Clean the platen glass with a soft and dry cloth. They can generate static electricity. Cleaning the Platen Glass and Feeder If a scanned image has unexpected specks, clean the platen glass and feeder.
... glass. 3 Open the feeder. 4 Clean the platen glass with a soft and dry cloth. They can generate static electricity. Cleaning the Platen Glass and Feeder If a scanned image has unexpected specks, clean the platen glass and feeder.
Operation Guide
Page 76
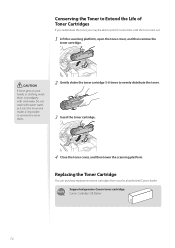
...5-6 times to print for some time until the toner runs out. 1 Lift the scanning platform, open the toner cover, and then remove the toner cartridge. CAUTION If toner gets on your local authorized Canon dealer. Conserving the Toner to Extend the Life of Toner Cartridges If you redistribute the... toner, you may be able to evenly distribute the toner. 3 Insert the toner cartridge. 4 Close the toner cover, and then lower the scanning platform.
...5-6 times to print for some time until the toner runs out. 1 Lift the scanning platform, open the toner cover, and then remove the toner cartridge. CAUTION If toner gets on your local authorized Canon dealer. Conserving the Toner to Extend the Life of Toner Cartridges If you redistribute the... toner, you may be able to evenly distribute the toner. 3 Insert the toner cartridge. 4 Close the toner cover, and then lower the scanning platform.

Operation Guide
Page 78
... may cause the toner remaining inside the cartridges to remove the toner stains. 3 Insert the toner cartridge. 4 Close the toner cover, and then lower the scanning platform. Washing with cold water. WARNING Do not dispose of the sealing tape removed from the new toner cartridge. •...
... may cause the toner remaining inside the cartridges to remove the toner stains. 3 Insert the toner cartridge. 4 Close the toner cover, and then lower the scanning platform. Washing with cold water. WARNING Do not dispose of the sealing tape removed from the new toner cartridge. •...
Operation Guide
Page 84
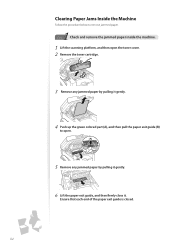
Ensure that each end of the paper exit guide is closed. 84 Clearing Paper Jams Inside the Machine Follow the procedure below to remove jammed paper. 1 Step Check and remove the jammed paper inside the machine. 1 Lift the scanning platform, and then open the toner cover. 2 Remove the toner cartridge. 3 Remove any jammed paper by pulling it gently. 4 Push up the green colored part (A), and then pull the paper exit guide (B) to open. (A) (B) 5 Remove any jammed paper by pulling it gently. 6 Lift the paper exit guide, and then firmly close it.
Ensure that each end of the paper exit guide is closed. 84 Clearing Paper Jams Inside the Machine Follow the procedure below to remove jammed paper. 1 Step Check and remove the jammed paper inside the machine. 1 Lift the scanning platform, and then open the toner cover. 2 Remove the toner cartridge. 3 Remove any jammed paper by pulling it gently. 4 Push up the green colored part (A), and then pull the paper exit guide (B) to open. (A) (B) 5 Remove any jammed paper by pulling it gently. 6 Lift the paper exit guide, and then firmly close it.
Operation Guide
Page 85
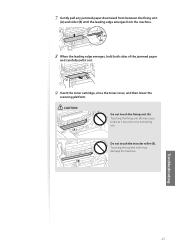
... damage the machine. Touching the transfer roller may cause burns as it out. 9 Insert the toner cartridge, close the toner cover, and then lower the scanning platform. Troubleshooting 85 7 Gently pull any jammed paper downward from between the fixing unit (A) and roller (B) until the leading edge emerges from the machine. (A) (B) 8 When...
... damage the machine. Touching the transfer roller may cause burns as it out. 9 Insert the toner cartridge, close the toner cover, and then lower the scanning platform. Troubleshooting 85 7 Gently pull any jammed paper downward from between the fixing unit (A) and roller (B) until the leading edge emerges from the machine. (A) (B) 8 When...
Operation Guide
Page 87
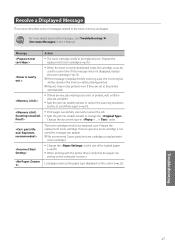
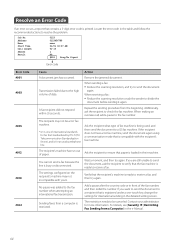
... used , this message does not disappear, replace the toner cartridge (→p.76). The toner cartridge needs to be replaced soon. We recommend Canon genuine toner cartridges as the paper type displayed on the computer is correct. Message Action • The toner cartridge needs to the toner, ...jobs are any jobs waiting to send them again (→p.51). • Print pages successfully scanned or cancel the job. • Split the job into smaller subsets or reduce the scanning resolution and try to be stored in the memory without being printed. Load paper same as replacement...
... used , this message does not disappear, replace the toner cartridge (→p.76). The toner cartridge needs to be replaced soon. We recommend Canon genuine toner cartridges as the paper type displayed on the computer is correct. Message Action • The toner cartridge needs to the toner, ...jobs are any jobs waiting to send them again (→p.51). • Print pages successfully scanned or cancel the job. • Split the job into smaller subsets or reduce the scanning resolution and try to be stored in the memory without being printed. Load paper same as replacement...
Operation Guide
Page 88
... to send the document again. Add a pause after the country code or in the e-Manual. 88 When sending a fax: • Reduce the scanning resolution, and try to check the fax machine. You cannot send a fax because the line is ready to receive a fax, and then try again... Cause A document jam has occurred. For details, see [Security] [Restricting Fax Sending from the beginning. When receiving a fax: • Reduce the scanning resolution or ask the sender to resolve the problem. Repeat the sending procedure from a Computer] in front of data. If you are still unable to...
... to send the document again. Add a pause after the country code or in the e-Manual. 88 When sending a fax: • Reduce the scanning resolution, and try to check the fax machine. You cannot send a fax because the line is ready to receive a fax, and then try again... Cause A document jam has occurred. For details, see [Security] [Restricting Fax Sending from the beginning. When receiving a fax: • Reduce the scanning resolution or ask the sender to resolve the problem. Repeat the sending procedure from a Computer] in front of data. If you are still unable to...


