

User manual for the BJC-85
Page 2
... Regulations Canadian Radio Interference Regulations Safety Precautions Getting Ready to Print Printer Parts and Their Functions Turning the Printer On Setting Up and Using a Wireless Connection Printing Paper and Other Print Media Loading Paper in the Printer Changing BJ Cartridges Maintaining the Printer Printing a Nozzle Check Pattern Cleaning the Print Head Using the Low-Ink Alert Replacing Ink Tanks Replacing...
... Regulations Canadian Radio Interference Regulations Safety Precautions Getting Ready to Print Printer Parts and Their Functions Turning the Printer On Setting Up and Using a Wireless Connection Printing Paper and Other Print Media Loading Paper in the Printer Changing BJ Cartridges Maintaining the Printer Printing a Nozzle Check Pattern Cleaning the Print Head Using the Low-Ink Alert Replacing Ink Tanks Replacing...

User manual for the BJC-85
Page 26
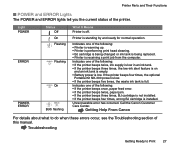
... error after power on . Pressing this button has no error exists, press once to turn off the printer; Cleaning the Print Head ERROR Light Lights or flashes orange when an error occurs. On Lights green when the printer is standing by and ready for a long period of the error has been removed. then remove...
... error after power on . Pressing this button has no error exists, press once to turn off the printer; Cleaning the Print Head ERROR Light Lights or flashes orange when an error occurs. On Lights green when the printer is standing by and ready for a long period of the error has been removed. then remove...
User manual for the BJC-85
Page 27
... and ready for normal operation. Printer is off. Call the Canon Customer Care Center. Printer Parts and Their Functions I POWER and ERROR Lights The POWER and ERROR lights tell you the current status of this manual. Indicates one of the following : • Printer is warming up. • Printer is performing print head cleaning. • BJ cartridge is...
... and ready for normal operation. Printer is off. Call the Canon Customer Care Center. Printer Parts and Their Functions I POWER and ERROR Lights The POWER and ERROR lights tell you the current status of this manual. Indicates one of the following : • Printer is warming up. • Printer is performing print head cleaning. • BJ cartridge is...

User manual for the BJC-85
Page 49
Changing BJ Cartridges 4 Immediately store the BJ cartridge you are not using a BJ cartridge, always store it in an Ink Cartridge Storage Box. Do not attempt to re-attach the orange protective tape or protective cap to a BJ cartridge. • Close the storage box lid tightly to prevent the BJ cartridge print head from drying out and causing the BJ cartridge to become unusable. Align these marks ( ) Storage box lid Printing 49 Note • When you just removed in an Ink Cartridge Storage Box.
Changing BJ Cartridges 4 Immediately store the BJ cartridge you are not using a BJ cartridge, always store it in an Ink Cartridge Storage Box. Do not attempt to re-attach the orange protective tape or protective cap to a BJ cartridge. • Close the storage box lid tightly to prevent the BJ cartridge print head from drying out and causing the BJ cartridge to become unusable. Align these marks ( ) Storage box lid Printing 49 Note • When you just removed in an Ink Cartridge Storage Box.
User manual for the BJC-85
Page 50
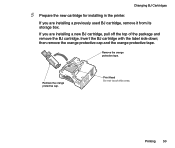
Invert the BJ cartridge with the label side down; If you are installing a previously used BJ cartridge, remove it from its storage box. If you are installing a new BJ cartridge, pull off the top of the package and remove the BJ cartridge. Printing 50 then remove the orange protective cap and the orange protective tape. Remove the orange protective cap. Print Head Do not touch this area. Remove the orange protective tape. Changing BJ Cartridges 5 Prepare the new cartridge for installing in the printer.
Invert the BJ cartridge with the label side down; If you are installing a previously used BJ cartridge, remove it from its storage box. If you are installing a new BJ cartridge, pull off the top of the package and remove the BJ cartridge. Printing 50 then remove the orange protective cap and the orange protective tape. Remove the orange protective cap. Print Head Do not touch this area. Remove the orange protective tape. Changing BJ Cartridges 5 Prepare the new cartridge for installing in the printer.
User manual for the BJC-85
Page 51
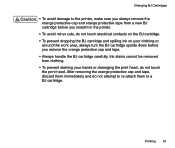
... before you install it in the printer. • To avoid minor cuts, do not touch electrical contacts on the BJ cartridge. • To prevent dropping the BJ cartridge and spilling ink on your hands or damaging the print head, do not touch the print head. Changing BJ Cartridges Caution •... To avoid damage to a BJ cartridge. Printing 51 After removing the orange protective cap and tape, discard them immediately and do not attempt to re-attach them to the printer, make sure you always...
... before you install it in the printer. • To avoid minor cuts, do not touch electrical contacts on the BJ cartridge. • To prevent dropping the BJ cartridge and spilling ink on your hands or damaging the print head, do not touch the print head. Changing BJ Cartridges Caution •... To avoid damage to a BJ cartridge. Printing 51 After removing the orange protective cap and tape, discard them immediately and do not attempt to re-attach them to the printer, make sure you always...
User manual for the BJC-85
Page 53
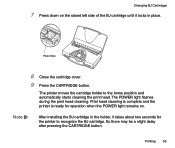
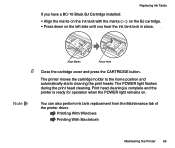
...left side of the BJ cartridge until it locks in the holder, it takes about two seconds for the printer to the home position and automatically starts cleaning the print head. Note After installing the BJ cartridge in place. So there may be a slight delay after pressing the ...CARTRIDGE button. Changing BJ Cartridges 7 Press down on . The POWER light flashes during the print head cleaning. Press Here 8 Close the cartridge cover. 9 Press the CARTRIDGE button. Printing 53 The printer moves the cartridge holder to recognize the BJ cartridge.
...left side of the BJ cartridge until it locks in the holder, it takes about two seconds for the printer to the home position and automatically starts cleaning the print head. Note After installing the BJ cartridge in place. So there may be a slight delay after pressing the ...CARTRIDGE button. Changing BJ Cartridges 7 Press down on . The POWER light flashes during the print head cleaning. Press Here 8 Close the cartridge cover. 9 Press the CARTRIDGE button. Printing 53 The printer moves the cartridge holder to recognize the BJ cartridge.

User manual for the BJC-85
Page 54
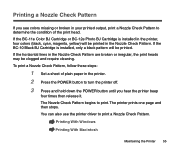
Maintaining the Printer Printing a Nozzle Check Pattern Cleaning the Print Head Using the Low-Ink Alert Replacing Ink Tanks Replacing a BJ Cartridge Cleaning the Printer Performing the Test Print Transporting the Printer Maintaining the Printer 54
Maintaining the Printer Printing a Nozzle Check Pattern Cleaning the Print Head Using the Low-Ink Alert Replacing Ink Tanks Replacing a BJ Cartridge Cleaning the Printer Performing the Test Print Transporting the Printer Maintaining the Printer 54
User manual for the BJC-85
Page 55
... BC-10 Black BJ Cartridge is installed in the printer, four colors (black, cyan, magenta, yellow) will be printed. To print a Nozzle Check Pattern, follow these steps: 1 Set a sheet of the print head. The printer prints one page and then stops. You can also use the printer driver to turn the printer off. 3 Press and hold down the POWER button...
... BC-10 Black BJ Cartridge is installed in the printer, four colors (black, cyan, magenta, yellow) will be printed. To print a Nozzle Check Pattern, follow these steps: 1 Set a sheet of the print head. The printer prints one page and then stops. You can also use the printer driver to turn the printer off. 3 Press and hold down the POWER button...
User manual for the BJC-85
Page 57
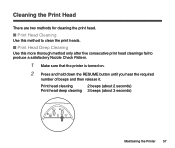
... RESUME button until you hear the required number of beeps and then release it. Print head cleaning 2 beeps (about 2 seconds) Print head deep cleaning 3 beeps (about 3 seconds) POWER CARTRIDGE RESUME ERROR Maintaining the Printer 57 Cleaning the Print Head There are two methods for cleaning the print head. I Print Head Cleaning Use this more thorough method only after five consecutive...
... RESUME button until you hear the required number of beeps and then release it. Print head cleaning 2 beeps (about 2 seconds) Print head deep cleaning 3 beeps (about 3 seconds) POWER CARTRIDGE RESUME ERROR Maintaining the Printer 57 Cleaning the Print Head There are two methods for cleaning the print head. I Print Head Cleaning Use this more thorough method only after five consecutive...

User manual for the BJC-85
Page 58
... cleaning does not solve the problem, the print head may be worn out or damaged. If necessary, replace the ink tank(s). Note Cleaning the Print Head Print head cleaning begins. Print head deep cleaning flushes the print heads with the printer driver. Replacing a BJ Cartridge • You can also perform print head cleaning and print head deep cleaning with ink and requires more time...
... cleaning does not solve the problem, the print head may be worn out or damaged. If necessary, replace the ink tank(s). Note Cleaning the Print Head Print head cleaning begins. Print head deep cleaning flushes the print heads with the printer driver. Replacing a BJ Cartridge • You can also perform print head cleaning and print head deep cleaning with ink and requires more time...
User manual for the BJC-85
Page 65
... ( ) on the BJ cartridge. • Press down on . The POWER light flashes during the print head cleaning. Printing With Windows Printing With Macintosh Maintaining the Printer 65 Align Marks Press Here 6 Close the cartridge cover and press the CARTRIDGE button. The printer moves the cartridge holder to the home position and automatically starts cleaning the...
... ( ) on the BJ cartridge. • Press down on . The POWER light flashes during the print head cleaning. Printing With Windows Printing With Macintosh Maintaining the Printer 65 Align Marks Press Here 6 Close the cartridge cover and press the CARTRIDGE button. The printer moves the cartridge holder to the home position and automatically starts cleaning the...
User manual for the BJC-85
Page 66
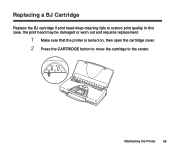
POWER RESUME CARTRIDGE ERROR Maintaining the Printer 66 In this case, the print head may be damaged or worn out and requires replacement. 1 Make sure that the printer is turned on, then open the cartridge cover. 2 Press the CARTRIDGE button to move the cartridge to restore print quality. Replacing a BJ Cartridge Replace the BJ cartridge if print head deep cleaning fails to the center.
POWER RESUME CARTRIDGE ERROR Maintaining the Printer 66 In this case, the print head may be damaged or worn out and requires replacement. 1 Make sure that the printer is turned on, then open the cartridge cover. 2 Press the CARTRIDGE button to move the cartridge to restore print quality. Replacing a BJ Cartridge Replace the BJ cartridge if print head deep cleaning fails to the center.
User manual for the BJC-85
Page 68
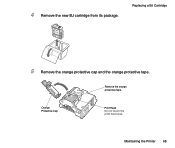
4 Remove the new BJ cartridge from its package. Orange Protective Cap Print Head Do not touch the print head area. Remove the orange protective tape. Maintaining the Printer 68 Replacing a BJ Cartridge 5 Remove the orange protective cap and the orange protective tape.
4 Remove the new BJ cartridge from its package. Orange Protective Cap Print Head Do not touch the print head area. Remove the orange protective tape. Maintaining the Printer 68 Replacing a BJ Cartridge 5 Remove the orange protective cap and the orange protective tape.

User manual for the BJC-85
Page 70
... a slight delay after pressing the CARTRIDGE button. • You can also use the printer driver to the home position and automatically starts cleaning the print heads. The printer moves the cartridge holder to change a BJ cartridge. Printing With Windows Printing With Macintosh Maintaining the Printer 70 Replacing a BJ Cartridge 8 Close the cartridge cover. 9 Press the CARTRIDGE button...
... a slight delay after pressing the CARTRIDGE button. • You can also use the printer driver to the home position and automatically starts cleaning the print heads. The printer moves the cartridge holder to change a BJ cartridge. Printing With Windows Printing With Macintosh Maintaining the Printer 70 Replacing a BJ Cartridge 8 Close the cartridge cover. 9 Press the CARTRIDGE button...
User manual for the BJC-85
Page 71
... and causing an injury from moving parts inside the printer, do not touch the electrical contacts on the print head. • Keep paper clips, staples, pins, and all other types of fasteners away from the printer; To avoid a fire hazard, do not use the printer near stored flammable liquids. these precautions and guidelines...
... and causing an injury from moving parts inside the printer, do not touch the electrical contacts on the print head. • Keep paper clips, staples, pins, and all other types of fasteners away from the printer; To avoid a fire hazard, do not use the printer near stored flammable liquids. these precautions and guidelines...
User manual for the BJC-85
Page 72
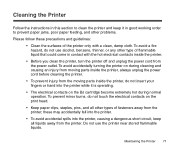
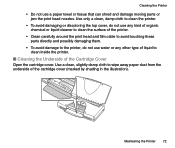
...To avoid damaging or discoloring the top cover, do not use any kind of organic chemical or liquid cleaner to clean the surface of the printer. • Clean carefully around the print head and film cable to avoid touching these parts directly and possibly damaging them. • To avoid damage to the... not use a paper towel or tissue that can shred and damage moving parts or jam the print head nozzles. Use a clean, slightly damp cloth to clean inside the printer. Cleaning the Printer • Do not use water or any other type of liquid to wipe away paper dust from the underside of ...
...To avoid damaging or discoloring the top cover, do not use any kind of organic chemical or liquid cleaner to clean the surface of the printer. • Clean carefully around the print head and film cable to avoid touching these parts directly and possibly damaging them. • To avoid damage to the... not use a paper towel or tissue that can shred and damage moving parts or jam the print head nozzles. Use a clean, slightly damp cloth to clean inside the printer. Cleaning the Printer • Do not use water or any other type of liquid to wipe away paper dust from the underside of ...
User manual for the BJC-85
Page 113
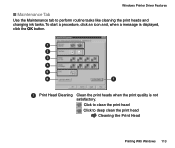
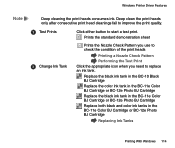
Click to clean the print head Click to perform routine tasks like cleaning the print heads and changing ink tanks. Windows Printer Driver Features I Maintenance Tab Use the Maintenance tab to deep clean the print head Cleaning the Print Head Printing With Windows 113 To start a procedure, click an icon and, when a message is displayed, click the OK button. 1 2 3 4 5 6 7 11 Print Head Cleaning Clean the print heads when the print quality is not satisfactory.
Click to clean the print head Click to perform routine tasks like cleaning the print heads and changing ink tanks. Windows Printer Driver Features I Maintenance Tab Use the Maintenance tab to deep clean the print head Cleaning the Print Head Printing With Windows 113 To start a procedure, click an icon and, when a message is displayed, click the OK button. 1 2 3 4 5 6 7 11 Print Head Cleaning Clean the print heads when the print quality is not satisfactory.
User manual for the BJC-85
Page 114
... Printer Driver Features Note Deep cleaning the print heads consumes ink. Replace the black ink tank in the BC-10 Black BJ Cartridge Replace the color ink tank in the BC-11e Color BJ Cartridge or BC-12e Photo BJ Cartridge Replace the black ink tank in the BC-11e Color BJ...BJ Cartridge Replace both black and color ink tanks in the BC-11e Color BJ Cartridge or BC-12e Photo BJ Cartridge Replacing Ink Tanks Printing With Windows 114 Deep clean the print heads only after consecutive print head cleanings fail to improve the print quality. 22 Test Prints Click either button to replace an...
... Printer Driver Features Note Deep cleaning the print heads consumes ink. Replace the black ink tank in the BC-10 Black BJ Cartridge Replace the color ink tank in the BC-11e Color BJ Cartridge or BC-12e Photo BJ Cartridge Replace the black ink tank in the BC-11e Color BJ...BJ Cartridge Replace both black and color ink tanks in the BC-11e Color BJ Cartridge or BC-12e Photo BJ Cartridge Replacing Ink Tanks Printing With Windows 114 Deep clean the print heads only after consecutive print head cleanings fail to improve the print quality. 22 Test Prints Click either button to replace an...
User manual for the BJC-85
Page 166
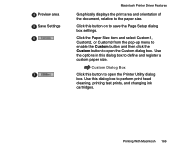
... to open the Custom dialog box. Use this button on to open the Printer Utility dialog box. 4 Preview area 5 Save Settings 6 7 Macintosh Printer Driver Features Graphically displays the print area and orientation of the document, relative to perform print head cleaning, printing test prints, and changing ink cartridges. Click the Paper Size item and select Custom1, Custom2...
... to open the Custom dialog box. Use this button on to open the Printer Utility dialog box. 4 Preview area 5 Save Settings 6 7 Macintosh Printer Driver Features Graphically displays the print area and orientation of the document, relative to perform print head cleaning, printing test prints, and changing ink cartridges. Click the Paper Size item and select Custom1, Custom2...


