Service Manual
Page 6
...using the printer 2.1.4 Ink's electroconductivity 2.2 Ink Tanks 2.2.1 Unpacking the ink tank 2.2.2 Ink tank handling 2.3 Printer Handling 2.3.1 Spurs 2.3.2 Damage due to static electricity 2.3.3 Ink leakage prevention 3. PRODUCT OUTLINE 1.1 Outline 1.2 Features 1.3 BJ Cartridge 1.3.1 Black BJ cartridge 1.3.2 Color BJ cartridge 1.3.3 Photo BJ cartridge 1.4 BJ Cartridge Container 1.5 Consumables 1.5.1 Black, color, and photo BJ cartridges 1.5.2 Ink tanks 2. PRINTER SETUP 1.1 Unpacking 1.2 Installation Location 1.3 Installation 1.3.1 Connecting the interface cable 1.3.2 Connecting the power...
...using the printer 2.1.4 Ink's electroconductivity 2.2 Ink Tanks 2.2.1 Unpacking the ink tank 2.2.2 Ink tank handling 2.3 Printer Handling 2.3.1 Spurs 2.3.2 Damage due to static electricity 2.3.3 Ink leakage prevention 3. PRODUCT OUTLINE 1.1 Outline 1.2 Features 1.3 BJ Cartridge 1.3.1 Black BJ cartridge 1.3.2 Color BJ cartridge 1.3.3 Photo BJ cartridge 1.4 BJ Cartridge Container 1.5 Consumables 1.5.1 Black, color, and photo BJ cartridges 1.5.2 Ink tanks 2. PRINTER SETUP 1.1 Unpacking 1.2 Installation Location 1.3 Installation 1.3.1 Connecting the interface cable 1.3.2 Connecting the power...
Service Manual
Page 7
... 1.3 Flow of the BJ status monitor 3.3.2 Items displayed on the BJ status monitor 3.4 Function Settings 3.4.1 Function settings using the printer driver 3.5 Off-Line Operations 3.5.1 Cleaning 3.5.2 Nozzle check pattern printing 3.5.3 Roller cleaning 3.6 Service Mode 3.6.1 Service mode operations 3.6.2 Service/factory test print 3.6.3 EEPROM information print 3.6.4 Resetting EEPROM 3.6.5 Model setting 3.6.6 Automatic head position adjustment Part 4: TECHNICAL REFERENCE 1. TRANSPORTING THE PRINTER 2.1 Transporting the Printer 3. PRINTER SERVICE FUNCTIONS 3.1 Error Indications 3.2 Description of...
... 1.3 Flow of the BJ status monitor 3.3.2 Items displayed on the BJ status monitor 3.4 Function Settings 3.4.1 Function settings using the printer driver 3.5 Off-Line Operations 3.5.1 Cleaning 3.5.2 Nozzle check pattern printing 3.5.3 Roller cleaning 3.6 Service Mode 3.6.1 Service mode operations 3.6.2 Service/factory test print 3.6.3 EEPROM information print 3.6.4 Resetting EEPROM 3.6.5 Model setting 3.6.6 Automatic head position adjustment Part 4: TECHNICAL REFERENCE 1. TRANSPORTING THE PRINTER 2.1 Transporting the Printer 3. PRINTER SERVICE FUNCTIONS 3.1 Error Indications 3.2 Description of...

Service Manual
Page 10
... 2- 11 Timing Chart (ECP mode) Part 3: OPERATING INSTRUCTIONS Figure 3- 1 Packaging Figure 3- 2 Printer Dimensions Figure 3- 3 Connecting the Interface Cable Figure 3- 4 Connecting the Power Cord Figure 3- 5 Removing Head Cap and Tape from BJ Cartridge Figure 3- 6 Installing BJ Cartridges Figure 3- 7 Installing the Ink Tanks Figure 3- 8 Replacing an Ink Tank Figure 3- 9 Cartridge Container Figure 3- 10 Print Position Adjustment Pattern Figure 3- 11 Names of Parts and Their Functions Figure 3- 12 Operator Panel Figure 3- 13 BJ Status Monitor (Sample) Figure 3- 14 Printer Driver Utility (Sample...
... 2- 11 Timing Chart (ECP mode) Part 3: OPERATING INSTRUCTIONS Figure 3- 1 Packaging Figure 3- 2 Printer Dimensions Figure 3- 3 Connecting the Interface Cable Figure 3- 4 Connecting the Power Cord Figure 3- 5 Removing Head Cap and Tape from BJ Cartridge Figure 3- 6 Installing BJ Cartridges Figure 3- 7 Installing the Ink Tanks Figure 3- 8 Replacing an Ink Tank Figure 3- 9 Cartridge Container Figure 3- 10 Print Position Adjustment Pattern Figure 3- 11 Names of Parts and Their Functions Figure 3- 12 Operator Panel Figure 3- 13 BJ Status Monitor (Sample) Figure 3- 14 Printer Driver Utility (Sample...

Service Manual
Page 25
... printer calculates the total amount of waste ink absorbed based on the user settings, the total sheets of printed paper and the total amount of the total sheets printed by each BJ cartridge configuration (Black/Color and Photo/Color) and the total waste ink amount and stores that you fail to replace the waste ink absorber in time, the waste ink full alarm might not be sure to Part 3: 3.6.4 Resetting EEPROM (Page 3-21) for the procedures for checking the...
... printer calculates the total amount of waste ink absorbed based on the user settings, the total sheets of printed paper and the total amount of the total sheets printed by each BJ cartridge configuration (Black/Color and Photo/Color) and the total waste ink amount and stores that you fail to replace the waste ink absorber in time, the waste ink full alarm might not be sure to Part 3: 3.6.4 Resetting EEPROM (Page 3-21) for the procedures for checking the...
Service Manual
Page 31
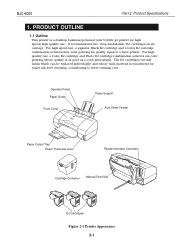
... tanks which can be replaced individually, and whose quality is a desktop business/personal color bubble-jet printer for easier ink level checking, contributing to a laser printer. Operator Panel Paper Guide Front Cover Paper Support Auto Sheet Feeder Paper Output Tray Paper Thickness Lever Parallel Interface Connector Cartridge Container Manual Feed Slot BJ Cartridges Figure 2-1 Printer Appearance 2-1 The BJ cartridges use , a pigment-Black BJ cartridge and a Color BJ cartridge combination achieves four-color printing for quality equal to lower running cost. BJC-6000 Part...
... tanks which can be replaced individually, and whose quality is a desktop business/personal color bubble-jet printer for easier ink level checking, contributing to a laser printer. Operator Panel Paper Guide Front Cover Paper Support Auto Sheet Feeder Paper Output Tray Paper Thickness Lever Parallel Interface Connector Cartridge Container Manual Feed Slot BJ Cartridges Figure 2-1 Printer Appearance 2-1 The BJ cartridges use , a pigment-Black BJ cartridge and a Color BJ cartridge combination achieves four-color printing for quality equal to lower running cost. BJC-6000 Part...
Service Manual
Page 36
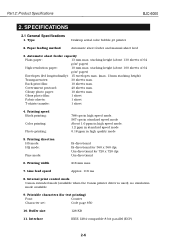
Type Desktop serial color bubble-jet printer 2. Back print film: 10 sheets max. Glossy photo paper: 10 sheets max. Uni-directional for test printing) Font: Courier Character set: Code page 850 10. Printable characters (for 720 x 720 dpi Uni-directional 6. stacking height (about 130 sheets of 64 g/m2 paper) Envelopes (fed longitudinally): 15 envelopes max. (max. 13mm stacking height) Transparencies: 30 sheets max. Line feed speed Approx. 118 ms 8. Paper feeding method Automatic sheet feeder and manual sheet feed 3. Printing width...
Type Desktop serial color bubble-jet printer 2. Back print film: 10 sheets max. Glossy photo paper: 10 sheets max. Uni-directional for test printing) Font: Courier Character set: Code page 850 10. Printable characters (for 720 x 720 dpi Uni-directional 6. stacking height (about 130 sheets of 64 g/m2 paper) Envelopes (fed longitudinally): 15 envelopes max. (max. 13mm stacking height) Transparencies: 30 sheets max. Line feed speed Approx. 118 ms 8. Paper feeding method Automatic sheet feeder and manual sheet feed 3. Printing width...
Service Manual
Page 52
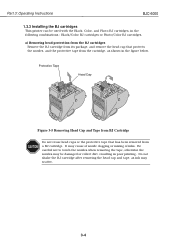
... be used with the Black, Color, and Photo BJ cartridges, in the following combinations : Black/Color BJ cartridges or Photo/Color BJ cartridges. Be careful not to touch the nozzles when removing the tape, otherwise the nozzles may cause of nozzle clogging or mixing of inks. Do not shake the BJ cartridge after removing the head cap and tape, as shown in the figure below. Part 3: Operating Instructions BJC-6000 1.3.3 Installing the BJ cartridges This printer...
... be used with the Black, Color, and Photo BJ cartridges, in the following combinations : Black/Color BJ cartridges or Photo/Color BJ cartridges. Be careful not to touch the nozzles when removing the tape, otherwise the nozzles may cause of nozzle clogging or mixing of inks. Do not shake the BJ cartridge after removing the head cap and tape, as shown in the figure below. Part 3: Operating Instructions BJC-6000 1.3.3 Installing the BJ cartridges This printer...
Service Manual
Page 57
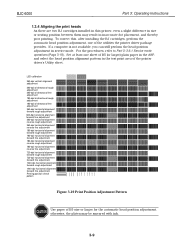
... with ink. 3-9 Set at least one of the printer driver's Utility sheet. BJC-6000 Part 3: Operating Instructions 1.3.4 Aligning the print heads As there are two BJ cartridges installed in this , after installing the BJ cartridges, perform the automatic head position adjustment, one sheet of B5 (or larger) plain paper in the ASF, and select the head position alignment pattern in the test print area of the utilities the printer driver package provides. For the procedures, refer to Part 3: 3.6.1 Service mode operations (Page 3-18). LED calibration...
... with ink. 3-9 Set at least one of the printer driver's Utility sheet. BJC-6000 Part 3: Operating Instructions 1.3.4 Aligning the print heads As there are two BJ cartridges installed in this , after installing the BJ cartridges, perform the automatic head position adjustment, one sheet of B5 (or larger) plain paper in the ASF, and select the head position alignment pattern in the test print area of the utilities the printer driver package provides. For the procedures, refer to Part 3: 3.6.1 Service mode operations (Page 3-18). LED calibration...
Service Manual
Page 58
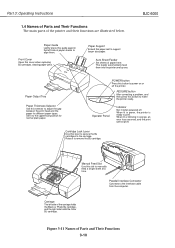
... Set it to print. When lit or blinking in green, the printer is ready to remove the BJ cartridge. RESUME button After correcting a problem, and then press this paper rest to manually feed a single sheet at a time. Part 3: Operating Instructions 1.4 Names of Parts and Their Functions The main parts of the carriage holds the Black or Photo BJ cartridge, and the right side holds the Color BJ cartridge. BJC-6000 Paper Guide Lightly press this slot to support larger size paper. Parallel Interface Connector Connects...
... Set it to print. When lit or blinking in green, the printer is ready to remove the BJ cartridge. RESUME button After correcting a problem, and then press this paper rest to manually feed a single sheet at a time. Part 3: Operating Instructions 1.4 Names of Parts and Their Functions The main parts of the carriage holds the Black or Photo BJ cartridge, and the right side holds the Color BJ cartridge. BJC-6000 Paper Guide Lightly press this slot to support larger size paper. Parallel Interface Connector Connects...

Service Manual
Page 60
...printer displays errors with the indicator lamp and buzzer. TABLE 3-1 ERROR INDICATIONS Errors Indicator [Recoverable by user] Paper feed error Paper jam Ink out BJ cartridge mis-installed No BJ cartridge BJ cartridge error Waste ink warning Auto head adjustment error Lights in Orange Lights in Orange Lights in Orange Lights in Orange Lights in Orange Lights in Orange Lights in Orange Lights in Orange Beeps 2 times 3 times 4 times 5 times 6 times 7 times 8 times 9 times Error Reference code page Page 5-25 Page 5-25 Page 5-27 Page 5-28 Page 5-28 Page 5-28 Page 5-29 [Unrecoverable by user...
...printer displays errors with the indicator lamp and buzzer. TABLE 3-1 ERROR INDICATIONS Errors Indicator [Recoverable by user] Paper feed error Paper jam Ink out BJ cartridge mis-installed No BJ cartridge BJ cartridge error Waste ink warning Auto head adjustment error Lights in Orange Lights in Orange Lights in Orange Lights in Orange Lights in Orange Lights in Orange Lights in Orange Lights in Orange Beeps 2 times 3 times 4 times 5 times 6 times 7 times 8 times 9 times Error Reference code page Page 5-25 Page 5-25 Page 5-27 Page 5-28 Page 5-28 Page 5-28 Page 5-29 [Unrecoverable by user...
Service Manual
Page 63
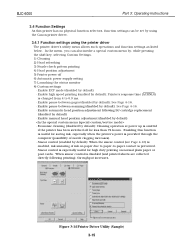
..., selecting Custom Settings. 1) Cleaning 2) Head refreshing 3) Nozzle check pattern printing 4) Head position adjustment 5) Printer power off 6) Automatic power supply setting 7) Launching the status monitor 8) Custom settings · Enable ECP mode (disabled by default) · Enable high speed printing (enabled by default): Printer's response time (ACKNLG) is changed from 4 to -paper contact is prevented. Smear control is especially useful for less than 72 hours. In the menu, you can be set by default): Cleaning operation at power up is omitted if the printer has been switched off for...
..., selecting Custom Settings. 1) Cleaning 2) Head refreshing 3) Nozzle check pattern printing 4) Head position adjustment 5) Printer power off 6) Automatic power supply setting 7) Launching the status monitor 8) Custom settings · Enable ECP mode (disabled by default) · Enable high speed printing (enabled by default): Printer's response time (ACKNLG) is changed from 4 to -paper contact is prevented. Smear control is especially useful for less than 72 hours. In the menu, you can be set by default): Cleaning operation at power up is omitted if the printer has been switched off for...
Service Manual
Page 64
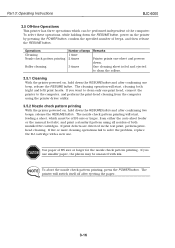
... head, connect the printer to solve the problem, replace the BJ cartridge with ink. The nozzle check pattern printing will start , cleaning both installed BJ cartridges. The cleaning operation will switch itself off after confirming one beep, release the RESUME button. If five or more cleaning operations fail to the computer, and perform the print-head cleaning from either the auto sheet feeder or the manual feed slot, and print a standard pattern using the printer driver utility. 3.5.2 Nozzle check pattern printing With the printer powered on , hold down the RESUME button, power...
... head, connect the printer to solve the problem, replace the BJ cartridge with ink. The nozzle check pattern printing will start , cleaning both installed BJ cartridges. The cleaning operation will switch itself off after confirming one beep, release the RESUME button. If five or more cleaning operations fail to the computer, and perform the print-head cleaning from either the auto sheet feeder or the manual feed slot, and print a standard pattern using the printer driver utility. 3.5.2 Nozzle check pattern printing With the printer powered on , hold down the RESUME button, power...
Service Manual
Page 68
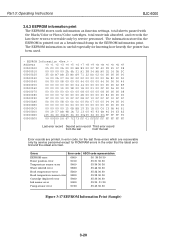
EEPROM Information - The EEPROM information is printed out as function settings, total sheets passed with the Black/Color or Photo/Color cartridges, total waste ink absorbed, and records the last three errors recoverable only by service personnel except for ROM/RAM errors in the order that the latest error first and the oldest error last. Address +0 +1 +2 +3 +4 +5 +6 +7 +8 +9 +A +B +C +D +E +F 00000000 05 20 00 0A 00 00 B8 83 00 0C...
EEPROM Information - The EEPROM information is printed out as function settings, total sheets passed with the Black/Color or Photo/Color cartridges, total waste ink absorbed, and records the last three errors recoverable only by service personnel except for ROM/RAM errors in the order that the latest error first and the oldest error last. Address +0 +1 +2 +3 +4 +5 +6 +7 +8 +9 +A +B +C +D +E +F 00000000 05 20 00 0A 00 00 B8 83 00 0C...
Service Manual
Page 69
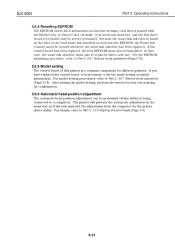
... the Black/Color or Photo/Color cartridge, total waste ink absorbed, and the last three errors recoverable only by service personnel. After setting the model setting, perform the service/factory test printing for different printers. BJC-6000 Part 3: Operating Instructions 3.6.4 Resetting EEPROM The EEPROM stores such information as if the user initiated the adjustment from the computer via the printer driver utility. If the control board has been replaced, the new EEPROM must be performed off-line (without being connected to set the mode setting...
... the Black/Color or Photo/Color cartridge, total waste ink absorbed, and the last three errors recoverable only by service personnel. After setting the model setting, perform the service/factory test printing for different printers. BJC-6000 Part 3: Operating Instructions 3.6.4 Resetting EEPROM The EEPROM stores such information as if the user initiated the adjustment from the computer via the printer driver utility. If the control board has been replaced, the new EEPROM must be performed off-line (without being connected to set the mode setting...
Service Manual
Page 74
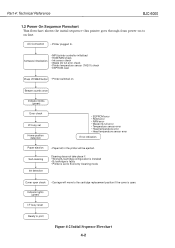
.../printer controller initialized • ROM/RAM check • Ink sensor check • Waste ink full error check • Printer temperature sensor (TH201) check • EEPROM read Press POWER button • Printer switched on -line. Indicator lights (green) I /F busy set to Economy Cleaning mode Cover open . Cleaning does not take place if: • Wrong BJ cartridge configuration is installed • BJ cartridge is faulty • Printer is open check • Carriage will be ejected. AC Connection • Printer plugged In. Part 4: Technical Reference BJC-6000 1.2 Power...
.../printer controller initialized • ROM/RAM check • Ink sensor check • Waste ink full error check • Printer temperature sensor (TH201) check • EEPROM read Press POWER button • Printer switched on -line. Indicator lights (green) I /F busy set to Economy Cleaning mode Cover open . Cleaning does not take place if: • Wrong BJ cartridge configuration is installed • BJ cartridge is faulty • Printer is open check • Carriage will be ejected. AC Connection • Printer plugged In. Part 4: Technical Reference BJC-6000 1.2 Power...
Service Manual
Page 85
... the installed cartridges, selected print media, printing quality, print data, etc. BJC-6000 Part 4: Technical Reference 2.2 Print Control 2.2.1 Print mode The printer adjusts the carriage action and paper feed action according to ensure high quality printing free from nozzle to nozzle will be automatically set to the normal (for speed) plain paper mode (1 path) with the Black BJ cartridge (160-nozzle) installed, the number of nozzles to be used for printing will be printed in lowdensity image areas with ink of 1/3 normal ink density (photo-cyan and photo magenta), printing with...
... the installed cartridges, selected print media, printing quality, print data, etc. BJC-6000 Part 4: Technical Reference 2.2 Print Control 2.2.1 Print mode The printer adjusts the carriage action and paper feed action according to ensure high quality printing free from nozzle to nozzle will be automatically set to the normal (for speed) plain paper mode (1 path) with the Black BJ cartridge (160-nozzle) installed, the number of nozzles to be used for printing will be printed in lowdensity image areas with ink of 1/3 normal ink density (photo-cyan and photo magenta), printing with...
Service Manual
Page 87
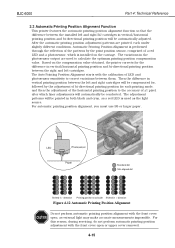
.... For automatic printing position alignment, you must use B5 or larger paper. Based on the carriage. The adjustment patterns will be automatically adjusted. Then the difference in vertical printing position between the left and right cartridges will be conducted. After the automatic printing position adjustment patterns are used as external light may make accurate measurements impossible. For this reason, during servicing, do not perform automatic printing position adjustment with the front cover open or upper cover removed...
.... For automatic printing position alignment, you must use B5 or larger paper. Based on the carriage. The adjustment patterns will be automatically adjusted. Then the difference in vertical printing position between the left and right cartridges will be conducted. After the automatic printing position adjustment patterns are used as external light may make accurate measurements impossible. For this reason, during servicing, do not perform automatic printing position adjustment with the front cover open or upper cover removed...
Service Manual
Page 88
... switch itself on the paper eject tray naturally. If, however, an error exists, paper is in temperature is detected, the printer sees this , when the head temperature sensor inside the bubble jet head detects a temperature higher than the specified range, overheat protection is open . Protection level 1: Prevents the user from touching the hot aluminum plate of time without receiving print data from moving to the cartridge replacement...
... switch itself on the paper eject tray naturally. If, however, an error exists, paper is in temperature is detected, the printer sees this , when the head temperature sensor inside the bubble jet head detects a temperature higher than the specified range, overheat protection is open . Protection level 1: Prevents the user from touching the hot aluminum plate of time without receiving print data from moving to the cartridge replacement...
Service Manual
Page 127
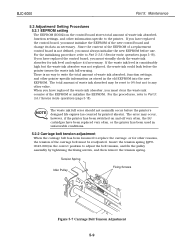
... waste ink level is not defined, you must visually check the waste ink absorber for other reasons, the tension of the carriage belt must always initialize the new EEPROM before the printer issues the waste ink full warning. When you have replaced the control board, you must be reset to adjust the belt tension, and fix the pulley assembly by printed sheets). For the procedures, refer to Part 3: 3.6.1 Service mode operations (page...
... waste ink level is not defined, you must visually check the waste ink absorber for other reasons, the tension of the carriage belt must always initialize the new EEPROM before the printer issues the waste ink full warning. When you have replaced the control board, you must be reset to adjust the belt tension, and fix the pulley assembly by printed sheets). For the procedures, refer to Part 3: 3.6.1 Service mode operations (page...
Service Manual
Page 131
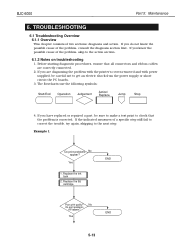
... are correctly connected. 2. If the indicated measures of two sections: diagnosis and action. No Do print problems still appear? If you have replaced or repaired a part, be sure to make a test print to check that all connectors and ribbon cables are diagnosing the problem with the printer's covers removed and with power supplied, be careful not to the action section. 6.1.2 Notes on troubleshooting 1. BJC-6000 Part 5: Maintenance 6. The flowcharts use the following symbols: Start/End...
... are correctly connected. 2. If the indicated measures of two sections: diagnosis and action. No Do print problems still appear? If you have replaced or repaired a part, be sure to make a test print to check that all connectors and ribbon cables are diagnosing the problem with the printer's covers removed and with power supplied, be careful not to the action section. 6.1.2 Notes on troubleshooting 1. BJC-6000 Part 5: Maintenance 6. The flowcharts use the following symbols: Start/End...


