Users Manual - English
Page 3
...Guidelines for printing on both sides of the paper 20 Automatic duplex printing (HL-2240D / HL-2242D / HL-2250DN / HL-2270DW only 21 Manual duplex printing ...22 2 Driver and Software 23 Printer ...Windows® ...51 Printer driver for Macintosh ...51 Software ...52 Software for networks (HL-2250DN / HL-2270DW only 52 Remote Printer Console (For Windows® only 52 3 Control Panel 53...test page ...61 Print a Printer Settings page...62 Print Fonts (HL-2250DN / HL-2270DW only 63 Print a WLAN report (HL-2270DW only 64 Default settings...64 4 Routine Maintenance 66 Replacing consumable...
...Guidelines for printing on both sides of the paper 20 Automatic duplex printing (HL-2240D / HL-2242D / HL-2250DN / HL-2270DW only 21 Manual duplex printing ...22 2 Driver and Software 23 Printer ...Windows® ...51 Printer driver for Macintosh ...51 Software ...52 Software for networks (HL-2250DN / HL-2270DW only 52 Remote Printer Console (For Windows® only 52 3 Control Panel 53...test page ...61 Print a Printer Settings page...62 Print Fonts (HL-2250DN / HL-2270DW only 63 Print a WLAN report (HL-2270DW only 64 Default settings...64 4 Routine Maintenance 66 Replacing consumable...

Users Manual - English
Page 57
... off. 3 Control Panel 3 LEDs (Light Emitting Diodes) 3 This section refers to four LEDs Toner, Drum, Error, Ready and Go button on the control panel. 1 Toner LED 3 1 The Toner LED indicates that the Toner is low. 2 Drum LED 2 The Drum LED indicates that the Drum will need to be replaced soon. 3 3 Error LED The Error LED indicates when the...
... off. 3 Control Panel 3 LEDs (Light Emitting Diodes) 3 This section refers to four LEDs Toner, Drum, Error, Ready and Go button on the control panel. 1 Toner LED 3 1 The Toner LED indicates that the Toner is low. 2 Drum LED 2 The Drum LED indicates that the Drum will need to be replaced soon. 3 3 Error LED The Error LED indicates when the...

Users Manual - English
Page 59
... on for 2 seconds and off for when REPLACE TONER is not installed correctly. Buy a new toner cartridge and have it back in. CARTRIDGE ERROR The drum unit assembly is indicated. Control Panel LEDs Machine Status TONER LOW The toner cartridge will turn on page 71 55 REPLACE TONER (Continue mode) The machine continues printing until the...
... on for 2 seconds and off for when REPLACE TONER is not installed correctly. Buy a new toner cartridge and have it back in. CARTRIDGE ERROR The drum unit assembly is indicated. Control Panel LEDs Machine Status TONER LOW The toner cartridge will turn on page 71 55 REPLACE TONER (Continue mode) The machine continues printing until the...
Users Manual - English
Page 62
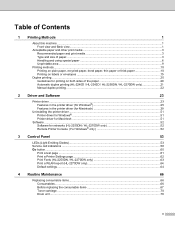
... 3 If there is an error that cannot be cleared by lighting up as shown below. 3 If you see the service call your dealer or Brother Customer Service. 58 If the error is needed by the user, the machine will light up all the LEDs as shown in the table below...again. Make a note of the indication, referring to your dealer or Brother Customer Service. If the error occurs again, call indication shown above, turn it back on and try to identify the error. LED error indication LEDs Main PCB failure Toner Drum Error Ready Fuser unit failure 1 Laser unit Main motor High voltage...
... 3 If there is an error that cannot be cleared by lighting up as shown below. 3 If you see the service call your dealer or Brother Customer Service. 58 If the error is needed by the user, the machine will light up all the LEDs as shown in the table below...again. Make a note of the indication, referring to your dealer or Brother Customer Service. If the error occurs again, call indication shown above, turn it back on and try to identify the error. LED error indication LEDs Main PCB failure Toner Drum Error Ready Fuser unit failure 1 Laser unit Main motor High voltage...
Users Manual - English
Page 65
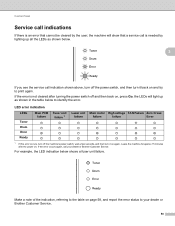
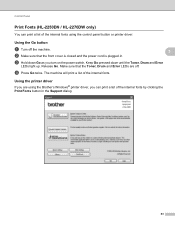
... that the front cover is closed and the power cord is plugged in the General tab of the printer driver. 61 c Hold down until the Toner, Drum and Error LEDs light up. Release Go. d Press Go again. Keep Go pressed down Go as you are off the machine. 3 b Make sure that the... Toner, Drum and Error LEDs are using the Windows® printer driver, click the Print Test Page button in . Using the printer driver 3 If you turn on ...
... that the front cover is closed and the power cord is plugged in the General tab of the printer driver. 61 c Hold down until the Toner, Drum and Error LEDs light up. Release Go. d Press Go again. Keep Go pressed down Go as you are off the machine. 3 b Make sure that the... Toner, Drum and Error LEDs are using the Windows® printer driver, click the Print Test Page button in . Using the printer driver 3 If you turn on ...
Users Manual - English
Page 67
...3 b Make sure that the Toner, Drum and Error LEDs are using the control panel button or printer driver. Using the Go button 3 a Turn off . Control Panel Print Fonts (HL-2250DN / HL-2270DW only) 3 You can print a list of the internal fonts using the Brother's Windows® printer driver, ...you can print a list of the internal fonts. c Hold down until the Toner, Drum and Error LEDs light up. Make sure that the...
...3 b Make sure that the Toner, Drum and Error LEDs are using the control panel button or printer driver. Using the Go button 3 a Turn off . Control Panel Print Fonts (HL-2250DN / HL-2270DW only) 3 You can print a list of the internal fonts using the Brother's Windows® printer driver, ...you can print a list of the internal fonts. c Hold down until the Toner, Drum and Error LEDs light up. Make sure that the...

Users Manual - English
Page 70
4 Routine Maintenance 4 You will need to clean the machine regularly and replace the consumable items. Replacing consumable items 4 The machine will indicate when it is time to replace the consumable items. (See LEDs (Light Emitting Diodes) on page 53) 4 Consumables 4 Toner cartridge See Toner cartridge on page 70 Order No.TN-420, TN-450 Drum unit See Drum unit on page 76. Order No.DR-420 66
4 Routine Maintenance 4 You will need to clean the machine regularly and replace the consumable items. Replacing consumable items 4 The machine will indicate when it is time to replace the consumable items. (See LEDs (Light Emitting Diodes) on page 53) 4 Consumables 4 Toner cartridge See Toner cartridge on page 70 Order No.TN-420, TN-450 Drum unit See Drum unit on page 76. Order No.DR-420 66

Users Manual - English
Page 72
...toner cartridge provided with cold water at once. • To prevent damage to the machine from the Brother machine, we strongly recommend the use of potentially incompatible toner and/or cartridges in the Brother... machine may cause damage to use of unauthorized third party toner ... in case you accidentally spill or scatter toner. • Handle the toner cartridge carefully. Routine Maintenance IMPORTANT • Brother strongly recommends that you clean the machine when...
...toner cartridge provided with cold water at once. • To prevent damage to the machine from the Brother machine, we strongly recommend the use of potentially incompatible toner and/or cartridges in the Brother... machine may cause damage to use of unauthorized third party toner ... in case you accidentally spill or scatter toner. • Handle the toner cartridge carefully. Routine Maintenance IMPORTANT • Brother strongly recommends that you clean the machine when...

Users Manual - English
Page 73
... a suitable bag so that you use only genuine Brother toner cartridges. If drum unit is exposed to the brother collection program. If you have questions, call your dealer. 69 If toner cartridges are left unpacked for instructions on how to return the used toner cartridge according to http://www.brother.com/original/index.html for a long time...
... a suitable bag so that you use only genuine Brother toner cartridges. If drum unit is exposed to the brother collection program. If you have questions, call your dealer. 69 If toner cartridges are left unpacked for instructions on how to return the used toner cartridge according to http://www.brother.com/original/index.html for a long time...
Users Manual - English
Page 74
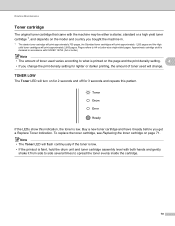
... • The amount of toner used varies according to A4 or Letter-size single-sided pages. Note • The Toner LED will change the print density setting for 3 seconds and repeats this indication, the toner is faint, hold the drum unit and toner cartridge assembly level with the machine... may be either a starter, standard or a high yield toner cartridge 1, and depends on page 71. If the LEDs show this pattern...
... • The amount of toner used varies according to A4 or Letter-size single-sided pages. Note • The Toner LED will change the print density setting for 3 seconds and repeats this indication, the toner is faint, hold the drum unit and toner cartridge assembly level with the machine... may be either a starter, standard or a high yield toner cartridge 1, and depends on page 71. If the LEDs show this pattern...
Users Manual - English
Page 75
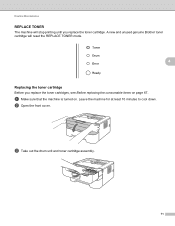
Leave the machine for at least 10 minutes to cool down. b Open the front cover. Routine Maintenance REPLACE TONER 4 The machine will reset the REPLACE TONER mode. 4 Replacing the toner cartridge 4 Before you replace the toner cartridge. c Take out the drum unit and toner cartridge assembly. 71 a Make sure that the machine is turned on page 67. A new and unused genuine Brother toner cartridge will stop printing until you replace the toner cartridges, see Before replacing the consumable items on .
Leave the machine for at least 10 minutes to cool down. b Open the front cover. Routine Maintenance REPLACE TONER 4 The machine will reset the REPLACE TONER mode. 4 Replacing the toner cartridge 4 Before you replace the toner cartridge. c Take out the drum unit and toner cartridge assembly. 71 a Make sure that the machine is turned on page 67. A new and unused genuine Brother toner cartridge will stop printing until you replace the toner cartridges, see Before replacing the consumable items on .

Users Manual - English
Page 76
Hold the cartridge level with both hands and gently shake it from side to side several times to spread the toner evenly inside the cartridge. 72 Routine Maintenance d Push down the green lock lever and take the toner cartridge out of the drum unit. 4 e Unpack the new toner cartridge.
Hold the cartridge level with both hands and gently shake it from side to side several times to spread the toner evenly inside the cartridge. 72 Routine Maintenance d Push down the green lock lever and take the toner cartridge out of the drum unit. 4 e Unpack the new toner cartridge.

Users Manual - English
Page 77
If you put it lock into the drum unit until you hear it in properly, the green lock lever will lift automatically. 73 Routine Maintenance f Pull off the protective cover. 4 g Put the new toner cartridge firmly into place.
If you put it lock into the drum unit until you hear it in properly, the green lock lever will lift automatically. 73 Routine Maintenance f Pull off the protective cover. 4 g Put the new toner cartridge firmly into place.

Users Manual - English
Page 78
Close the front cover. Routine Maintenance h Clean the primary corona wire inside the drum unit by gently sliding the green tab from right to left and left to right several times. 4 1 Note Be sure to return the tab to the home position (a) (1). Note DO NOT turn off the machine's power switch or open the front cover until the Ready LED lights up. 74 If you do not, printed pages may have a vertical stripe. i Put the drum unit and toner cartridge assembly back into the machine.
Close the front cover. Routine Maintenance h Clean the primary corona wire inside the drum unit by gently sliding the green tab from right to left and left to right several times. 4 1 Note Be sure to return the tab to the home position (a) (1). Note DO NOT turn off the machine's power switch or open the front cover until the Ready LED lights up. 74 If you do not, printed pages may have a vertical stripe. i Put the drum unit and toner cartridge assembly back into the machine.
Users Manual - English
Page 80
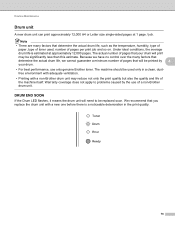
...as the temperature, humidity, type of paper, type of a non-Brother drum unit. The machine should be replaced soon. Because we have no control over the many factors that your drum. • For best performance, use of toner used only in the print quality. 76 free environment with adequate ...the print quality but also the quality and life of pages that you replace the drum unit with a non-Brother drum unit may be printed by the use only genuine Brother toner. Under ideal conditions, the average drum life is a noticeable deterioration in a clean, dust- We recommend that will ...
...as the temperature, humidity, type of paper, type of a non-Brother drum unit. The machine should be replaced soon. Because we have no control over the many factors that your drum. • For best performance, use of toner used only in the print quality. 76 free environment with adequate ...the print quality but also the quality and life of pages that you replace the drum unit with a non-Brother drum unit may be printed by the use only genuine Brother toner. Under ideal conditions, the average drum life is a noticeable deterioration in a clean, dust- We recommend that will ...

Users Manual - English
Page 82
b Open the front cover. 4 c Take out the drum unit and toner cartridge assembly. 78 When you replace the drum unit with a new one, you replace the drum unit, see Before replacing the consumable items on and the Drum LED is turned on page 67. Leave the machine for at least 10 minutes to reset the drum counter by completing the following steps: a Make sure that the machine is flashing. Routine Maintenance Replacing the drum unit 4 Before you need to cool down.
b Open the front cover. 4 c Take out the drum unit and toner cartridge assembly. 78 When you replace the drum unit with a new one, you replace the drum unit, see Before replacing the consumable items on and the Drum LED is turned on page 67. Leave the machine for at least 10 minutes to reset the drum counter by completing the following steps: a Make sure that the machine is flashing. Routine Maintenance Replacing the drum unit 4 Before you need to cool down.

Users Manual - English
Page 83
Routine Maintenance d Push down the green lock lever and take the toner cartridge out of the drum unit. 4 e Unpack the new drum unit. 79
Routine Maintenance d Push down the green lock lever and take the toner cartridge out of the drum unit. 4 e Unpack the new drum unit. 79

Users Manual - English
Page 84
Do not close the front cover yet. 80 Routine Maintenance f Put the toner cartridge firmly into the new drum unit until you put the cartridge in properly, the green lock lever will lift automatically. 4 g Put the drum unit and toner cartridge assembly back into place. If you hear it lock into the machine.
Do not close the front cover yet. 80 Routine Maintenance f Put the toner cartridge firmly into the new drum unit until you put the cartridge in properly, the green lock lever will lift automatically. 4 g Put the drum unit and toner cartridge assembly back into place. If you hear it lock into the machine.
Users Manual - English
Page 85
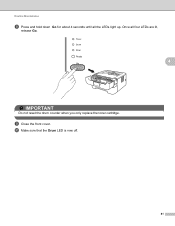
j Make sure that the Drum LED is now off. 81 i Close the front cover. Routine Maintenance h Press and hold down Go for about 4 seconds until all four LEDs are lit, release Go. 4 IMPORTANT Do not reset the drum counter when you only replace the toner cartridge. Once all the LEDs light up.
j Make sure that the Drum LED is now off. 81 i Close the front cover. Routine Maintenance h Press and hold down Go for about 4 seconds until all four LEDs are lit, release Go. 4 IMPORTANT Do not reset the drum counter when you only replace the toner cartridge. Once all the LEDs light up.
Quick Setup Guide - English
Page 1
...Toner Drum Error Ready User's Guide Printer LED Toner Drum Error Ready TONER LOW3 Chapter 4 COVER OPEN PAPER JAM2 REPLACE TONER4 TONER ENDED DRUM END SOON3 Chapter 4 Chapter 4 Chapter 4 NO PAPER DRUM ERROR2 DRUM STOP REPLACE DRUM...ON and OFF at http://www.brother.com/original/ or contact your ...toner setting to an AC power outlet. Note For Legal or Folio size paper, press the release button in the User's Guide. Fan the stack of the paper so it to the continue mode. Over filling the paper tray will feed properly. Quick Setup Guide HL-2230, HL-2240, HL-2240D HL-2242D, HL...
...Toner Drum Error Ready User's Guide Printer LED Toner Drum Error Ready TONER LOW3 Chapter 4 COVER OPEN PAPER JAM2 REPLACE TONER4 TONER ENDED DRUM END SOON3 Chapter 4 Chapter 4 Chapter 4 NO PAPER DRUM ERROR2 DRUM STOP REPLACE DRUM...ON and OFF at http://www.brother.com/original/ or contact your ...toner setting to an AC power outlet. Note For Legal or Folio size paper, press the release button in the User's Guide. Fan the stack of the paper so it to the continue mode. Over filling the paper tray will feed properly. Quick Setup Guide HL-2230, HL-2240, HL-2240D HL-2242D, HL...


