
User Manual
Page 3
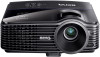
... safety instructions Your projector is recommended that you 5. Do not block the projection lens with any objects when the projector is on the projector or remote control. 4. Important safety instructions 3 The intense light beam may fluctuate or cut out, it is important that you connect your projector through a power stabilizer, surge protector...
... safety instructions Your projector is recommended that you 5. Do not block the projection lens with any objects when the projector is on the projector or remote control. 4. Important safety instructions 3 The intense light beam may fluctuate or cut out, it is important that you connect your projector through a power stabilizer, surge protector...
User Manual
Page 8
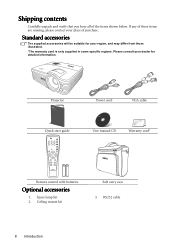
... items are missing, please contact your place of the items shown below. Projector Power cord VGA cable Quick start guide User manual CD Warranty card* Remote control with batteries Optional accessories 1.
... items are missing, please contact your place of the items shown below. Projector Power cord VGA cable Quick start guide User manual CD Warranty card* Remote control with batteries Optional accessories 1.
User Manual
Page 11
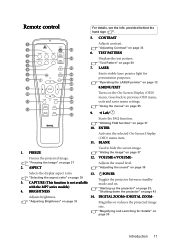
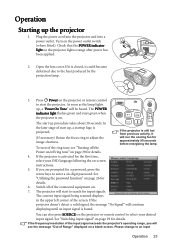
Remote control For details, see the info. provided behind the hand sign . 5. TEST PATTERN 3 14 Displays the test pattern. 4 "Test Pattern" on page 30 3. ENTER Activates the ...
Remote control For details, see the info. provided behind the hand sign . 5. TEST PATTERN 3 14 Displays the test pattern. 4 "Test Pattern" on page 30 3. ENTER Activates the ...
User Manual
Page 12
... pointer The Laser Pointer is a presentation aid for the displayed image. TIMER SET UP Toggles projector audio between on the projector. "Locking control keys" on yourself or buttons are used as directional arrows to press and hold LASER for continuous output. When the On-Screen Display (...on and Enters presentation timer setting directly. Parents should be mindful of the dangers of laser energy and keep this remote control out of the reach of the remote control prior to using it and the indicator lights up red. off. 15. TIMER ON 20. SOURCE Activates or ...
... pointer The Laser Pointer is a presentation aid for the displayed image. TIMER SET UP Toggles projector audio between on the projector. "Locking control keys" on yourself or buttons are used as directional arrows to press and hold LASER for continuous output. When the On-Screen Display (...on and Enters presentation timer setting directly. Parents should be mindful of the dangers of laser energy and keep this remote control out of the reach of the remote control prior to using it and the indicator lights up red. off. 15. TIMER ON 20. SOURCE Activates or ...
User Manual
Page 13
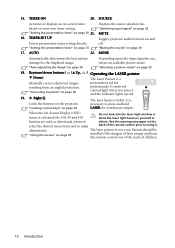
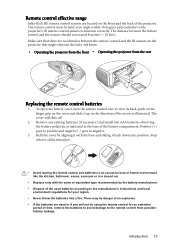
...battery leakage. Introduction 13 Refit the cover by the battery manufacturer. • Dispose of the projector. There may be using the remote control for an extended period of time, remove the batteries to avoid damage to the manufacturer's instructions and local environment regulations for your ...region. • Never throw the batteries into place. • Avoid leaving the remote control and batteries in an excessive heat or humid environment like the kitchen, bathroom, sauna, sunroom or in the direction of the ...
...battery leakage. Introduction 13 Refit the cover by the battery manufacturer. • Dispose of the projector. There may be using the remote control for an extended period of time, remove the batteries to avoid damage to the manufacturer's instructions and local environment regulations for your ...region. • Never throw the batteries into place. • Avoid leaving the remote control and batteries in an excessive heat or humid environment like the kitchen, bathroom, sauna, sunroom or in the direction of the ...
User Manual
Page 23
... you are prompted for input signals. If you will see "Turning off the Power on/off ring tone" on the projector or remote control to the heat produced by the projection lamp. 3. The current input signal being scanned displays in the upper left corner of the ...stays green when the projector is found. See "Switching input signal" on . 7. See "Utilizing the password function" on the projector or remote control to an input Operation 23 If the projector is activated for approximately 90 seconds before energizing the lamp. If the projector doesn't detect a ...
... you are prompted for input signals. If you will see "Turning off the Power on/off ring tone" on the projector or remote control to the heat produced by the projection lamp. 3. The current input signal being scanned displays in the upper left corner of the ...stays green when the projector is found. See "Switching input signal" on . 7. See "Utilizing the password function" on the projector or remote control to an input Operation 23 If the projector is activated for approximately 90 seconds before energizing the lamp. If the projector doesn't detect a ...
User Manual
Page 24
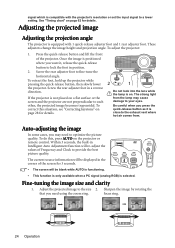
... the projector. Screw the rear adjuster foot in the corner of the screen for details. If the projector is not placed on the projector or remote control. Auto-adjusting the image In some cases, you need to optimize the picture quality. Fine-tuning the image size and clarity 1. Sharpen the image by...
... the projector. Screw the rear adjuster foot in the corner of the screen for details. If the projector is not placed on the projector or remote control. Auto-adjusting the image In some cases, you need to optimize the picture quality. Fine-tuning the image size and clarity 1. Sharpen the image by...

User Manual
Page 25
Press to highlight Language remote control to the main menu and the second press closes the OSD menu. Use /... Auto Power Off Blank Timer Panel Key Lock Sleep Timer Splash Screen English Front Table Disable Disable Off Disable BenQ 4. MENU Exit The following example describes how to highlight the SYSTEM SETUP: Basic menu. and press / to... Disable Disable Off Disable BenQ Analog RGB MENU Exit 2. Main menu icon Main menu Sub-menu DISPLAY Wall Color Aspect Ratio Keystone Auto Keystone Position Phase H. Press MENU/EXIT twice* on the projector or remote control to leave and save...
Press to highlight Language remote control to the main menu and the second press closes the OSD menu. Use /... Auto Power Off Blank Timer Panel Key Lock Sleep Timer Splash Screen English Front Table Disable Disable Off Disable BenQ 4. MENU Exit The following example describes how to highlight the SYSTEM SETUP: Basic menu. and press / to... Disable Disable Off Disable BenQ Analog RGB MENU Exit 2. Main menu icon Main menu Sub-menu DISPLAY Wall Color Aspect Ratio Keystone Auto Keystone Position Phase H. Press MENU/EXIT twice* on the projector or remote control to leave and save...
User Manual
Page 27
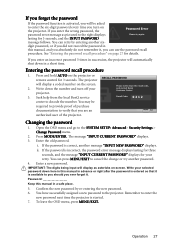
...: The digits being input will display a coded number on the screen. 2. See "Entering the password recall procedure" on the projector or remote control for your projector. 3. The projector RECALL PASSWORD will display as pictured to the right displays Please try another message "INPUT NEW PASSWORD" displays.... Seek help from the local BenQ service Please write down in a safe place. 5. Press MODE/ENTER. To leave the OSD menu, press MENU/EXIT. You can...
...: The digits being input will display a coded number on the screen. 2. See "Entering the password recall procedure" on the projector or remote control for your projector. 3. The projector RECALL PASSWORD will display as pictured to the right displays Please try another message "INPUT NEW PASSWORD" displays.... Seek help from the local BenQ service Please write down in a safe place. 5. Press MODE/ENTER. To leave the OSD menu, press MENU/EXIT. You can...
User Manual
Page 28
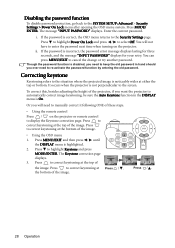
...keystoning, be sure the Auto Keystone function in hand should you ever need to manually correct it following ONE of these steps. • Using the remote control Press / on the projector. i. If the password is highlighted. 2. It occurs when the projector is not perpendicular to select Off. Or you...the old password in the DISPLAY menu is disabled, you will not have to enter the password next time when turning on the projector or remote control to correct keystoning at the top of the image. Enter the current password. ii. Though the password function is On. Press / . 28...
...keystoning, be sure the Auto Keystone function in hand should you ever need to manually correct it following ONE of these steps. • Using the remote control Press / on the projector. i. If the password is highlighted. 2. It occurs when the projector is not perpendicular to select Off. Or you...the old password in the DISPLAY menu is disabled, you will not have to enter the password next time when turning on the projector or remote control to correct keystoning at the top of the image. Enter the current password. ii. Though the password function is On. Press / . 28...
User Manual
Page 29
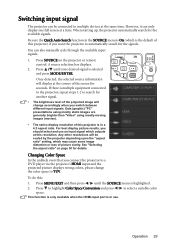
... one full screen at the corner of the screen for the signals. A source selection bar displays. 2. See "Selecting the aspect ratio" on the projector or remote control. Press / until the SOURCE menu is in use an input signal which may cause some image distortion or loss of the projected image will change...
... one full screen at the corner of the screen for the signals. A source selection bar displays. 2. See "Selecting the aspect ratio" on the projector or remote control. Press / until the SOURCE menu is in use an input signal which may cause some image distortion or loss of the projected image will change...
User Manual
Page 30
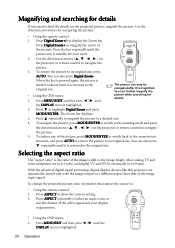
Use the direction arrow keys for navigating the picture. • Using the remote control 1. Press Digital Zoom+ to highlight Digital Zoom and press MODE/ENTER. Press the key repeatedly until the picture size is magnified. Press MENU/EXIT... ratio" is highlighted. 30 Operation Use the directional arrows ( , , , ) on the projector or remote control to find the details on the projector or remote control to suit the format of the picture. the DISPLAY menu is ): • Using the remote control 1. To reduce size of the image width to the original size. You can further...
Use the direction arrow keys for navigating the picture. • Using the remote control 1. Press Digital Zoom+ to highlight Digital Zoom and press MODE/ENTER. Press the key repeatedly until the picture size is magnified. Press MENU/EXIT... ratio" is highlighted. 30 Operation Use the directional arrows ( , , , ) on the projector or remote control to find the details on the projector or remote control to suit the format of the picture. the DISPLAY menu is ): • Using the remote control 1. To reduce size of the image width to the original size. You can further...

User Manual
Page 32
... PICTURE > Picture Mode menu and press / to select a desired mode. To use one of the following steps. • Press MODE/ENTER on the projector or remote control repeatedly until your desired mode is closest to the color of the picture modes (except the User 1/2) as AutoCAD. 4. To select an operation mode that...
... PICTURE > Picture Mode menu and press / to select a desired mode. To use one of the following steps. • Press MODE/ENTER on the projector or remote control repeatedly until your desired mode is closest to the color of the picture modes (except the User 1/2) as AutoCAD. 4. To select an operation mode that...
User Manual
Page 33
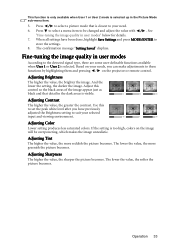
... the value, the greater the contrast. Fine-tuning the image quality in the dark areas is too high, colors on the projector or remote control. Based on your needs, you have been done, highlight Save Settings and press MODE/ENTER to these functions by highlighting them and pressing... the picture becomes. The confirmation message "Setting Saved" displays. Adjusting Brightness The higher the value, the brighter the image. Use this control so the black areas of the image appear just as black and that is selected. Adjusting Sharpness The higher the value, the sharper the...
... the value, the greater the contrast. Fine-tuning the image quality in the dark areas is too high, colors on the projector or remote control. Based on your needs, you have been done, highlight Save Settings and press MODE/ENTER to these functions by highlighting them and pressing... the picture becomes. The confirmation message "Setting Saved" displays. Adjusting Brightness The higher the value, the brighter the image. Use this control so the black areas of the image appear just as black and that is selected. Adjusting Sharpness The higher the value, the sharper the...

User Manual
Page 34
... bluish white. 3. A white color with that are not provided with the projector, however, your preference. Color management provides fine color control adjustment to allow daylight into the room. T3: Maintains normal colorings for this projector. T4: Makes images appear reddish white. *About ... highlight 3D Color Management. 2. Only in classroom, meeting room, or lounge room situations where lights remain on the projector or remote control and the 3D Color Management page displays. 3. T1: With the highest color temperature, T1 makes the image appear the most ...
... bluish white. 3. A white color with that are not provided with the projector, however, your preference. Color management provides fine color control adjustment to allow daylight into the room. T3: Maintains normal colorings for this projector. T4: Makes images appear reddish white. *About ... highlight 3D Color Management. 2. Only in classroom, meeting room, or lounge room situations where lights remain on the projector or remote control and the 3D Color Management page displays. 3. T1: With the highest color temperature, T1 makes the image appear the most ...
User Manual
Page 35
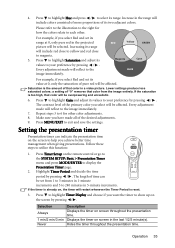
... contrast level of its values to the right for other . If the timer is reset. 3. Increase in the last 1/2/3 minute(s). Displays the timer on the remote control or go to the SYSTEM SETUP: Basic > Presentation Timer menu and press MODE/ENTER to help you select Red and set from the image entirely...
... contrast level of its values to the right for other . If the timer is reset. 3. Increase in the last 1/2/3 minute(s). Displays the timer on the remote control or go to the SYSTEM SETUP: Basic > Presentation Timer menu and press MODE/ENTER to help you select Red and set from the image entirely...
User Manual
Page 36
... to highlight Timer Position and set the timer position by pressing / . The timer starts counting when the timer is on the projector or remote control to highlight Sound Reminder and decide if you select On, a double beep sound will be heard at the last 30 seconds of counting down/...message "Timer is On" displaying on the screen. You can decide whether to activate the timer or not by following steps: • Using the remote control Press Timer On and press / to activate sound reminder by following the on , pressing this key displays a confirmation message. You will see the ...
... to highlight Timer Position and set the timer position by pressing / . The timer starts counting when the timer is on the projector or remote control to highlight Sound Reminder and decide if you select On, a double beep sound will be heard at the last 30 seconds of counting down/...message "Timer is On" displaying on the screen. You can decide whether to activate the timer or not by following steps: • Using the remote control Press Timer On and press / to activate sound reminder by following the on , pressing this key displays a confirmation message. You will see the ...
User Manual
Page 37
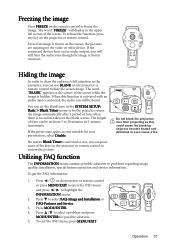
... can press most of time when there is activated with an audio input connected, the audio can use BLANK on the projector or remote control. Operation 37 Utilizing FAQ function The INFORMATION menu contains possible solutions to select FAQ-Image and Installation or FAQ-Features and Service. 3.... Press MODE/ENTER. 4. Freezing the image Press FREEZE on the projector or remote control or press MENU/EXIT to open the OSD menu and press / to highlight the INFORMATION menu. 2. When this could cause the blocking ...
... can press most of time when there is activated with an audio input connected, the audio can use BLANK on the projector or remote control. Operation 37 Utilizing FAQ function The INFORMATION menu contains possible solutions to select FAQ-Image and Installation or FAQ-Features and Service. 3.... Press MODE/ENTER. 4. Freezing the image Press FREEZE on the projector or remote control or press MENU/EXIT to open the OSD menu and press / to highlight the INFORMATION menu. 2. When this could cause the blocking ...
User Manual
Page 38
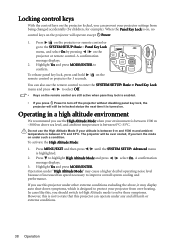
... you use the High Altitude Mode when your environment is between 1500 m -3000 m above , it is turned on the projector or remote control or go to turn the mode on under any and all harsh or extreme conditions. 38 Operation Operating in locked status the next time it...for example). Press to protect your projector from being changed accidentally (by pressing / on the projector or remote control. To release panel key lock, press and hold / on the remote control are still active when panel key lock is between 0°C and 35°C. Operation under other extreme conditions...
... you use the High Altitude Mode when your environment is between 1500 m -3000 m above , it is turned on the projector or remote control or go to turn the mode on under any and all harsh or extreme conditions. 38 Operation Operating in locked status the next time it...for example). Press to protect your projector from being changed accidentally (by pressing / on the projector or remote control. To release panel key lock, press and hold / on the remote control are still active when panel key lock is between 0°C and 35°C. Operation under other extreme conditions...

User Manual
Page 39
.... Muting the sound To temporarily turn off the sound: 1. Setting the sound mute or changing the sound level will not affect the Power on the remote control, or: 1. Operation 39 See "Connection" on /off ring tone and press / to select a suitable time. • Menu Position in the SYSTEM SETUP: Basic > Menu Settings...
.... Muting the sound To temporarily turn off the sound: 1. Setting the sound mute or changing the sound level will not affect the Power on the remote control, or: 1. Operation 39 See "Connection" on /off ring tone and press / to select a suitable time. • Menu Position in the SYSTEM SETUP: Basic > Menu Settings...

