User Manual
Page 2
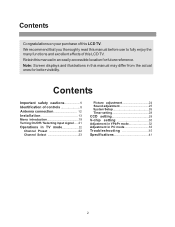
... connection 12 Installation 13 Menu introduction 19 Turning On/Off / Selecting input signal......21 Operations in TV mode 22 Channel Preset 22 Channel Select 23 Picture adjustment 24 Sound adjustment 25 System Setup 26 Timer setting 28 CCD setting 29 V-chip setting 30 Adjustment in YPbPr mode 32 Adjustment in PC...
... connection 12 Installation 13 Menu introduction 19 Turning On/Off / Selecting input signal......21 Operations in TV mode 22 Channel Preset 22 Channel Select 23 Picture adjustment 24 Sound adjustment 25 System Setup 26 Timer setting 28 CCD setting 29 V-chip setting 30 Adjustment in YPbPr mode 32 Adjustment in PC...
User Manual
Page 10
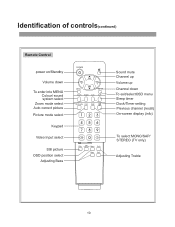
Identification of controls(continued) Remote Control power on/Standby Volume down To enter into MENU Colour/ sound system select Zoom mode select Auto correct picture Picture mode select Keypad Video Input select Still picture OSD position select Adjusting Bass Sound mute Channel up Volume up Channel down To exit/selectOSD menu Sleep timer Clock/Timer setting Previous channel (recall) On-screen display (info) To select MONO/SAP/ STEREO (TV only) Adjusting Treble 10
Identification of controls(continued) Remote Control power on/Standby Volume down To enter into MENU Colour/ sound system select Zoom mode select Auto correct picture Picture mode select Keypad Video Input select Still picture OSD position select Adjusting Bass Sound mute Channel up Volume up Channel down To exit/selectOSD menu Sleep timer Clock/Timer setting Previous channel (recall) On-screen display (info) To select MONO/SAP/ STEREO (TV only) Adjusting Treble 10
User Manual
Page 19
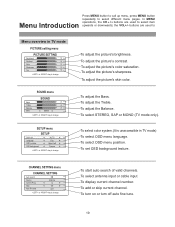
... Eng Upper Left Opaque or key to select item upwards or downwards; To turn on or turn off auto fine tune. 19 To adjust the picture's skin color. To select STEREO, SAP or MONO (TV mode only). In MENU operations, the CH5/6buttons are used to change To adjust the... picture's brightness. To select OSD menu position. To adjust the picture's contrast. To select antenna input or cable input To display current channel number. buttons are used to Menu overview in TV...
... Eng Upper Left Opaque or key to select item upwards or downwards; To turn on or turn off auto fine tune. 19 To adjust the picture's skin color. To select STEREO, SAP or MONO (TV mode only). In MENU operations, the CH5/6buttons are used to change To adjust the... picture's brightness. To select OSD menu position. To adjust the picture's contrast. To select antenna input or cable input To display current channel number. buttons are used to Menu overview in TV...

User Manual
Page 22
... Antenna 12 ON OFF or key to confirm or adjust selected item. During the process of inferior broadcast conditions where adjustment is necessary for a better picture and sound, use Fine tuning. Enter into CHANNEL SETTING menu and select Source item. Press VOL+ button to select ON to change Auto Search Please...
... Antenna 12 ON OFF or key to confirm or adjust selected item. During the process of inferior broadcast conditions where adjustment is necessary for a better picture and sound, use Fine tuning. Enter into CHANNEL SETTING menu and select Source item. Press VOL+ button to select ON to change Auto Search Please...
User Manual
Page 24
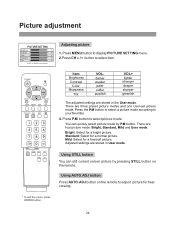
... AUTO.ADJ button Press AUTO.ADJ button on the remote. Press the P.M button to select a picture mode according to select picture mode. You can still current screen picture by P.M button. Mild: Select for best viewing. * To exit the menu, press ENTER button. 24 Press P.M ...button to your favorites. 4. Adjusted settings are stored in User mode. Picture adjustment PICTURE SETTING Brightness 50 Contrast 50 Color 50 Sharpness 50 Tint 50 or key to select item. Item Brightness Contrast Color Sharpness Tint ...
... AUTO.ADJ button Press AUTO.ADJ button on the remote. Press the P.M button to select a picture mode according to select picture mode. You can still current screen picture by P.M button. Mild: Select for best viewing. * To exit the menu, press ENTER button. 24 Press P.M ...button to your favorites. 4. Adjusted settings are stored in User mode. Picture adjustment PICTURE SETTING Brightness 50 Contrast 50 Color 50 Sharpness 50 Tint 50 or key to select item. Item Brightness Contrast Color Sharpness Tint ...

User Manual
Page 32
... Temp item, press the VOL+/- Item Brightness Contrast Saturation Sharpness VOLdarker weaker paler softer VOL+ lighter stronger deeper sharper PICTURE SETTING Brightness Contrast Saturation Sharpness Color Temp 25 25 25 25 9300K or key to change Adjusting Color temperature You can... adjust its horizontal and vertical position to change Adjusting horizontal / vertical position Press MENU button twice and the PICTURE POSITION menu appears. PICTURE POSITION Horizontal 25 Vertical 25 or key to display correctly. Press MENU button, use CH5/6 to adjust. When...
... Temp item, press the VOL+/- Item Brightness Contrast Saturation Sharpness VOLdarker weaker paler softer VOL+ lighter stronger deeper sharper PICTURE SETTING Brightness Contrast Saturation Sharpness Color Temp 25 25 25 25 9300K or key to change Adjusting Color temperature You can... adjust its horizontal and vertical position to change Adjusting horizontal / vertical position Press MENU button twice and the PICTURE POSITION menu appears. PICTURE POSITION Horizontal 25 Vertical 25 or key to display correctly. Press MENU button, use CH5/6 to adjust. When...
User Manual
Page 33
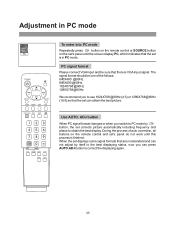
... or when you switch to PC mode by itself to the best displaying status, now you to obtain the best display. When the set corrects picture automatically including frequency and phase to use 1024X768 @60Hz (4:3) or 1280X768@60Hz (16:9) so that the set can not adjust by button, the set displays... on the remote control and set's panel do not work until the screen display PC, which indicates that are nonstandard and can obtain the best picture. PC signal format Please connect VGA input and be one of auto correction, all buttons on the set's panel until this process is VGA input...
... or when you switch to PC mode by itself to the best displaying status, now you to obtain the best display. When the set corrects picture automatically including frequency and phase to use 1024X768 @60Hz (4:3) or 1280X768@60Hz (16:9) so that the set can not adjust by button, the set displays... on the remote control and set's panel do not work until the screen display PC, which indicates that are nonstandard and can obtain the best picture. PC signal format Please connect VGA input and be one of auto correction, all buttons on the set's panel until this process is VGA input...

User Manual
Page 34
... Brightness Contrast Phase Frequency Color Temp 25 25 25 25 9300K or key to select item and VOL+/- PICTURE SETTING Brightness Contrast Phase Frequency Color Temp 25 25 25 25 9300K or key to change Adjusting Color temperature You can adjust phase and frequency ... auto correction for many times. Press MENU button, use CH5/6 to change When there is correct input signal, press MENU button and PICTURE SETTING menu appears. to select between PICTURE SETTING Brightness Contrast Phase Frequency Color Temp 25 25 25 25 9300K or key to select Color Temp item, press the VOL...
... Brightness Contrast Phase Frequency Color Temp 25 25 25 25 9300K or key to select item and VOL+/- PICTURE SETTING Brightness Contrast Phase Frequency Color Temp 25 25 25 25 9300K or key to change Adjusting Color temperature You can adjust phase and frequency ... auto correction for many times. Press MENU button, use CH5/6 to change When there is correct input signal, press MENU button and PICTURE SETTING menu appears. to select between PICTURE SETTING Brightness Contrast Phase Frequency Color Temp 25 25 25 25 9300K or key to select Color Temp item, press the VOL...


