User Manual
Page 2
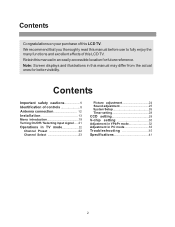
... controls 8 Antenna connection 12 Installation 13 Menu introduction 19 Turning On/Off / Selecting input signal......21 Operations in TV mode 22 Channel Preset 22 Channel Select 23 Picture adjustment 24 Sound adjustment 25 System Setup 26 Timer setting 28 CCD setting 29 V-chip setting 30 Adjustment in YPbPr mode 32 Adjustment in this LCD TV. Contents Congratulations on your purchase of this manual in an easily accessible location for better visibility. Note: Screen displays and illustrations in PC mode 33 Troubleshooting 35 Specifications...
... controls 8 Antenna connection 12 Installation 13 Menu introduction 19 Turning On/Off / Selecting input signal......21 Operations in TV mode 22 Channel Preset 22 Channel Select 23 Picture adjustment 24 Sound adjustment 25 System Setup 26 Timer setting 28 CCD setting 29 V-chip setting 30 Adjustment in YPbPr mode 32 Adjustment in this LCD TV. Contents Congratulations on your purchase of this manual in an easily accessible location for better visibility. Note: Screen displays and illustrations in PC mode 33 Troubleshooting 35 Specifications...
User Manual
Page 5
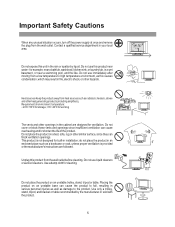
...other hazards. Use only a trolley, stand, tripod, and bracket or table recommended by liquid. Unplug this unit in a wet basement, or near a swimming pool, and the like. Use a damp cloth for example, near water - Contact a qualified service department in ...use liquid cleaners or aerosol cleaners. Do not expose this product from the wall outlet. Important Safety Cautions When any unusual situation occurs, turn off the power supply at once and remove the plug from the wall outlet before cleaning. Do not place the product on an unstable trolley, stand, tripod or table...
...other hazards. Use only a trolley, stand, tripod, and bracket or table recommended by liquid. Unplug this unit in a wet basement, or near a swimming pool, and the like. Use a damp cloth for example, near water - Contact a qualified service department in ...use liquid cleaners or aerosol cleaners. Do not expose this product from the wall outlet. Important Safety Cautions When any unusual situation occurs, turn off the power supply at once and remove the plug from the wall outlet before cleaning. Do not place the product on an unstable trolley, stand, tripod or table...
User Manual
Page 9
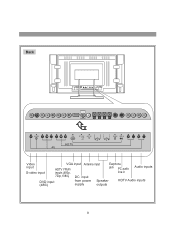
Back VILDEO S-VIDEO Y Cb Cr Y Pb Pr VGA HDTV AV ANT IN R PHONE LINE IN R L R L L VILDEO S-VIDEO Y Cb Cr Y Pb Pr VGA DC +24V ANT IN +12V +5V R HDTV AV PHONE LINE IN R L R L L Video input S-video input VGA input Antenna input HDTV YPbPr inputs (480p, Earphone jack PC audio line in Audio inputs 720p,1080i) DC input DVD input (480i) from power Speaker supply outputs HDTV Audio inputs 9
Back VILDEO S-VIDEO Y Cb Cr Y Pb Pr VGA HDTV AV ANT IN R PHONE LINE IN R L R L L VILDEO S-VIDEO Y Cb Cr Y Pb Pr VGA DC +24V ANT IN +12V +5V R HDTV AV PHONE LINE IN R L R L L Video input S-video input VGA input Antenna input HDTV YPbPr inputs (480p, Earphone jack PC audio line in Audio inputs 720p,1080i) DC input DVD input (480i) from power Speaker supply outputs HDTV Audio inputs 9
User Manual
Page 10
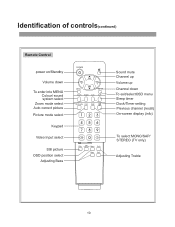
Identification of controls(continued) Remote Control power on/Standby Volume down To enter into MENU Colour/ sound system select Zoom mode select Auto correct picture Picture mode select Keypad Video Input select Still picture OSD position select Adjusting Bass Sound mute Channel up Volume up Channel down To exit/selectOSD menu Sleep timer Clock/Timer setting Previous channel (recall) On-screen display (info) To select MONO/SAP/ STEREO (TV only) Adjusting Treble 10
Identification of controls(continued) Remote Control power on/Standby Volume down To enter into MENU Colour/ sound system select Zoom mode select Auto correct picture Picture mode select Keypad Video Input select Still picture OSD position select Adjusting Bass Sound mute Channel up Volume up Channel down To exit/selectOSD menu Sleep timer Clock/Timer setting Previous channel (recall) On-screen display (info) To select MONO/SAP/ STEREO (TV only) Adjusting Treble 10
User Manual
Page 11
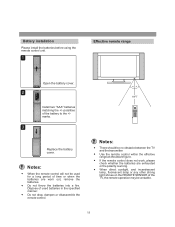
... figure. Battery installation Please install the batteries before using the remote control unit. 1 Effective remote range Open the battery cover. 2 Install two "AAA" batteries matching the +/- When direct sunlight, and incandescent lamp, fluorescent lamp or any other strong light shines on the REMOTE SENSOR of the battery to the +/marks. 3 Replace the battery cover. polarities of the TV, the remote operation may be...
... figure. Battery installation Please install the batteries before using the remote control unit. 1 Effective remote range Open the battery cover. 2 Install two "AAA" batteries matching the +/- When direct sunlight, and incandescent lamp, fluorescent lamp or any other strong light shines on the REMOTE SENSOR of the battery to the +/marks. 3 Replace the battery cover. polarities of the TV, the remote operation may be...
User Manual
Page 12
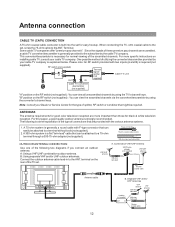
... (not supplied). 2. VHF/UHF antenna A. terminal on the RF switch (not supplied) : You can view the scrambled channels via the converter/descrambler by using the converter's channel keys. Some cable TV companies offer "premium pay channels are more specific instructions on the RF switch (not supplied) : You can view all unscrambled channels by using the TV's channel keys. The following two diagrams if you connect an outdoor antenna. RF switch (not supplied) Two-set .
... (not supplied). 2. VHF/UHF antenna A. terminal on the RF switch (not supplied) : You can view the scrambled channels via the converter/descrambler by using the converter's channel keys. Some cable TV companies offer "premium pay channels are more specific instructions on the RF switch (not supplied) : You can view all unscrambled channels by using the TV's channel keys. The following two diagrams if you connect an outdoor antenna. RF switch (not supplied) Two-set .
User Manual
Page 13
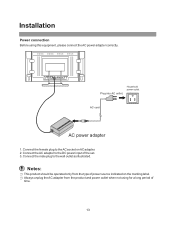
... HDTV AV - Household power outlet AC cord AC power adapter 1. ANT IN R + PHONE LINE IN R L R L L Plug into AC outlet. Connect the female plug to the DC power input of the set. 3. Connect the AC adapter to the AC socket on the marking label. + Always unplug the AC adapter from the type of power source indicated on AC adapter. 2. Installation Power connection Before using for a long period of time. 13 Connect the male plug to the wall...
... HDTV AV - Household power outlet AC cord AC power adapter 1. ANT IN R + PHONE LINE IN R L R L L Plug into AC outlet. Connect the female plug to the DC power input of the set. 3. Connect the AC adapter to the AC socket on the marking label. + Always unplug the AC adapter from the type of power source indicated on AC adapter. 2. Installation Power connection Before using for a long period of time. 13 Connect the male plug to the wall...
User Manual
Page 15
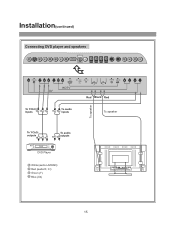
Installation(continued) Connecting DVD player and speakers VILDEO S-VIDEO Y Cb Cr Y Pb Pr VGA DC +24V ANT IN +12V +5V R HDTV AV PHONE LINE IN R L R L L Red Black Red To YCbCr inputs G B R To audio R w inputs To speaker To speaker To YCbCr outputs G B R To audio R w outputs DVD DVD Player W White (audio L/MONO) R Red (audio R, Cr) G Green (Y) B Blue (Cb) VILDEO S-VIDEO Y Cb Cr Y Pb Pr VGA HDTV AV ANT IN R PHONE LINE IN R L R L L 15
Installation(continued) Connecting DVD player and speakers VILDEO S-VIDEO Y Cb Cr Y Pb Pr VGA DC +24V ANT IN +12V +5V R HDTV AV PHONE LINE IN R L R L L Red Black Red To YCbCr inputs G B R To audio R w inputs To speaker To speaker To YCbCr outputs G B R To audio R w outputs DVD DVD Player W White (audio L/MONO) R Red (audio R, Cr) G Green (Y) B Blue (Cb) VILDEO S-VIDEO Y Cb Cr Y Pb Pr VGA HDTV AV ANT IN R PHONE LINE IN R L R L L 15
User Manual
Page 19
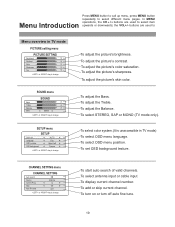
... texture. To select antenna input or cable input To display current channel number. To adjust the picture's color saturation. To select color system.(It is unaccessible in TV mode PICTURE setting menu PICTURE SETTING Brightness 50 Contrast 50 Color 50 Sharpness 50 Tint 50 or key to change SOUND menu SOUND Bass 25 Treble 25 Balance MTS 25 MONO or key to change SETUP menu SETUP Color sys Language OSD position OSD background AUTO Eng Upper Left Opaque...
... texture. To select antenna input or cable input To display current channel number. To adjust the picture's color saturation. To select color system.(It is unaccessible in TV mode PICTURE setting menu PICTURE SETTING Brightness 50 Contrast 50 Color 50 Sharpness 50 Tint 50 or key to change SOUND menu SOUND Bass 25 Treble 25 Balance MTS 25 MONO or key to change SETUP menu SETUP Color sys Language OSD position OSD background AUTO Eng Upper Left Opaque...
User Manual
Page 20
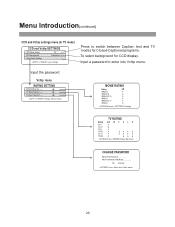
... V S L D A B A A AAA A A AAA A A AA A move , return, execute 20 Menu Introduction(continued) CCD and Vchip settings menu (in TV mode) CCD and Vchip SETTINGS CCD Mode setting CCD Background Video Rating Settings Off Transparent ____ or key to change , return CHANGE PASSWORD New Password: _ _ _ _ New Password Validate: _ _ _ _ Ok Cancel move , change Press to enter into Vchip menu. Input a password to switch between Caption, text and TV modes for Closed-Captioned programs. To select background for CCD...
... V S L D A B A A AAA A A AAA A A AA A move , return, execute 20 Menu Introduction(continued) CCD and Vchip settings menu (in TV mode) CCD and Vchip SETTINGS CCD Mode setting CCD Background Video Rating Settings Off Transparent ____ or key to change , return CHANGE PASSWORD New Password: _ _ _ _ New Password Validate: _ _ _ _ Ok Cancel move , change Press to enter into Vchip menu. Input a password to switch between Caption, text and TV modes for Closed-Captioned programs. To select background for CCD...
User Manual
Page 21
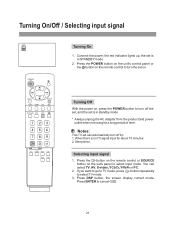
... signal input for a long period of time. You can automatically turn off the set, and the set can select TV, AV, S-video, YCbCr, YPbPr or PC. 2. Connect the power, the red indicator lights up, the set 's panel to cancel OSD. 21 Press DSP button, the screen display current mode. If you want to go to TV mode, press button repeatedly to turn the set on the set is in STANDBY mode. 2. Turning Off With the power...
... signal input for a long period of time. You can automatically turn off the set, and the set can select TV, AV, S-video, YCbCr, YPbPr or PC. 2. Connect the power, the red indicator lights up, the set 's panel to cancel OSD. 21 Press DSP button, the screen display current mode. If you want to go to TV mode, press button repeatedly to turn the set on the set is in STANDBY mode. 2. Turning Off With the power...

User Manual
Page 22
.... CHANNEL SETTING Auto search Source Current Prog Skip Auto fine tune Antenna 12 ON OFF or key to change * To exit the menu, press ENTER button. Press MENU button repeatedly to select Antenna or Cable. or VOL+ button to display CHANNEL SETTING menu. 2. Antenna Auto searching 28 VHFL Press to escape Adding and skipping channels After auto search, you can add or skip channels as follows: Select a channel to be memorized. Operations in TV mode Channel Preset CHANNEL SETTING Auto...
.... CHANNEL SETTING Auto search Source Current Prog Skip Auto fine tune Antenna 12 ON OFF or key to change * To exit the menu, press ENTER button. Press MENU button repeatedly to select Antenna or Cable. or VOL+ button to display CHANNEL SETTING menu. 2. Antenna Auto searching 28 VHFL Press to escape Adding and skipping channels After auto search, you can add or skip channels as follows: Select a channel to be memorized. Operations in TV mode Channel Preset CHANNEL SETTING Auto...
User Manual
Page 24
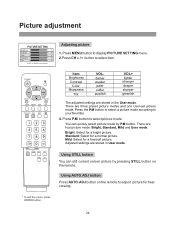
... the User mode. Mild: Select for a bright picture. Using STILL button You can quickly select picture mode by pressing STILL button on the remote to select picture mode. Picture adjustment PICTURE SETTING Brightness 50 Contrast 50 Color 50 Sharpness 50 Tint 50 or key to your favorites. 4. Standard: Select for best viewing. * To exit the menu, press ENTER button. 24 Press P.M button to adjust picture for a normal picture. Using AUTO.ADJ button Press AUTO.ADJ button on the remote. Press MENU button to display PICTURE SETTING menu...
... the User mode. Mild: Select for a bright picture. Using STILL button You can quickly select picture mode by pressing STILL button on the remote to select picture mode. Picture adjustment PICTURE SETTING Brightness 50 Contrast 50 Color 50 Sharpness 50 Tint 50 or key to your favorites. 4. Standard: Select for best viewing. * To exit the menu, press ENTER button. 24 Press P.M button to adjust picture for a normal picture. Using AUTO.ADJ button Press AUTO.ADJ button on the remote. Press MENU button to display PICTURE SETTING menu...
User Manual
Page 26
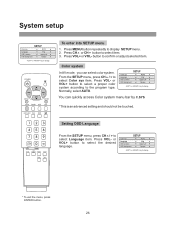
... key to select item. 3. or VOL+ button to display SETUP menu. 2. Press MENU button repeatedly to select the desired language. button to the program type. Color system In AV mode, you can quickly access Color system menu bar by C.SYS *This is an advanced setting and should not be touched. or VOL+ button to select a proper color system according to confirm or adjust selected item. Press VOL- Normally, select AUTO.
... key to select item. 3. or VOL+ button to display SETUP menu. 2. Press MENU button repeatedly to select the desired language. button to the program type. Color system In AV mode, you can quickly access Color system menu bar by C.SYS *This is an advanced setting and should not be touched. or VOL+ button to select a proper color system according to confirm or adjust selected item. Press VOL- Normally, select AUTO.

User Manual
Page 27
... can quickly select screen ratio by using ZOOM button on the Remote Control * To exit the menu, press ENTER button. 27 Press VOL- Press VOL- or VOL+ button to select an OSD position in your preference. System setup(continued) SETUP Color sys Language OSD position OSD background AUTO Eng Upper Left Opaque or key to change Setting Scaler mode This unit allows you to adjust screen aspect ratio...
... can quickly select screen ratio by using ZOOM button on the Remote Control * To exit the menu, press ENTER button. 27 Press VOL- Press VOL- or VOL+ button to select an OSD position in your preference. System setup(continued) SETUP Color sys Language OSD position OSD background AUTO Eng Upper Left Opaque or key to change Setting Scaler mode This unit allows you to adjust screen aspect ratio...
User Manual
Page 30
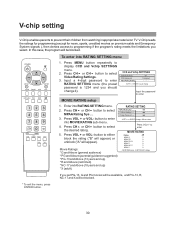
... on premium cable and Emergency System signals ), then denies access to programming if the program's rating meets the limitations you select. Press CH5 or CH6 button to enter into MOVIE RATING sub-menu. 4. MPAA Rating Sys ... button to select MPAA Rating Sys .... Press VOL + or VOL- Movie Ratings: * G and Above (general audience) or change it). Input a 4-digit password to select Video Rating Settings. 3. Press...
... on premium cable and Emergency System signals ), then denies access to programming if the program's rating meets the limitations you select. Press CH5 or CH6 button to enter into MOVIE RATING sub-menu. 4. MPAA Rating Sys ... button to select MPAA Rating Sys .... Press VOL + or VOL- Movie Ratings: * G and Above (general audience) or change it). Input a 4-digit password to select Video Rating Settings. 3. Press...

User Manual
Page 32
... 9300K or key to adjust. to change Adjusting Color temperature You can adjust its horizontal and vertical position to select item and VOL+/- Adjusting picture In YPbPr mode when there is signal input. Adjustment in YPbPr mode YPbPr To enter into YPbPr mode Repeatedly press button on the remote control or SOURCE button on the set's panel until the screen display YPbPr, which indicates that the set and the picture may not be in...
... 9300K or key to adjust. to change Adjusting Color temperature You can adjust its horizontal and vertical position to select item and VOL+/- Adjusting picture In YPbPr mode when there is signal input. Adjustment in YPbPr mode YPbPr To enter into YPbPr mode Repeatedly press button on the remote control or SOURCE button on the set's panel until the screen display YPbPr, which indicates that the set and the picture may not be in...
User Manual
Page 33
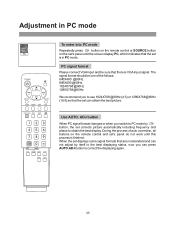
... set displays some signal formats that the set can press AUTO.ADJ button to obtain the best display. ADJ button When PC signal format changes or when you switch to PC mode by itself to the best displaying status, now you to use 1024X768 @60Hz (4:3) or 1280X768@60Hz (16:9) so that there is VGA input signal. PC signal format Please connect VGA input and be one of auto correction, all buttons on the remote control and set's panel do not work...
... set displays some signal formats that the set can press AUTO.ADJ button to obtain the best display. ADJ button When PC signal format changes or when you switch to PC mode by itself to the best displaying status, now you to use 1024X768 @60Hz (4:3) or 1280X768@60Hz (16:9) so that there is VGA input signal. PC signal format Please connect VGA input and be one of auto correction, all buttons on the remote control and set's panel do not work...

User Manual
Page 34
... key to obtain correct white. Adjustment in TV and AV mode. Adjusting phase and frequency If you can select different Color temperature to change When there is correct input signal, press MENU button and PICTURE SETTING menu appears. PICTURE SETTING Brightness Contrast Phase Frequency Color Temp 25 25 25 25 9300K or key to change * To exit the menu, press ENTER button. 34 to select between PICTURE SETTING Brightness Contrast Phase...
... key to obtain correct white. Adjustment in TV and AV mode. Adjusting phase and frequency If you can select different Color temperature to change When there is correct input signal, press MENU button and PICTURE SETTING menu appears. PICTURE SETTING Brightness Contrast Phase Frequency Color Temp 25 25 25 25 9300K or key to change * To exit the menu, press ENTER button. 34 to select between PICTURE SETTING Brightness Contrast Phase...
User Manual
Page 41
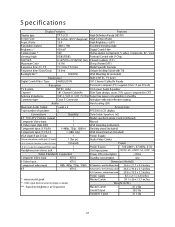
... Audio Hard coating (2H) Maximum Audio Output 5 watt x 2 Acces s ories Total number of speakers 2 FPE3000 LCD display Connections Quantity Detachable Speakers (x2) R F: TV/CATV 75ohms coaxial 1 Model specific R emote Control (Infrared) Composite Video input 1 Manual S-Video input (4pin DIN) 1 Wall mounting instructions Component input (Y,Pb,Pr) 1 (480p, 720p, 1080i**) Desktop stand (included) Component input (Y,Cb,Cr) 1 (480i only) Wall mount bracket (included) VGA input15 pin D-Sub 1 Power Supply Stereo mini phone audio jack (3.5mm) 1 (for pc) Audio Video Cables...
... Audio Hard coating (2H) Maximum Audio Output 5 watt x 2 Acces s ories Total number of speakers 2 FPE3000 LCD display Connections Quantity Detachable Speakers (x2) R F: TV/CATV 75ohms coaxial 1 Model specific R emote Control (Infrared) Composite Video input 1 Manual S-Video input (4pin DIN) 1 Wall mounting instructions Component input (Y,Pb,Pr) 1 (480p, 720p, 1080i**) Desktop stand (included) Component input (Y,Cb,Cr) 1 (480i only) Wall mount bracket (included) VGA input15 pin D-Sub 1 Power Supply Stereo mini phone audio jack (3.5mm) 1 (for pc) Audio Video Cables...


