
Owners Manual
Page 8
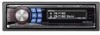
... encoder (OPEN) SOURCE/ 3 Grasp the front panel firmly, slide to the left , and then pull to remove. /RTN FUNC./SETUP Accessory List • Head unit 1 • Power cable 1 • Mounting sleeve 1 • Carrying case 1 • Bracket key 2 • Screw (M5 x 8 4 • Remote Control 1 • Battery (AAA size 2 • Owner's Manual 1 set •...
... encoder (OPEN) SOURCE/ 3 Grasp the front panel firmly, slide to the left , and then pull to remove. /RTN FUNC./SETUP Accessory List • Head unit 1 • Power cable 1 • Mounting sleeve 1 • Carrying case 1 • Bracket key 2 • Screw (M5 x 8 4 • Remote Control 1 • Battery (AAA size 2 • Owner's Manual 1 set •...

Owners Manual
Page 37
... or equalizer to the corresponding output lead coming from the main unit (see "Removal" on either side. This ensures that holds it unlocked as you install this unit in the CONNECTlONS section. 3 Slide the CDA-9885 into the unit, along the guides on page 35). 2 Hex Nut (M5...remedy the problem. Remove the detachable front panel. 2. Insert the bracket keys into the dashboard until it clicks. Less than 35° 1 Mounting Sleeve (Included) Dashboard Reinforce the head unit with the metal mounting strap (not supplied). Connect all other leads of the CDA-9885 according to details ...
... or equalizer to the corresponding output lead coming from the main unit (see "Removal" on either side. This ensures that holds it unlocked as you install this unit in the CONNECTlONS section. 3 Slide the CDA-9885 into the unit, along the guides on page 35). 2 Hex Nut (M5...remedy the problem. Remove the detachable front panel. 2. Insert the bracket keys into the dashboard until it clicks. Less than 35° 1 Mounting Sleeve (Included) Dashboard Reinforce the head unit with the metal mounting strap (not supplied). Connect all other leads of the CDA-9885 according to details ...


