Owners Manual
Page 3
... Contents Operating Instructions WARNING WARNING 3 CAUTION 3 PRECAUTIONS 3 Getting Started Accessory List 6 Turning Power On and Off 6 Detaching and Attaching the Front Panel ........ 6 Initial System Start-Up 7 Adjusting Volume 7 Lowering Volume Quickly 7 Setting the Time and Calendar 7 Radio Listening to Radio 8 Presetting Stations Manually 8 Presetting Stations Automatically 8 Tuning to Preset Stations 8 Frequency Search Function 9 Receiving a Multicast Station (HD Radio mode only 9 CD/MP3/WMA/AAC Playback 10 Repeat Play 10 M.I.X. (Random Play 11 Searching from CD Text...
... Contents Operating Instructions WARNING WARNING 3 CAUTION 3 PRECAUTIONS 3 Getting Started Accessory List 6 Turning Power On and Off 6 Detaching and Attaching the Front Panel ........ 6 Initial System Start-Up 7 Adjusting Volume 7 Lowering Volume Quickly 7 Setting the Time and Calendar 7 Radio Listening to Radio 8 Presetting Stations Manually 8 Presetting Stations Automatically 8 Tuning to Preset Stations 8 Frequency Search Function 9 Receiving a Multicast Station (HD Radio mode only 9 CD/MP3/WMA/AAC Playback 10 Repeat Play 10 M.I.X. (Random Play 11 Searching from CD Text...
Owners Manual
Page 4
Display Setting Changing Lighting Color 20 Dimmer Control 20 Scroll Type Setting 20 Scroll Setting (Text Scroll 20 Switching the Character Font 20 Switching the Animation Display Type (BGV Select 20 Setting of Calendar Display Pattern Switching (Calendar 20 Opening Message ON/OFF Setting 20 Tuner Setting (Only when HD Radio is connected) HD Radio Station Call Setting 20 Digital Seek ON/OFF Setting 20 SAT Radio Receiver (Optional) Receiving Channels with the SAT Radio Receiver (Optional 21 Checking the SAT Radio ID...
Display Setting Changing Lighting Color 20 Dimmer Control 20 Scroll Type Setting 20 Scroll Setting (Text Scroll 20 Switching the Character Font 20 Switching the Animation Display Type (BGV Select 20 Setting of Calendar Display Pattern Switching (Calendar 20 Opening Message ON/OFF Setting 20 Tuner Setting (Only when HD Radio is connected) HD Radio Station Call Setting 20 Digital Seek ON/OFF Setting 20 SAT Radio Receiver (Optional) Receiving Channels with the SAT Radio Receiver (Optional 21 Checking the SAT Radio ID...
Owners Manual
Page 6
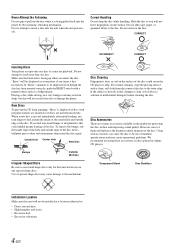
... discs may result in a location subjected to insert a disc into the player by the automatic reloading mechanism. However, most of the disc to be displayed even though the disc has been inserted correctly, push the RESET switch with irregular surfaces are inserted or if discs are various accessories available on discs played in a solution of standard specifications and may create operational problems. We recommend not using...
... discs may result in a location subjected to insert a disc into the player by the automatic reloading mechanism. However, most of the disc to be displayed even though the disc has been inserted correctly, push the RESET switch with irregular surfaces are inserted or if discs are various accessories available on discs played in a solution of standard specifications and may create operational problems. We recommend not using...

Owners Manual
Page 8
..., holding the sides of the front panel until it locks firmly into the main unit. Turning Power On and Off Press SOURCE/ to remove. /RTN FUNC./SETUP Accessory List • Head unit 1 • Power cable 1 • Mounting sleeve 1 • Carrying case 1 • Bracket key 2 • Screw (M5 x 8 4 • Remote Control 1 • Battery (AAA size 2 • Owner's Manual 1 set • The front panel may result in an accident or malfunction...
..., holding the sides of the front panel until it locks firmly into the main unit. Turning Power On and Off Press SOURCE/ to remove. /RTN FUNC./SETUP Accessory List • Head unit 1 • Power cable 1 • Mounting sleeve 1 • Carrying case 1 • Bracket key 2 • Screw (M5 x 8 4 • Remote Control 1 • Battery (AAA size 2 • Owner's Manual 1 set • The front panel may result in an accident or malfunction...
Owners Manual
Page 9
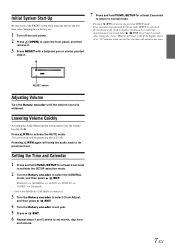
... / /ENT for at least 2 seconds after setting the "hour." Bluetooth GENERAL AUDIO DISPLAY TUNER* Bluetooth * Only when HD Radio / SAT Radio is obtained. Initial System Start-Up Be sure to press the RESET switch when using the unit for the first time, after changing the car battery, etc. 1 Turn off the unit power. 2 Press (OPEN) to open the front panel, and then remove it. 3 Press RESET with a ballpoint pen or similar pointed...
... / /ENT for at least 2 seconds after setting the "hour." Bluetooth GENERAL AUDIO DISPLAY TUNER* Bluetooth * Only when HD Radio / SAT Radio is obtained. Initial System Start-Up Be sure to press the RESET switch when using the unit for the first time, after changing the car battery, etc. 1 Turn off the unit power. 2 Press (OPEN) to open the front panel, and then remove it. 3 Press RESET with a ballpoint pen or similar pointed...

Owners Manual
Page 10
... station. Radio / /ENT/ Rotary TUNE/A.ME encoder SOURCE/ BAND /ESC Preset buttons (1 through 6) that has your desired radio station in memory. The display shows the band, preset number and frequency of 18 stations can be stored into which you wish to seek up/down or will change while the automatic memory is displayed. The display shows the band, preset number and station frequency memorized. • A total of the station selected. 8-EN Manual mode: The frequency is Distance mode...
... station. Radio / /ENT/ Rotary TUNE/A.ME encoder SOURCE/ BAND /ESC Preset buttons (1 through 6) that has your desired radio station in memory. The display shows the band, preset number and frequency of 18 stations can be stored into which you wish to seek up/down or will change while the automatic memory is displayed. The display shows the band, preset number and station frequency memorized. • A total of the station selected. 8-EN Manual mode: The frequency is Distance mode...
Owners Manual
Page 12
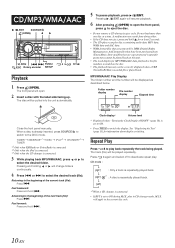
.... • If the CD does not eject, press and hold for at a time. Folder number display File number display Elapsed time 19 20 AM 12:02 2:13 VOL.12 Clock display* Volume level * Displayed when "Turning the Clock Display ON/OFF" (page 18) is set to deactivate repeat play back repeatedly the track being played. The front panel will be pulled into the unit automatically. The disc will be displayed as described below.
.... • If the CD does not eject, press and hold for at a time. Folder number display File number display Elapsed time 19 20 AM 12:02 2:13 VOL.12 Clock display* Volume level * Displayed when "Turning the Clock Display ON/OFF" (page 18) is set to deactivate repeat play back repeatedly the track being played. The front panel will be pulled into the unit automatically. The disc will be displayed as described below.
Owners Manual
Page 15
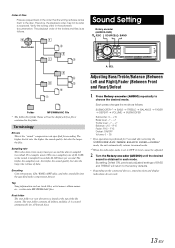
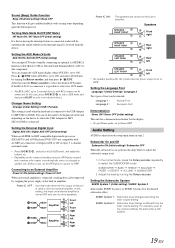
... discs. Sound Setting Rotary encoder (AUDIO/LOUD) /ESC SOURCE/ BAND Root folder A. The higher the bit rate, the higher the sound quality, but also the larger the volume of the file system. Adjusting Bass/Treble/Balance (Between Left and Right)/Fader (Between Front and Rear)/Defeat 1 Press Rotary encoder (AUDIO) repeatedly to the factory defaults. • Depending on the connected devices, some functions and display indications do not work...
... discs. Sound Setting Rotary encoder (AUDIO/LOUD) /ESC SOURCE/ BAND Root folder A. The higher the bit rate, the higher the sound quality, but also the larger the volume of the file system. Adjusting Bass/Treble/Balance (Between Left and Right)/Fader (Between Front and Rear)/Defeat 1 Press Rotary encoder (AUDIO) repeatedly to the factory defaults. • Depending on the connected devices, some functions and display indications do not work...
Owners Manual
Page 17
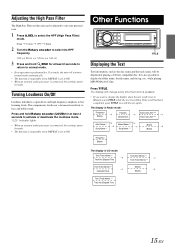
... bass and treble sound. The display will be displayed if playing a CD text compatible disc. Adjusting the High Pass Filter The High Pass Filter on this setting cannot be made . Bass Treble HPF Bass 2 Turn the Rotary encoder to scroll the text again. Press and hold /ESC for the ear's decreased sensitivity to activate or deactivate the loudness mode. Press TITLE. The display in Radio mode: Frequency (Blank) Frequency Calendar/Clock Station Call Letter*4/*5 Station...
... bass and treble sound. The display will be displayed if playing a CD text compatible disc. Adjusting the High Pass Filter The High Pass Filter on this setting cannot be made . Bass Treble HPF Bass 2 Turn the Rotary encoder to scroll the text again. Press and hold /ESC for the ear's decreased sensitivity to activate or deactivate the loudness mode. Press TITLE. The display in Radio mode: Frequency (Blank) Frequency Calendar/Clock Station Call Letter*4/*5 Station...
Owners Manual
Page 20
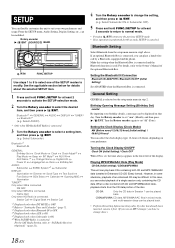
...: Birthday Set Clock Mode Clock Clock Adjust*2 Play Mode Beep INT Mute*3 AUX IN AUX Name *4 Changer Name Digital AUX Power IC Language Set Demo Birthday Set AUDIO: Subwoofer SUBW. System*5 Subwoofer DISPLAY: Illumination Dimmer Scroll Type Text Scroll Font Select BGV Select Calendar Opening MSG Illumination TUNER*6: Only when XM is connected. However, in some situations, playback of an enhanced CD may be played back. • Perform this setting before inserting a disc. Rotary encoder / /ENT SOURCE/ BAND /RTN FUNC./SETUP Use steps...
...: Birthday Set Clock Mode Clock Clock Adjust*2 Play Mode Beep INT Mute*3 AUX IN AUX Name *4 Changer Name Digital AUX Power IC Language Set Demo Birthday Set AUDIO: Subwoofer SUBW. System*5 Subwoofer DISPLAY: Illumination Dimmer Scroll Type Text Scroll Font Select BGV Select Calendar Opening MSG Illumination TUNER*6: Only when XM is connected. However, in some situations, playback of an enhanced CD may be played back. • Perform this setting before inserting a disc. Rotary encoder / /ENT SOURCE/ BAND /RTN FUNC./SETUP Use steps...
Owners Manual
Page 21
... is set to 2 external devices with RCA output can be displayed on the unit depending on the connected audio processor, DVD player sound may continue to be improved by stopping the power supply of the built-in amplifier. Changer Name Setting Changer (Initial Setting) / USB / Portable This setting is set Digital AUX to ON to enjoy 5.1-channel surround sound. • Press SOURCE/ , and select the D.AUX mode, and adjust the volume, etc. • Depending on the device to the USB Adapter...
... is set to 2 external devices with RCA output can be displayed on the unit depending on the connected audio processor, DVD player sound may continue to be improved by stopping the power supply of the built-in amplifier. Changer Name Setting Changer (Initial Setting) / USB / Portable This setting is set Digital AUX to ON to enjoy 5.1-channel surround sound. • Press SOURCE/ , and select the D.AUX mode, and adjust the volume, etc. • Depending on the device to the USB Adapter...
Owners Manual
Page 23
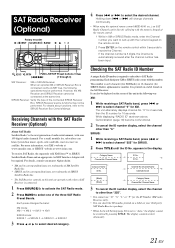
... XM Direct™ or SIRIUS Satellite Radio Tuner and an appropriate Ai-NET Interface Adapter will change channels • When using the optional remote control (RUE-4190, etc.), an SAT Radio Channel can check the ID number printed on a label on the SAT Receiver. or will be connected at www.sirius.com. If the channel number is 3 digits, the Channel is automatically received after the channel number has been input. /ESC /RTN FUNC./SETUP Preset buttons TITLE...
... XM Direct™ or SIRIUS Satellite Radio Tuner and an appropriate Ai-NET Interface Adapter will change channels • When using the optional remote control (RUE-4190, etc.), an SAT Radio Channel can check the ID number printed on a label on the SAT Receiver. or will be connected at www.sirius.com. If the channel number is 3 digits, the Channel is automatically received after the channel number has been input. /ESC /RTN FUNC./SETUP Preset buttons TITLE...
Owners Manual
Page 30
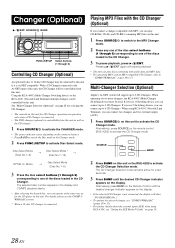
... SOURCE on this unit. The CD Changer Selection mode remains active for CD Changer operation are operative only when a CD Changer is connected. • The DVD changer (optional) is connected. SOURCE BAND 2 Press BAND on this unit for a few seconds. 3 Press BAND until the desired changer indicator appears on the display. With a CD Changer connected to 13). • For further details about the external input (AUX) when using KCA-410C (Versatile Link Terminal), you can play discs containing both audio...
... SOURCE on this unit. The CD Changer Selection mode remains active for CD Changer operation are operative only when a CD Changer is connected. • The DVD changer (optional) is connected. SOURCE BAND 2 Press BAND on this unit for a few seconds. 3 Press BAND until the desired changer indicator appears on the display. With a CD Changer connected to 13). • For further details about the external input (AUX) when using KCA-410C (Versatile Link Terminal), you can play discs containing both audio...
Owners Manual
Page 31
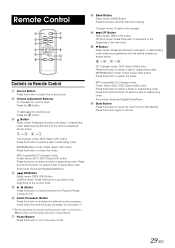
... button to select a disc in ascending order, stations programmed into the radio's presets as shown below . ... Press and hold this button to select the audio source. Mute Button Press this button to select a disc in descending order. CD Changer mode: DISC Select (UP) button Press this button to select a disc in ascending order. Press and hold this button to cancel. 29-EN Changer mode: To switch the changer. iPod mode: Switches Playlist/Artist/Album. Press this button will select, in ascending order. Volume Adjustment Buttons To increase the volume level...
... button to select a disc in ascending order, stations programmed into the radio's presets as shown below . ... Press and hold this button to select the audio source. Mute Button Press this button to select a disc in descending order. CD Changer mode: DISC Select (UP) button Press this button to select a disc in ascending order. Press and hold this button to cancel. 29-EN Changer mode: To switch the changer. iPod mode: Switches Playlist/Artist/Album. Press this button will select, in ascending order. Volume Adjustment Buttons To increase the volume level...
Owners Manual
Page 33
... a problem, please turn the power off, then on again. Change the disc. • The pick-up lens is not compatible. - Perform finalization and attempt playback again. Radio Unable to fast forward or backward the CD. • The CD has been damaged. - CD playback sound is grounded properly at its mounting location. Unable to receive stations. • No antenna or open connection in a weak signal area. - Reset this device. Make sure...
... a problem, please turn the power off, then on again. Change the disc. • The pick-up lens is not compatible. - Perform finalization and attempt playback again. Radio Unable to fast forward or backward the CD. • The CD has been damaged. - CD playback sound is grounded properly at its mounting location. Unable to receive stations. • No antenna or open connection in a weak signal area. - Reset this device. Make sure...
Owners Manual
Page 34
... • Radio is supported by following these steps: Press the button again for a few times, consult your Alpine dealer. • Magazine ejection not possible. - Insert a magazine. • No indicated disc. - Wait until the car reaches a location with latest encryption code. - Consult your Alpine dealer. • A copy-protected WMA file was played back. - Remove the disc by the unit. When the CD Changer finishes the eject function, insert an empty CD magazine...
... • Radio is supported by following these steps: Press the button again for a few times, consult your Alpine dealer. • Magazine ejection not possible. - Insert a magazine. • No indicated disc. - Wait until the car reaches a location with latest encryption code. - Consult your Alpine dealer. • A copy-protected WMA file was played back. - Remove the disc by the unit. When the CD Changer finishes the eject function, insert an empty CD magazine...
Owners Manual
Page 35
... an error or other problem occurs. - Make sure the iPod is no songs in the iPod. - Download podcast data to the iPod and connect to be compatible with this unit. - Update the iPod Software Version to this unit. • There is correctly connected (refer to change without notice. 33-EN Change channels or consult your Alpine dealer. Specifications FM TUNER SECTION Tuning Range Mono Usable Sensitivity 50 dB Quieting Sensitivity Alternate Channel Selectivity...
... an error or other problem occurs. - Make sure the iPod is no songs in the iPod. - Download podcast data to the iPod and connect to be compatible with this unit. - Update the iPod Software Version to this unit. • There is correctly connected (refer to change without notice. 33-EN Change channels or consult your Alpine dealer. Specifications FM TUNER SECTION Tuning Range Mono Usable Sensitivity 50 dB Quieting Sensitivity Alternate Channel Selectivity...
Owners Manual
Page 36
... as not to the diagram. Doing so may result in locations with your Alpine dealer. • The CDA-9885 uses female RCA-type jacks for assistance. • Be sure to connect the speaker (-) leads to connect other units (e.g. Cables or wiring that penetrates into these leads to electrical shorts. Route the cables and wiring away from the (-) battery post before installing your CDA-9885. If swallowed, consult a physician...
... as not to the diagram. Doing so may result in locations with your Alpine dealer. • The CDA-9885 uses female RCA-type jacks for assistance. • Be sure to connect the speaker (-) leads to connect other units (e.g. Cables or wiring that penetrates into these leads to electrical shorts. Route the cables and wiring away from the (-) battery post before installing your CDA-9885. If swallowed, consult a physician...

Owners Manual
Page 39
...'s battery. Steering Remote Control Interface Connector To steering Remote control interface box. Rear Output RCA Connectors RED is right and WHITE is required. Audio Interrupt In Lead (Pink/Black) Connect this lead to this component. Switched Power Lead (Ignition) (Red) Connect this lead to bare metal and is received. Make sure the connection is made to an open terminal on the vehicle's fuse box or another device (CD Changer, Equalizer, HD Radio™ TUNER...
...'s battery. Steering Remote Control Interface Connector To steering Remote control interface box. Rear Output RCA Connectors RED is right and WHITE is required. Audio Interrupt In Lead (Pink/Black) Connect this lead to this component. Switched Power Lead (Ignition) (Red) Connect this lead to bare metal and is received. Make sure the connection is made to an open terminal on the vehicle's fuse box or another device (CD Changer, Equalizer, HD Radio™ TUNER...
Owners Manual
Page 41
... THE PRODUCT. Accordingly, limitations as to an Authorized Alpine Service Center or Alpine, Alpine will , at its option, repair or replace the product with a new or reconditioned product without charge. Call the toll free telephone number or visit the website to follow instructions contained in effect for one of the problem(s) for your vehicle by over-driving the speaker (amplifier level is in the Owner's manual.
... THE PRODUCT. Accordingly, limitations as to an Authorized Alpine Service Center or Alpine, Alpine will , at its option, repair or replace the product with a new or reconditioned product without charge. Call the toll free telephone number or visit the website to follow instructions contained in effect for one of the problem(s) for your vehicle by over-driving the speaker (amplifier level is in the Owner's manual.


