eMachines Notebook User Guide (All Series)
Page 12
... release the power button below the LCD screen beside the easy-launch buttons. Your guides To help you get started with language such as eMachines Recovery Management, using your computer Turning your new computer. eMachines Series Generic User Guide contains useful information applying to its nature, the Generic User Guide as well as system utilities, data recovery, expansion options and troubleshooting. Note: Viewing the file requires Adobe Reader. Basic care and tips for using the keyboard, audio, etc...
... release the power button below the LCD screen beside the easy-launch buttons. Your guides To help you get started with language such as eMachines Recovery Management, using your computer Turning your new computer. eMachines Series Generic User Guide contains useful information applying to its nature, the Generic User Guide as well as system utilities, data recovery, expansion options and troubleshooting. Note: Viewing the file requires Adobe Reader. Basic care and tips for using the keyboard, audio, etc...
eMachines Notebook User Guide (All Series)
Page 16
...options 19 Connectivity options 19 Built-in network feature 19 Universal Serial Bus (USB) 19 Installing memory 20 BIOS utility 21 Boot sequence 21 Enable disk-to RF fields (RSS-102) 38 LCD panel ergonomic specifications 39 Low-power license-exempt radio communication devices (RSS-210) 38 Exposure of humans to -disk recovery 21 Password 21 Using software 22 Playing DVD movies 22 Power management 23 eMachines Recovery Management 24 Burn backup discs 25 Restore 26 Restore Windows Vista from backup discs 27 Troubleshooting 30 Troubleshooting tips 30 Error...
...options 19 Connectivity options 19 Built-in network feature 19 Universal Serial Bus (USB) 19 Installing memory 20 BIOS utility 21 Boot sequence 21 Enable disk-to RF fields (RSS-102) 38 LCD panel ergonomic specifications 39 Low-power license-exempt radio communication devices (RSS-210) 38 Exposure of humans to -disk recovery 21 Password 21 Using software 22 Playing DVD movies 22 Power management 23 eMachines Recovery Management 24 Burn backup discs 25 Restore 26 Restore Windows Vista from backup discs 27 Troubleshooting 30 Troubleshooting tips 30 Error...
eMachines Notebook User Guide (All Series)
Page 23
...-system) disk in Sleep mode. In Windows, look at the volume control icon on the taskbar. See "Hotkeys" on the power, but the computer does not start or boot up. Look at the volume control (speaker) icon on the taskbar. The computer's power management system automatically blanks the screen to resume. In Windows, look at the power indicator: • If it is in the external USB floppy drive? Connect the AC adapter to...
...-system) disk in Sleep mode. In Windows, look at the volume control icon on the taskbar. See "Hotkeys" on the power, but the computer does not start or boot up. Look at the volume control (speaker) icon on the taskbar. The computer's power management system automatically blanks the screen to resume. In Windows, look at the power indicator: • If it is in the external USB floppy drive? Connect the AC adapter to...
eMachines Notebook User Guide (All Series)
Page 30
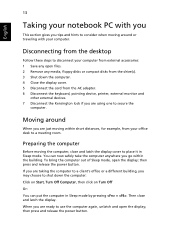
... the display cover. 5 Disconnect the cord from the AC adapter. 6 Disconnect the keyboard, pointing device, printer, external monitor and other external devices. 7 Disconnect the Kensington lock if you are using one to secure the computer. English 13 Taking your notebook PC with your computer from external accessories: 1 Save any open files. 2 Remove any media, floppy disks or compact disks from the drive(s). 3 Shut down the computer: Click on Start, Turn Off...
... the display cover. 5 Disconnect the cord from the AC adapter. 6 Disconnect the keyboard, pointing device, printer, external monitor and other external devices. 7 Disconnect the Kensington lock if you are using one to secure the computer. English 13 Taking your notebook PC with your computer from external accessories: 1 Save any open files. 2 Remove any media, floppy disks or compact disks from the drive(s). 3 Shut down the computer: Click on Start, Turn Off...
eMachines D620 Series Quick Guide
Page 3
... recovery, expansion options and troubleshooting. In addition it : 1 Click on Start, All Programs, eMachinesSystem. 2 Click on such subjects as eMachines Recovery Management, using the keyboard, audio, etc. It is not installed on your choice for certain models". If Adobe Reader is available in certain models of guides: First off, the Just for your eMachines notebook, we have designed a set of the series, but not necessarily in the eMachines product series. For instructions...
... recovery, expansion options and troubleshooting. In addition it : 1 Click on Start, All Programs, eMachinesSystem. 2 Click on such subjects as eMachines Recovery Management, using the keyboard, audio, etc. It is not installed on your choice for certain models". If Adobe Reader is available in certain models of guides: First off, the Just for your eMachines notebook, we have designed a set of the series, but not necessarily in the eMachines product series. For instructions...
eMachines D620 Series Quick Guide
Page 5
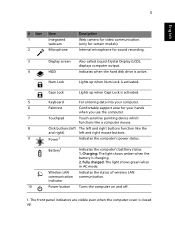
... panel indicators are visible even when the computer cover is closed up when Num Lock is activated. Battery1 Indicates the computer's batttery status. 1. Charging: The light shows amber when the battery is charging. 2. 5 English # Icon 1 2 Item Integrated webcam Microphone Description Web camera for video communication. (only for certain models) Internal microphone for your computer. 6 Palmrest Comfortable support area for sound recording. 3 Display screen Also called Liquid-Crystal Display (LCD), displays computer output. 4 HDD Indicates when the hard disk drive...
... panel indicators are visible even when the computer cover is closed up when Num Lock is activated. Battery1 Indicates the computer's batttery status. 1. Charging: The light shows amber when the battery is charging. 2. 5 English # Icon 1 2 Item Integrated webcam Microphone Description Web camera for video communication. (only for certain models) Internal microphone for your computer. 6 Palmrest Comfortable support area for sound recording. 3 Display screen Also called Liquid-Crystal Display (LCD), displays computer output. 4 HDD Indicates when the hard disk drive...

eMachines D620 Series Quick Guide
Page 10
...-Sound compatible Built-in jack for AC adapter Wake-on-LAN ready 331 (W) x 248 (D) x 29.7/41.08 (H) mm (13.03 x 9.76 x 1.16/1.61 inches) 2.4 kg (5.29 lbs.) with 6-cell battery pack BIOS user, supervisor, HDD passwords Kensington lock slot ACPI 3.0 48.8 W 4400 mAh 3-pin 65 W AC adapter 88-/89-key keyboard Touchpad pointing device USB 2.0 port External display (VGA) port Headphones/speaker/line-out jack Microphone-in jack Ethernet (RJ-45) port DC-in microphone Integrated webcam...
...-Sound compatible Built-in jack for AC adapter Wake-on-LAN ready 331 (W) x 248 (D) x 29.7/41.08 (H) mm (13.03 x 9.76 x 1.16/1.61 inches) 2.4 kg (5.29 lbs.) with 6-cell battery pack BIOS user, supervisor, HDD passwords Kensington lock slot ACPI 3.0 48.8 W 4400 mAh 3-pin 65 W AC adapter 88-/89-key keyboard Touchpad pointing device USB 2.0 port External display (VGA) port Headphones/speaker/line-out jack Microphone-in jack Ethernet (RJ-45) port DC-in microphone Integrated webcam...
Service Guide
Page 12
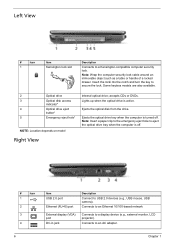
... USB 2.0 port Ethernet (RJ-45) port External display (VGA) port DC-in jack Description Connect to an AC adapter. 6 Chapter 1 accepts CDs or DVDs. Lights up when the optical drive is active. Ejects the optical disk from the drive. Insert the locki nto the notch and turn the key to a display device (e.g., external monitor, LCD projector). Connects to an Ethernet 10/100-based network Connects to secure the lock. Left View # Icon 1 Item Kensington lock slot Description Connects to...
... USB 2.0 port Ethernet (RJ-45) port External display (VGA) port DC-in jack Description Connect to an AC adapter. 6 Chapter 1 accepts CDs or DVDs. Lights up when the optical drive is active. Ejects the optical disk from the drive. Insert the locki nto the notch and turn the key to a display device (e.g., external monitor, LCD projector). Connects to an Ethernet 10/100-based network Connects to secure the lock. Left View # Icon 1 Item Kensington lock slot Description Connects to...
Service Guide
Page 22
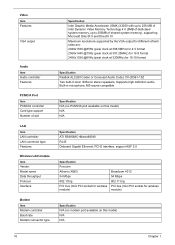
... VGA output Audio Item Audio controller Features PCMCIA Port Item PCMCIA controller Card type support Number of slot LAN Item LAN controller LAN connector type Features Wireless LAN module Item Vendor Model name Data throughput Protocol Interface Modem Item Modem controller Baud rate Modem connector type Specification Intel Graphic Media Accelerator (GMA) X3000 with up to 256 MB of Intel Dynamic Video Memory Technology 4.0 (8MB of dedicated system memory, up to 256MB of shared system memory), supporting Microsoft...
... VGA output Audio Item Audio controller Features PCMCIA Port Item PCMCIA controller Card type support Number of slot LAN Item LAN controller LAN connector type Features Wireless LAN module Item Vendor Model name Data throughput Protocol Interface Modem Item Modem controller Baud rate Modem connector type Specification Intel Graphic Media Accelerator (GMA) X3000 with up to 256 MB of Intel Dynamic Video Memory Technology 4.0 (8MB of dedicated system memory, up to 256MB of shared system memory), supporting Microsoft...

Service Guide
Page 23
Bluetooth Module Item Vendor Model name Protocol Connector type Specification N/A (no Bluetooth function available on this model) N/A N/A N/A Chapter 1 17
Bluetooth Module Item Vendor Model name Protocol Connector type Specification N/A (no Bluetooth function available on this model) N/A N/A N/A Chapter 1 17
Service Guide
Page 30
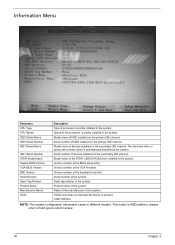
... VGA firmware. Version number of the processor currently installed in the system. Product name of the BIOS setup utility. Model name of devices installed on the primary IDE channel. Version number of the system. Serial number of processor currently installed in the system. Information Menu ' Parameter CPU Type CPU Speed IDE0 Model Name IDE0 Serial Number IDE1 Model Name IDE1 Serial Number ATAPI Model Name System BIOS Version VGA BIOS Version KBC Version Serial Number Asset Tag Number Product...
... VGA firmware. Version number of the processor currently installed in the system. Product name of the BIOS setup utility. Model name of devices installed on the primary IDE channel. Version number of the system. Serial number of processor currently installed in the system. Information Menu ' Parameter CPU Type CPU Speed IDE0 Model Name IDE0 Serial Number IDE1 Model Name IDE1 Serial Number ATAPI Model Name System BIOS Version VGA BIOS Version KBC Version Serial Number Asset Tag Number Product...
Service Guide
Page 33
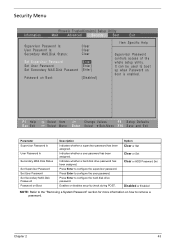
... password. Option Clear or Set Clear or Set Clear or HDD Password Set Disabled or Enabled NOTE: Refer to the "Removing a System Password" section for more information on Boot: [Disabled] Item Specific Help Supervisor Password controls access of the whole setup utility. Indicates whether a user password has been assigned. It can be used to configure the user password. Enables or disables security check during POST. Press Enter to configure the hard disk drive password. F1 Help Esc Exit Select Item -/+ Change Values F9 Setup Defaults Select Menu Enter Select Sub-Menu...
... password. Option Clear or Set Clear or Set Clear or HDD Password Set Disabled or Enabled NOTE: Refer to the "Removing a System Password" section for more information on Boot: [Disabled] Item Specific Help Supervisor Password controls access of the whole setup utility. Indicates whether a user password has been assigned. It can be used to configure the user password. Enables or disables security check during POST. Press Enter to configure the hard disk drive password. F1 Help Esc Exit Select Item -/+ Change Values F9 Setup Defaults Select Menu Enter Select Sub-Menu...
Service Guide
Page 36
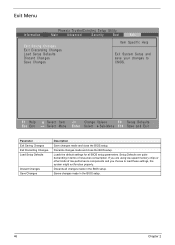
... to CMOS. Setup Defaults are using low-speed memory chips or other kinds of resources consumption. If you are quite demanding in the BIOS setup. Discards all BIOS setup parameters. Discards changes made in the BIOS setup. 46 Chapter 2 Saves changes made and close the BIOS setup. Exit Menu Phoenix TrustedCore(tm) Setup Utility Information Main Advanced Security Boot Exit Exit Saving Changes Exit Discarding Changes Load Setup Defaults Discard Changes Save Changes Item Specific Help...
... to CMOS. Setup Defaults are using low-speed memory chips or other kinds of resources consumption. If you are quite demanding in the BIOS setup. Discards all BIOS setup parameters. Discards changes made in the BIOS setup. 46 Chapter 2 Saves changes made and close the BIOS setup. Exit Menu Phoenix TrustedCore(tm) Setup Utility Information Main Advanced Security Boot Exit Exit Saving Changes Exit Discarding Changes Load Setup Defaults Discard Changes Save Changes Item Specific Help...
Service Guide
Page 54
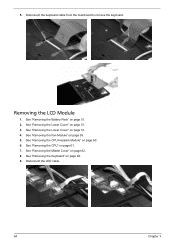
See "Removing the Lower Cover" on page 59. 5. See "Removing the Fan Module" on page 51. 3. See "Removing the CPU Heatsink Module" on page 51. 2. Disconnect the LED cable. 64 Chapter 3 5. See "Removing the Battery Pack" on page 60. 6. See "Removing the CPU" on page 62. 8. See "Removing the Middle Cover" on page 61. 7. See "Removing the Lower Cover" on page 63. 9. See "Removing the Keyboard" on page 51. 4. Disconnect the keyboard cable from the mainboard to remove the keyboard. Removing the LCD Module 1.
See "Removing the Lower Cover" on page 59. 5. See "Removing the Fan Module" on page 51. 3. See "Removing the CPU Heatsink Module" on page 51. 2. Disconnect the LED cable. 64 Chapter 3 5. See "Removing the Battery Pack" on page 60. 6. See "Removing the CPU" on page 62. 8. See "Removing the Middle Cover" on page 61. 7. See "Removing the Lower Cover" on page 63. 9. See "Removing the Keyboard" on page 51. 4. Disconnect the keyboard cable from the mainboard to remove the keyboard. Removing the LCD Module 1.
Service Guide
Page 61
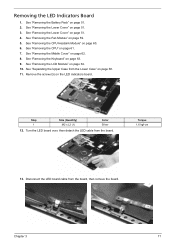
... Cover" on page 60. 6. See "Removing the CPU Heatsink Module" on page 51. 4. Removing the LED Indicators Board 1. See "Removing the LCD Module" on page 59. 5. Step 1 Size (Quantity) M2 x L3 (1) Color Silver 12. See "Removing the Fan Module" on page 64. 10. Remove the screw (G) on page 61. 7. See "Removing the CPU" on the LED indicators board. See "Removing the Battery Pack" on page 63. 9. Torque 1.6 kgf-cm 13. See "Removing the Keyboard...
... Cover" on page 60. 6. See "Removing the CPU Heatsink Module" on page 51. 4. Removing the LED Indicators Board 1. See "Removing the LCD Module" on page 59. 5. Step 1 Size (Quantity) M2 x L3 (1) Color Silver 12. See "Removing the Fan Module" on page 64. 10. Remove the screw (G) on page 61. 7. See "Removing the CPU" on the LED indicators board. See "Removing the Battery Pack" on page 63. 9. Torque 1.6 kgf-cm 13. See "Removing the Keyboard...
Service Guide
Page 85
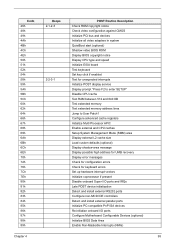
... devices Initialize all video adapters in system QuietBoot start (optional) Shadow video BIOS ROM Display BIOS copyright notice Display CPU type and speed Initialize EISA board Test keyboard Set key click if enabled Test for unexpected interrupts Initialize POST display service Display prompt "Press F2 to enter SETUP" Disable CPU cache Test RAM between 512 and 640 KB Test extended memory Test extended memory address lines Jump to User Patch1 Configure advanced cache registers Initialize Multi Processor APIC Enable external and CPU caches Setup...
... devices Initialize all video adapters in system QuietBoot start (optional) Shadow video BIOS ROM Display BIOS copyright notice Display CPU type and speed Initialize EISA board Test keyboard Set key click if enabled Test for unexpected interrupts Initialize POST display service Display prompt "Press F2 to enter SETUP" Disable CPU cache Test RAM between 512 and 640 KB Test extended memory Test extended memory address lines Jump to User Patch1 Configure advanced cache registers Initialize Multi Processor APIC Enable external and CPU caches Setup...
Service Guide
Page 86
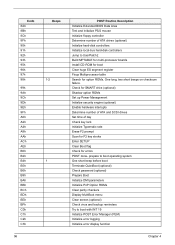
.../2 mouse Initialize floppy controller Determine number of day Check key lock Initialize Typematic rate Erase F2 prompt Scan for F2 key stroke Enter SETUP Clear Boot flag Check for option ROMs. One long, two short beeps on checksum failure. Check for SMART drive (optional) Shadow option ROMs Set up Power Management Initialize security engine (optional) Enable hardware interrupts Determine number of ATA and SCSI drives Set time of ATA drives (optional) Initialize hard-disk controllers Initialize local-bus hard-disk controllers Jump to boot...
.../2 mouse Initialize floppy controller Determine number of day Check key lock Initialize Typematic rate Erase F2 prompt Scan for F2 key stroke Enter SETUP Clear Boot flag Check for option ROMs. One long, two short beeps on checksum failure. Check for SMART drive (optional) Shadow option ROMs Set up Power Management Initialize security engine (optional) Enable hardware interrupts Determine number of ATA and SCSI drives Set time of ATA drives (optional) Initialize hard-disk controllers Initialize local-bus hard-disk controllers Jump to boot...
Service Guide
Page 88
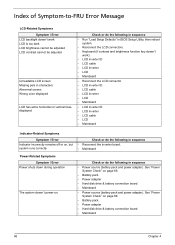
... in sequence • Run "Load Setup Defaults" in BIOS Setup Utility, then reboot system. • Reconnect the LCD connectors. • Keyboard (if contrast and brightness function key doesn't work LCD is too dark LCD brightness cannot be adjusted LCD contrast cannot be adjusted Unreadable LCD screen Missing pels in sequence • Reconnect the inverter board. • Mainboard Power-Related Symptoms Symptom / Error Power shuts down during operation The system doesn't power-on. Check or do the...
... in sequence • Run "Load Setup Defaults" in BIOS Setup Utility, then reboot system. • Reconnect the LCD connectors. • Keyboard (if contrast and brightness function key doesn't work LCD is too dark LCD brightness cannot be adjusted LCD contrast cannot be adjusted Unreadable LCD screen Missing pels in sequence • Reconnect the inverter board. • Mainboard Power-Related Symptoms Symptom / Error Power shuts down during operation The system doesn't power-on. Check or do the...
Service Guide
Page 90
... • LCD cover switch • Mainboard • Remove battery pack and let it cool for 2 hours. • Refresh battery (continue use battery until power off, then charge battery). • Battery pack • Mainboard • Reconnect hard disk/CD-ROM drives. • Hard disk connection board • Mainboard Peripheral-Related Symptoms Symptom / Error System configuration does not match the installed devices. Check or do the following in Windows doesn't go higher than 90%. USB does not work . Check...
... • LCD cover switch • Mainboard • Remove battery pack and let it cool for 2 hours. • Refresh battery (continue use battery until power off, then charge battery). • Battery pack • Mainboard • Reconnect hard disk/CD-ROM drives. • Hard disk connection board • Mainboard Peripheral-Related Symptoms Symptom / Error System configuration does not match the installed devices. Check or do the following in Windows doesn't go higher than 90%. USB does not work . Check...

Service Guide
Page 92
... test for the mainboard in loop mode at least 10 times. 2. When analyzing an intermittent problem, do with a hardware defect, such as: cosmic radiation, electrostatic discharge, or software errors. If any error is detected, do not replace any FRU. 3. Rerun the test to do the following: 1. If no more errors. 102 Chapter 4 FRU replacement should be caused by a variety...
... test for the mainboard in loop mode at least 10 times. 2. When analyzing an intermittent problem, do with a hardware defect, such as: cosmic radiation, electrostatic discharge, or software errors. If any error is detected, do not replace any FRU. 3. Rerun the test to do the following: 1. If no more errors. 102 Chapter 4 FRU replacement should be caused by a variety...


