eMachines Notebook User Guide (All Series)
Page 16
...devices (RSS-210) 38 Exposure of humans to -disk recovery 21 Password 21 Using software 22 Playing DVD movies 22 Power management 23 eMachines Recovery Management 24 Burn backup discs 25 Restore 26 Restore Windows Vista from backup discs 27 Troubleshooting 30 Troubleshooting tips 30 Error messages 30...passwords 18 Expanding through options 19 Connectivity options 19 Built-in network feature 19 Universal Serial Bus (USB) 19 Installing memory 20 BIOS utility 21 Boot sequence 21 Enable disk-to RF fields (RSS-102) 38 LCD panel ergonomic specifications 39
...devices (RSS-210) 38 Exposure of humans to -disk recovery 21 Password 21 Using software 22 Playing DVD movies 22 Power management 23 eMachines Recovery Management 24 Burn backup discs 25 Restore 26 Restore Windows Vista from backup discs 27 Troubleshooting 30 Troubleshooting tips 30 Error messages 30...passwords 18 Expanding through options 19 Connectivity options 19 Built-in network feature 19 Universal Serial Bus (USB) 19 Installing memory 20 BIOS utility 21 Boot sequence 21 Enable disk-to RF fields (RSS-102) 38 LCD panel ergonomic specifications 39
eMachines Notebook User Guide (All Series)
Page 21
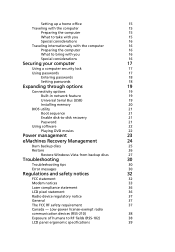
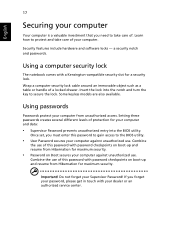
... backlight off . 4 English Hotkeys The computer employs hotkeys or key combinations to access most of the computer's controls like screen brightness, volume output and the BIOS utility.
... backlight off . 4 English Hotkeys The computer employs hotkeys or key combinations to access most of the computer's controls like screen brightness, volume output and the BIOS utility.
eMachines Notebook User Guide (All Series)
Page 24
... a power outlet and that it works, contact your notebook. Note: To activate the BIOS utility, press during POST. There is Enabled. 3 Exit the BIOS utility and save changes. The keyboard does not respond. Before performing a restore operation, please check the BIOS settings. 1 Check to see if eMachines Disk-to a USB port on the printer.
... a power outlet and that it works, contact your notebook. Note: To activate the BIOS utility, press during POST. There is Enabled. 3 Exit the BIOS utility and save changes. The keyboard does not respond. Before performing a restore operation, please check the BIOS settings. 1 Check to see if eMachines Disk-to a USB port on the printer.
eMachines Notebook User Guide (All Series)
Page 34
... boot-up and resume from unauthorized access. Combine the use of this password to gain access to the BIOS utility. • User Password secures your computer against unauthorized use. Insert the lock into the BIOS utility. Setting these passwords creates several different levels of protection for a security lock. Some keyless models are...
... boot-up and resume from unauthorized access. Combine the use of this password to gain access to the BIOS utility. • User Password secures your computer against unauthorized use. Insert the lock into the BIOS utility. Setting these passwords creates several different levels of protection for a security lock. Some keyless models are...
eMachines Notebook User Guide (All Series)
Page 35
..., a prompt appears at boot-up . • Type the User Password and press to use the computer. Important! Setting passwords You can set passwords using the BIOS utility. Press and hold the power button for four seconds to enter a password. If you press to enter the...
..., a prompt appears at boot-up . • Type the User Password and press to use the computer. Important! Setting passwords You can set passwords using the BIOS utility. Press and hold the power button for four seconds to enter a password. If you press to enter the...
eMachines Notebook User Guide (All Series)
Page 38
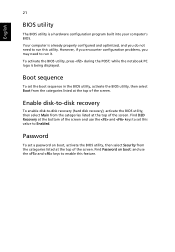
... the top of the screen. Your computer is already properly configured and optimized, and you may need to -disk recovery (hard disk recovery), activate the BIOS utility, then select Main from the categories listed at the bottom of the screen. Enable disk-to-disk recovery To enable disk-to run it.... Password To set the boot sequence in the BIOS utility, activate the BIOS utility, then select Boot from the categories listed at the top of the screen and use the and keys to enable this feature. English...
... the top of the screen. Your computer is already properly configured and optimized, and you may need to -disk recovery (hard disk recovery), activate the BIOS utility, then select Main from the categories listed at the bottom of the screen. Enable disk-to-disk recovery To enable disk-to run it.... Password To set the boot sequence in the BIOS utility, activate the BIOS utility, then select Boot from the categories listed at the top of the screen and use the and keys to enable this feature. English...
eMachines Notebook User Guide (All Series)
Page 45
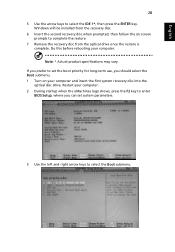
... recovery disc from the optical drive once the restore is complete. Do this before rebooting your computer. 2 During startup when the eMachines logo shows, press the F2 key to enter BIOS Setup, where you can set system parameters. 3 Use the left and right arrow keys to set the boot priority for long...
... recovery disc from the optical drive once the restore is complete. Do this before rebooting your computer. 2 During startup when the eMachines logo shows, press the F2 key to enter BIOS Setup, where you can set system parameters. 3 Use the left and right arrow keys to set the boot priority for long...
eMachines Notebook User Guide (All Series)
Page 47
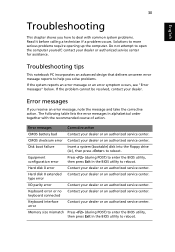
... message or an error symptom occurs, see "Error messages" below. Memory size mismatch Press (during POST) to enter the BIOS utility, then press Exit in the BIOS utility to reboot. Disk boot failure Insert a system (bootable) disk into the floppy drive (A:), then press to open the... computer yourself; Do not attempt to reboot. The following table lists the error messages in the BIOS utility to reboot. Hard disk 0 extended Contact your dealer. contact your dealer or authorized service center for assistance. 30 English Troubleshooting This...
... message or an error symptom occurs, see "Error messages" below. Memory size mismatch Press (during POST) to enter the BIOS utility, then press Exit in the BIOS utility to reboot. Disk boot failure Insert a system (bootable) disk into the floppy drive (A:), then press to open the... computer yourself; Do not attempt to reboot. The following table lists the error messages in the BIOS utility to reboot. Hard disk 0 extended Contact your dealer. contact your dealer or authorized service center for assistance. 30 English Troubleshooting This...

eMachines Notebook User Guide (All Series)
Page 48
31 If you still encounter problems after going through the corrective measures, please contact your dealer or an authorized service center for assistance. Some problems may be solved using the BIOS utility. English
31 If you still encounter problems after going through the corrective measures, please contact your dealer or an authorized service center for assistance. Some problems may be solved using the BIOS utility. English
eMachines Notebook User Guide (All Series)
Page 58
... caring for xiv characteristics 9 charging 11 checking charge level 11 installing 10 low conditions 12 maximizing life 9 optimizing 11 removing 11 using the first time 9 BIOS utility 21 brightness hotkeys 4 C caps lock 2 care AC adapter xiii battery pack xiv computer xiii CD-ROM ejecting manually 7 troubleshooting 7 charging checking level 11 cleaning...
... caring for xiv characteristics 9 charging 11 checking charge level 11 installing 10 low conditions 12 maximizing life 9 optimizing 11 removing 11 using the first time 9 BIOS utility 21 brightness hotkeys 4 C caps lock 2 care AC adapter xiii battery pack xiv computer xiii CD-ROM ejecting manually 7 troubleshooting 7 charging checking level 11 cleaning...

eMachines D620 Series Quick Guide
Page 10
Wake-on-LAN ready 331 (W) x 248 (D) x 29.7/41.08 (H) mm (13.03 x 9.76 x 1.16/1.61 inches) 2.4 kg (5.29 lbs.) with 6-cell battery pack BIOS user, supervisor, HDD passwords Kensington lock slot ACPI 3.0 48.8 W 4400 mAh 3-pin 65 W AC adapter 88-/89-key keyboard Touchpad pointing device USB 2.0 port External ...
Wake-on-LAN ready 331 (W) x 248 (D) x 29.7/41.08 (H) mm (13.03 x 9.76 x 1.16/1.61 inches) 2.4 kg (5.29 lbs.) with 6-cell battery pack BIOS user, supervisor, HDD passwords Kensington lock slot ACPI 3.0 48.8 W 4400 mAh 3-pin 65 W AC adapter 88-/89-key keyboard Touchpad pointing device USB 2.0 port External ...

Service Guide
Page 7
Wake-on-LAN ready Privacy control • BIOS user, supervisor, HDD passwords • Kensington lock slot Chapter 1 1 Chapter 1 System Specification Features Below is a brief summary of the computer's many feature: Operating system • ...
Wake-on-LAN ready Privacy control • BIOS user, supervisor, HDD passwords • Kensington lock slot Chapter 1 1 Chapter 1 System Specification Features Below is a brief summary of the computer's many feature: Operating system • ...

Service Guide
Page 18
... computer employs hotkeys or key combinations to return. Press any key to access most of the computer's controls like screen brightness, volume output and the BIOS utility. Volume down Decreases the screen brightness 12 Chapter 1 Fn-F5 Fn-F6 Fn-F7 Display toggle Screen blank Touchpad toggle Switches display output between...
... computer employs hotkeys or key combinations to return. Press any key to access most of the computer's controls like screen brightness, volume output and the BIOS utility. Volume down Decreases the screen brightness 12 Chapter 1 Fn-F5 Fn-F6 Fn-F7 Display toggle Screen blank Touchpad toggle Switches display output between...
Service Guide
Page 21
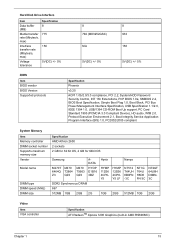
...) Voltage tolerance Specification 8 775 150 5V(DC) +/- 5% 8 794 (MK3252GSX) N/A 5V(DC) +/- 5% 8 933 150 5V(DC) +/- 5% BIOS Item BIOS vendor BIOS Version Supported protocols Specification Phoenix v0.25 ACPI 1.0b/2.0/3.0 compliance, PCI 2.2, System/HDD Password Security Control, INT 13h Extenstions, PnP... BIOS 1.0a, SMBIOS 2.4, BIOS Boot Specification, Simple Boot Flag 1.0, Boot Block, PCI Bus Power Management Interface Specification, USB Specification 1.1/2.0, IEEE ...
...) Voltage tolerance Specification 8 775 150 5V(DC) +/- 5% 8 794 (MK3252GSX) N/A 5V(DC) +/- 5% 8 933 150 5V(DC) +/- 5% BIOS Item BIOS vendor BIOS Version Supported protocols Specification Phoenix v0.25 ACPI 1.0b/2.0/3.0 compliance, PCI 2.2, System/HDD Password Security Control, INT 13h Extenstions, PnP... BIOS 1.0a, SMBIOS 2.4, BIOS Boot Specification, Simple Boot Flag 1.0, Boot Block, PCI Bus Power Management Interface Specification, USB Specification 1.1/2.0, IEEE ...
Service Guide
Page 29
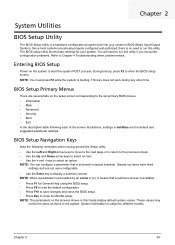
...option. Grayed-out items have fixed settings and are the default and suggested parameter settings. This key does not work during any other time. BIOS Setup Navigation Keys Note the following each of the screen illustrations, settings in square brackets. NOTE: When a parameter is preceeded by an ...submenu screen is enclosed in boldface are not user-configurable. • Use the Enter key to display a submenu screen. keys to enter the BIOS setup screen. These values may not be the same as those in this Guide display default system values. NOTE: You must press F2 while ...
...option. Grayed-out items have fixed settings and are the default and suggested parameter settings. This key does not work during any other time. BIOS Setup Navigation Keys Note the following each of the screen illustrations, settings in square brackets. NOTE: When a parameter is preceeded by an ...submenu screen is enclosed in boldface are not user-configurable. • Use the Enter key to display a submenu screen. keys to enter the BIOS setup screen. These values may not be the same as those in this Guide display default system values. NOTE: You must press F2 while ...
Service Guide
Page 30
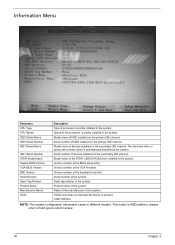
... ' Parameter CPU Type CPU Speed IDE0 Model Name IDE0 Serial Number IDE1 Model Name IDE1 Serial Number ATAPI Model Name System BIOS Version VGA BIOS Version KBC Version Serial Number Asset Tag Number Product Name Manufacturer Name UUID Description Type of the processor currently installed in the system...automatically detected by the system. Model name of the ATAPI CD/DVD-ROM drive installed in different models. Asset tag number of the BIOS setup utility. Version number of the system. Name of the manufacturer of devices installed on the secondary IDE channel. The hard disk ...
... ' Parameter CPU Type CPU Speed IDE0 Model Name IDE0 Serial Number IDE1 Model Name IDE1 Serial Number ATAPI Model Name System BIOS Version VGA BIOS Version KBC Version Serial Number Asset Tag Number Product Name Manufacturer Name UUID Description Type of the processor currently installed in the system...automatically detected by the system. Model name of the ATAPI CD/DVD-ROM drive installed in different models. Asset tag number of the BIOS setup utility. Version number of the system. Name of the manufacturer of devices installed on the secondary IDE channel. The hard disk ...
Service Guide
Page 31
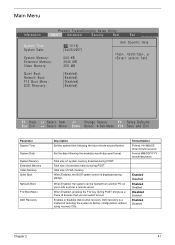
Total size of restoring the system to factory configurations without using recovery CDs. When Enabled, the BIOS splash screen is a method of system memory detected during startup. D2D recovery is displayed during POST. Main Menu Phoenix TrustedCore(tm) Setup Utility Information Main ...
Total size of restoring the system to factory configurations without using recovery CDs. When Enabled, the BIOS splash screen is a method of system memory detected during startup. D2D recovery is displayed during POST. Main Menu Phoenix TrustedCore(tm) Setup Utility Information Main ...
Service Guide
Page 35
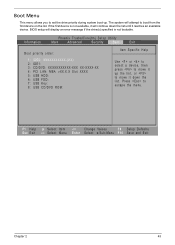
... an available device. Boot Menu This menu allows you to move it up the list, or to set the drive priority during system boot-up. BIOS setup will display an error message if the drive(s) specified is not available, it will attempt to escape the menu. Press to boot from the...
... an available device. Boot Menu This menu allows you to move it up the list, or to set the drive priority during system boot-up. BIOS setup will display an error message if the drive(s) specified is not available, it will attempt to escape the menu. Press to boot from the...
Service Guide
Page 36
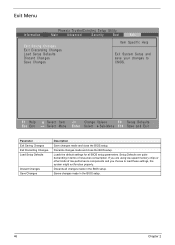
... or other kinds of low-performance components and you are quite demanding in the BIOS setup. Saves changes made and close the BIOS setup. Loads the default settings for all changes made and close the BIOS setup. Discards all BIOS setup parameters. Exit Menu Phoenix TrustedCore(tm) Setup Utility Information Main Advanced Security Boot...
... or other kinds of low-performance components and you are quite demanding in the BIOS setup. Saves changes made and close the BIOS setup. Loads the default settings for all changes made and close the BIOS setup. Discards all BIOS setup parameters. Exit Menu Phoenix TrustedCore(tm) Setup Utility Information Main Advanced Security Boot...
Service Guide
Page 81
...: If the system fails after you make changes in the computer. If the symptom is not included on the list, please refer to indicate the BIOS signals on the screen and the error symptoms classified by functions. Power-On Self-Test (POST) Error Message The POST error message index lists the... actions in the sequence shown in FRU/Action column, if the FRU replacement does not solve the problem, put the original part back in the BIOS Setup Utility menus, reset the computer, enter Setup and install Setup defaults or correct the error. Chapter 4 91
...: If the system fails after you make changes in the computer. If the symptom is not included on the list, please refer to indicate the BIOS signals on the screen and the error symptoms classified by functions. Power-On Self-Test (POST) Error Message The POST error message index lists the... actions in the sequence shown in FRU/Action column, if the FRU replacement does not solve the problem, put the original part back in the BIOS Setup Utility menus, reset the computer, enter Setup and install Setup defaults or correct the error. Chapter 4 91


