eMachines D732 Support and Manuals
Get Help and Manuals for this eMachines item
View All Support Options Below
Free eMachines D732 manuals!
Problems with eMachines D732?
Ask a Question
Free eMachines D732 manuals!
Problems with eMachines D732?
Ask a Question
Most Recent eMachines D732 Questions


Hangs
upon opening the windows and it displays the desktop icons it hangs.
upon opening the windows and it displays the desktop icons it hangs.
(Posted by joguanco 11 years ago)

I Cannot Install 3 Web Cam Drivers Application
(Posted by reyneeugenio 12 years ago)

How To Open The Bluetooth Of My Emachines D732
i cannot find the button or icon to open the bluetooth of my laptop on the description it says that ...
i cannot find the button or icon to open the bluetooth of my laptop on the description it says that ...
(Posted by me2hairone 12 years ago)
eMachines D732 Videos

Acer D732
Duration: 3:50
Total Views: 1,187
Duration: 3:50
Total Views: 1,187
Popular eMachines D732 Manual Pages
User Guide - Page 3
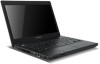
... from one in your package. 1. Chapter 3
55 See "Removing the Battery Pack" on page 53. 2. Turn the computer over onto the palm rest. Removing the Keyboard
NOTE: The model displayed in this service guide may differ in color to the one side to
remove the keyboard.
3.
There are five (5) securing clips that must be released in...
User Guide - Page 21
4.
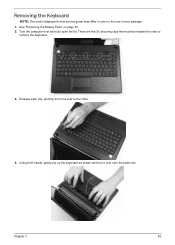
See "Removing the Thermal Module" on a clean, dry surface when it from the mainboard. Removing the CPU
1.
Chapter 3
73 Carefully lift up the thermal module assembly and remove it is not installed. Using a slotted screw driver, rotate the CPU locking screw 180° counter-clockwise as shown. IMPORTANT:Place the thermal module on page 72. 2.
User Guide - Page 31
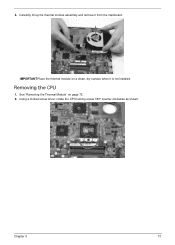
Remove the LVDS cable from the LCD panel. See "Removing the LCD Bezel" on page 80. 2. Remove the six (6) securing screws from the cable guides. Removing the LCD Panel
1.
Screw Type
Chapter 3
83 Step
LCD Panel Disassembly
Size M2.5*4.0
Quantity 6
3.
User Guide - Page 34
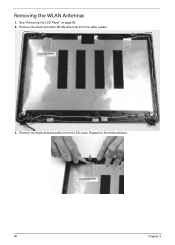
Repeat for the white antenna.
86
Chapter 3 See "Removing the LCD Panel" on page 83. 2. Remove the black antenna cable from the cable guides.
3. Removing the WLAN Antennas
1. Remove the black and white WLAN antennas from the LCD cover.
User Guide - Page 39
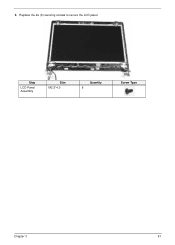
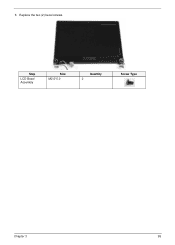
Replace the six (6) securing screws to secure the LCD panel. Step
LCD Panel Assembly
Size M2.5*4.0
Quantity 6
Screw Type
Chapter 3
91 3.
User Guide - Page 40
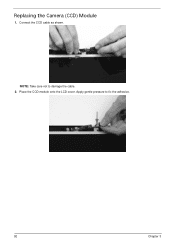
Connect the CCD cable as shown. NOTE: Take care not to fix the adhesive.
92
Chapter 3 Replacing the Camera (CCD) Module
1. Apply gentle pressure to damage the cable. 2. Place the CCD module onto the LCD cover.
User Guide - Page 41
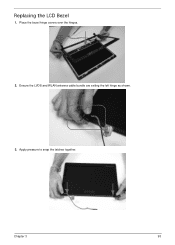
Place the bezel hinge covers over the hinges.
2. Ensure the LVDS and WLAN antenna cable bundle are exiting the left hinge as shown.
3. Apply pressure to snap the latches together.
Chapter 3
93 Replacing the LCD Bezel
1.
User Guide - Page 43
Step
LCD Bezel Assembly
Size M2.5*5.0
Quantity 2
Screw Type
Chapter 3
95 7. Replace the two (2) bezel screws.
User Guide - Page 44
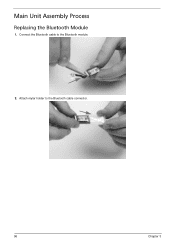
Attach mylar holder to the Bluetooth module.
2. Connect the Bluetooth cable to the Bluetooth cable connector.
96
Chapter 3 Main Unit Assembly Process
Replacing the Bluetooth Module
1.
User Guide - Page 46
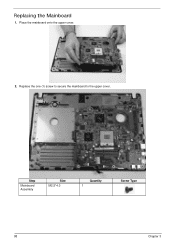
Place the mainboard onto the upper cover.
2.
Replace the one (1) screw to secure the mainboard to the upper cover. Step
Mainboard Assembly
Size M2.5*4.0
Quantity 1
Screw Type
98
Chapter 3 Replacing the Mainboard
1.
User Guide - Page 48
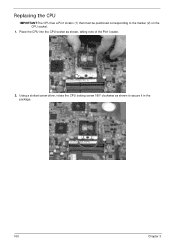
Using a slotted screw driver, rotate the CPU locking screw 180° clockwise as shown, taking note of the Pin1 locator.
1 2
2. Place the CPU into the CPU socket as shown to the marker (2) on the CPU socket.
1. Replacing the CPU
IMPORTANT:The CPU has a Pin1 locator (1) that must be positioned corresponding to secure it in the package.
100
Chapter 3
User Guide - Page 49
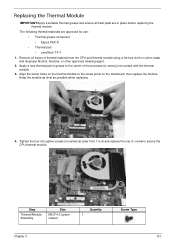
... the CPU thermal module.
4
1
3
2
Step
Thermal Module Assembly
Size
M2.5*4.0 (green callout)
Quantity 1
Screw Type
Chapter 3
101 Tighten the four (4) captive screws (in place before replacing the thermal module
The following thermal materials are approved for use:
• Thermal grease compound
• Eapus PSX-D
• Thermal pad
• LairdTech T-F-7
1. Apply a new...
User Guide - Page 51
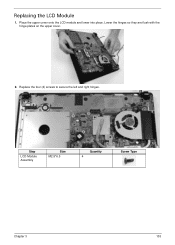
Place the upper cover onto the LCD module and lower into place. Lower the hinges so they are flush with the hinge plates on the upper cover.
2. Replace the four (4) screws to secure the left and right hinges. Step
LCD Module Assembly
Size M2.5*6.5
Quantity 4
Screw Type
Chapter 3
103
Replacing the LCD Module
1.
User Guide - Page 53
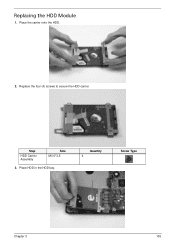
Place the carrier onto the HDD.
2. Replace the four (4) screws to secure the HDD carrier. Quantity 4
Screw Type
Chapter 3
105
Place HDD in the HDD bay. Step
HDD Carrier Assembly
Size M3.0*3.5
3.
Replacing the HDD Module
1.
User Guide - Page 55
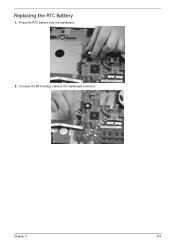
Replacing the RTC Battery
1. Place the RTC battery onto the mainboard.
2. Chapter 3
107
Connect the RTC battery cable to the mainboard connector.
eMachines D732 Reviews
 eMachines has a rating of 3.50 based upon 2 reviews.
Get much more information including the actual reviews and ratings that combined to make up the overall score listed above. Our reviewers
have graded the eMachines D732 based upon the following criteria:
eMachines has a rating of 3.50 based upon 2 reviews.
Get much more information including the actual reviews and ratings that combined to make up the overall score listed above. Our reviewers
have graded the eMachines D732 based upon the following criteria:
- Durability [2 ratings]
- Cost Effective [2 ratings]
- Quality [2 ratings]
- Operate as Advertised [2 ratings]
- Customer Service [2 ratings]