Get support for eMachines D732

eMachines D732 Support Question

eMachines D732 Support Question

Find answers below for this question about eMachines D732.
Need a eMachines D732 manual? We have 1 online manual for this item!
Question posted by agkramos on June 23rd, 2013

How To Remove Harddrive

i need to replace the harddrive

Current Answers

Answer #1: Posted by waelsaidani1 on June 23rd, 2013 4:59 AM
This answer was accepted by the poster of the original question.
waelsaidani1

Member since:
May 12th, 2013

Points: 19,501,787
1,090
points
Hello agkramos

Remove the hard drive

  1. Turn off the computer, and then disconnect the power cord.
  2. Remove the left side panel.
  3. Inside the case, the hard drive cage is located near the front of the case.
  4. At the rear of the hard drive, disconnect the power and signal cables. If more than one hard drive is installed, disconnect cables to both drives. 
  5. While supporting the hard drive cage with one hand, remove the hard drive cage thumbscrew.
    View Picture
  6. Slide the hard drive cage out of the computer case.
    View Picture
  7. Remove the four screws that secure the hard drive in the cage. There are two screws on each side of the cage.
    View Picture
  8. Slide the hard drive out of the cage.

Replace the hard drive

  1. Slide the hard drive into the hard drive cage. The rear of the drive needs to face the same direction as the tab with the screw hole for the thumbscrew.
  2. Secure the hard drive in the cage with four screws. Two screws are used on each side.
    View Picture
  3. Align the raised tabs on one side of the drive cage with the slots inside the computer case, ensuring that no cables are behind the cage, and then slide the cage into the case.
    View Picture
  4. Secure the hard drive cage in the computer with the thumbscrew.
  5. Connect the power and signal cables to the hard drive or drives.
  6. Replace the left side panel.
  7. Plug in the power cord, and then turn on the computer.

Related eMachines D732 Manual Pages

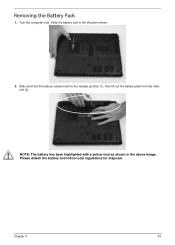
User Guide - Page 1

... out the battery pack from the main unit (2). 2 1 NOTE: The battery has been highlighted with a yellow oval as shown in the direction shown. 2. Chapter 3 53 Removing the Battery Pack 1. Please detach the battery and follow local regulations for disposal. Slide the battery lock in the above image. Turn the computer over.
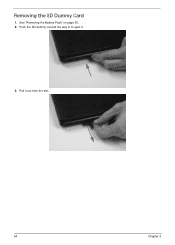
User Guide - Page 2

Pull it . 3. See "Removing the Battery Pack" on page 53. 2. Removing the SD Dummy Card 1. Push the SD dummy card all the way in to eject it out from the slot. 54 Chapter 3
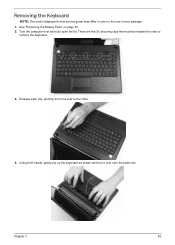
User Guide - Page 3

.... Release each clip, working from one in your package. 1. Chapter 3 55 There are five (5) securing clips that must be released in order to the other. 4. Removing the Keyboard NOTE: The model displayed in this service guide may differ in color to the one side to...
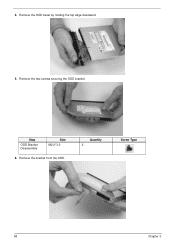
User Guide - Page 5

Remove the one (1) screw securing the ODD module in place. Grasp the ODD by the bezel and slide it out of the chassis. Step ODD Module Disassembly Size M2.5*6.5 Quantity 1 3. See "Removing the Battery Pack" on page 53. 2. Screw Type Chapter 3 57 Removing the ODD Module 1.
User Guide - Page 6

Remove the bracket from the ODD. 4. Step ODD Bracket Disassembly Size M2.0*3.0 6. Remove the ODD bezel by rotating the top edge downward. 5. Quantity 2 Screw Type 58 Chapter 3 Remove the two screws securing the ODD bracket.
User Guide - Page 8

....5*6.5 M2.0*3.0 Quantity 17 6 Screw Type 60 Chapter 3 Step HDD Carrier Disassembly LCD Module Disassembly Thermal Module Disassembly Mainboard Disassembly Screw M3.0*3.5 M2.5*6.5 M2.5*4.0 M2.5*4.0 Quantity 4 4 1 1 Removing the Lower Cover 1. Remove the twenty three (23) securing screws from the lower cover. See "External Modules Disassembly Process" on page 52. 2.
User Guide - Page 10

Disassembly Overview 1. This section is an overview of the major components of the main unit. 1 23 9 8 Item 1 2 3 4 5 Description RTC battery LVDS cable Thermal module WLAN module DIMM module(s) 76 5 4 Item 6 7 8 9 Description CPU Bluetooth cable HDD USB module 62 Chapter 3 See "Removing the Lower Cover" on page 60. 2.
User Guide - Page 11

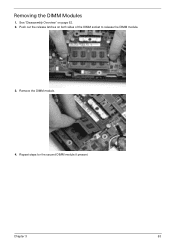
Push out the release latches on page 62. 2. Repeat steps for the second DIMM module if present. See "Disassembly Overview" on both sides of the DIMM socket to release the DIMM module. 3. Remove the DIMM module. 4. Chapter 3 63 Removing the DIMM Modules 1.
User Guide - Page 12

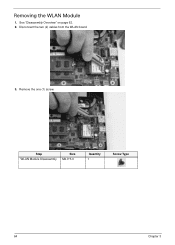
Removing the WLAN Module 1. Step WLAN Module Disassembly Size M2.0*3.0 Quantity 1 Screw Type 64 Chapter 3 See "Disassembly Overview" on page 62. 2. Remove the one (1) screw. Disconnect the two (2) cables from the WLAN board. 3.
User Guide - Page 13

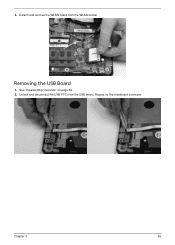
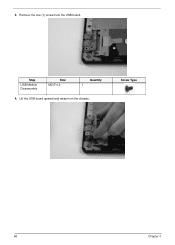
Removing the USB Board 1. Chapter 3 65 Repeat for the mainboard connector. Unlock and disconnect the USB FFC from the WLAN socket. See "Disassembly Overview" on page 62. 2. 4. Detach and remove the WLAN board from the USB board.
User Guide - Page 14

3. Remove the one (1) screw from the chassis. Lift the USB board upward and away from the USB board. Screw Type 66 Chapter 3 Step USB Module Disassembly Size M2.5*4.0 Quantity 1 4.
User Guide - Page 15

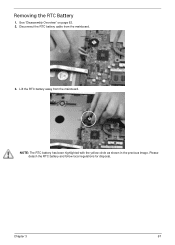
See "Disassembly Overview" on page 62. 2. Chapter 3 67 Lift the RTC battery away from the mainboard. 3. Removing the RTC Battery 1. NOTE: The RTC battery has been highlighted with the yellow circle as shown in the previous image. Please detach the RTC battery and follow local regulations for disposal. Disconnect the RTC battery cable from the mainboard.
User Guide - Page 16

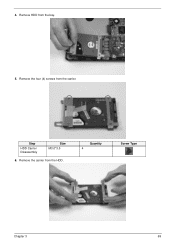
Removing the HDD Module 1. Remove the one (1) screw securing the HDD module to disconnect the interface. 68 Chapter 3 Using the pull-tab, slide the HDD module in the direction of the arrow to the mainboard. Step HDD Module Size M2-0.4*2 Quantity 1 Screw Type 3. See "Disassembly Overview" on page 62. 2.
User Guide - Page 17

Remove the carrier from the bay. 5. Remove HDD from the HDD. Step HDD Carrier Disassembly Size M3.0*3.5 6. Quantity 4 Screw Type Chapter 3 69 4. Remove the four (4) screws from the carrier.
User Guide - Page 18

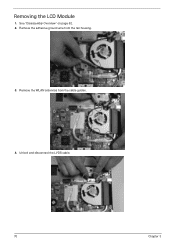
Unlock and disconnect the LVDS cable. 70 Chapter 3 Remove the adhesive ground wire from the cable guides. 4. See "Disassembly Overview" on page 62. 2. Remove the WLAN antennas from the fan housing. 3. Removing the LCD Module 1.
User Guide - Page 19

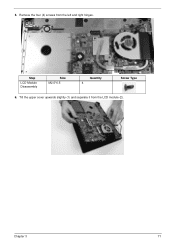
Remove the four (4) screws from the LCD module (2). 2 1 Chapter 3 71 Tilt the upper cover upwards slightly (1) and separate it from the left and right hinges. Step LCD Module Disassembly Size M2.5*6.5 Quantity 4 Screw Type 6. 5.
User Guide - Page 20

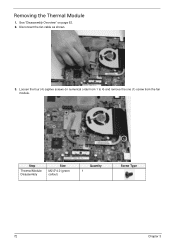
Removing the Thermal Module 1. Disconnect the fan cable as shown. 3. Loosen the four (4) captive screws (in numerical order from 1 to 4) and remove the one (1) screw from the fan module. 4 1 3 Step Thermal Module Disassembly Size M2.5*4.0 (green callout) 2 Quantity 1 Screw Type 72 Chapter 3 See "Disassembly Overview" on page 62. 2.
User Guide - Page 21

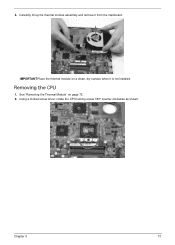
See "Removing the Thermal Module" on a clean, dry surface when it from the mainboard. Chapter 3 73 4. Removing the CPU 1. IMPORTANT:Place the thermal module on page 72. 2. Using a slotted screw driver, rotate the CPU locking screw 180° counter-clockwise as shown. Carefully lift up the thermal module assembly and remove it is not installed.
User Guide - Page 37

Step LCD Hinge Assembly Size M2.0*3.0 Quantity 6 Screw Type Chapter 3 89 Replacing the LCD Hinges 1. See "Removing the LCD Panel" on each side to secure the hinges. Replace the four (4) screws, 2 on page 83. 2.
User Guide - Page 49

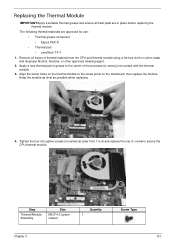
...Acetone, or other approved cleaning agent. 2. Keep the module as level as possible when replacing. 4. Remove all heat pads are approved for use: • Thermal grease compound • Eapus... pad • LairdTech T-F-7 1. Align the screw holes on the mainboard, then replace the module. Replacing the Thermal Module IMPORTANT:Apply a suitable thermal grease and ensure all traces of the...

Similar Questions

My Laptop Gives A Consider Replacing Battery Message.
does it means my battery is over
(Posted by 1poppienel 9 years ago)
Driver Software For Wifi
can i install wi-fi software to my laptop emachines model no.d729Z ?
(Posted by piyuspal007 9 years ago)
Hard Drive Access
i have an e machine d728 that has a hard drive immenant failure detected, can u pease advise as to h...
(Posted by springtech 10 years ago)
Emachines Model E730, Few Keys Not Working On Keyboard
The following keys are not working: Letters: i, o numbers; 2,4,5,6,7,8,9,0
(Posted by Anonymous-96094 11 years ago)
How To Open The Bluetooth Of My Emachines D732
i cannot find the button or icon to open the bluetooth of my laptop on the description it says that ...
(Posted by me2hairone 12 years ago)
Ask a New Question
Use the box below to post a new question about this eMachines product .
Points & Prizes
  • You can earn points for nearly everything you do on HelpOwl.com
  • You can trade in those points for gift cards at leading retailers such as Amazon.com and Walmart
  • It's that simple!
See How it Works
Create a Free Account

eMachines Manuals

Find free eMachines D732 manuals and user guides available at ManualOwl.com. Try out our unique manual viewer allowing you to interact with manuals from directly within your browser!

eMachines Reviews

View thousands of eMachines user reviews and customer ratings available at ReviewOwl.com.

Contact Information

Complete eMachines customer service contact information including steps to reach representatives, hours of operation, customer support links and more from ContactHelp.com.

Scoreboard Ratings

See detailed eMachines customer service rankings, employee comments and much more from our sister site.