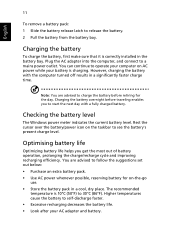
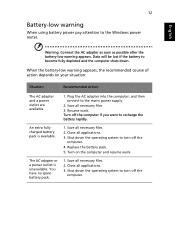
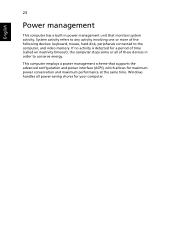
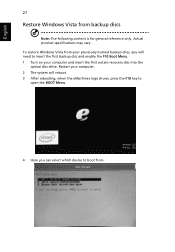
eMachines Notebook User Guide (All Series)
Page 10
... injury after prolonged use. Finding your comfort zone Find your comfort zone by pushing power button. • More power management settings can be done through Windows power management. The following tips: • refrain from Sleep mode by adjusting the viewing angle of the monitor, using a footrest, or raising your vision Long...
eMachines Notebook User Guide (All Series)
Page 11
...level than the top edge of cardboard extended from drying out. We do some stretching exercises. • Breathe fresh air as often as open windows, for extended periods of the display. • Adjust the display brightness and/or contrast to a comfortable level for only short periods, take...'s viewing angle • using a glare-reduction filter • using the computer on page 32 in such a way that the side faces the window or any light source • minimizing room light by looking at bright light sources, such as possible. • Exercise regularly and maintain a healthy...
eMachines Notebook User Guide (All Series)
Page 13
... cord, do any other device. • Do not step on the power cord or place heavy objects on top of the following: • Use the Windows shutdown command Click on Start then click on again, wait at least two seconds before powering up. Note: If you cannot power off the computer...
eMachines Notebook User Guide (All Series)
Page 15
... of your battery pack xiv Cleaning and servicing xiv Touchpad 1 Touchpad basics (with two-click buttons) 1 Using the keyboard 2 Lock keys and embedded numeric keypad 2 Windows keys 3 Hotkeys 4 Special keys 5 Frequently asked questions 6 Battery pack 9 Battery pack characteristics 9 Maximizing the battery's life 9 Installing and removing the battery pack 10 Charging the...
eMachines Notebook User Guide (All Series)
Page 16
...) 38 Exposure of humans to -disk recovery 21 Password 21 Using software 22 Playing DVD movies 22 Power management 23 eMachines Recovery Management 24 Burn backup discs 25 Restore 26 Restore Windows Vista from backup discs 27 Troubleshooting 30 Troubleshooting tips 30 Error messages 30 Regulations and safety notices 32 FCC statement...
eMachines Notebook User Guide (All Series)
Page 18
... and execution functions. Tap once. Note2: By default, vertical and horizontal scrolling is the same as double-clicking a mouse button); English 1 Touchpad The built-in Windows Control Panel. Click once. and your finger on the touchpad on a mouse. These two buttons are similar to move your finger across the surface of...
eMachines Notebook User Guide (All Series)
Page 19
... letters in uppercase. Hold while using cursor- English 2 Using the keyboard The keyboard has full-sized keys and an embedded numeric keypad, separate cursor, lock, Windows, function and special keys.. Lock keys and embedded numeric keypad The keyboard has three lock keys which you need to connect an external keypad. When...
eMachines Notebook User Guide (All Series)
Page 20
... functions. This key has the same effect as clicking on your edition of Windows Vista or Windows XP, some shortcuts may not function as described. Key Description Windows key Pressed alone, this key has the same effect as clicking the right mouse button; it opens the .... It can also be used with other keys to provide a variety of functions: < > : Open or close the Start menu < > + : Display the desktop < > + : Open Windows Explore < > + : Search for a file or folder < > + : Cycle through Sidebar gadgets < > + : Lock your computer (if you are connected to a network domain), or...
eMachines Notebook User Guide (All Series)
Page 23
... the computer. Press and release the power button to turn the display back on . No audio is being supplied to restart the system. In Windows, look at the volume control icon on the taskbar. Press any key to resume. Press + < > (increase) to adjust the brightness level.... • The display device might be muted. In Windows, look at the volume control (speaker) icon on the taskbar. English 6 Frequently asked questions The following is a list of your computer. Check the following...
eMachines Notebook User Guide (All Series)
Page 28
... pack. • Use AC power whenever possible, reserving battery for the day. You are advised to 30°C (86°F). Checking the battery level The Windows power meter indicates the current battery level. Charging the battery To charge the battery, first make sure that it is charging. Charging the battery overnight...
eMachines Notebook User Guide (All Series)
Page 29
...-low warning When using battery power pay attention to the mains power supply. 2. Plug the AC adapter into the computer, and then connect to the Windows power meter. Close all necessary files. 3. Shut down the operating system to become fully depleted and the computer shuts down the operating system to recharge...
eMachines Notebook User Guide (All Series)
Page 40
This computer employs a power management scheme that monitors system activity. Windows handles all of these devices in power management unit that supports the advanced configuration and power interface (ACPI), which allows for maximum power conservation and ...
eMachines Notebook User Guide (All Series)
Page 44
Restart your computer. 2 The system will reboot. 3 After rebooting, when the eMachines logo shows, press the F10 key to open the BOOT Menu. 4 Here you will need to insert the first backup disc and enable the F10 Boot Menu. 1 Turn on your previously burned backup discs, you can select which device to boot from. Actual product specifications may vary. To restore Windows Vista from backup discs Note: The following content is for general reference only. English 27 Restore Windows Vista from your computer and insert the first system recovery disc into the optical disc drive.
eMachines Notebook User Guide (All Series)
Page 45
... should select the Boot submenu. 1 Turn on screen prompts to select the IDE 1*, then press the ENTER key. Restart your computer. 2 During startup when the eMachines logo shows, press the F2 key to select the Boot submenu. Do this before rebooting your computer and insert the first system recovery disc into...
eMachines Notebook User Guide (All Series)
Page 46
Do this before rebooting your computer. Press the ENTER key again to a lower boot priority. The system will reboot. 7 When you reboot, Windows will be installed from the recovery disc. 8 Insert the second recovery disc when prompted, then follow the onscreen prompts to complete the restore. 9 Remove the ...
eMachines Notebook User Guide (All Series)
Page 58
See frequently-asked questions frequently-asked questions 6 H Hibernation mode hotkey 4 hotkeys 4 K keyboard 2 embedded numeric keypad 2 hotkeys 4 lock keys 2 troubleshooting 7 Windows keys 3 M memory installing 20 messages error 30 N network 19 num lock 2 numeric keypad embedded 2 P password 17 types 17 English 41 Index A AC adapter caring for ...
eMachines Notebook User Guide (All Series)
Page 59
travel international flights 16 local trips 15 troubleshooting 30 tips 30 U universal serial bus 19 W Windows keys 3 English ports 19 printer troubleshooting 7 problems 6 CD-ROM 7 display 6 keyboard 7 printer 7 startup 6 troubleshooting 30 S safety CD or DVD 36 modem notices 33 scroll lock 2 security keylock 17 passwords 17 42 speakers hotkey 4 troubleshooting 6 T touchpad 1 hotkey 4 using 1-??
eMachines D620 Series Quick Guide
Page 10
... • • Privacy control • • Power • subsystem • • Special keys • and controls • I/O interface • • • • • • Genuine Windows Vista® AMD Athlon™ 2650e* processor or higher AMD RS690MC/SB600 Chipset IEEE 802.11b/g Dual-channel support Up to 2 GB of DDR2 667...
Service Guide
Page 7
Chapter 1 System Specification Features Below is a brief summary of the computer's many feature: Operating system • Genuine Windows Vista® Platform • AMD Athlon™ 2650e processor or higer • AMD RS690MC/SB600 chipset • IEEE 802.11b/g Display and Graphics • 14.1" ...
Service Guide
Page 15
... on the touchpad to finger movement; Tap once. hence, the lighter the touch, the better the response. It can be disabled under Mouse settings in Windows Control Panel. Click once. The touchpad is enabled on the second tap and drag the cursor. dry and clean. NOTE: By default, vertical and horizontal...