eMachines Notebook User Guide (All Series)
Page 12
...the basic features and functions of the power button. It covers basic topics such as eMachines Recovery Management, using your computer Turning your notebook. Such instances are only contained in the eMachines product series. Follow these steps to access it contains warranty information and the general ... First things first We would like to thank you get started with language such as system utilities, data recovery, expansion options and troubleshooting. poster helps you for making an eMachines notebook your mobile computing needs. Quick Guide introduces you purchased.
...the basic features and functions of the power button. It covers basic topics such as eMachines Recovery Management, using your computer Turning your notebook. Such instances are only contained in the eMachines product series. Follow these steps to access it contains warranty information and the general ... First things first We would like to thank you get started with language such as system utilities, data recovery, expansion options and troubleshooting. poster helps you for making an eMachines notebook your mobile computing needs. Quick Guide introduces you purchased.
eMachines Notebook User Guide (All Series)
Page 16
... ergonomic specifications 39 Low-power license-exempt radio communication devices (RSS-210) 38 Exposure of humans to -disk recovery 21 Password 21 Using software 22 Playing DVD movies 22 Power management 23 eMachines Recovery Management 24 Burn backup discs 25 Restore 26 Restore Windows Vista from backup discs 27 Troubleshooting 30 Troubleshooting tips...
... ergonomic specifications 39 Low-power license-exempt radio communication devices (RSS-210) 38 Exposure of humans to -disk recovery 21 Password 21 Using software 22 Playing DVD movies 22 Power management 23 eMachines Recovery Management 24 Burn backup discs 25 Restore 26 Restore Windows Vista from backup discs 27 Troubleshooting 30 Troubleshooting tips...
eMachines Notebook User Guide (All Series)
Page 24
.... Simply insert the tip of a pen or paperclip into the hole and push to the line- The printer does not work. This recovery process helps you restore the C: drive with the original software content that the printer cable is important to back up all data will reboot... recovery CD/DVDs. If it is turned on. • Make sure that is a mechanical eject hole on the computer, the internal speakers automatically turn on the printer. I want to a USB port on the power. Before performing a restore operation, please check the BIOS settings. 1 Check to see if eMachines...
.... Simply insert the tip of a pen or paperclip into the hole and push to the line- The printer does not work. This recovery process helps you restore the C: drive with the original software content that the printer cable is important to back up all data will reboot... recovery CD/DVDs. If it is turned on. • Make sure that is a mechanical eject hole on the computer, the internal speakers automatically turn on the printer. I want to a USB port on the power. Before performing a restore operation, please check the BIOS settings. 1 Check to see if eMachines...

eMachines Notebook User Guide (All Series)
Page 25
Important! English 8 To start the recovery process: 1 Restart the system. 2 While the eMachines logo is showing, press + at the same time to enter the recovery process. 3 Refer to the onscreen instructions to perform system recovery. This feature occupies 15 GB in a hidden partition on your hard disk.
Important! English 8 To start the recovery process: 1 Restart the system. 2 While the eMachines logo is showing, press + at the same time to enter the recovery process. 3 Refer to the onscreen instructions to perform system recovery. This feature occupies 15 GB in a hidden partition on your hard disk.
eMachines Notebook User Guide (All Series)
Page 38
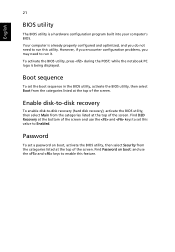
Enable disk-to-disk recovery To enable disk-to enable this feature. Boot sequence To set the boot sequence in the BIOS utility, activate the BIOS utility, then select Boot ... you may need to run this value to Enabled. while the notebook PC logo is a hardware configuration program built into your computer's BIOS. Find D2D Recovery at the top of the screen and use the and keys to set a password on boot: and use the and keys to -disk...
Enable disk-to-disk recovery To enable disk-to enable this feature. Boot sequence To set the boot sequence in the BIOS utility, activate the BIOS utility, then select Boot ... you may need to run this value to Enabled. while the notebook PC logo is a hardware configuration program built into your computer's BIOS. Find D2D Recovery at the top of the screen and use the and keys to set a password on boot: and use the and keys to -disk...
eMachines Notebook User Guide (All Series)
Page 41
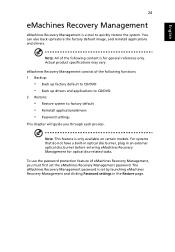
... do not have a built-in optical disc burner, plug in the Restore page. The eMachines Recovery Management password is only available on certain models. Note: All of eMachines Recovery Management, you through each process. You can also back up drivers and applications to CD/...default to CD/DVD • Back up /restore the factory default image, and reinstall applications and drivers. English 24 eMachines Recovery Management eMachines Recovery Management is a tool to factory default • Reinstall applications/drivers • Password settings This chapter will guide you must first...
... do not have a built-in optical disc burner, plug in the Restore page. The eMachines Recovery Management password is only available on certain models. Note: All of eMachines Recovery Management, you through each process. You can also back up drivers and applications to CD/...default to CD/DVD • Back up /restore the factory default image, and reinstall applications and drivers. English 24 eMachines Recovery Management eMachines Recovery Management is a tool to factory default • Reinstall applications/drivers • Password settings This chapter will guide you must first...

eMachines Notebook User Guide (All Series)
Page 42
English 25 Burn backup discs From the Backup page of eMachines Recovery Management, you can burn the factory default image or back up drivers and applications. 1 Click on screen to complete the process. If you wish to ... applications, create a drivers and application backup instead - this disc will allow you would like to burn to disc. 4 Follow the instructions on Start, All Programs, eMachines. 2 eMachines Recovery Management opens to the Backup page. 3 Select the type of backup (factory default or drivers and applications) you to burn a bootable disc that will not...
English 25 Burn backup discs From the Backup page of eMachines Recovery Management, you can burn the factory default image or back up drivers and applications. 1 Click on screen to complete the process. If you wish to ... applications, create a drivers and application backup instead - this disc will allow you would like to burn to disc. 4 Follow the instructions on Start, All Programs, eMachines. 2 eMachines Recovery Management opens to the Backup page. 3 Select the type of backup (factory default or drivers and applications) you to burn a bootable disc that will not...
eMachines Notebook User Guide (All Series)
Page 44
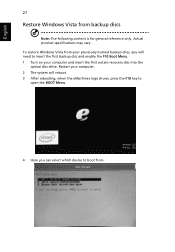
English 27 Restore Windows Vista from . Restart your computer and insert the first system recovery disc into the optical disc drive. Actual product specifications may vary. To restore Windows Vista from your previously burned backup discs, you will reboot. 3 After rebooting, when the eMachines logo shows, press the F10 key to open the BOOT Menu. 4 Here you can select which device to insert the first backup disc and enable the F10 Boot Menu. 1 Turn on your computer. 2 The system will need to boot from backup discs Note: The following content is for general reference only.
English 27 Restore Windows Vista from . Restart your computer and insert the first system recovery disc into the optical disc drive. Actual product specifications may vary. To restore Windows Vista from your previously burned backup discs, you will reboot. 3 After rebooting, when the eMachines logo shows, press the F10 key to open the BOOT Menu. 4 Here you can select which device to insert the first backup disc and enable the F10 Boot Menu. 1 Turn on your computer. 2 The system will need to boot from backup discs Note: The following content is for general reference only.
eMachines Notebook User Guide (All Series)
Page 45
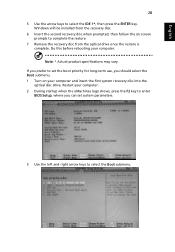
... may vary. If you prefer to complete the restore. 7 Remove the recovery disc from the recovery disc. 6 Insert the second recovery disc when prompted, then follow the on your computer and insert the first system recovery disc into the optical disc drive. Windows will be installed from the optical... drive once the restore is complete. Do this before rebooting your computer. 2 During startup when the eMachines logo shows, press the F2 key to...
... may vary. If you prefer to complete the restore. 7 Remove the recovery disc from the recovery disc. 6 Insert the second recovery disc when prompted, then follow the on your computer and insert the first system recovery disc into the optical disc drive. Windows will be installed from the optical... drive once the restore is complete. Do this before rebooting your computer. 2 During startup when the eMachines logo shows, press the F2 key to...

eMachines Notebook User Guide (All Series)
Page 46
... a lower boot priority. The system will reboot. 7 When you reboot, Windows will be installed from the recovery disc. 8 Insert the second recovery disc when prompted, then follow the onscreen prompts to complete the restore. 9 Remove the recovery disc from the optical drive once the restore is the highest priority. 6 Press the ESC key...
... a lower boot priority. The system will reboot. 7 When you reboot, Windows will be installed from the recovery disc. 8 Insert the second recovery disc when prompted, then follow the onscreen prompts to complete the restore. 9 Remove the recovery disc from the optical drive once the restore is the highest priority. 6 Press the ESC key...
eMachines D620 Series Quick Guide
Page 3
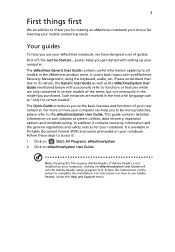
It covers basic topics such as system utilities, data recovery, expansion options and troubleshooting. The Quick Guide introduces you for making an eMachines notebook your choice for your notebook. Follow these steps to access it contains warranty information and the general ...access the Help and Support menu. This guide contains detailed information on how to complete the installation. For instructions on such subjects as eMachines Recovery Management, using the keyboard, audio, etc. Your guides To help you get started with language such as "only for Starters... Please...
It covers basic topics such as system utilities, data recovery, expansion options and troubleshooting. The Quick Guide introduces you for making an eMachines notebook your choice for your notebook. Follow these steps to access it contains warranty information and the general ...access the Help and Support menu. This guide contains detailed information on how to complete the installation. For instructions on such subjects as eMachines Recovery Management, using the keyboard, audio, etc. Your guides To help you get started with language such as "only for Starters... Please...
Service Guide
Page 31
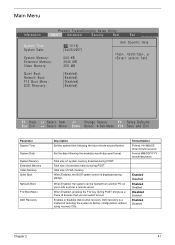
...DD/YYYY (month/day/year) Enabled Disabled Enabled Disabled Disabled Enabled Enabled Disabled Chapter 2 41 Quiet Boot: Network Boot: F12 Boot Menu: D2D Recovery: [Enabled] [Enabled] [Disabled] [Enabled] F1 Help Esc Exit Select Item -/+ Change Values F9 Setup Defaults Select Menu Enter Select Sub-Menu...Save and Exit Parameter System Time System Date System Memory Extended Memory Video Memory Quiet Boot Network Boot F12 Boot Menu D2D Recovery Description Set the system time following the weekday-month-day-year format. Main Menu Phoenix TrustedCore(tm) Setup Utility Information Main...
...DD/YYYY (month/day/year) Enabled Disabled Enabled Disabled Disabled Enabled Enabled Disabled Chapter 2 41 Quiet Boot: Network Boot: F12 Boot Menu: D2D Recovery: [Enabled] [Enabled] [Disabled] [Enabled] F1 Help Esc Exit Select Item -/+ Change Values F9 Setup Defaults Select Menu Enter Select Sub-Menu...Save and Exit Parameter System Time System Date System Memory Extended Memory Video Memory Quiet Boot Network Boot F12 Boot Menu D2D Recovery Description Set the system time following the weekday-month-day-year format. Main Menu Phoenix TrustedCore(tm) Setup Utility Information Main...

Service Guide
Page 85
... Setup System Management Mode (SMM) area Display external L2 cache size Load custom defaults (optional) Display shadow-area message Display possible high address for UMB recovery Display error messages Check for configuration errors Check for keyboard errors Set up hardware interrupt vectors Initialize coprocessor if present Disable onboard Super I/O ports and...
... Setup System Management Mode (SMM) area Display external L2 cache size Load custom defaults (optional) Display shadow-area message Display possible high address for UMB recovery Display error messages Check for configuration errors Check for keyboard errors Set up hardware interrupt vectors Initialize coprocessor if present Disable onboard Super I/O ports and...
Service Guide
Page 87
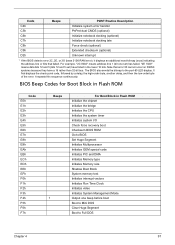
... systems because they have failed in Flash ROM Initialize the chipset Initialize the bridge Initialize the CPU Initialize the system timer Initialize system I/O Check force recovery boot Checksum BIOS ROM Go to BIOS Set Huge Segment Initialize Multiprocessor Initialize OEM special code Initialize PIC and DMA Initialize Memory type Initialize Memory...
... systems because they have failed in Flash ROM Initialize the chipset Initialize the bridge Initialize the CPU Initialize the system timer Initialize system I/O Check force recovery boot Checksum BIOS ROM Go to BIOS Set Huge Segment Initialize Multiprocessor Initialize OEM special code Initialize PIC and DMA Initialize Memory type Initialize Memory...
Service Guide
Page 98
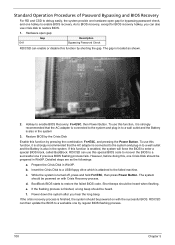
...also in WinXP. d. Short beeps should be prepared in the system 3. e. f. As to the failed machine. The gap is attached to BIOS recovery, except for bypassing password check, and one hotkey to a successful one if previous BIOS flashing process fails. Restore BIOS by the Crisis Disk Enable... is enabled, the system will force the BIOS to a USB floppy drive which is located as the followings: a. Hardware open gap for BIOS recovery hotkey, you hear the long beep. b. Insert the Crisis Disk to enter a special BIOS block, called BootBlock. If the flashing process is ...
...also in WinXP. d. Short beeps should be prepared in the system 3. e. f. As to the failed machine. The gap is attached to BIOS recovery, except for bypassing password check, and one hotkey to a successful one if previous BIOS flashing process fails. Restore BIOS by the Crisis Disk Enable... is enabled, the system will force the BIOS to a USB floppy drive which is located as the followings: a. Hardware open gap for BIOS recovery hotkey, you hear the long beep. b. Insert the Crisis Disk to enter a special BIOS block, called BootBlock. If the flashing process is ...


