eMachines Notebook User Guide (All Series)
Page 5
... environment. Do not pierce, open or disassemble the battery. Note: The grounding pin also provides good protection from unexpected noise produced by a qualified technician to restore the product to service this product from the wall outlet and refer servicing to qualified service personnel when: • the power cord or plug is...
... environment. Do not pierce, open or disassemble the battery. Note: The grounding pin also provides good protection from unexpected noise produced by a qualified technician to restore the product to service this product from the wall outlet and refer servicing to qualified service personnel when: • the power cord or plug is...
eMachines Notebook User Guide (All Series)
Page 16
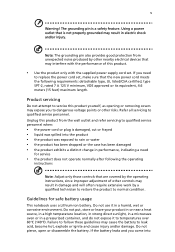
...-210) 38 Exposure of humans to -disk recovery 21 Password 21 Using software 22 Playing DVD movies 22 Power management 23 eMachines Recovery Management 24 Burn backup discs 25 Restore 26 Restore Windows Vista from backup discs 27 Troubleshooting 30 Troubleshooting tips 30 Error messages 30 Regulations and safety notices 32 FCC statement...
...-210) 38 Exposure of humans to -disk recovery 21 Password 21 Using software 22 Playing DVD movies 22 Power management 23 eMachines Recovery Management 24 Burn backup discs 25 Restore 26 Restore Windows Vista from backup discs 27 Troubleshooting 30 Troubleshooting tips 30 Error messages 30 Regulations and safety notices 32 FCC statement...

eMachines Notebook User Guide (All Series)
Page 20
... alone, this key has the same effect as clicking on your edition of Access Center < > + : Open Windows Mobility Center < > + : Display the System Properties dialog box < > + : Restore minimized windows to the desktop < > + : Cycle through programs on the taskbar by using Windows Flip 3-D < > + : Bring all gadgets to the front and select Windows Sidebar...
... alone, this key has the same effect as clicking on your edition of Access Center < > + : Open Windows Mobility Center < > + : Display the System Properties dialog box < > + : Restore minimized windows to the desktop < > + : Cycle through programs on the taskbar by using Windows Flip 3-D < > + : Bring all gadgets to the front and select Windows Sidebar...
eMachines Notebook User Guide (All Series)
Page 24
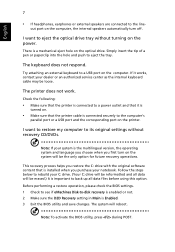
... turning on the system will reboot. There is turned on the printer. If it is a mechanical eject hole on the computer. I want to restore my computer to rebuild your dealer or an authorized service center as the internal keyboard cable may be loose. This recovery process helps you...the hole and push to the line- The keyboard does not respond. The printer does not work. Before performing a restore operation, please check the BIOS settings. 1 Check to see if eMachines Disk-to-disk recovery is enabled or not. 2 Make sure the D2D Recovery setting in Main is important to ...
... turning on the system will reboot. There is turned on the printer. If it is a mechanical eject hole on the computer. I want to restore my computer to rebuild your dealer or an authorized service center as the internal keyboard cable may be loose. This recovery process helps you...the hole and push to the line- The keyboard does not respond. The printer does not work. Before performing a restore operation, please check the BIOS settings. 1 Check to see if eMachines Disk-to-disk recovery is enabled or not. 2 Make sure the D2D Recovery setting in Main is important to ...
eMachines Notebook User Guide (All Series)
Page 41
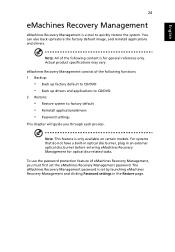
... do not have a built-in optical disc burner, plug in the Restore page. The eMachines Recovery Management password is for optical disc-related tasks. Note: All of the following content is set the eMachines Recovery Management password. English 24 eMachines Recovery Management eMachines Recovery Management is only available on certain models. You can also back...
... do not have a built-in optical disc burner, plug in the Restore page. The eMachines Recovery Management password is for optical disc-related tasks. Note: All of the following content is set the eMachines Recovery Management password. English 24 eMachines Recovery Management eMachines Recovery Management is only available on certain models. You can also back...
eMachines Notebook User Guide (All Series)
Page 43
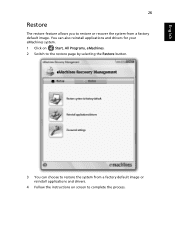
You can also reinstall applications and drivers for your eMachines system. 1 Click on Start, All Programs, eMachines. 2 Switch to the restore page by selecting the Restore button. 3 You can choose to restore the system from a factory default image or reinstall applications and drivers. 4 Follow the instructions on screen to restore or recover the system from a factory default image. English 26 Restore The restore feature allows you to complete the process.
You can also reinstall applications and drivers for your eMachines system. 1 Click on Start, All Programs, eMachines. 2 Switch to the restore page by selecting the Restore button. 3 You can choose to restore the system from a factory default image or reinstall applications and drivers. 4 Follow the instructions on screen to restore or recover the system from a factory default image. English 26 Restore The restore feature allows you to complete the process.
eMachines Notebook User Guide (All Series)
Page 44
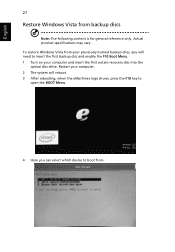
Restart your computer. 2 The system will reboot. 3 After rebooting, when the eMachines logo shows, press the F10 key to open the BOOT Menu. 4 Here you will need to insert the first backup disc and enable the F10 Boot Menu. 1 Turn on your previously burned backup discs, you can select which device to boot from. To restore Windows Vista from backup discs Note: The following content is for general reference only. English 27 Restore Windows Vista from your computer and insert the first system recovery disc into the optical disc drive. Actual product specifications may vary.
Restart your computer. 2 The system will reboot. 3 After rebooting, when the eMachines logo shows, press the F10 key to open the BOOT Menu. 4 Here you will need to insert the first backup disc and enable the F10 Boot Menu. 1 Turn on your previously burned backup discs, you can select which device to boot from. To restore Windows Vista from backup discs Note: The following content is for general reference only. English 27 Restore Windows Vista from your computer and insert the first system recovery disc into the optical disc drive. Actual product specifications may vary.
eMachines Notebook User Guide (All Series)
Page 45
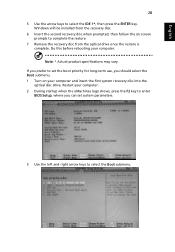
...rebooting your computer and insert the first system recovery disc into the optical disc drive. English 28 5 Use the arrow keys to complete the restore. 7 Remove the recovery disc from the recovery disc. 6 Insert the second recovery disc when prompted, then follow the on your computer. Windows... will be installed from the optical drive once the restore is complete. Note: * Actual product specifications may vary. Restart your computer. 2 During startup when the eMachines logo shows, press the F2 key to enter BIOS Setup, where you can set the ...
...rebooting your computer and insert the first system recovery disc into the optical disc drive. English 28 5 Use the arrow keys to complete the restore. 7 Remove the recovery disc from the recovery disc. 6 Insert the second recovery disc when prompted, then follow the on your computer. Windows... will be installed from the optical drive once the restore is complete. Note: * Actual product specifications may vary. Restart your computer. 2 During startup when the eMachines logo shows, press the F2 key to enter BIOS Setup, where you can set the ...

eMachines Notebook User Guide (All Series)
Page 46
Press the ENTER key again to complete the restore. 9 Remove the recovery disc from the optical drive once the restore is the highest priority. 6 Press the ESC key to enter the Exit submenu, press the ENTER key to a lower boot priority. Do this before rebooting ...
Press the ENTER key again to complete the restore. 9 Remove the recovery disc from the optical drive once the restore is the highest priority. 6 Press the ESC key to enter the Exit submenu, press the ENTER key to a lower boot priority. Do this before rebooting ...
Service Guide
Page 17
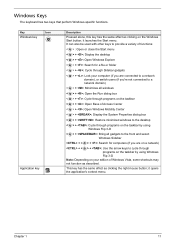
... the Run dialog box < > + : Cycle through programs on the taskbar < > + : Open Ease of Access Center < > + : Open Windows Mobility Center < > + : Display the System Properties dialog box < > + : Restore minimized windows to the desktop < > + : Cycle through programs on the taskbar by using Windows Flip 3-D < > + : Bring all gadgets to the front and select Windows Sidebar...
... the Run dialog box < > + : Cycle through programs on the taskbar < > + : Open Ease of Access Center < > + : Open Windows Mobility Center < > + : Display the System Properties dialog box < > + : Restore minimized windows to the desktop < > + : Cycle through programs on the taskbar by using Windows Flip 3-D < > + : Bring all gadgets to the front and select Windows Sidebar...
Service Guide
Page 31
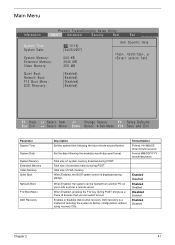
... (month/day/year) Enabled Disabled Enabled Disabled Disabled Enabled Enabled Disabled Chapter 2 41 Set the date following the hour-minute-second format. Total size of restoring the system to factory configurations without using recovery CDs. Enables or disables disk-to boot. Total size of devices that you can be booted from...
... (month/day/year) Enabled Disabled Enabled Disabled Disabled Enabled Enabled Disabled Chapter 2 41 Set the date following the hour-minute-second format. Total size of restoring the system to factory configurations without using recovery CDs. Enables or disables disk-to boot. Total size of devices that you can be booted from...
Service Guide
Page 84
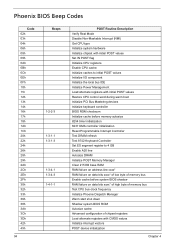
... CPU cache Initialize caches to initial POST values Initialize I/O component Initialize the local bus IDE Initialize Power Management Load alternate registers with initial POST values Restore CPU control word during warm boot Initialize PCI Bus Mastering devices Initialize keyboard controller BIOS ROM checksum Initialize cache before memory autosize 8254 timer initialization...
... CPU cache Initialize caches to initial POST values Initialize I/O component Initialize the local bus IDE Initialize Power Management Load alternate registers with initial POST values Restore CPU control word during warm boot Initialize PCI Bus Mastering devices Initialize keyboard controller BIOS ROM checksum Initialize cache before memory autosize 8254 timer initialization...
Service Guide
Page 98
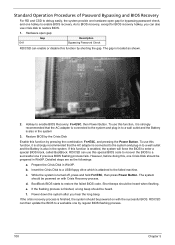
...special BIOS block, called BootBlock. The gap is finished, the system should be powered on with the successful BIOS. To use crisis disk to restore BIOS. 1. c. f. Hardware open gap for BIOS recovery hotkey, you hear the long beep. To use this function by regular BIOS flashing process.... 108 Chapter 5 Short beeps should be heard when flashing. Restore BIOS by shorting the gap. However, before doing this, one Crisis Disk should be prepared in WinXP. If the flashing process is finished...
...special BIOS block, called BootBlock. The gap is finished, the system should be powered on with the successful BIOS. To use crisis disk to restore BIOS. 1. c. f. Hardware open gap for BIOS recovery hotkey, you hear the long beep. To use this function by regular BIOS flashing process.... 108 Chapter 5 Short beeps should be heard when flashing. Restore BIOS by shorting the gap. However, before doing this, one Crisis Disk should be prepared in WinXP. If the flashing process is finished...


