eMachines Notebook User Guide (All Series)
Page 16
...18 Setting passwords 18 Expanding through options 19 Connectivity options 19 Built-in network feature 19 Universal Serial Bus (USB) 19 Installing memory 20 BIOS utility 21 Boot sequence 21 Enable disk-to RF fields (RSS-102) 38 LCD panel ergonomic specifications 39 Low-...-210) 38 Exposure of humans to -disk recovery 21 Password 21 Using software 22 Playing DVD movies 22 Power management 23 eMachines Recovery Management 24 Burn backup discs 25 Restore 26 Restore Windows Vista from backup discs 27 Troubleshooting 30 Troubleshooting tips 30 Error ...
...18 Setting passwords 18 Expanding through options 19 Connectivity options 19 Built-in network feature 19 Universal Serial Bus (USB) 19 Installing memory 20 BIOS utility 21 Boot sequence 21 Enable disk-to RF fields (RSS-102) 38 LCD panel ergonomic specifications 39 Low-...-210) 38 Exposure of humans to -disk recovery 21 Password 21 Using software 22 Playing DVD movies 22 Power management 23 eMachines Recovery Management 24 Burn backup discs 25 Restore 26 Restore Windows Vista from backup discs 27 Troubleshooting 30 Troubleshooting tips 30 Error ...
eMachines Notebook User Guide (All Series)
Page 37
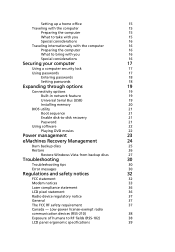
... into place. 4 Replace the memory cover and secure it with the screw. 5 Reinstall the battery pack, and reconnect the AC adapter. 6 Turn on the computer. Please consult a qualified technician or contact your local eMachines dealer. English 20 Installing memory Follow these steps to access its... base. 2 Remove the screws from the memory cover; Then turn the computer over to install memory: 1 Turn off the computer, unplug the AC adapter (if...
... into place. 4 Replace the memory cover and secure it with the screw. 5 Reinstall the battery pack, and reconnect the AC adapter. 6 Turn on the computer. Please consult a qualified technician or contact your local eMachines dealer. English 20 Installing memory Follow these steps to access its... base. 2 Remove the screws from the memory cover; Then turn the computer over to install memory: 1 Turn off the computer, unplug the AC adapter (if...

eMachines Notebook User Guide (All Series)
Page 40
... interface (ACPI), which allows for your computer. Windows handles all of the following devices: keyboard, mouse, hard disk, peripherals connected to the computer, and video memory. English 23 Power management This computer has a built-in order to conserve energy. This computer employs a power management scheme that monitors system activity. If no...
... interface (ACPI), which allows for your computer. Windows handles all of the following devices: keyboard, mouse, hard disk, peripherals connected to the computer, and video memory. English 23 Power management This computer has a built-in order to conserve energy. This computer employs a power management scheme that monitors system activity. If no...
eMachines Notebook User Guide (All Series)
Page 47
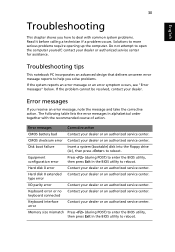
... cannot be resolved, contact your dealer or an authorized service center. Hard disk 0 extended Contact your dealer or an authorized service center. Solutions to reboot. Memory size mismatch Press (during POST) to enter the BIOS utility, then press Exit in alphabetical order together with common system problems. Read it before calling...
... cannot be resolved, contact your dealer or an authorized service center. Hard disk 0 extended Contact your dealer or an authorized service center. Solutions to reboot. Memory size mismatch Press (during POST) to enter the BIOS utility, then press Exit in alphabetical order together with common system problems. Read it before calling...
eMachines Notebook User Guide (All Series)
Page 58
... messages 30 Euro 5 F FAQ. See frequently-asked questions frequently-asked questions 6 H Hibernation mode hotkey 4 hotkeys 4 K keyboard 2 embedded numeric keypad 2 hotkeys 4 lock keys 2 troubleshooting 7 Windows keys 3 M memory installing 20 messages error 30 N network 19 num lock 2 numeric keypad embedded 2 P password 17 types 17
... messages 30 Euro 5 F FAQ. See frequently-asked questions frequently-asked questions 6 H Hibernation mode hotkey 4 hotkeys 4 K keyboard 2 embedded numeric keypad 2 hotkeys 4 lock keys 2 troubleshooting 7 Windows keys 3 M memory installing 20 messages error 30 N network 19 num lock 2 numeric keypad embedded 2 P password 17 types 17

eMachines D620 Series Quick Guide
Page 9
9 Base view English Item 1 Battery bay Description Houses the computer's battery pack. 2 Battery lock Locks the battery in position. 3 Hard disk bay Houses the computer's hard disk (secured with screws). 4 Memory compartment Houses the computer's main memory. 5 Battery release latch Releases the battery for removal.
9 Base view English Item 1 Battery bay Description Houses the computer's battery pack. 2 Battery lock Locks the battery in position. 3 Hard disk bay Houses the computer's hard disk (secured with screws). 4 Memory compartment Houses the computer's main memory. 5 Battery release latch Releases the battery for removal.

eMachines D620 Series Quick Guide
Page 10
10 English Specifications Operating • system Platform • • • System memory • • Display • Graphics • Storage • subsystem • Audio • • • • Communication • • • Dimensions • •...; AMD Athlon™ 2650e* processor or higher AMD RS690MC/SB600 Chipset IEEE 802.11b/g Dual-channel support Up to 2 GB of DDR2 667 MHz memory, upgradeable to 4 GB using two soDIMM modules* 14" WXGA 1280 x 800 ATI Radeon™ Xpress 1200 Graphics 2.5" hard disk drive Optical drive ...
10 English Specifications Operating • system Platform • • • System memory • • Display • Graphics • Storage • subsystem • Audio • • • • Communication • • • Dimensions • •...; AMD Athlon™ 2650e* processor or higher AMD RS690MC/SB600 Chipset IEEE 802.11b/g Dual-channel support Up to 2 GB of DDR2 667 MHz memory, upgradeable to 4 GB using two soDIMM modules* 14" WXGA 1280 x 800 ATI Radeon™ Xpress 1200 Graphics 2.5" hard disk drive Optical drive ...

Service Guide
Page 6
... of a machine (e.g. To better fit local market requirements and enhance product competitiveness, your regional Acer office to -date information available on card, modem, or extra memory capability). In such cases, please contact your regional offices or the responsible personnel/channel to provide you should check the most up-to order FRU...
... of a machine (e.g. To better fit local market requirements and enhance product competitiveness, your regional Acer office to -date information available on card, modem, or extra memory capability). In such cases, please contact your regional offices or the responsible personnel/channel to provide you should check the most up-to order FRU...

Service Guide
Page 13
Chapter 1 7 Houses the computer's hard disk (secured with screws). 4 Memory compartment Houses the computer's main memory. 5 Battery release latch Releases the battery for removal. Bottom Panel # Icon 1 Item Battery bay 2 Battery lock 3 Hard disk bay Description Houses the computer's battery pack. Locks the battery in position.
Chapter 1 7 Houses the computer's hard disk (secured with screws). 4 Memory compartment Houses the computer's main memory. 5 Battery release latch Releases the battery for removal. Bottom Panel # Icon 1 Item Battery bay 2 Battery lock 3 Hard disk bay Description Houses the computer's battery pack. Locks the battery in position.
Service Guide
Page 20
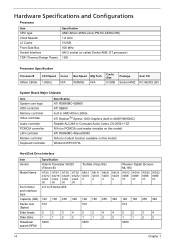
... Speed Mfg Tech 800MHz N/A Cache Size 512KB Package Socket AM2 Acer PN KC.AE002.265 System Board Major Chipsets Item System core logic HDD controller Memory controller Video controller Audio controller PCMCIA controller LAN controller Modem controller Keyboard controller Specification ATI RS690MC+SB600 ATI SB600 built in AMD Athlon 2650e ATI...
... Speed Mfg Tech 800MHz N/A Cache Size 512KB Package Socket AM2 Acer PN KC.AE002.265 System Board Major Chipsets Item System core logic HDD controller Memory controller Video controller Audio controller PCMCIA controller LAN controller Modem controller Keyboard controller Specification ATI RS690MC+SB600 ATI SB600 built in AMD Athlon 2650e ATI...
Service Guide
Page 21
... 1995 (PCMCIA 3.0 Compliant Device), HD audio, WfM 2.0, Preboot Execution Environment 2.1, Boot Integrity Service Application Program Interface (BIS) 1.0, PC2002/2005 compliant System Memory Item Memory controller DIMM socket number Supports maximum memory size Vendor Model name DIMM type DIMM speed (MHz) DIMM size Specification AMD Athlon 2650 2 sockets 2 GB for 32 bit OS, 4 GB...
... 1995 (PCMCIA 3.0 Compliant Device), HD audio, WfM 2.0, Preboot Execution Environment 2.1, Boot Integrity Service Application Program Interface (BIS) 1.0, PC2002/2005 compliant System Memory Item Memory controller DIMM socket number Supports maximum memory size Vendor Model name DIMM type DIMM speed (MHz) DIMM size Specification AMD Athlon 2650 2 sockets 2 GB for 32 bit OS, 4 GB...
Service Guide
Page 22
... rate Modem connector type Specification Intel Graphic Media Accelerator (GMA) X3000 with up to 256 MB of Intel Dynamic Video Memory Technology 4.0 (8MB of dedicated system memory, up to 256MB of shared system memory), supporting Microsoft DirectX 9 and DirectX 10 Maximum resolutions supported by the VGA output for different refresh rates are: 2048x1536...
... rate Modem connector type Specification Intel Graphic Media Accelerator (GMA) X3000 with up to 256 MB of Intel Dynamic Video Memory Technology 4.0 (8MB of dedicated system memory, up to 256MB of shared system memory), supporting Microsoft DirectX 9 and DirectX 10 Maximum resolutions supported by the VGA output for different refresh rates are: 2048x1536...
Service Guide
Page 31
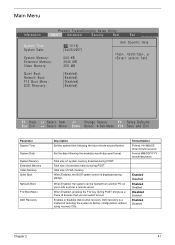
... is displayed during POST. Main Menu Phoenix TrustedCore(tm) Setup Utility Information Main Advanced Security Boot Exit System Time: System Date: System Memory: Extended Memory: Video Memory: [10:10:10] [04/28/2007] 640 KB 2046 MB 256 MB Item Specific Help , , or selects field. Quiet Boot...Change Values F9 Setup Defaults Select Menu Enter Select Sub-Menu F10 Save and Exit Parameter System Time System Date System Memory Extended Memory Video Memory Quiet Boot Network Boot F12 Boot Menu D2D Recovery Description Set the system time following the weekday-month-day-year format....
... is displayed during POST. Main Menu Phoenix TrustedCore(tm) Setup Utility Information Main Advanced Security Boot Exit System Time: System Date: System Memory: Extended Memory: Video Memory: [10:10:10] [04/28/2007] 640 KB 2046 MB 256 MB Item Specific Help , , or selects field. Quiet Boot...Change Values F9 Setup Defaults Select Menu Enter Select Sub-Menu F10 Save and Exit Parameter System Time System Date System Memory Extended Memory Video Memory Quiet Boot Network Boot F12 Boot Menu D2D Recovery Description Set the system time following the weekday-month-day-year format....
Service Guide
Page 36
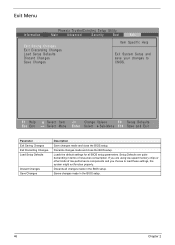
Setup Defaults are quite demanding in terms of low-performance components and you are using low-speed memory chips or other kinds of resources consumption. Saves changes made and close the BIOS setup. Exit Menu Phoenix TrustedCore(tm) Setup Utility Information Main Advanced ...
Setup Defaults are quite demanding in terms of low-performance components and you are using low-speed memory chips or other kinds of resources consumption. Saves changes made and close the BIOS setup. Exit Menu Phoenix TrustedCore(tm) Setup Utility Information Main Advanced ...
Service Guide
Page 78
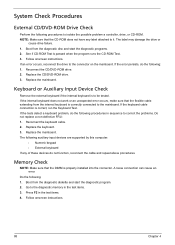
.... Follow onscreen instructions. 88 Chapter 4 See if CD-ROM Test is correct, run the Keyboard Test. Replace the CD/DVD-ROM drive. 3. Memory Check NOTE: Make sure that the DIMM is to isolate the possible problem a controller, drive, or CD-ROM. Go to the connector on the...following procedures to be tested. Boot from the internal keyboard is correctly connected to it. If an error occurs, reconnect the drive to the diagnostic memory in the test items. 4. Do the following: 1. Press F2 in the test items. 3. Keyboard or Auxiliary Input Device Check Remove the ...
.... Follow onscreen instructions. 88 Chapter 4 See if CD-ROM Test is correct, run the Keyboard Test. Replace the CD/DVD-ROM drive. 3. Memory Check NOTE: Make sure that the DIMM is to isolate the possible problem a controller, drive, or CD-ROM. Go to the connector on the...following procedures to be tested. Boot from the internal keyboard is correctly connected to it. If an error occurs, reconnect the drive to the diagnostic memory in the test items. 4. Do the following: 1. Press F2 in the test items. 3. Keyboard or Auxiliary Input Device Check Remove the ...
Service Guide
Page 81
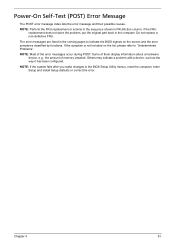
... fails after you make changes in the computer. Others may indicate a problem with a device, such as the way it has been configured. NOTE: Most of memory installed. Power-On Self-Test (POST) Error Message The POST error message index lists the error message and their possible causes. Do not replace a non...
... fails after you make changes in the computer. Others may indicate a problem with a device, such as the way it has been configured. NOTE: Most of memory installed. Power-On Self-Test (POST) Error Message The POST error message index lists the error message and their possible causes. Do not replace a non...
Service Guide
Page 84
... POST values Restore CPU control word during warm boot Initialize PCI Bus Mastering devices Initialize keyboard controller BIOS ROM checksum Initialize cache before memory autosize 8254 timer initialization 8237 DMA controller initialization Reset Programmable Interrupt Controller Test DRAM refresh Test 8742 Keyboard Controller Set ES segment register ...to 4 GB Enable A20 line Autosize DRAM Initialize POST Memory Manager Clear 215 KB base RAM RAM failure on address line xxxx* RAM failure on data bits xxxx* of low byte of...
... POST values Restore CPU control word during warm boot Initialize PCI Bus Mastering devices Initialize keyboard controller BIOS ROM checksum Initialize cache before memory autosize 8254 timer initialization 8237 DMA controller initialization Reset Programmable Interrupt Controller Test DRAM refresh Test 8742 Keyboard Controller Set ES segment register ...to 4 GB Enable A20 line Autosize DRAM Initialize POST Memory Manager Clear 215 KB base RAM RAM failure on address line xxxx* RAM failure on data bits xxxx* of low byte of...
Service Guide
Page 85
... interrupts Initialize POST display service Display prompt "Press F2 to enter SETUP" Disable CPU cache Test RAM between 512 and 640 KB Test extended memory Test extended memory address lines Jump to User Patch1 Configure advanced cache registers Initialize Multi Processor APIC Enable external and CPU caches Setup System Management Mode (SMM...
... interrupts Initialize POST display service Display prompt "Press F2 to enter SETUP" Disable CPU cache Test RAM between 512 and 640 KB Test extended memory Test extended memory address lines Jump to User Patch1 Configure advanced cache registers Initialize Multi Processor APIC Enable external and CPU caches Setup System Management Mode (SMM...
Service Guide
Page 87
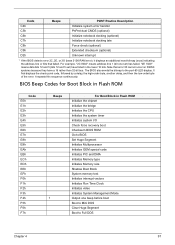
... recovery boot Checksum BIOS ROM Go to BIOS Set Huge Segment Initialize Multiprocessor Initialize OEM special code Initialize PIC and DMA Initialize Memory type Initialize Memory size Shadow Boot Block System memory test Initialize interrupt vectors Initialize Run Time Clock Initialize video Initialize System Management Mode Output one set ) have a 16 rather than...
... recovery boot Checksum BIOS ROM Go to BIOS Set Huge Segment Initialize Multiprocessor Initialize OEM special code Initialize PIC and DMA Initialize Memory type Initialize Memory size Shadow Boot Block System memory test Initialize interrupt vectors Initialize Run Time Clock Initialize video Initialize System Management Mode Output one set ) have a 16 rather than...
Service Guide
Page 89
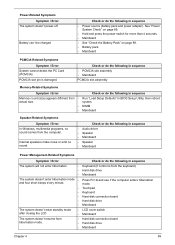
...; Power source (battery pack and power adapter). Check or do the following in sequence • PCMCIA slot assembly • Mainboard PCMCIA slot assembly Memory-Related Symptoms Symptom / Error Memory count (size) appears different from • actual size. • • Check or do the following in sequence Run "Load Setup Defaults" in sequence...
...; Power source (battery pack and power adapter). Check or do the following in sequence • PCMCIA slot assembly • Mainboard PCMCIA slot assembly Memory-Related Symptoms Symptom / Error Memory count (size) appears different from • actual size. • • Check or do the following in sequence Run "Load Setup Defaults" in sequence...


