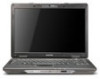
eMachines Notebook User Guide (All Series)
Page 12
... Please refre to the Quick Guide for your notebook. Please understand that due to its nature, the Generic User Guide as well as eMachines Recovery Management, using your computer Turning your computer on and off , the Just for meeting your mobile computing needs. This guide contains ... topics such as the eMachinesSystem User Guide mentioned below the LCD screen beside the easy-launch buttons. In addition it : 1 Click on Start, All Programs, eMachinesSystem. 2 Click on your notebook. If Adobe Reader is available in certain models of the power button. For instructions on...
... Please refre to the Quick Guide for your notebook. Please understand that due to its nature, the Generic User Guide as well as eMachines Recovery Management, using your computer Turning your computer on and off , the Just for meeting your mobile computing needs. This guide contains ... topics such as the eMachinesSystem User Guide mentioned below the LCD screen beside the easy-launch buttons. In addition it : 1 Click on Start, All Programs, eMachinesSystem. 2 Click on your notebook. If Adobe Reader is available in certain models of the power button. For instructions on...
eMachines Notebook User Guide (All Series)
Page 13
... any cables away from foot traffic. • When unplugging the power cord, do any of the following: • Use the Windows shutdown command Click on Start then click on the plug. • The total ampere ratings of heat, such as a radiator. • Do not expose the computer to temperatures below 0 º...
... any cables away from foot traffic. • When unplugging the power cord, do any of the following: • Use the Windows shutdown command Click on Start then click on the plug. • The total ampere ratings of heat, such as a radiator. • Do not expose the computer to temperatures below 0 º...

eMachines Notebook User Guide (All Series)
Page 20
... has two keys that perform Windows-specific functions. It can also be used with other keys to provide a variety of functions: < > : Open or close the Start menu < > + : Display the desktop < > + : Open Windows Explore < > + : Search for a file or folder < > + : Cycle through Sidebar gadgets < > + : Lock your edition of Access Center < > + : Open Windows Mobility... you are on a + < > + : Use the arrow keys to cycle through programs on the taskbar by using Windows Flip 3-D Application key Note: Depending on the Windows Start button; This key has the same effect as described.
... has two keys that perform Windows-specific functions. It can also be used with other keys to provide a variety of functions: < > : Open or close the Start menu < > + : Display the desktop < > + : Open Windows Explore < > + : Search for a file or folder < > + : Cycle through Sidebar gadgets < > + : Lock your edition of Access Center < > + : Open Windows Mobility... you are on a + < > + : Use the arrow keys to cycle through programs on the taskbar by using Windows Flip 3-D Application key Note: Depending on the Windows Start button; This key has the same effect as described.
eMachines Notebook User Guide (All Series)
Page 23
... adjust the volume. Nothing appears on page 4 for each one. Press + < > (increase) to turn the display back on the power, but the computer does not start or boot up. See "Hotkeys" on the screen. Check the following : • If you are provided for more detail. You can also use of your...
... adjust the volume. Nothing appears on page 4 for each one. Press + < > (increase) to turn the display back on the power, but the computer does not start or boot up. See "Hotkeys" on the screen. Check the following : • If you are provided for more detail. You can also use of your...

eMachines Notebook User Guide (All Series)
Page 25
This feature occupies 15 GB in a hidden partition on your hard disk. Important! English 8 To start the recovery process: 1 Restart the system. 2 While the eMachines logo is showing, press + at the same time to enter the recovery process. 3 Refer to the onscreen instructions to perform system recovery.
This feature occupies 15 GB in a hidden partition on your hard disk. Important! English 8 To start the recovery process: 1 Restart the system. 2 While the eMachines logo is showing, press + at the same time to enter the recovery process. 3 Refer to the onscreen instructions to perform system recovery.
eMachines Notebook User Guide (All Series)
Page 28
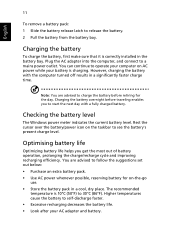
... the battery's present charge level. Rest the cursor over the battery/power icon on the taskbar to 30°C (86°F). You are advised to start the next day with the computer turned off results in a significantly faster charge time. Charging the battery overnight before traveling enables you get the most...
... the battery's present charge level. Rest the cursor over the battery/power icon on the taskbar to 30°C (86°F). You are advised to start the next day with the computer turned off results in a significantly faster charge time. Charging the battery overnight before traveling enables you get the most...
eMachines Notebook User Guide (All Series)
Page 30
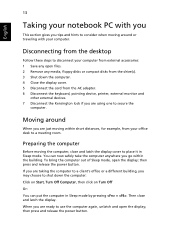
... computer from external accessories: 1 Save any open files. 2 Remove any media, floppy disks or compact disks from the drive(s). 3 Shut down the computer: Click on Start, Turn Off Computer, then click on Turn Off Or: You can now safely take the computer anywhere you go within short distances, for example, from...
... computer from external accessories: 1 Save any open files. 2 Remove any media, floppy disks or compact disks from the drive(s). 3 Shut down the computer: Click on Start, Turn Off Computer, then click on Turn Off Or: You can now safely take the computer anywhere you go within short distances, for example, from...

eMachines Notebook User Guide (All Series)
Page 42
... will allow you from the factory. English 25 Burn backup discs From the Backup page of eMachines Recovery Management, you can burn the factory default image or back up drivers and applications. 1 Click on Start, All Programs, eMachines. 2 eMachines Recovery Management opens to the Backup page. 3 Select the type of backup (factory default or...
... will allow you from the factory. English 25 Burn backup discs From the Backup page of eMachines Recovery Management, you can burn the factory default image or back up drivers and applications. 1 Click on Start, All Programs, eMachines. 2 eMachines Recovery Management opens to the Backup page. 3 Select the type of backup (factory default or...
eMachines Notebook User Guide (All Series)
Page 43
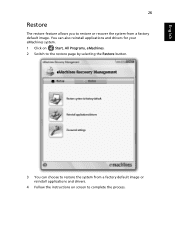
You can also reinstall applications and drivers for your eMachines system. 1 Click on Start, All Programs, eMachines. 2 Switch to the restore page by selecting the Restore button. 3 You can choose to restore the system from a factory default image or reinstall applications and drivers. 4 Follow the instructions on screen to restore or recover the system from a factory default image. English 26 Restore The restore feature allows you to complete the process.
You can also reinstall applications and drivers for your eMachines system. 1 Click on Start, All Programs, eMachines. 2 Switch to the restore page by selecting the Restore button. 3 You can choose to restore the system from a factory default image or reinstall applications and drivers. 4 Follow the instructions on screen to restore or recover the system from a factory default image. English 26 Restore The restore feature allows you to complete the process.
eMachines D620 Series Quick Guide
Page 3
... and functions of your new computer. For more productive, please refer to the eMachinesSystem User Guide. In addition it : 1 Click on Start, All Programs, eMachinesSystem. 2 Click on your notebook. It is not installed on your computer, clicking on eMachinesSystem User Guide will occasionally ... information and the general regulations and safety notices for meeting your mobile computing needs. Follow the instructions on how to use your eMachines notebook, we have designed a set of the series, but not necessarily in the text with setting up your computer. For ...
... and functions of your new computer. For more productive, please refer to the eMachinesSystem User Guide. In addition it : 1 Click on Start, All Programs, eMachinesSystem. 2 Click on your notebook. It is not installed on your computer, clicking on eMachinesSystem User Guide will occasionally ... information and the general regulations and safety notices for meeting your mobile computing needs. Follow the instructions on how to use your eMachines notebook, we have designed a set of the series, but not necessarily in the text with setting up your computer. For ...
Service Guide
Page 17
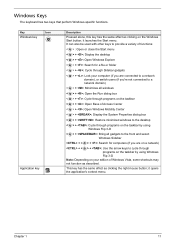
It can also be used with other keys to provide a variety of functions: < > : Open or close the Start menu < > + : Display the desktop < > + : Open Windows Explore < > + : Search for a file or folder < > + : Cycle through Sidebar gadgets < > + : Lock your computer (if you are ... on a network) + < > + : Use the arrow keys to cycle through programs on the taskbar by using Windows Flip 3-D Note: Depending on the Windows Start button; Windows Keys The keyboard has two keys that perform Windows-specific functions. This key has the same effect as described. Chapter 1 11 Key Icon...
It can also be used with other keys to provide a variety of functions: < > : Open or close the Start menu < > + : Display the desktop < > + : Open Windows Explore < > + : Search for a file or folder < > + : Cycle through Sidebar gadgets < > + : Lock your computer (if you are ... on a network) + < > + : Use the arrow keys to cycle through programs on the taskbar by using Windows Flip 3-D Note: Depending on the Windows Start button; Windows Keys The keyboard has two keys that perform Windows-specific functions. This key has the same effect as described. Chapter 1 11 Key Icon...
Service Guide
Page 29
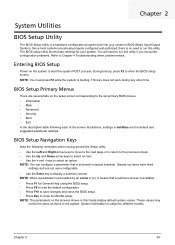
... different models. NOTE: You can configure a parameter that a submenu screen is available. • Press F1 for your system's BIOS (Basic Input/Output System). keys to start the system POST process. NOTE: You must press F2 while the system is subject to run this utility. BIOS Setup Primary Menus There are already...
... different models. NOTE: You can configure a parameter that a submenu screen is available. • Press F1 for your system's BIOS (Basic Input/Output System). keys to start the system POST process. NOTE: You must press F2 while the system is subject to run this utility. BIOS Setup Primary Menus There are already...
Service Guide
Page 45
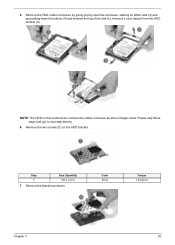
Please skip these steps and got to detach from the HDD module (6). Step 7 Size (Quantity) M3 x L4 (2) 7. Remove the HDD rubber enclosure by gently prying open the enclosure, starting on either side (3) and proceeding down the bottom (4) and towards the top of the disk (5), then pull it up to next step directly. 6. 5. Color Silver Torque 1.6 kgf-cm Chapter 3 55 NOTE: The HDD on the HDD bracket. Remove the bracket as above images show. Remove the two screws (D) on this model does not have the rubber enclosure as shown.
Please skip these steps and got to detach from the HDD module (6). Step 7 Size (Quantity) M3 x L4 (2) 7. Remove the HDD rubber enclosure by gently prying open the enclosure, starting on either side (3) and proceeding down the bottom (4) and towards the top of the disk (5), then pull it up to next step directly. 6. 5. Color Silver Torque 1.6 kgf-cm Chapter 3 55 NOTE: The HDD on the HDD bracket. Remove the bracket as above images show. Remove the two screws (D) on this model does not have the rubber enclosure as shown.
Service Guide
Page 78
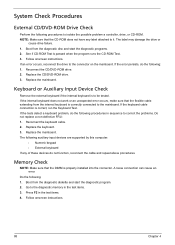
...the possible problem a controller, drive, or CD-ROM. A loose connection can cause an error. Boot from the diagnostic disc and start the diagnostic program. 2. See if CD-ROM Test is correct, run the Keyboard Test. If the error persists, do the following ... keyboard. 3. Press F2 in the test items. 3. Follow onscreen instructions. 88 Chapter 4 Replace the mainboard. Boot from the diagnostic diskette and start the diagnostic programs. 2. System Check Procedures External CD/DVD-ROM Drive Check Perform the following : 1. If the tests detect a keyboard problem, ...
...the possible problem a controller, drive, or CD-ROM. A loose connection can cause an error. Boot from the diagnostic disc and start the diagnostic program. 2. See if CD-ROM Test is correct, run the Keyboard Test. If the error persists, do the following ... keyboard. 3. Press F2 in the test items. 3. Follow onscreen instructions. 88 Chapter 4 Replace the mainboard. Boot from the diagnostic diskette and start the diagnostic programs. 2. System Check Procedures External CD/DVD-ROM Drive Check Perform the following : 1. If the tests detect a keyboard problem, ...
Service Guide
Page 84
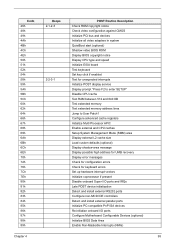
... system BIOS shadow RAM failure on data bits xxxx* of high byte of memory bus Test CPU bus-clock frequency Initialize Phoenix Dispatch Manager Warm start shut down Shadow system BIOS ROM Autosize cache Advanced configuration of chipset registers Load alternate registers with CMOS values Initialize interrupt vectors POST device initialization...
... system BIOS shadow RAM failure on data bits xxxx* of high byte of memory bus Test CPU bus-clock frequency Initialize Phoenix Dispatch Manager Warm start shut down Shadow system BIOS ROM Autosize cache Advanced configuration of chipset registers Load alternate registers with CMOS values Initialize interrupt vectors POST device initialization...
Service Guide
Page 85
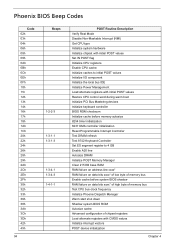
... Beeps 2-1-2-3 2-2-3-1 POST Routine Description Check ROM copyright notice Check video configuration against CMOS Initialize PCI bus and devices Initialize all video adapters in system QuietBoot start (optional) Shadow video BIOS ROM Display BIOS copyright notice Display CPU type and speed Initialize EISA board Test keyboard Set key click if enabled Test...
... Beeps 2-1-2-3 2-2-3-1 POST Routine Description Check ROM copyright notice Check video configuration against CMOS Initialize PCI bus and devices Initialize all video adapters in system QuietBoot start (optional) Shadow video BIOS ROM Display BIOS copyright notice Display CPU type and speed Initialize EISA board Test keyboard Set key click if enabled Test...
Service Guide
Page 98
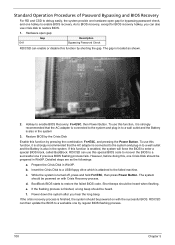
... recovery, except for bypassing password check, and one Crisis Disk should be heard. b. The system should be powered on with Crisis Recovery process. c. BootBlock BIOS starts to enter a special BIOS block, called BootBlock. f. Power down the system after you can use crisis disk to a workable one if previous BIOS flashing process...
... recovery, except for bypassing password check, and one Crisis Disk should be heard. b. The system should be powered on with Crisis Recovery process. c. BootBlock BIOS starts to enter a special BIOS block, called BootBlock. f. Power down the system after you can use crisis disk to a workable one if previous BIOS flashing process...


