
Owner's Manual
Page 1
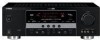
U RX-V563 AV Receiver OWNER'S MANUAL
U RX-V563 AV Receiver OWNER'S MANUAL
Owner's Manual
Page 3
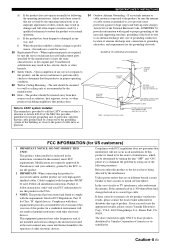
..., or other products (including amplifiers) that the product is being affected by the interference. Modifications not expressly approved by Yamaha may result in any service or repairs to this product, ask the service technician to perform safety checks to determine that.... Cable/s supplied with these corrective measures do not produce satisfactory results, please contact the local retailer authorized to distribute this manual, meets FCC requirements. EXAMPLE OF ANTENNA GROUNDING MAST GROUND CLAMP ELECTRIC SERVICE EQUIPMENT NEC - NATIONAL ELECTRICAL CODE ANTENNA LEAD IN...
..., or other products (including amplifiers) that the product is being affected by the interference. Modifications not expressly approved by Yamaha may result in any service or repairs to this product, ask the service technician to perform safety checks to determine that.... Cable/s supplied with these corrective measures do not produce satisfactory results, please contact the local retailer authorized to distribute this manual, meets FCC requirements. EXAMPLE OF ANTENNA GROUNDING MAST GROUND CLAMP ELECTRIC SERVICE EQUIPMENT NEC - NATIONAL ELECTRICAL CODE ANTENNA LEAD IN...
Owner's Manual
Page 4
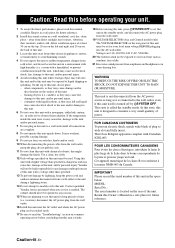
... prevent condensation inside this unit, and/or personal injury. Contact qualified Yamaha service personnel when any damage resulting from the AC power source as long as they may cause fire, damage to read this manual carefully. This unit is turned off by lightning, keep the power cord... local main voltage BEFORE plugging into the AC wall outlet. FOR CANADIAN CUSTOMERS To prevent electric shock, match wide blade of this Owner's Manual in a environment with Canadian ICES-003. This Class B digital apparatus complies with high humidity (i.e. Cet appareil numérique de la ...
... prevent condensation inside this unit, and/or personal injury. Contact qualified Yamaha service personnel when any damage resulting from the AC power source as long as they may cause fire, damage to read this manual carefully. This unit is turned off by lightning, keep the power cord... local main voltage BEFORE plugging into the AC wall outlet. FOR CANADIAN CUSTOMERS To prevent electric shock, match wide blade of this Owner's Manual in a environment with Canadian ICES-003. This Class B digital apparatus complies with high humidity (i.e. Cet appareil numérique de la ...
Owner's Manual
Page 5
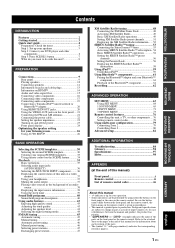
... on HDMI 14 Audio and video signal flow 15 Connecting video components 16 Connecting other components 17 Connecting audio components 19 Connecting a Yamaha iPod™ universal dock or Bluetooth™ adapter 20 Using REMOTE IN/OUT jacks 20 Using the VIDEO AUX jacks on the ... 35 Basic operations 35 Selecting audio input jacks (AUDIO SELECT 36 Selecting the MULTI CH INPUT component......... 36 Displaying the current status of this manual) Front panel i Remote control ii List of the parts. • The symbol "☞ " with page number(s) indicates the corresponding reference...
... on HDMI 14 Audio and video signal flow 15 Connecting video components 16 Connecting other components 17 Connecting audio components 19 Connecting a Yamaha iPod™ universal dock or Bluetooth™ adapter 20 Using REMOTE IN/OUT jacks 20 Using the VIDEO AUX jacks on the ... 35 Basic operations 35 Selecting audio input jacks (AUDIO SELECT 36 Selecting the MULTI CH INPUT component......... 36 Displaying the current status of this manual) Front panel i Remote control ii List of the parts. • The symbol "☞ " with page number(s) indicates the corresponding reference...
Owner's Manual
Page 11
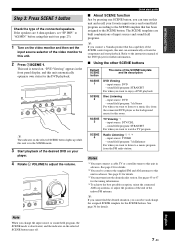
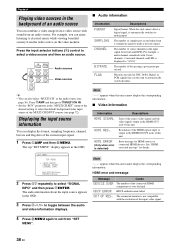
... sound field program, the SCENE mode is in advance. input source: DVD - TV Viewing *1 - sound field program: 7ch Enhancer For when you connect a Yamaha product that has been assigned to this unit (see page 23). 1 Turn on this unit and recall your player. 4 Rotate L VOLUME to the instruction... manual of the DVD player for this unit is deactivated, and the indicator on . to "6Ω MIN" before using this unit. 2 Press TSCENE 1. Quick ...
... sound field program, the SCENE mode is in advance. input source: DVD - TV Viewing *1 - sound field program: 7ch Enhancer For when you connect a Yamaha product that has been assigned to this unit (see page 23). 1 Turn on this unit and recall your player. 4 Rotate L VOLUME to the instruction... manual of the DVD player for this unit is deactivated, and the indicator on . to "6Ω MIN" before using this unit. 2 Press TSCENE 1. Quick ...

Owner's Manual
Page 12
To turn on the front panel to set to receive infrared signals from the standby mode, press AMAIN ZONE ON/OFF (or HPOWER). Quick start guide ■ After using this unit from the remote control. ... with this unit? ■ Customizing the SCENE templates • Using various SCENE templates ☞ P. 30 • Creating your listening room (AUTO SETUP) ☞ P. 26 • Manually adjusting various parameters of power in order to the standby mode. See page 23 for your original SCENE templates ☞ P. 33 This unit is set...
To turn on the front panel to set to receive infrared signals from the standby mode, press AMAIN ZONE ON/OFF (or HPOWER). Quick start guide ■ After using this unit from the remote control. ... with this unit? ■ Customizing the SCENE templates • Using various SCENE templates ☞ P. 30 • Creating your listening room (AUTO SETUP) ☞ P. 26 • Manually adjusting various parameters of power in order to the standby mode. See page 23 for your original SCENE templates ☞ P. 33 This unit is set...
Owner's Manual
Page 16
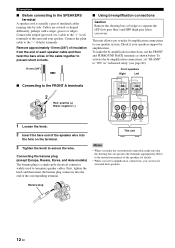
... (-) 3 1 Loosen the knob. 2 Insert the bare end of the speaker wire into the end of insulated cables running side by side. Refer to the instruction manuals of this unit and your speakers support biamplification. Check if your speaker. First, tighten the knob and then insert the banana plug connector into the...
... (-) 3 1 Loosen the knob. 2 Insert the bare end of the speaker wire into the end of insulated cables running side by side. Refer to the instruction manuals of this unit and your speakers support biamplification. Check if your speaker. First, tighten the knob and then insert the banana plug connector into the...

Owner's Manual
Page 24
Refer to the owner's manuals for details about the capability of the SCENE control signals of the components. • If the component connected to connect a Yamaha iPod universal dock (such as YDS-10, sold separately). DVD IN1 REMOTE IN OUT +12V 15mA MAX. Using REMOTE IN/..., set "SCENE IR" in XM PB SIRIUS DTV/CBL Y B DVR C DOCK ANTENNA AM GND SURROUND BAC R Yamaha iPod universal dock or Bluetooth adapter Infrared signal receiver or Yamaha component Yamaha component (CD or DVD player, etc.) y • If the components have the capability of the transmission of the remote ...
Refer to the owner's manuals for details about the capability of the SCENE control signals of the components. • If the component connected to connect a Yamaha iPod universal dock (such as YDS-10, sold separately). DVD IN1 REMOTE IN OUT +12V 15mA MAX. Using REMOTE IN/..., set "SCENE IR" in XM PB SIRIUS DTV/CBL Y B DVR C DOCK ANTENNA AM GND SURROUND BAC R Yamaha iPod universal dock or Bluetooth adapter Infrared signal receiver or Yamaha component Yamaha component (CD or DVD player, etc.) y • If the components have the capability of the transmission of the remote ...
Owner's Manual
Page 30
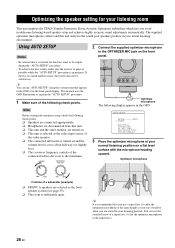
...listening environment. You can run "AUTO SETUP" using the system menu that it is normal for your listening room This unit employs the YPAO (Yamaha Parametric Room Acoustic Optimizer) technology which lets you are selected as the front speaker system (see page 35). ❏ The room is set ... level is set to the maximum. Using AUTO SETUP Notes • Be advised that appears in the OSD or in the front panel display. This manual uses the OSD illustrations to explain the "AUTO SETUP" procedure. 1 Make sure of all item [ ]/[ ]:Up/Down [p]/[[]:Select 3 Place the optimizer microphone...
...listening environment. You can run "AUTO SETUP" using the system menu that it is normal for your listening room This unit employs the YPAO (Yamaha Parametric Room Acoustic Optimizer) technology which lets you are selected as the front speaker system (see page 35). ❏ The room is set ... level is set to the maximum. Using AUTO SETUP Notes • Be advised that appears in the OSD or in the front panel display. This manual uses the OSD illustrations to explain the "AUTO SETUP" procedure. 1 Make sure of all item [ ]/[ ]:Up/Down [p]/[[]:Select 3 Place the optimizer microphone...

Owner's Manual
Page 32
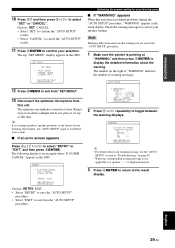
... is canceled and an error screen appears. AUTO SETUP SETUP;;;;;;;AUTO . AUTO:RESULT . p Optimizing the speaker setting for your speakers. 9 Press 8ENTER to return to manually adjust each parameter, run "MANUAL SETUP" (see page 29). Number of speakers SP Displays the number of warning messages appears (see page 63).
... is canceled and an error screen appears. AUTO SETUP SETUP;;;;;;;AUTO . AUTO:RESULT . p Optimizing the speaker setting for your speakers. 9 Press 8ENTER to return to manually adjust each parameter, run "MANUAL SETUP" (see page 29). Number of speakers SP Displays the number of warning messages appears (see page 63).
Owner's Manual
Page 33
..." display appears in the OSD. PREPARATION p p 10 Press 8n and then press 8l / h to toggle between the warning displays. SET MENU TOP MENU . ;AUTO SETUP ;MANUAL SETUP .A;SIGNAL INFO [ ]/[ ]:Up/Down [ENTER]:Enter Optimizing the speaker setting for your speaker settings.
..." display appears in the OSD. PREPARATION p p 10 Press 8n and then press 8l / h to toggle between the warning displays. SET MENU TOP MENU . ;AUTO SETUP ;MANUAL SETUP .A;SIGNAL INFO [ ]/[ ]:Up/Down [ENTER]:Enter Optimizing the speaker setting for your speaker settings.
Owner's Manual
Page 42
... cannot detect a digital signal, it automatically switches to exit from "SET MENU". 38 En HDCP ERROR HDCP authentication failed. SET MENU TOP MENU . ;AUTO SETUP ;MANUAL SETUP .A;SIGNAL INFO [ ]/[ ]:Up/Down [ENTER]:Enter 2 Press 8n repeatedly to select a video source and then an audio source. The top "SET MENU" display appears...
... cannot detect a digital signal, it automatically switches to exit from "SET MENU". 38 En HDCP ERROR HDCP authentication failed. SET MENU TOP MENU . ;AUTO SETUP ;MANUAL SETUP .A;SIGNAL INFO [ ]/[ ]:Up/Down [ENTER]:Enter 2 Press 8n repeatedly to select a video source and then an audio source. The top "SET MENU" display appears...
Owner's Manual
Page 49
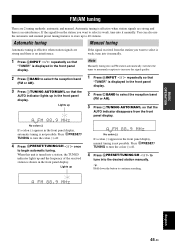
...front panel display. TUNED A FM 88.9 MHz English 45 En Automatic tuning is effective when station signals are 2 tuning methods: automatic and manual. BASIC OPERATION FM/AM TUNING FM/AM tuning There are strong and there is no interference. If the signal from the station you want to... select is weak, tune into the desired station manually. If the signal received from the station you want to select is weak, tune into it manually. 1 Press RINPUT l / h repeatedly so that the AUTO indicator lights up to tune into it...
...front panel display. TUNED A FM 88.9 MHz English 45 En Automatic tuning is effective when station signals are 2 tuning methods: automatic and manual. BASIC OPERATION FM/AM TUNING FM/AM tuning There are strong and there is no interference. If the signal from the station you want to... select is weak, tune into the desired station manually. If the signal received from the station you want to select is weak, tune into it manually. 1 Press RINPUT l / h repeatedly so that the AUTO indicator lights up to tune into it...
Owner's Manual
Page 50
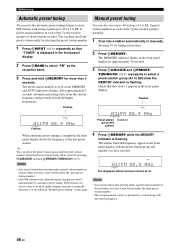
...Press EBAND to store is weak in order. You can select the preset station group and the preset station number where the first received station will be stored by automatic preset tuning. After approximately 5 seconds, automatic presetting starts from the current frequency and proceeds toward the...number 4 Press HMEMORY while the MEMORY indicator is completed, the front panel display shows the frequency of the 5 preset station groups) manually. 1 Tune into it manually and store it as the reception band. 3 Press and hold HMEMORY for more than 3 seconds. The preset station number as ...
...Press EBAND to store is weak in order. You can select the preset station group and the preset station number where the first received station will be stored by automatic preset tuning. After approximately 5 seconds, automatic presetting starts from the current frequency and proceeds toward the...number 4 Press HMEMORY while the MEMORY indicator is completed, the front panel display shows the frequency of the 5 preset station groups) manually. 1 Tune into it manually and store it as the reception band. 3 Press and hold HMEMORY for more than 3 seconds. The preset station number as ...
Owner's Manual
Page 57
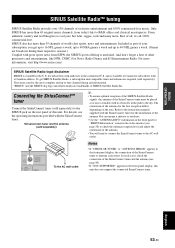
...-class sports, news and entertainment. Connecting the SiriusConnect™ tuner Connect the SiriusConnect tuner (sold separately) to the AC wall outlet. Refer to the instruction manuals supplied with great sports news from today's hits to cool jazz, hot latin, reggae, rock and many more than 55 channels of the antenna.You...
...-class sports, news and entertainment. Connecting the SiriusConnect™ tuner Connect the SiriusConnect tuner (sold separately) to the AC wall outlet. Refer to the instruction manuals supplied with great sports news from today's hits to cool jazz, hot latin, reggae, rock and many more than 55 channels of the antenna.You...
Owner's Manual
Page 60
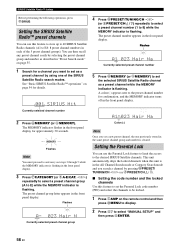
...) to set as a preset channel while the MEMORY indicator is in the same preset channel group and number is flashing. A colon (:) appears next to select "MANUAL SETUP" and then press 8ENTER. 56 En l / h) repeatedly to select a preset channel group (A to display. The preset channel group letter appears in the front panel...
...) to set as a preset channel while the MEMORY indicator is in the same preset channel group and number is flashing. A colon (:) appears next to select "MANUAL SETUP" and then press 8ENTER. 56 En l / h) repeatedly to select a preset channel group (A to display. The preset channel group letter appears in the front panel...
Owner's Manual
Page 67
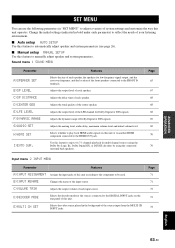
...You can use the following parameters in "SET MENU" to adjust a variety of system settings and customize the way this feature to manually adjust speaker and system parameters. Adjusts the muting level, audio delay, maximum volume level and initial volume level. C)VOLUME TRIM Adjusts ... each parameter) to reflect the needs of the front speakers connected to automatically adjust speaker and system parameters (see page 26). ■ Manual setup MANUAL SETUP Use this unit operates. Sound menu 1 SOUND MENU Parameter A)SPEAKER SET B)SP LEVEL C)SP DISTANCE D)CENTER GEQ E)LFE LEVEL F)DYNAMIC...
...You can use the following parameters in "SET MENU" to adjust a variety of system settings and customize the way this feature to manually adjust speaker and system parameters. Adjusts the muting level, audio delay, maximum volume level and initial volume level. C)VOLUME TRIM Adjusts ... each parameter) to reflect the needs of the front speakers connected to automatically adjust speaker and system parameters (see page 26). ■ Manual setup MANUAL SETUP Use this unit operates. Sound menu 1 SOUND MENU Parameter A)SPEAKER SET B)SP LEVEL C)SP DISTANCE D)CENTER GEQ E)LFE LEVEL F)DYNAMIC...
Owner's Manual
Page 68
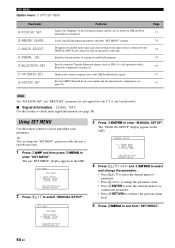
... En p p p p Using SET MENU Use the remote control to select "MANUAL SETUP". INI E)BLUETOOTH SET F)XM RADIO SET G)SIRIUS SET Features Adjusts the brightness of sound field programs. Pair the connected Yamaha Bluetooth adapter (such as YBA-10, sold separately) with a Bluetooth component (see... page 61). The top "SET MENU" display appears in the OSD. ;MANUAL SETUP . 1 SOUND MENU 2 INPUT MENU 3 OPTION MENU [ ]/[...
... En p p p p Using SET MENU Use the remote control to select "MANUAL SETUP". INI E)BLUETOOTH SET F)XM RADIO SET G)SIRIUS SET Features Adjusts the brightness of sound field programs. Pair the connected Yamaha Bluetooth adapter (such as YBA-10, sold separately) with a Bluetooth component (see... page 61). The top "SET MENU" display appears in the OSD. ;MANUAL SETUP . 1 SOUND MENU 2 INPUT MENU 3 OPTION MENU [ ]/[...
Owner's Manual
Page 69
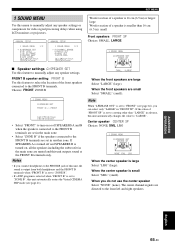
... Select "NONE" (none). ADVANCED OPERATION English 65 En A)SPEAKER SET B)SP LEVEL C)SP DISTANCE D)CENTER GEQ E)LFE LEVEL [ ]/[ ]:Up/Down [ENTER]:Enter ;MANUAL SETUP 1 SOUND MENU 2/2 . F)DYNAMIC RANGE G)AUDIO SET H)HDMI SET I)EXTD SUR. [ ]/[ ]:Up/Down [ENTER]:Enter Woofer section of a speaker is 16...a speaker is set in the main zone. • Select "ZONE B" if the speakers connected to the FRONT B terminals are directed to manually adjust any speaker settings. If SPEAKERS A is turned on, all the speakers including the subwoofer in ): small Front speakers FRONT SP Choices: SMALL...
... Select "NONE" (none). ADVANCED OPERATION English 65 En A)SPEAKER SET B)SP LEVEL C)SP DISTANCE D)CENTER GEQ E)LFE LEVEL [ ]/[ ]:Up/Down [ENTER]:Enter ;MANUAL SETUP 1 SOUND MENU 2/2 . F)DYNAMIC RANGE G)AUDIO SET H)HDMI SET I)EXTD SUR. [ ]/[ ]:Up/Down [ENTER]:Enter Woofer section of a speaker is 16...a speaker is set in the main zone. • Select "ZONE B" if the speakers connected to the FRONT B terminals are directed to manually adjust any speaker settings. If SPEAKERS A is turned on, all the speakers including the subwoofer in ): small Front speakers FRONT SP Choices: SMALL...
Owner's Manual
Page 71
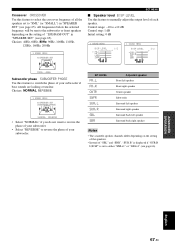
...;;;80Hz Subwoofer phase SUBWOOFER PHASE Use this feature to switch the phase of your subwoofer. All frequencies below the selected frequency will be sent to manually adjust the output level of each speaker. Choices: 40Hz, 60Hz, 80Hz, 90Hz, 100Hz, 110Hz, 120Hz, 160Hz, 200Hz 1 SOUND MENU A)SPEAKER SET CROSSOVER SET MENU ■...
...;;;80Hz Subwoofer phase SUBWOOFER PHASE Use this feature to switch the phase of your subwoofer. All frequencies below the selected frequency will be sent to manually adjust the output level of each speaker. Choices: 40Hz, 60Hz, 80Hz, 90Hz, 100Hz, 110Hz, 120Hz, 160Hz, 200Hz 1 SOUND MENU A)SPEAKER SET CROSSOVER SET MENU ■...


