Owner's Manual
Page 5
... signal flow 15 Connecting video components 16 Connecting other components 17 Connecting audio components 19 Connecting a Yamaha iPod™ universal dock or Bluetooth™ adapter 20 Using REMOTE IN/OUT jacks 20 Using the VIDEO AUX jacks on the front panel .... 21 Connecting the...setup 82 ADDITIONAL INFORMATION Troubleshooting 84 Glossary 94 Specifications 97 Index 98 APPENDIX (at the end of this manual) Front panel i Remote control ii List of remote control codes iii About this manual • y indicates a tip for your listening room 26 Using AUTO SETUP 26 BASIC OPERATION ...
... signal flow 15 Connecting video components 16 Connecting other components 17 Connecting audio components 19 Connecting a Yamaha iPod™ universal dock or Bluetooth™ adapter 20 Using REMOTE IN/OUT jacks 20 Using the VIDEO AUX jacks on the front panel .... 21 Connecting the...setup 82 ADDITIONAL INFORMATION Troubleshooting 84 Glossary 94 Specifications 97 Index 98 APPENDIX (at the end of this manual) Front panel i Remote control ii List of remote control codes iii About this manual • y indicates a tip for your listening room 26 Using AUTO SETUP 26 BASIC OPERATION ...
Owner's Manual
Page 6
... of Apple, Inc., registered in 7-channel power amplifier ◆ Minimum RMS output power [U.S.A. Product "DTS" and "DTS-ES | NEO:6" are trademarks owned by Yamaha in accordance with preset remote control codes ◆ Zone 2 custom installation facility ◆ Bi-amplification connection capability Manufactured under license from Dolby Laboratories. and other countries. Bluetooth™ Bluetooth...
... of Apple, Inc., registered in 7-channel power amplifier ◆ Minimum RMS output power [U.S.A. Product "DTS" and "DTS-ES | NEO:6" are trademarks owned by Yamaha in accordance with preset remote control codes ◆ Zone 2 custom installation facility ◆ Bi-amplification connection capability Manufactured under license from Dolby Laboratories. and other countries. Bluetooth™ Bluetooth...

Owner's Manual
Page 7
..., or if exhausted batteries remain in the remote control, the contents of the memory may be set up the remote control code. dispose of them immediately. Avoid touching the leaked material or letting it is too late, Yamaha and the Electronic Industries Association's Consumer Electronics ...Group recommend you to the polarity markings (+ and -) on the rear panel of this unit and create a potential fire hazard. INTRODUCTION Getting started Getting started ■ Supplied accessories Check that you received all...
..., or if exhausted batteries remain in the remote control, the contents of the memory may be set up the remote control code. dispose of them immediately. Avoid touching the leaked material or letting it is too late, Yamaha and the Electronic Industries Association's Consumer Electronics ...Group recommend you to the polarity markings (+ and -) on the rear panel of this unit and create a potential fire hazard. INTRODUCTION Getting started Getting started ■ Supplied accessories Check that you received all...

Owner's Manual
Page 12
...30 • Creating your listening room (AUTO SETUP) ☞ P. 26 • Manually adjusting various parameters of power in order to receive infrared signals from the standby mode, press AMAIN ZONE ON/OFF (or HPOWER). In the standby mode, this unit... See page 23 for...consumes a small amount of this unit ☞ P. 63 • Setting the remote control ☞ P. 76 • Adjusting the advanced parameters ☞ P. 82 ■ Additional features Automatically turning off this unit from the remote control. Press AMAIN ZONE ON/OFF on this unit ☞ P. 39 8 En ...
...30 • Creating your listening room (AUTO SETUP) ☞ P. 26 • Manually adjusting various parameters of power in order to receive infrared signals from the standby mode, press AMAIN ZONE ON/OFF (or HPOWER). In the standby mode, this unit... See page 23 for...consumes a small amount of this unit ☞ P. 63 • Setting the remote control ☞ P. 76 • Adjusting the advanced parameters ☞ P. 82 ■ Additional features Automatically turning off this unit from the remote control. Press AMAIN ZONE ON/OFF on this unit ☞ P. 39 8 En ...

Owner's Manual
Page 24
... playback when you to the remote control input and output jack with the DOCK terminal on the rear panel of the remote control signals, connect the REMOTE IN jack and REMOTE OUT jack to connect a Yamaha iPod universal dock (such as... YDS-10, sold separately). This unit is not the Yamaha product, set "SCENE IR" in XM PB SIRIUS DTV/CBL Y B DVR C DOCK ANTENNA AM GND SURROUND BAC R Yamaha iPod universal dock or Bluetooth adapter Infrared signal receiver or Yamaha...
... playback when you to the remote control input and output jack with the DOCK terminal on the rear panel of the remote control signals, connect the REMOTE IN jack and REMOTE OUT jack to connect a Yamaha iPod universal dock (such as... YDS-10, sold separately). This unit is not the Yamaha product, set "SCENE IR" in XM PB SIRIUS DTV/CBL Y B DVR C DOCK ANTENNA AM GND SURROUND BAC R Yamaha iPod universal dock or Bluetooth adapter Infrared signal receiver or Yamaha...
Owner's Manual
Page 27
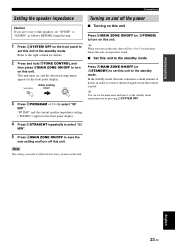
... holding down MAIN ZONE ON/OFF 3 Press OPROGRAM l / h to receive infrared signals from the remote control. y When you turn on this unit, there will be a 4 to 5-second delay before this unit can set this unit. PREPARATION Connections Setting the speaker impedance ...) to save the new setting and turn on this unit to the standby mode. Refer to the right column for details. 2 Press and hold NTONE CONTROL and then press AMAIN ZONE ON/OFF to turn off the power ■ Turning on this unit Press AMAIN ZONE ON/OFF (or HPOWER) to...
... holding down MAIN ZONE ON/OFF 3 Press OPROGRAM l / h to receive infrared signals from the remote control. y When you turn on this unit, there will be a 4 to 5-second delay before this unit can set this unit. PREPARATION Connections Setting the speaker impedance ...) to save the new setting and turn on this unit to the standby mode. Refer to the right column for details. 2 Press and hold NTONE CONTROL and then press AMAIN ZONE ON/OFF to turn off the power ■ Turning on this unit Press AMAIN ZONE ON/OFF (or HPOWER) to...
Owner's Manual
Page 29
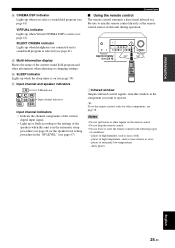
...name of the speakers when this unit is active (see page 41). dusty places English 25 En Connections ■ Using the remote control The remote control transmits a directional infrared ray. Be sure to operate. Notes • Do not spill water or other liquids on (see page 78.... SILENT CINEMA indicator Lights up when headphones are connected and a sound field program is on the remote control. • Do not drop the remote control. • Do not leave or store the remote control in the "SP LEVEL" (see page 41). G Input channel and speaker indicators LFE L CR...
...name of the speakers when this unit is active (see page 41). dusty places English 25 En Connections ■ Using the remote control The remote control transmits a directional infrared ray. Be sure to operate. Notes • Do not spill water or other liquids on (see page 78.... SILENT CINEMA indicator Lights up when headphones are connected and a sound field program is on the remote control. • Do not drop the remote control. • Do not leave or store the remote control in the "SP LEVEL" (see page 41). G Input channel and speaker indicators LFE L CR...
Owner's Manual
Page 34
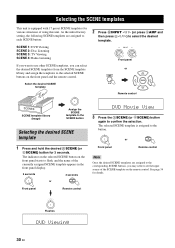
... template library (Image) 1 Assign the SCENE template to select the desired template. The indicator on the selected SCENE button on the remote control. Select the desired SCENE template 2 Press RINPUT l / h (or press 5AMP and then press 8l / h) to the SCENE button ...6SCENE) button for 3 seconds. SELECTING THE SCENE TEMPLATES Selecting the SCENE templates This unit is assigned to the button. 1 Front panel or 1 Remote control Note Once the desired SCENE templates are assigned to each SCENE button: SCENE 1: DVD Viewing SCENE 2: Disc Listening SCENE 3: TV Viewing SCENE ...
... template library (Image) 1 Assign the SCENE template to select the desired template. The indicator on the selected SCENE button on the remote control. Select the desired SCENE template 2 Press RINPUT l / h (or press 5AMP and then press 8l / h) to the SCENE button ...6SCENE) button for 3 seconds. SELECTING THE SCENE TEMPLATES Selecting the SCENE templates This unit is assigned to the button. 1 Front panel or 1 Remote control Note Once the desired SCENE templates are assigned to each SCENE button: SCENE 1: DVD Viewing SCENE 2: Disc Listening SCENE 3: TV Viewing SCENE ...
Owner's Manual
Page 37
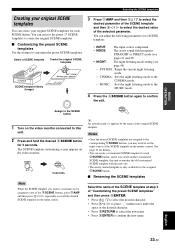
... hold the desired 6SCENE button for each 6SCENE button, and if you may need to set the input source of the SCENE template on the remote control. You can create your original SCENE templates You can refer to the preset 17 SCENE templates to create the original SCENE templates. ■ Customizing the...
... hold the desired 6SCENE button for each 6SCENE button, and if you may need to set the input source of the SCENE template on the remote control. You can create your original SCENE templates You can refer to the preset 17 SCENE templates to create the original SCENE templates. ■ Customizing the...
Owner's Manual
Page 38
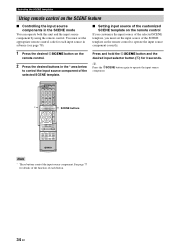
...AV A XM SIRIUS MUTE CD MD/CD-R TUNER DVD DTV/CBL DVR TV CH V-AUX/DOCK B C AMP TV INPUT TV MUTE TV VOL SCENE 1 2 3 4 BAND LEVEL TITLE SRCH MODE MENU VOLUME ENTER RETURN MEMORY REC DISPLAY INFO l PROG h 1 2 ENHANCER SUR. You must set the appropriate remote control... code for 3 seconds. Selecting the SCENE templates Using remote control on the remote control. 2 Press the desired buttons in the SCENE mode You can operate both this unit and the input...
...AV A XM SIRIUS MUTE CD MD/CD-R TUNER DVD DTV/CBL DVR TV CH V-AUX/DOCK B C AMP TV INPUT TV MUTE TV VOL SCENE 1 2 3 4 BAND LEVEL TITLE SRCH MODE MENU VOLUME ENTER RETURN MEMORY REC DISPLAY INFO l PROG h 1 2 ENHANCER SUR. You must set the appropriate remote control... code for 3 seconds. Selecting the SCENE templates Using remote control on the remote control. 2 Press the desired buttons in the SCENE mode You can operate both this unit and the input...

Owner's Manual
Page 47
...speaker FRONT R Front right speaker CENTER Center speaker SWFR Subwoofer SUR. Notes • "TONE CONTROL" and "SOUND MENU" (see page 67). 1 Press 5AMP and then press 7LEVEL on the remote control and then 8k / n to select the speaker you increase or decrease the high-frequency or ...10 dB 3 Press 7LEVEL to an extreme level, the tonal quality of bass and treble for speaker level settings) are stored independently. 1 Press NTONE CONTROL repeatedly to select the high-frequency response (TREBLE) or the low-frequency response (BASS). 2 Press OPROGRAM l / h repeatedly to select "DIRECT"....
...speaker FRONT R Front right speaker CENTER Center speaker SWFR Subwoofer SUR. Notes • "TONE CONTROL" and "SOUND MENU" (see page 67). 1 Press 5AMP and then press 7LEVEL on the remote control and then 8k / n to select the speaker you increase or decrease the high-frequency or ...10 dB 3 Press 7LEVEL to an extreme level, the tonal quality of bass and treble for speaker level settings) are stored independently. 1 Press NTONE CONTROL repeatedly to select the high-frequency response (TREBLE) or the low-frequency response (BASS). 2 Press OPROGRAM l / h repeatedly to select "DIRECT"....
Owner's Manual
Page 51
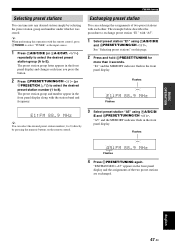
...FA/B/C/D/ E and GPRESET/TUNING/CH l / h. The preset station group and number appear in the front panel display. See "Selecting preset stations" on the remote control. 3 Select preset station "A5" using FA/B/C/D/E and GPRESET/TUNING/CH l / h. "EXCHANGE E1-A5" appears in the front panel display and changes each...other. English 47 En The preset station group letter appears in the front panel display and the assignments of two preset stations with the remote control, press 4TUNER to select "TUNER" as the input source. 1 Press FA/B/C/D/E (or 8A-E/CAT. "E1" and the MEMORY indicator...
...FA/B/C/D/ E and GPRESET/TUNING/CH l / h. The preset station group and number appear in the front panel display. See "Selecting preset stations" on the remote control. 3 Select preset station "A5" using FA/B/C/D/E and GPRESET/TUNING/CH l / h. "EXCHANGE E1-A5" appears in the front panel display and changes each...other. English 47 En The preset station group letter appears in the front panel display and the assignments of two preset stations with the remote control, press 4TUNER to select "TUNER" as the input source. 1 Press FA/B/C/D/E (or 8A-E/CAT. "E1" and the MEMORY indicator...
Owner's Manual
Page 54
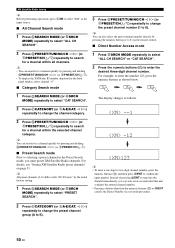
.... The display changes as shown below. 1 2 3 1 Press DSEARCH MODE (or MSRCH MODE) repeatedly to 8). For details, see "Setting XM Satellite Radio preset channels" on the remote control. ■ Direct Number Access mode 2 Press GPRESET/TUNING/CH l / h (or 8PRESET/CH k / n) repeatedly to enter the desired three-digit channel number. y You can search for...
.... The display changes as shown below. 1 2 3 1 Press DSEARCH MODE (or MSRCH MODE) repeatedly to 8). For details, see "Setting XM Satellite Radio preset channels" on the remote control. ■ Direct Number Access mode 2 Press GPRESET/TUNING/CH l / h (or 8PRESET/CH k / n) repeatedly to enter the desired three-digit channel number. y You can search for...
Owner's Manual
Page 56
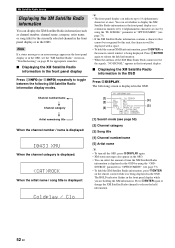
...again. • XM status messages also appear in the OSD. • You can select the amount of the XM Mini-Tuner Dock cannot receive the signals, "NO SIGNAL" appears in the front panel display. ■ Displaying the XM Satellite Radio information in the OSD Press ODISPLAY. Press...Radio information contains a character that cannot be displayed with a space. • To hold the XM Satellite Radio information, press 8ENTER on the remote control while it is being displayed. Coldplay / Clo 52 En XM Satellite Radio tuning Displaying the XM Satellite Radio information You can display the XM...
...again. • XM status messages also appear in the OSD. • You can select the amount of the XM Mini-Tuner Dock cannot receive the signals, "NO SIGNAL" appears in the front panel display. ■ Displaying the XM Satellite Radio information in the OSD Press ODISPLAY. Press...Radio information contains a character that cannot be displayed with a space. • To hold the XM Satellite Radio information, press 8ENTER on the remote control while it is being displayed. Coldplay / Clo 52 En XM Satellite Radio tuning Displaying the XM Satellite Radio information You can display the XM...

Owner's Manual
Page 59
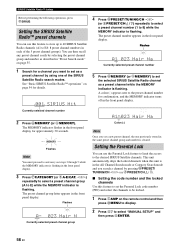
...-digit Parental Lock code number by pressing the numeric buttons (1 to 8) (G). ■ Direct Number Access mode 1 Press MSRCH MODE on the remote control repeatedly to select "ALL CH SEARCH" or "CAT SEARCH". 2 Press the numeric buttons (G) to enter the desired three-digit channel number. SIRIUS... Number Access mode procedure. • If the selected channel is locked (see "Setting the SIRIUS Satellite Radio™ preset channels" on the remote control and then press TENT to confirm the input number. • Instead of pressing TENT to the channel. y You can skip channels to 8)....
...-digit Parental Lock code number by pressing the numeric buttons (1 to 8) (G). ■ Direct Number Access mode 1 Press MSRCH MODE on the remote control repeatedly to select "ALL CH SEARCH" or "CAT SEARCH". 2 Press the numeric buttons (G) to enter the desired three-digit channel number. SIRIUS... Number Access mode procedure. • If the selected channel is locked (see "Setting the SIRIUS Satellite Radio™ preset channels" on the remote control and then press TENT to confirm the input number. • Instead of pressing TENT to the channel. y You can skip channels to 8)....
Owner's Manual
Page 60
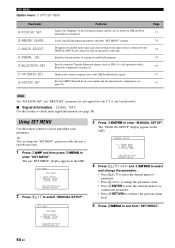
... appears in the front panel display. You can then recall any preset channel easily by using one previously stored in "Preset Search mode" on the remote control and then press MMENU to select "MANUAL SETUP" and then press 8ENTER. 56 En Flashes MEMORY A1 023 Hair Na Currently selected preset channel number...
... appears in the front panel display. You can then recall any preset channel easily by using one previously stored in "Preset Search mode" on the remote control and then press MMENU to select "MANUAL SETUP" and then press 8ENTER. 56 En Flashes MEMORY A1 023 Hair Na Currently selected preset channel number...
Owner's Manual
Page 63
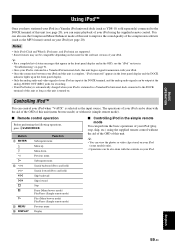
... the basic operations of your iPod (play, stop, skip, etc.) using the supplied remote control. BASIC OPERATION USING IPOD™ Using iPod™ Once you have stationed your iPod in a Yamaha iPod universal dock (such as YDS-10, sold separately) connected to the DOCK terminal of... this unit (see page 20), you can enjoy playback of your iPod using the supplied remote control without it (simple remote mode). ■ Remote control operation Before performing the following...
... the basic operations of your iPod (play, stop, skip, etc.) using the supplied remote control. BASIC OPERATION USING IPOD™ Using iPod™ Once you have stationed your iPod in a Yamaha iPod universal dock (such as YDS-10, sold separately) connected to the DOCK terminal of... this unit (see page 20), you can enjoy playback of your iPod using the supplied remote control without it (simple remote mode). ■ Remote control operation Before performing the following...
Owner's Manual
Page 64
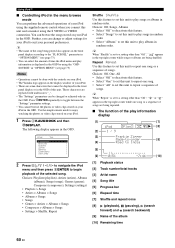
... a setting other than "Off ", " " or " " 1 All appears in the top right corner while one song or a sequence of your iPod using the supplied remote control when you connect this unit to play albums in random order. Choices: Off, One, All • Select "Off " to deactivate this feature. • Select "One...feature to set this unit to play information is set to enjoy watching the photos or video clips stored on your iPod. • The Yamaha logo appears in the display window of your iPod. • There are being played also appears in the front panel display according to the ...
... a setting other than "Off ", " " or " " 1 All appears in the top right corner while one song or a sequence of your iPod using the supplied remote control when you connect this unit to play albums in random order. Choices: Off, One, All • Select "Off " to deactivate this feature. • Select "One...feature to set this unit to play information is set to enjoy watching the photos or video clips stored on your iPod. • The Yamaha logo appears in the display window of your iPod. • There are being played also appears in the front panel display according to the ...
Owner's Manual
Page 68
...64 En Initializes the parameters of a group of the XM Satellite Radio signals. Displays the current reception level of sound field programs. Pair the connected Yamaha Bluetooth adapter (such as YBA-10, sold separately) with a Bluetooth component (see page 61). Page 73 74 74 74 75 75 75 Note... select "MANUAL SETUP". SET MENU Option menu 3 OPTION MENU Parameter A)DISPLAY SET B)MEMORY GUARD C)AUDIO SELECT D)PARAM. p p p p Using SET MENU Use the remote control to change the "SET MENU" parameters while this unit. Locks sound field program parameters and other "SET MENU" settings.
...64 En Initializes the parameters of a group of the XM Satellite Radio signals. Displays the current reception level of sound field programs. Pair the connected Yamaha Bluetooth adapter (such as YBA-10, sold separately) with a Bluetooth component (see page 61). Page 73 74 74 74 75 75 75 Note... select "MANUAL SETUP". SET MENU Option menu 3 OPTION MENU Parameter A)DISPLAY SET B)MEMORY GUARD C)AUDIO SELECT D)PARAM. p p p p Using SET MENU Use the remote control to change the "SET MENU" parameters while this unit. Locks sound field program parameters and other "SET MENU" settings.
Owner's Manual
Page 75
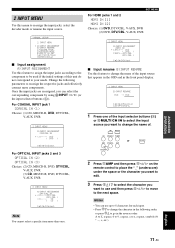
... components. XM SIRIUS CD MD/CD-R TUNER or DVD DTV/CBL DVR MULTI CH IN V-AUX/DOCK 2 Press 5AMP and then press 8l / h on the remote control to place the "_" (underscore) under the space or the character you want to edit. 3 Press 8k / n to select the character you want to the next...
... components. XM SIRIUS CD MD/CD-R TUNER or DVD DTV/CBL DVR MULTI CH IN V-AUX/DOCK 2 Press 5AMP and then press 8l / h on the remote control to place the "_" (underscore) under the space or the character you want to edit. 3 Press 8k / n to select the character you want to the next...


