Owner's Manual
Page 3
... an outside antenna or cable system is connected to the product, be determined by the manufacturer. 23 Heat - Follow all installations. If the antenna lead-in all installation instructions. Adjust only those products distributed by Yamaha Corporation of other electronic devices. This equipment generates/uses radio frequencies and, if not installed and used replacement parts specified by a qualified technician to restore the product to those controls that...
... an outside antenna or cable system is connected to the product, be determined by the manufacturer. 23 Heat - Follow all installations. If the antenna lead-in all installation instructions. Adjust only those products distributed by Yamaha Corporation of other electronic devices. This equipment generates/uses radio frequencies and, if not installed and used replacement parts specified by a qualified technician to restore the product to those controls that...
Owner's Manual
Page 5
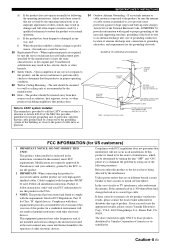
... and cable plugs 13 Information on HDMI 14 Audio and video signal flow 15 Connecting video components 16 Connecting other components 17 Connecting audio components 19 Connecting a Yamaha iPod™ universal dock or Bluetooth™ adapter 20 Using REMOTE IN/OUT jacks 20 Using the VIDEO AUX jacks on the front panel .... 21 Connecting the FM and AM antennas 21 Connecting the power cable 22 Setting the speaker impedance 23 Turning on and off the power 23 Front panel display 24 Optimizing the speaker setting for your listening room 26 Using AUTO SETUP 26 BASIC OPERATION Selecting...
... and cable plugs 13 Information on HDMI 14 Audio and video signal flow 15 Connecting video components 16 Connecting other components 17 Connecting audio components 19 Connecting a Yamaha iPod™ universal dock or Bluetooth™ adapter 20 Using REMOTE IN/OUT jacks 20 Using the VIDEO AUX jacks on the front panel .... 21 Connecting the FM and AM antennas 21 Connecting the power cable 22 Setting the speaker impedance 23 Turning on and off the power 23 Front panel display 24 Optimizing the speaker setting for your listening room 26 Using AUTO SETUP 26 BASIC OPERATION Selecting...
Owner's Manual
Page 10
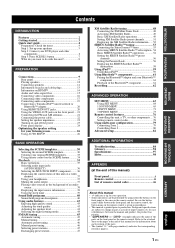
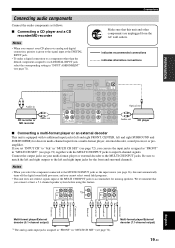
...SUB SB(8CH) SURROUND WOOFER MULTI CH INPUT ZONE 2 OUT OUTPUT CENTER SURROUND BACK/BI-AMP R L SINGLE R FRONT A L R SURROUND L R FRONT B L AC OUTLETS SWITCHED 3 Connect the video cable to the composite video output jack of your DVD player and the DVD DIGITAL INPUT COAXIAL jack of this unit and the DVD player are unplugged from the AC wall outlets. Video monitor AV receiver Make sure that this unit. Video input jack Video cable VIDEO MONITOR OUT jack 1 Connect the digital coaxial audio cable to the digital coaxial audio output jack of your DVD player and the DVD VIDEO jack...
...SUB SB(8CH) SURROUND WOOFER MULTI CH INPUT ZONE 2 OUT OUTPUT CENTER SURROUND BACK/BI-AMP R L SINGLE R FRONT A L R SURROUND L R FRONT B L AC OUTLETS SWITCHED 3 Connect the video cable to the composite video output jack of your DVD player and the DVD DIGITAL INPUT COAXIAL jack of this unit and the DVD player are unplugged from the AC wall outlets. Video monitor AV receiver Make sure that this unit. Video input jack Video cable VIDEO MONITOR OUT jack 1 Connect the digital coaxial audio cable to the digital coaxial audio output jack of your DVD player and the DVD VIDEO jack...
Owner's Manual
Page 11
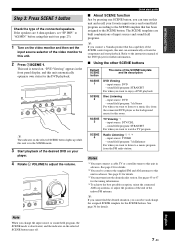
... selected SCENE button lights up while this unit is turned on this unit in advance. sound field program: 7ch Stereo For when you want to listen to a music program from the connected DVD player as the background music for details. *3 You must connect a cable TV or a satellite tuner to this unit and recall your player. 4 Rotate L VOLUME to adjust the volume. "DVD Viewing" appears in the front panel display, and this unit in advance. Radio...
... selected SCENE button lights up while this unit is turned on this unit in advance. sound field program: 7ch Stereo For when you want to listen to a music program from the connected DVD player as the background music for details. *3 You must connect a cable TV or a satellite tuner to this unit and recall your player. 4 Rotate L VOLUME to adjust the volume. "DVD Viewing" appears in the front panel display, and this unit in advance. Radio...
Owner's Manual
Page 23
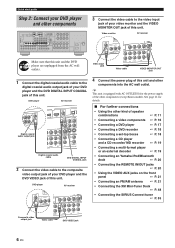
...) SURROUND SUB WOOFER MULTI CH INPUT LR LR L *1 R LR CENTER L R FRONT(6CH) SB(8CH) SURROUND SUB WOOFER MULTI CH INPUT LR LR English Center out Subwoofer out Surround out Surround back out Front out Center out Subwoofer out Surround out Front out Multi-format player/External decoder (5.1-channel output) *1 The analog audio input jacks assigned as "FRONT" in CD recorder or MD recorder L R Audio out COAXIAL OPTICAL DVD IN1 DTV/CBL IN2 HDMI REMOTE IN DVD DTV/CBL CD OUT 1 2 3 DIGITAL INPUT DVD PR COMPONENT VIDEO PB...
...) SURROUND SUB WOOFER MULTI CH INPUT LR LR L *1 R LR CENTER L R FRONT(6CH) SB(8CH) SURROUND SUB WOOFER MULTI CH INPUT LR LR English Center out Subwoofer out Surround out Surround back out Front out Center out Subwoofer out Surround out Front out Multi-format player/External decoder (5.1-channel output) *1 The analog audio input jacks assigned as "FRONT" in CD recorder or MD recorder L R Audio out COAXIAL OPTICAL DVD IN1 DTV/CBL IN2 HDMI REMOTE IN DVD DTV/CBL CD OUT 1 2 3 DIGITAL INPUT DVD PR COMPONENT VIDEO PB...
Owner's Manual
Page 25
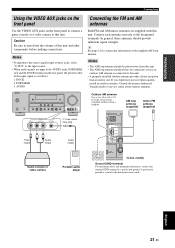
... moist earth. O Game console or video camera Portable audio player SUB WOOFER TPUT CENTER (U.S.A. DOCK 2. PORTABLE 3. In general, these jacks, select "V-AUX" as the input source. • When audio signals are supplied with this unit. • The AM loop antenna should provide sufficient signal strength. Consult the nearest authorized Yamaha dealer or service center about outdoor antennas. PREPARATION Connections Using the VIDEO AUX jacks on the front panel Use the VIDEO AUX jacks on the rear panel, the priority order of the...
... moist earth. O Game console or video camera Portable audio player SUB WOOFER TPUT CENTER (U.S.A. DOCK 2. PORTABLE 3. In general, these jacks, select "V-AUX" as the input source. • When audio signals are supplied with this unit. • The AM loop antenna should provide sufficient signal strength. Consult the nearest authorized Yamaha dealer or service center about outdoor antennas. PREPARATION Connections Using the VIDEO AUX jacks on the front panel Use the VIDEO AUX jacks on the rear panel, the priority order of the...
Owner's Manual
Page 40
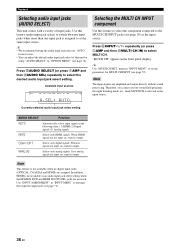
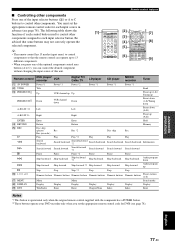
... order: (1) HDMI (2) Digital signals (3) Analog signals Selects only HDMI signals. Currently selected audio input jack select setting AUDIO SELECT AUTO HDMI COAX/OPT ANALOG Function Automatically selects input signals in the front panel display. If no analog signals are assigned. Press SAUDIO SELECT (or press 5AMP and then FAUDIO SEL) repeatedly to select MULTI CH. When HDMI signals are amplified and output directly without sound processing. Available input sources MULTI CH DVR V-AUX DTV/CBL DVD MD/CD-R CD TUNER A.SEL: AUTO XM SIRIUS Selecting the MULTI CH INPUT component Use this...
... order: (1) HDMI (2) Digital signals (3) Analog signals Selects only HDMI signals. Currently selected audio input jack select setting AUDIO SELECT AUTO HDMI COAX/OPT ANALOG Function Automatically selects input signals in the front panel display. If no analog signals are assigned. Press SAUDIO SELECT (or press 5AMP and then FAUDIO SEL) repeatedly to select MULTI CH. When HDMI signals are amplified and output directly without sound processing. Available input sources MULTI CH DVR V-AUX DTV/CBL DVD MD/CD-R CD TUNER A.SEL: AUTO XM SIRIUS Selecting the MULTI CH INPUT component Use this...
Owner's Manual
Page 42
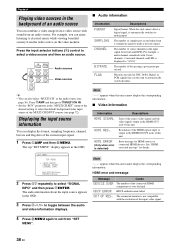
... CD MD/CD-R TUNER DVD DTV/CBL DVR V-AUX Audio sources Video sources y • You can combine a video image from a video source with sound from "SET MENU". 38 En The audio information about the input source appears in the OSD. The number of the input video signal. 4 Press MMENU again to automatically switch decoders. Resolution of the HDMI signals input or output at the HDMI IN/OUT jacks of the connected HDMI components is not compatible with 3 front channels, 2 surround channels and LFE, is...
... CD MD/CD-R TUNER DVD DTV/CBL DVR V-AUX Audio sources Video sources y • You can combine a video image from a video source with sound from "SET MENU". 38 En The audio information about the input source appears in the OSD. The number of the input video signal. 4 Press MMENU again to automatically switch decoders. Resolution of the HDMI signals input or output at the HDMI IN/OUT jacks of the connected HDMI components is not compatible with 3 front channels, 2 surround channels and LFE, is...
Owner's Manual
Page 49
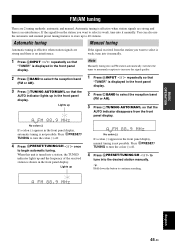
... ITUNING AUTO/MAN'L so that the AUTO indicator disappears from the station you want to select is not possible. Lights up and the frequency of the received station is not possible. TUNED A FM 88.9 MHz English 45 En If the signal from the front panel display. Press DPRESET/ TUNING to turn the colon (:) off . 4 Press GPRESET/TUNING/CH l / h to tune into an FM station automatically switches the tuner to...
... ITUNING AUTO/MAN'L so that the AUTO indicator disappears from the station you want to select is not possible. Lights up and the frequency of the received station is not possible. TUNED A FM 88.9 MHz English 45 En If the signal from the front panel display. Press DPRESET/ TUNING to turn the colon (:) off . 4 Press GPRESET/TUNING/CH l / h to tune into an FM station automatically switches the tuner to...
Owner's Manual
Page 67
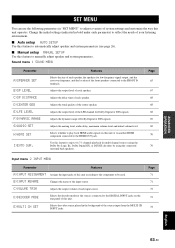
... output level of each speaker. Adjusts the dynamic range of the center speaker. Use this unit operates. E)MULTI CH SET Selects the video source played in "SET MENU" to adjust a variety of system settings and customize the way this feature to be used. Sound menu 1 SOUND MENU Parameter A)SPEAKER SET B)SP LEVEL C)SP DISTANCE D)CENTER GEQ E)LFE LEVEL F)DYNAMIC RANGE G)AUDIO SET H)HDMI SET I)EXTD SUR. Adjusts the tonal quality of Dolby Digital or DTS signals. Page 65 67 68 68 68 69 69 70 70 Input menu 2 INPUT MENU...
... output level of each speaker. Adjusts the dynamic range of the center speaker. Use this unit operates. E)MULTI CH SET Selects the video source played in "SET MENU" to adjust a variety of system settings and customize the way this feature to be used. Sound menu 1 SOUND MENU Parameter A)SPEAKER SET B)SP LEVEL C)SP DISTANCE D)CENTER GEQ E)LFE LEVEL F)DYNAMIC RANGE G)AUDIO SET H)HDMI SET I)EXTD SUR. Adjusts the tonal quality of Dolby Digital or DTS signals. Page 65 67 68 68 68 69 69 70 70 Input menu 2 INPUT MENU...
Owner's Manual
Page 68
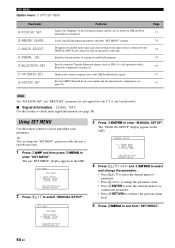
... Adjusts the brightness of sound field programs. Pair the connected Yamaha Bluetooth adapter (such as YBA-10, sold separately) with a Bluetooth component (see page 56). p p p p Using SET MENU Use the remote control to select "MANUAL SETUP". Sets the SIRIUS Parental Lock code number and the channel lock configuration (see page 61). The top "SET MENU" display appears in which the XM and iPod information is reproducing sound. 1 Press 5AMP and then press MMENU to the DIGITAL INPUT jacks when you turn on the power...
... Adjusts the brightness of sound field programs. Pair the connected Yamaha Bluetooth adapter (such as YBA-10, sold separately) with a Bluetooth component (see page 56). p p p p Using SET MENU Use the remote control to select "MANUAL SETUP". Sets the SIRIUS Parental Lock code number and the channel lock configuration (see page 61). The top "SET MENU" display appears in which the XM and iPod information is reproducing sound. 1 Press 5AMP and then press MMENU to the DIGITAL INPUT jacks when you turn on the power...
Owner's Manual
Page 69
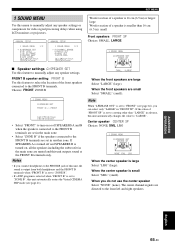
..., LARGE 1 SOUND MENU A)SPEAKER SET FRONT SP p p p p p p ■ Speaker settings A)SPEAKER SET Use this unit automatically changes the value to "ZONE B", this unit automatically enters the Virtual CINEMA DSP mode (see page 41). If SPEAKERS A is set in the main zone are small Select "SMALL" (small). If the value of the front speakers connected to manually adjust any speaker settings or compensate for video signal processing delays when using LCD monitors or projectors. ;MANUAL SETUP 1 SOUND MENU 1/2 . When the front speakers are...
..., LARGE 1 SOUND MENU A)SPEAKER SET FRONT SP p p p p p p ■ Speaker settings A)SPEAKER SET Use this unit automatically changes the value to "ZONE B", this unit automatically enters the Virtual CINEMA DSP mode (see page 41). If SPEAKERS A is set in the main zone are small Select "SMALL" (small). If the value of the front speakers connected to manually adjust any speaker settings or compensate for video signal processing delays when using LCD monitors or projectors. ;MANUAL SETUP 1 SOUND MENU 1/2 . When the front speakers are...
Owner's Manual
Page 74
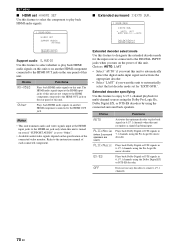
... connected to the DIGITAL INPUT jacks when you want this unit to automatically select the last decoder mode set H)HDMI SET Use this feature to select the component to play back HDMI audio signals. 1 SOUND MENU H)HDMI SET SUPPORT AUDIO: RX-V563 ■ Extended surround I)EXTD SUR. 1 SOUND MENU I)EXTD SUR. . >AUTO LAST EXTD SUR.;;;;;;AUTO [p]/[[]:Select [ENTER]:Return [p]/[[]:Select [ENTER]:Return Support audio S.AUDIO Use this feature to select whether to the HDMI OUT jack on the rear panel of this feature to enjoy 6.1/7.1-channel playback for multi-channel sources using the Dolby...
... connected to the DIGITAL INPUT jacks when you want this unit to automatically select the last decoder mode set H)HDMI SET Use this feature to select the component to play back HDMI audio signals. 1 SOUND MENU H)HDMI SET SUPPORT AUDIO: RX-V563 ■ Extended surround I)EXTD SUR. 1 SOUND MENU I)EXTD SUR. . >AUTO LAST EXTD SUR.;;;;;;AUTO [p]/[[]:Select [ENTER]:Return [p]/[[]:Select [ENTER]:Return Support audio S.AUDIO Use this feature to select whether to the HDMI OUT jack on the rear panel of this feature to enjoy 6.1/7.1-channel playback for multi-channel sources using the Dolby...
Owner's Manual
Page 76
... En Input channels INPUT CH Use this setting to select the number of this unit to automatically select the last selected video source as the background video source. Front left and right channel signals output from the connected component are input. Choices: CD, MD/CD-R, TUNER, DVD, DTV/CBL, V-AUX, DVR, DOCK, MULTI CH, XM, SIRIUS Control range: -6.0 to +6.0 dB Control step: 1.0 dB Initial setting: 0.0 dB 2 INPUT MENU C)VOLUME TRIM DVD DVD ;;;;;0.0dB [p]/[[]:Adjust [RETURN]:Exit Note You can select the analog audio jacks at which...
... En Input channels INPUT CH Use this setting to select the number of this unit to automatically select the last selected video source as the background video source. Front left and right channel signals output from the connected component are input. Choices: CD, MD/CD-R, TUNER, DVD, DTV/CBL, V-AUX, DVR, DOCK, MULTI CH, XM, SIRIUS Control range: -6.0 to +6.0 dB Control step: 1.0 dB Initial setting: 0.0 dB 2 INPUT MENU C)VOLUME TRIM DVD DVD ;;;;;0.0dB [p]/[[]:Adjust [RETURN]:Exit Note You can select the analog audio jacks at which...
Owner's Manual
Page 81
... desired component without changing the input source of this unit. [1] POWER POWER STANDBY POWER TV AV A XM SIRIUS MUTE CD MD/CD-R TUNER DVD DTV/CBL DVR TV CH V-AUX/DOCK B C AMP TV INPUT TV MUTE TV VOL SCENE 1 2 3 4 [2] BAND LEVEL TITLE SRCH MODE MENU VOLUME [3] [4] [5] [6] ENTER RETURN MEMORY REC DISPLAY INFO l PROG h 1 2 ENHANCER SUR. DECODE 3 4 STRAIGHT DIRECT 5 6 NIGHT PARAMETER 7 8 MULTI CH IN AUDIO SEL SLEEP 9 0 10 ENT [7] [8] [9] Remote control [1] AV POWER [2] TITLE [3] PRESET/CH k PRESET/CH n A-E/CAT. ADVANCED OPERATION...
... desired component without changing the input source of this unit. [1] POWER POWER STANDBY POWER TV AV A XM SIRIUS MUTE CD MD/CD-R TUNER DVD DTV/CBL DVR TV CH V-AUX/DOCK B C AMP TV INPUT TV MUTE TV VOL SCENE 1 2 3 4 [2] BAND LEVEL TITLE SRCH MODE MENU VOLUME [3] [4] [5] [6] ENTER RETURN MEMORY REC DISPLAY INFO l PROG h 1 2 ENHANCER SUR. DECODE 3 4 STRAIGHT DIRECT 5 6 NIGHT PARAMETER 7 8 MULTI CH IN AUDIO SEL SLEEP 9 0 10 ENT [7] [8] [9] Remote control [1] AV POWER [2] TITLE [3] PRESET/CH k PRESET/CH n A-E/CAT. ADVANCED OPERATION...
Owner's Manual
Page 88
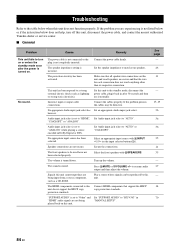
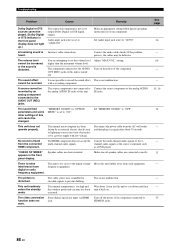
... resume audio output and then adjust the volume. Set this unit. No appropriate Audio input jack select has Set an appropriate Audio input jack select. No appropriate input source has been selected. Select an appropriate input source with MSPEAKERS. The front speakers to the standby mode, disconnect the power cable, plug it back in "HDMI" audio signals are not being input from a source component, such as lightning or strong static electricity). Select the front speakers with RINPUT l / h (or the input selector buttons(4)). Turn up the volume. Press...
... resume audio output and then adjust the volume. Set this unit. No appropriate Audio input jack select has Set an appropriate Audio input jack select. No appropriate input source has been selected. Select an appropriate input source with MSPEAKERS. The front speakers to the standby mode, disconnect the power cable, plug it back in "HDMI" audio signals are not being input from a source component, such as lightning or strong static electricity). Select the front speakers with RINPUT l / h (or the input selector buttons(4)). Turn up the volume. Press...
Owner's Manual
Page 90
... source uses scrambled or encoded signals to "AUTO". Turn on . Move this unit. The picture is set to "ANALOG". Disconnect the power cable from such equipment. This unit suddenly enters the standby mode. Audio input jack select is disturbed. heard. Set Audio input jack select to prevent dubbing. "MEMORY GUARD" in "OPTION MENU" is not set to output Dolby Digital or DTS digital signals. Make sure all speaker cables are input via HDMI jack. The video conversion function does not work. Make an appropriate setting following the operating instructions...
... source uses scrambled or encoded signals to "AUTO". Turn on . Move this unit. The picture is set to "ANALOG". Disconnect the power cable from such equipment. This unit suddenly enters the standby mode. Audio input jack select is disturbed. heard. Set Audio input jack select to prevent dubbing. "MEMORY GUARD" in "OPTION MENU" is not set to output Dolby Digital or DTS digital signals. Make sure all speaker cables are input via HDMI jack. The video conversion function does not work. Make an appropriate setting following the operating instructions...
Owner's Manual
Page 94
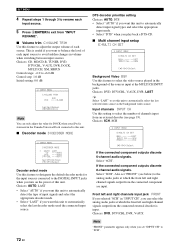
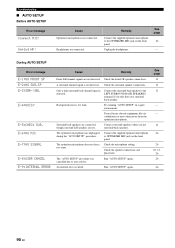
...Connect the supplied optimizer microphone to the OPTIMIZER MIC jack on the front panel. Run "AUTO SETUP" again. Background noise is not detected. E-6:NO MIC E-7:NO SIGNAL E-8:USER CANCEL E-9:INTERNAL ERROR Cause Remedy Front L/R channel signals are not detected. Check the surround speaker connections. The optimizer microphone does not detect test tones. Check the front L/R speaker connections. Connect the surround back speaker to user activity. Connect surround speakers when you only have one surround back speaker. The optimizer microphone...
...Connect the supplied optimizer microphone to the OPTIMIZER MIC jack on the front panel. Run "AUTO SETUP" again. Background noise is not detected. E-6:NO MIC E-7:NO SIGNAL E-8:USER CANCEL E-9:INTERNAL ERROR Cause Remedy Front L/R channel signals are not detected. Check the surround speaker connections. The optimizer microphone does not detect test tones. Check the front L/R speaker connections. Connect the surround back speaker to user activity. Connect surround speakers when you only have one surround back speaker. The optimizer microphone...
Owner's Manual
Page 102
...GUARD, Option menu 74 B)SPEAKER LEVEL, Sound menu 67 Background Video, Multi channel input setup 72 BGV, Multi channel input setup .......... 72 BI-AMP, Advanced setup 82 Bi-Amplifier, Advanced setup 82 Bluetooth setting, Option menu ...........75 BT connected, Bluetooth status message 92 ■C C)AUDIO SELECT, Option menu ......74 C)SP DISTANCE, Sound menu ..........68 C)VOLUME TRIM, Input menu .........72 CALL SIRIUS, SIRIUS Satellite Radio status message 89 Canceled, Troubleshooting 92 CAT SEARCH, XM tuning 55 Category Search mode, XM tuning ......50 CD player, Connection 19 CD...
...GUARD, Option menu 74 B)SPEAKER LEVEL, Sound menu 67 Background Video, Multi channel input setup 72 BGV, Multi channel input setup .......... 72 BI-AMP, Advanced setup 82 Bi-Amplifier, Advanced setup 82 Bluetooth setting, Option menu ...........75 BT connected, Bluetooth status message 92 ■C C)AUDIO SELECT, Option menu ......74 C)SP DISTANCE, Sound menu ..........68 C)VOLUME TRIM, Input menu .........72 CALL SIRIUS, SIRIUS Satellite Radio status message 89 Canceled, Troubleshooting 92 CAT SEARCH, XM tuning 55 Category Search mode, XM tuning ......50 CD player, Connection 19 CD...
Owner's Manual
Page 104
... VIDEO jacks 13 SB L/R SP, Speaker settings 66 SCENE 7 SCENE IR code setting, Advanced setup 83 SCENE IR, Advanced setup 83 SCENE template selection 30 Searching..., Bluetooth status message 92 Selection, Audio input jacks 36 Selection, MULTI CH INPUT component ...... 36 Selection, Preset station, FM/AM tuning 47 Selection, SCENE template 30 SET MENU 63 Setting remote control codes 78 Setting SCENE template input source, Remote control 34 Set-top box connection 18 Shuffle, iPod controlling 60 SILENT CINEMA 41 SILENT CINEMA indicator 25 Simple remote mode, iPod controlling 59...
... VIDEO jacks 13 SB L/R SP, Speaker settings 66 SCENE 7 SCENE IR code setting, Advanced setup 83 SCENE IR, Advanced setup 83 SCENE template selection 30 Searching..., Bluetooth status message 92 Selection, Audio input jacks 36 Selection, MULTI CH INPUT component ...... 36 Selection, Preset station, FM/AM tuning 47 Selection, SCENE template 30 SET MENU 63 Setting remote control codes 78 Setting SCENE template input source, Remote control 34 Set-top box connection 18 Shuffle, iPod controlling 60 SILENT CINEMA 41 SILENT CINEMA indicator 25 Simple remote mode, iPod controlling 59...


