Owner's Manual
Page 6
.... Other features ◆ YPAO (Yamaha Parametric Room Acoustic Optimizer) for automatic speaker setup ◆ 192-kHz/24-bit D/A converter ◆ DIRECT mode for high quality sound for all sources ◆ 6 additional input jacks for discrete multi-channel input ◆ OSD (on-screen display) menus that allow... you to optimize this unit to connect a Yamaha iPod universal dock (such as YDS-10, sold separately) or Bluetooth adapter (such as YBA-10,...
.... Other features ◆ YPAO (Yamaha Parametric Room Acoustic Optimizer) for automatic speaker setup ◆ 192-kHz/24-bit D/A converter ◆ DIRECT mode for high quality sound for all sources ◆ 6 additional input jacks for discrete multi-channel input ◆ OSD (on-screen display) menus that allow... you to optimize this unit to connect a Yamaha iPod universal dock (such as YDS-10, sold separately) or Bluetooth adapter (such as YBA-10,...
Owner's Manual
Page 17
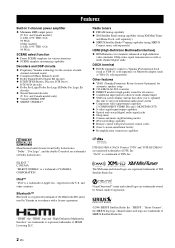
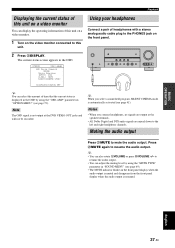
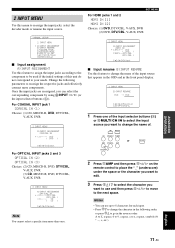
... flow for MONITOR OUT COMPONENT VIDEO Input PR PB Y Output (MONITOR OUT) PR PB Y S VIDEO VIDEO Through Video conversion ON (see page 73) Note The OSD signal is not output at the analog AUDIO OUT (REC) jacks. ■ Video jacks This unit has three types of audio jacks. PREPARATION Connections Information...
... flow for MONITOR OUT COMPONENT VIDEO Input PR PB Y Output (MONITOR OUT) PR PB Y S VIDEO VIDEO Through Video conversion ON (see page 73) Note The OSD signal is not output at the analog AUDIO OUT (REC) jacks. ■ Video jacks This unit has three types of audio jacks. PREPARATION Connections Information...
Owner's Manual
Page 20
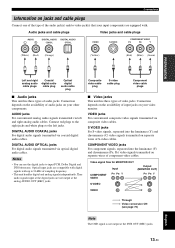
... of this unit and other components are in the standby mode. Connections Connecting video components Connect your TV monitor or projector via HDMI connection, the OSD does not appear. Notes • Some video monitors connected to this unit or on the video monitor connected to the HDMI OUT jack of this...
... of this unit and other components are in the standby mode. Connections Connecting video components Connect your TV monitor or projector via HDMI connection, the OSD does not appear. Notes • Some video monitors connected to this unit or on the video monitor connected to the HDMI OUT jack of this...
Owner's Manual
Page 30
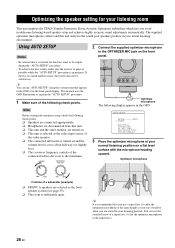
...It is too much ambient noise, the results may not be when you are seated in your listening room This unit employs the YPAO (Yamaha Parametric Room Acoustic Optimizer) technology which lets you use the attached screw of the following display appears in progress. Optimizer microphone p p MIN ...height as possible while the "AUTO SETUP" procedure is sufficiently quiet. Using AUTO SETUP Notes • Be advised that appears in the OSD or in your normal listening position on the front panel. AUTO SETUP SETUP;;;;;;;AUTO . Note Before starting the automatic setup, check the ...
...It is too much ambient noise, the results may not be when you are seated in your listening room This unit employs the YPAO (Yamaha Parametric Room Acoustic Optimizer) technology which lets you use the attached screw of the following display appears in progress. Optimizer microphone p p MIN ...height as possible while the "AUTO SETUP" procedure is sufficiently quiet. Using AUTO SETUP Notes • Be advised that appears in the OSD or in your normal listening position on the front panel. AUTO SETUP SETUP;;;;;;;AUTO . Note Before starting the automatic setup, check the ...
Owner's Manual
Page 31
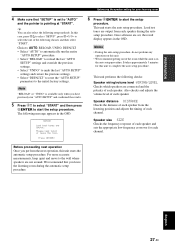
.... For more accurate measurements, keep quiet or leave the room. We recommend that "SETUP" is set , the result display appears in the OSD. This unit starts the auto setup procedure. This unit performs the following choises and then select "START". y You can also select the following... message appears in the OSD. Please keep quiet and move to select the one of each channel. Note "RELOAD" or "UNDO" is in the auto setup procedure. ...
.... For more accurate measurements, keep quiet or leave the room. We recommend that "SETUP" is set , the result display appears in the OSD. This unit starts the auto setup procedure. This unit performs the following choises and then select "START". y You can also select the following... message appears in the OSD. Please keep quiet and move to select the one of each channel. Note "RELOAD" or "UNDO" is in the auto setup procedure. ...
Owner's Manual
Page 33
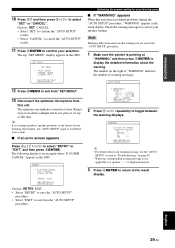
...information about each warning message, see the "AUTO SETUP" section in the result display. The top "SET MENU" display appears in the OSD. Note Warnings differ from errors in that warnings do not place it on the right of "WARNING" indicates the number of your listening ...Troubleshooting" on page 90. • When the corresponding warning message is not applicable to a speaker, "- -" is an example where "E-8:USER CANCEL" appears in the OSD. Choices: SET, CANCEL • Select "SET" to confirm the "AUTO SETUP" results. • Select "CANCEL" to cancel the "AUTO SETUP" results. 11...
...information about each warning message, see the "AUTO SETUP" section in the result display. The top "SET MENU" display appears in the OSD. Note Warnings differ from errors in that warnings do not place it on the right of "WARNING" indicates the number of your listening ...Troubleshooting" on page 90. • When the corresponding warning message is not applicable to a speaker, "- -" is an example where "E-8:USER CANCEL" appears in the OSD. Choices: SET, CANCEL • Select "SET" to confirm the "AUTO SETUP" results. • Select "CANCEL" to cancel the "AUTO SETUP" results. 11...

Owner's Manual
Page 39
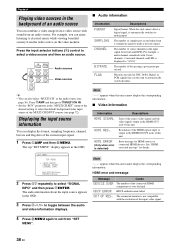
... damage your listening preference, not merely on the selected component or select a broadcast station. • Refer to ... The respective speaker indicators lights up in the OSD, see page 41). • To display information about the currently selected input source in the front panel display. 3 Press RINPUT l / h repeatedly (or press one of...
... damage your listening preference, not merely on the selected component or select a broadcast station. • Refer to ... The respective speaker indicators lights up in the OSD, see page 41). • To display information about the currently selected input source in the front panel display. 3 Press RINPUT l / h repeatedly (or press one of...
Owner's Manual
Page 41
Note The OSD signal is not output at the speaker terminals. • All Dolby Digital and DTS audio signals are output ...CINEMA (MID) [DISPLAY]:STATUS OFF y You can select the amount of time that the current status is displayed in the OSD by using the "OSD-AMP" parameter in the front panel display when the audio output is muted and disappears from the front panel display when ... a video monitor You can display the operating information of this unit. The current status screen appears in the OSD. Notes • When you select a sound field program, SILENT CINEMA mode is resumed.
Note The OSD signal is not output at the speaker terminals. • All Dolby Digital and DTS audio signals are output ...CINEMA (MID) [DISPLAY]:STATUS OFF y You can select the amount of time that the current status is displayed in the OSD by using the "OSD-AMP" parameter in the front panel display when the audio output is muted and disappears from the front panel display when ... a video monitor You can display the operating information of this unit. The current status screen appears in the OSD. Notes • When you select a sound field program, SILENT CINEMA mode is resumed.
Owner's Manual
Page 42
Press 5AMP and then press EMULTI CH IN. • Set the "BGV" parameter in the OSD. The top "SET MENU" display appears in the "MULTI CH SET" menu to the desired setting to select the default background video input source of ... of the source video signals and the video signals output at the HDMI IN/OUT jacks of samples per second. Flag data encoded in the OSD. 3 Press 8l / h to automatically switch decoders. OUT OF RES. For example, you can display the format, sampling frequency, channel, bit rate and flag data of...
Press 5AMP and then press EMULTI CH IN. • Set the "BGV" parameter in the OSD. The top "SET MENU" display appears in the "MULTI CH SET" menu to the desired setting to select the default background video input source of ... of the source video signals and the video signals output at the HDMI IN/OUT jacks of samples per second. Flag data encoded in the OSD. 3 Press 8l / h to automatically switch decoders. OUT OF RES. For example, you can display the format, sampling frequency, channel, bit rate and flag data of...
Owner's Manual
Page 53
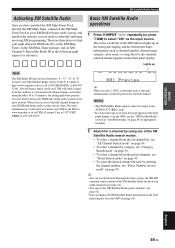
..."O", "S" or "F". online at the AUDIO OUT (REC) jacks. • If a status message or an error message appears in the front panel display or in the OSD, see page 52). English 49 En BASIC OPERATION XM Satellite Radio tuning Activating XM Satellite Radio Once you have installed the XM Mini-Tuner Dock... to 15 minutes, but during peak busy periods you are ready to subscribe in the OSD (see the "XM Satellite Radio" section in the front panel display. For more information or to subscribe and begin receiving XM programming. MULTI CH DVR V-AUX DTV/CBL DVD MD/CD-R CD TUNER XM ...
..."O", "S" or "F". online at the AUDIO OUT (REC) jacks. • If a status message or an error message appears in the front panel display or in the OSD, see page 52). English 49 En BASIC OPERATION XM Satellite Radio tuning Activating XM Satellite Radio Once you have installed the XM Mini-Tuner Dock... to 15 minutes, but during peak busy periods you are ready to subscribe in the OSD (see the "XM Satellite Radio" section in the front panel display. For more information or to subscribe and begin receiving XM programming. MULTI CH DVR V-AUX DTV/CBL DVD MD/CD-R CD TUNER XM ...
Owner's Manual
Page 56
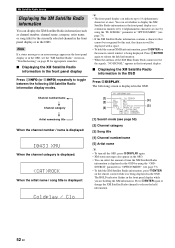
...You can set whether to release the held information. • When the antenna of time the XM Satellite Radio information is displayed in the OSD by this unit, the character will be recognized by using the "OSDSOURCE" parameter in "OPTION MENU" (see the "XM Satellite Radio" ...section in "Troubleshooting" on the remote control while it is being displayed in the OSD. You can select the amount of the XM Mini-Tuner Dock cannot receive the signals, "NO SIGNAL" appears in the front panel display. ■ Displaying the XM Satellite Radio ...
...You can set whether to release the held information. • When the antenna of time the XM Satellite Radio information is displayed in the OSD by this unit, the character will be recognized by using the "OSDSOURCE" parameter in "OPTION MENU" (see the "XM Satellite Radio" ...section in "Troubleshooting" on the remote control while it is being displayed in the OSD. You can select the amount of the XM Mini-Tuner Dock cannot receive the signals, "NO SIGNAL" appears in the front panel display. ■ Displaying the XM Satellite Radio ...

Owner's Manual
Page 58
... to display the Sirius ID of your subscription yet, you can display the SIRIUS Satellite Radio information in the front panel display or in the OSD (see page 58). 54 En y To scroll the message again, press IINFO (or AINFO). The cursor on the label of the SiriusConnect tuner and when...
... to display the Sirius ID of your subscription yet, you can display the SIRIUS Satellite Radio information in the front panel display or in the OSD (see page 58). 54 En y To scroll the message again, press IINFO (or AINFO). The cursor on the label of the SiriusConnect tuner and when...

Owner's Manual
Page 62
... Radio information in the front panel display Press IINFO (or AINFO) repeatedly to 14 alphanumeric characters at once by using the "OSDSOURCE" parameter in the OSD Press IINFO (or ODISPLAY). Channel number/Antenna reception level DSP PROG. SIRIUS Information ANT: [5] [1] ALL CH SEARCH 008:Big '80s [6] [2] :Pop :...following operations, press K SIRIUS. Note If a status message or an error message appears in the front panel display or in the OSD, see the "SIRIUS Satellite Radio" section in "Troubleshooting" on page 89 for the currently selected channel in the front panel display or...
... Radio information in the front panel display Press IINFO (or AINFO) repeatedly to 14 alphanumeric characters at once by using the "OSDSOURCE" parameter in the OSD Press IINFO (or ODISPLAY). Channel number/Antenna reception level DSP PROG. SIRIUS Information ANT: [5] [1] ALL CH SEARCH 008:Big '80s [6] [2] :Pop :...following operations, press K SIRIUS. Note If a status message or an error message appears in the front panel display or in the OSD, see the "SIRIUS Satellite Radio" section in "Troubleshooting" on page 89 for the currently selected channel in the front panel display or...
Owner's Manual
Page 63
..., skip, etc.) using the supplied remote control. y • For a complete list of status messages that appear in the front panel display and in a Yamaha iPod universal dock connected to improve the sound quality of this unit. English 59 En y • You can view the photos or video clips stored... page 91. • Once your iPod is stationed in the OSD, see page 20). The operations of your iPod (see the "iPod" section in a Yamaha iPod universal dock, this unit begins signal transmission with the aid of the OSD of the compression artifacts (such as the input source. You can...
..., skip, etc.) using the supplied remote control. y • For a complete list of status messages that appear in the front panel display and in a Yamaha iPod universal dock connected to improve the sound quality of this unit. English 59 En y • You can view the photos or video clips stored... page 91. • Once your iPod is stationed in the OSD, see page 20). The operations of your iPod (see the "iPod" section in a Yamaha iPod universal dock, this unit begins signal transmission with the aid of the OSD of the compression artifacts (such as the input source. You can...
Owner's Manual
Page 64
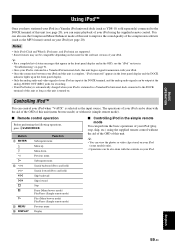
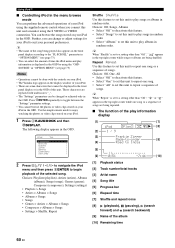
... characters are replaced with the controls on your iPod. • The Yamaha logo appears in the display window of the album [10] Remaining time...you can select the amount of this unit and a monitor using the "OSDSOURCE" in the OSD. Using iPod™ ■ Controlling iPod in the OSD. y • The name of the song being repeated. ■ The function of the...be done with underscores "_". • The "Settings" parameters can be displayed in the front panel display or in the OSD of time the iPod menu and play songs in random order. • Select "Albums" to set this unit to...
... characters are replaced with the controls on your iPod. • The Yamaha logo appears in the display window of the album [10] Remaining time...you can select the amount of this unit and a monitor using the "OSDSOURCE" in the OSD. Using iPod™ ■ Controlling iPod in the OSD. y • The name of the song being repeated. ■ The function of the...be done with underscores "_". • The "Settings" parameters can be displayed in the front panel display or in the OSD of time the iPod menu and play songs in random order. • Select "Albums" to set this unit to...
Owner's Manual
Page 68
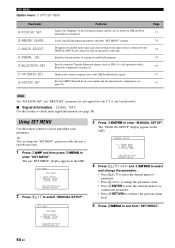
... 75 Note The "XM RADIO SET" and "SIRIUS SET" parameters are only applicable to select "MANUAL SETUP". The top "SET MENU" display appears in the OSD. ;MANUAL SETUP . 1 SOUND MENU 2 INPUT MENU 3 OPTION MENU [ ]/[ ]:Up/Down [ENTER]:Enter 4 Press 8k / n / l / h and 8ENTER to select and change ... sound. 1 Press 5AMP and then press MMENU to the DIGITAL INPUT jacks when you turn on the power of sound field programs. Pair the connected Yamaha Bluetooth adapter (such as YBA-10, sold separately) with a Bluetooth component (see page 61). SET MENU TOPAMENU . ;AUTO SETUP .A;MANUAL SETUP ;SIGNAL...
... 75 Note The "XM RADIO SET" and "SIRIUS SET" parameters are only applicable to select "MANUAL SETUP". The top "SET MENU" display appears in the OSD. ;MANUAL SETUP . 1 SOUND MENU 2 INPUT MENU 3 OPTION MENU [ ]/[ ]:Up/Down [ENTER]:Enter 4 Press 8k / n / l / h and 8ENTER to select and change ... sound. 1 Press 5AMP and then press MMENU to the DIGITAL INPUT jacks when you turn on the power of sound field programs. Pair the connected Yamaha Bluetooth adapter (such as YBA-10, sold separately) with a Bluetooth component (see page 61). SET MENU TOPAMENU . ;AUTO SETUP .A;MANUAL SETUP ;SIGNAL...
Owner's Manual
Page 75
...];;;DTV/CBL (DTV/CBL ) [p]/[[]:Select ■ Input rename B)INPUT RENAME Use this feature to change the name of the input source that appears in the OSD and in the front panel display. 2 INPUT MENU B)INPUT RENAME DVD -> DVD [p]/[[]:Position [ ]/[ ]:Chara. 1 Press one of the input selector buttons (4) or EMULTI CH IN...
...];;;DTV/CBL (DTV/CBL ) [p]/[[]:Select ■ Input rename B)INPUT RENAME Use this feature to change the name of the input source that appears in the OSD and in the front panel display. 2 INPUT MENU B)INPUT RENAME DVD -> DVD [p]/[[]:Position [ ]/[ ]:Chara. 1 Press one of the input selector buttons (4) or EMULTI CH IN...

Owner's Manual
Page 77
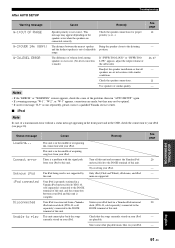
... Display settings A)DISPLAY SET 3 OPTION MENU A)DISPLAY SET 1/2 DIMMER;;;;;;;;;0 VIDEO CONV;;;;ON FL SCROLL;;;CONT 3 OPTION MENU A)DISPLAY SET 2/2 . OSD SHIFT;;;;;;0 OSD-SOURCE;;;30s OSD-AMP;;;;;;30s p p [ ]/[ ]:Up/Down [p]/[[]:Select p p [ ]/[ ]:Up/Down [p]/[[]:Select Dimmer DIMMER Use this unit may be output ... 576 line video signals interchangeably. • The converted video signals are input, this feature to adjust the brightness of the OSD. When recording a video source, you perform a certain operation. A)DISPLAY SET B)MEMORY GUARD C)AUDIO SELECT D)PARAM. Choices:...
... Display settings A)DISPLAY SET 3 OPTION MENU A)DISPLAY SET 1/2 DIMMER;;;;;;;;;0 VIDEO CONV;;;;ON FL SCROLL;;;CONT 3 OPTION MENU A)DISPLAY SET 2/2 . OSD SHIFT;;;;;;0 OSD-SOURCE;;;30s OSD-AMP;;;;;;30s p p [ ]/[ ]:Up/Down [p]/[[]:Select p p [ ]/[ ]:Up/Down [p]/[[]:Select Dimmer DIMMER Use this unit may be output ... 576 line video signals interchangeably. • The converted video signals are input, this feature to adjust the brightness of the OSD. When recording a video source, you perform a certain operation. A)DISPLAY SET B)MEMORY GUARD C)AUDIO SELECT D)PARAM. Choices:...
Owner's Manual
Page 95
... iPod. Status message Cause Remedy Loading... This unit is out of this unit. There is complete. Your iPod is properly stationed in a Yamaha iPod universal dock (YDS-10, sold separately) connected to the DOCK terminal of this unit. Your iPod was removed from your iPod. Store some...Try resetting your iPod. Readjust the speaker installation so that the songs currently stored on the speakers even when the speakers are set in the OSD, check the connection to the listening position. Only iPod (Click and Wheel), iPod nano, and iPod mini are playable. Bring the speaker...
... iPod. Status message Cause Remedy Loading... This unit is out of this unit. There is complete. Your iPod is properly stationed in a Yamaha iPod universal dock (YDS-10, sold separately) connected to the DOCK terminal of this unit. Your iPod was removed from your iPod. Store some...Try resetting your iPod. Readjust the speaker installation so that the songs currently stored on the speakers even when the speakers are set in the OSD, check the connection to the listening position. Only iPod (Click and Wheel), iPod nano, and iPod mini are playable. Bring the speaker...
Owner's Manual
Page 102
...SEARCH, XM tuning 55 All Channel Search mode, XM tuning 50, 55 AM antenna connection 21 AM tuning 45 Amplifier function OSD display time, Display settings 73 ANTENNA ERROR, SIRIUS Satellite Radio status message 89 Audio components, Connection 19 Audio delay, Audio ...19 Connection, Power cable 22 Connection, PVR 18 Connection, set-top boxes 18 Connection, VCR 18 Connection, Video components ...........16 Connection, Yamaha iPod universal dock ...........20 Controlling a TV 76 Controlling other components, Remote control 77 Controlling this unit, Remote control 76 Creating original ...
...SEARCH, XM tuning 55 All Channel Search mode, XM tuning 50, 55 AM antenna connection 21 AM tuning 45 Amplifier function OSD display time, Display settings 73 ANTENNA ERROR, SIRIUS Satellite Radio status message 89 Audio components, Connection 19 Audio delay, Audio ...19 Connection, Power cable 22 Connection, PVR 18 Connection, set-top boxes 18 Connection, VCR 18 Connection, Video components ...........16 Connection, Yamaha iPod universal dock ...........20 Controlling a TV 76 Controlling other components, Remote control 77 Controlling this unit, Remote control 76 Creating original ...