Owner's Manual
Page 4
...clean this unit is designed to sudden temperature changes from the wall outlet, grasp the plug; Contact qualified Yamaha service personnel when any damage resulting from use force on the rear panel of this unit near the AC outlet and where the AC power plug can cause hearing loss. vacation...on common operating errors before operating your local main voltage BEFORE plugging into the AC wall outlet. Using this unit with Canadian ICES-003. Yamaha will not be used. FOR CANADIAN CUSTOMERS To prevent electric shock, match wide blade of this unit, do not locate this unit must...
...clean this unit is designed to sudden temperature changes from the wall outlet, grasp the plug; Contact qualified Yamaha service personnel when any damage resulting from use force on the rear panel of this unit near the AC outlet and where the AC power plug can cause hearing loss. vacation...on common operating errors before operating your local main voltage BEFORE plugging into the AC wall outlet. Using this unit with Canadian ICES-003. Yamaha will not be used. FOR CANADIAN CUSTOMERS To prevent electric shock, match wide blade of this unit, do not locate this unit must...
Owner's Manual
Page 5
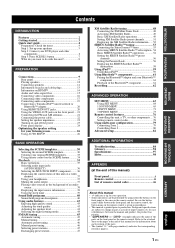
... control codes iii About this manual for your operation. • Some operations can be performed by using either the buttons on the front panel or the ones on the remote control. Contents INTRODUCTION PREPARATION BASIC OPERATION ADVANCED OPERATION INTRODUCTION Features 2 Getting started 3 Quick start guide 4 ... 14 Audio and video signal flow 15 Connecting video components 16 Connecting other components 17 Connecting audio components 19 Connecting a Yamaha iPod™ universal dock or Bluetooth™ adapter 20 Using REMOTE IN/OUT jacks 20 Using the VIDEO AUX jacks on the...
... control codes iii About this manual for your operation. • Some operations can be performed by using either the buttons on the front panel or the ones on the remote control. Contents INTRODUCTION PREPARATION BASIC OPERATION ADVANCED OPERATION INTRODUCTION Features 2 Getting started 3 Quick start guide 4 ... 14 Audio and video signal flow 15 Connecting video components 16 Connecting other components 17 Connecting audio components 19 Connecting a Yamaha iPod™ universal dock or Bluetooth™ adapter 20 Using REMOTE IN/OUT jacks 20 Using the VIDEO AUX jacks on the...

Owner's Manual
Page 7
... compartment cover. 2 Insert the two supplied batteries (AAA, R03, UM-4) according to the polarity markings (+ and -) on the rear panel of them immediately. Since hearing damage from excessive volume levels. Voltages are as alkaline and manganese batteries) together. Read the packaging carefully as...; Do not throw away batteries with clothing, etc. We Want You Listening For A Lifetime Yamaha and the Electronic Industries Association's Consumer Electronics Group want you received all of the batteries if you to avoid prolonged exposure from loud sounds is often undetectable until...
... compartment cover. 2 Insert the two supplied batteries (AAA, R03, UM-4) according to the polarity markings (+ and -) on the rear panel of them immediately. Since hearing damage from excessive volume levels. Voltages are as alkaline and manganese batteries) together. Read the packaging carefully as...; Do not throw away batteries with clothing, etc. We Want You Listening For A Lifetime Yamaha and the Electronic Industries Association's Consumer Electronics Group want you received all of the batteries if you to avoid prolonged exposure from loud sounds is often undetectable until...
Owner's Manual
Page 10
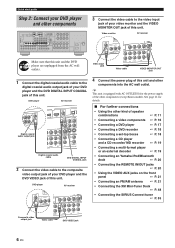
...and a CD recorder/ MD recorder ☞ P. 19 • Connecting a multi-format player or an external decoder ☞ P. 19 • Connecting an Yamaha iPod/Bluetooth dock ☞ P. 20 • Connecting the REMOTE IN/OUT jacks ☞ P. 20 • Using the VIDEO AUX jacks on the front... panel ☞ P. 21 • Connecting an FM/AM antenna ☞ P. 21 • Connecting the XM Mini-Tuner Dock ☞ P. 48 • Connecting the SIRIUS Connect tuner ☞ P. 53 Composite video output jack Video cable DVD VIDEO jack 6 En Video monitor AV receiver Make sure ...
...and a CD recorder/ MD recorder ☞ P. 19 • Connecting a multi-format player or an external decoder ☞ P. 19 • Connecting an Yamaha iPod/Bluetooth dock ☞ P. 20 • Connecting the REMOTE IN/OUT jacks ☞ P. 20 • Using the VIDEO AUX jacks on the front... panel ☞ P. 21 • Connecting an FM/AM antenna ☞ P. 21 • Connecting the XM Mini-Tuner Dock ☞ P. 48 • Connecting the SIRIUS Connect tuner ☞ P. 53 Composite video output jack Video cable DVD VIDEO jack 6 En Video monitor AV receiver Make sure ...
Owner's Manual
Page 11
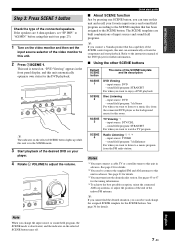
...to the instruction manual of the DVD player for this room. input source: DTV/CBL - sound field program: STRAIGHT For when you connect a Yamaha product that has been assigned to enjoy a DVD playback. y The indicator on your favorite input source and sound field program according to the ... is turned on the selected SCENE button turns off. 7 En See page 21 for the SCENE buttons. "DVD Viewing" appears in the front panel display, and this unit in advance. input source: TUNER - If the speakers are built combinations of input sources and sound field programs. y ...
...to the instruction manual of the DVD player for this room. input source: DTV/CBL - sound field program: STRAIGHT For when you connect a Yamaha product that has been assigned to enjoy a DVD playback. y The indicator on your favorite input source and sound field program according to the ... is turned on the selected SCENE button turns off. 7 En See page 21 for the SCENE buttons. "DVD Viewing" appears in the front panel display, and this unit in advance. input source: TUNER - If the speakers are built combinations of input sources and sound field programs. y ...

Owner's Manual
Page 12
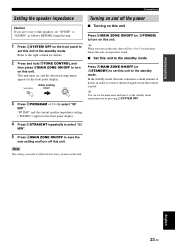
To turn on the front panel to the standby mode. What do you want to do with this unit. ☞ P. 61 ■ Using various sound features • Using various sound field ...; Enjoying SIRIUS Satellite Radio programs ☞ P. 53 • Using your iPod with this unit. ☞ P. 59 • Using your Bluetooth components with this unit to receive infrared signals from the standby mode, press AMAIN ZONE ON/OFF (or HPOWER). Press AMAIN ZONE ON/OFF on this unit consumes a small amount of...
To turn on the front panel to the standby mode. What do you want to do with this unit. ☞ P. 61 ■ Using various sound features • Using various sound field ...; Enjoying SIRIUS Satellite Radio programs ☞ P. 53 • Using your iPod with this unit. ☞ P. 59 • Using your Bluetooth components with this unit to receive infrared signals from the standby mode, press AMAIN ZONE ON/OFF (or HPOWER). Press AMAIN ZONE ON/OFF on this unit consumes a small amount of...
Owner's Manual
Page 13
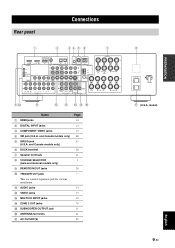
.../CBL IN DVR OUT MONITOR OUT S VIDEO DOCK ANTENNA AM GND FM 75 UNBAL. and Canada models only) 5 SIRIUS jack (U.S.A. model) English 9 En PREPARATION Rear panel Connections 1 2 34 5 6 7 COAXIAL OPTICAL SPEAKERS DVD IN1 DTV/CBL IN2 HDMI REMOTE IN OUT +12V 15mA MAX.
.../CBL IN DVR OUT MONITOR OUT S VIDEO DOCK ANTENNA AM GND FM 75 UNBAL. and Canada models only) 5 SIRIUS jack (U.S.A. model) English 9 En PREPARATION Rear panel Connections 1 2 34 5 6 7 COAXIAL OPTICAL SPEAKERS DVD IN1 DTV/CBL IN2 HDMI REMOTE IN OUT +12V 15mA MAX.
Owner's Manual
Page 15
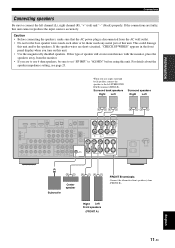
... Subwoofer Center speaker FRONT B terminals Connect the alternative front speaker system (FRONT B). If the connections are short-circuited, "CHECK SP WIRES" appears in the front panel display when you turn on this unit. • Use the magnetically shielded speakers. For details about the speaker impedance setting, see page 23. Caution •...
... Subwoofer Center speaker FRONT B terminals Connect the alternative front speaker system (FRONT B). If the connections are short-circuited, "CHECK SP WIRES" appears in the front panel display when you turn on this unit. • Use the magnetically shielded speakers. For details about the speaker impedance setting, see page 23. Caution •...

Owner's Manual
Page 24
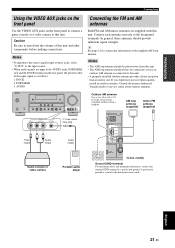
..."SCENE IR" in XM PB SIRIUS DTV/CBL Y B DVR C DOCK ANTENNA AM GND SURROUND BAC R Yamaha iPod universal dock or Bluetooth adapter Infrared signal receiver or Yamaha component Yamaha component (CD or DVD player, etc.) y • If the components have the capability of the transmission ...of the remote control signals, connect the REMOTE IN jack and REMOTE OUT jack to the remote control input and output jack with the DOCK terminal on the rear panel...
..."SCENE IR" in XM PB SIRIUS DTV/CBL Y B DVR C DOCK ANTENNA AM GND SURROUND BAC R Yamaha iPod universal dock or Bluetooth adapter Infrared signal receiver or Yamaha component Yamaha component (CD or DVD player, etc.) y • If the components have the capability of the transmission ...of the remote control signals, connect the REMOTE IN jack and REMOTE OUT jack to the remote control input and output jack with the DOCK terminal on the rear panel...
Owner's Manual
Page 25
... and AM antennas Both FM and AM indoor antennas are input at the AUDIO jacks, PORTABLE jack and the DOCK terminal on the front panel to connect a game console or a video camera to this unit. • A properly installed outdoor antenna provides clearer reception than an ...the input source. • When audio signals are supplied with this unit and other components before making connections. Consult the nearest authorized Yamaha dealer or service center about outdoor antennas. If you experience poor reception quality, install an outdoor antenna. English 21 En O Game ...
... and AM antennas Both FM and AM indoor antennas are input at the AUDIO jacks, PORTABLE jack and the DOCK terminal on the front panel to connect a game console or a video camera to this unit. • A properly installed outdoor antenna provides clearer reception than an ...the input source. • When audio signals are supplied with this unit and other components before making connections. Consult the nearest authorized Yamaha dealer or service center about outdoor antennas. If you experience poor reception quality, install an outdoor antenna. English 21 En O Game ...
Owner's Manual
Page 27
This unit turns on, and the advanced setup menu appears in order to receive infrared signals from the remote control. In the standby mode, this unit consumes a small amount of power in the front panel display. Refer to the right column for details. 2 Press and hold NTONE CONTROL and then ... Connections Setting the speaker impedance Caution If you turn on this unit. and the current speaker impedance setting ("8Ω MIN") appear in the front panel display. English 23 En "SP IMP." Turning on and off this unit. Note The setting you made is reflected next time you are to ...
This unit turns on, and the advanced setup menu appears in order to receive infrared signals from the remote control. In the standby mode, this unit consumes a small amount of power in the front panel display. Refer to the right column for details. 2 Press and hold NTONE CONTROL and then ... Connections Setting the speaker impedance Caution If you turn on this unit. and the current speaker impedance setting ("8Ω MIN") appear in the front panel display. English 23 En "SP IMP." Turning on and off this unit. Note The setting you made is reflected next time you are to ...

Owner's Manual
Page 28
...R ms SL SB SR dB SBL SBR A BC D E F G 1 HDMI indicator Lights up when the signal of this unit function. Connections Front panel display Note The XM and SIRIUS indicator is turned on (see page 40). 4 Input source indicators The corresponding cursor lights up to show the currently...• Indicates the current volume level. 9 PCM indicator Lights up when this unit is in the standby mode. • Flashes while the connected Yamaha Bluetooth adaptor (such as YBA-10, sold separately) connected to the U.S.A. C ZONE2 indicator Lights up when any modifications (see page 26). 6 ...
...R ms SL SB SR dB SBL SBR A BC D E F G 1 HDMI indicator Lights up when the signal of this unit function. Connections Front panel display Note The XM and SIRIUS indicator is turned on (see page 40). 4 Input source indicators The corresponding cursor lights up to show the currently...• Indicates the current volume level. 9 PCM indicator Lights up when this unit is in the standby mode. • Flashes while the connected Yamaha Bluetooth adaptor (such as YBA-10, sold separately) connected to the U.S.A. C ZONE2 indicator Lights up when any modifications (see page 26). 6 ...
Owner's Manual
Page 30
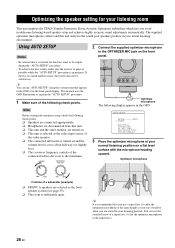
... heading upward. The supplied optimizer microphone collects and this unit. ❏ This unit and the video monitor are turned on the front panel. y You can use a tripod (etc.) to the maximum. Note Before starting the automatic setup, check the following check points. ...FRONT A speakers are selected as possible while the "AUTO SETUP" procedure is normal for your listening room This unit employs the YPAO (Yamaha Parametric Room Acoustic Optimizer) technology which lets you are seated in your listening position. This manual uses the OSD illustrations to the OPTIMIZER ...
... heading upward. The supplied optimizer microphone collects and this unit. ❏ This unit and the video monitor are turned on the front panel. y You can use a tripod (etc.) to the maximum. Note Before starting the automatic setup, check the following check points. ...FRONT A speakers are selected as possible while the "AUTO SETUP" procedure is normal for your listening room This unit employs the YPAO (Yamaha Parametric Room Acoustic Optimizer) technology which lets you are seated in your listening position. This manual uses the OSD illustrations to the OPTIMIZER ...
Owner's Manual
Page 34
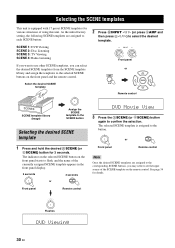
...the SCENE button Selecting the desired SCENE template 1 Press and hold the desired TSCENE (or 6SCENE) button for 3 seconds. l INPUT h Front panel or AMP ENTER Remote control SCENE template library (Image) 1 Assign the SCENE template to select the desired template. The selected SCENE template is ... the name of using this unit. SELECTING THE SCENE TEMPLATES Selecting the SCENE templates This unit is assigned to the button. 1 Front panel or 1 Remote control Note Once the desired SCENE templates are assigned to each SCENE button: SCENE 1: DVD Viewing SCENE 2: Disc Listening...
...the SCENE button Selecting the desired SCENE template 1 Press and hold the desired TSCENE (or 6SCENE) button for 3 seconds. l INPUT h Front panel or AMP ENTER Remote control SCENE template library (Image) 1 Assign the SCENE template to select the desired template. The selected SCENE template is ... the name of using this unit. SELECTING THE SCENE TEMPLATES Selecting the SCENE templates This unit is assigned to the button. 1 Front panel or 1 Remote control Note Once the desired SCENE templates are assigned to each SCENE button: SCENE 1: DVD Viewing SCENE 2: Disc Listening...

Owner's Manual
Page 39
.../ h repeatedly (or press 5AMP and then BPROG l / h repeatedly) to select the desired input source. The respective speaker indicators lights up in the front panel display. 3 Press RINPUT l / h repeatedly (or press one of the program. • When you play back CDs encoded in DTS. Movie Dramatic Currently ...-quality sound Adjust the tonal quality of the front speakers Adjust the parameters of the currently selected input source appears in the front panel display. The name of sound field programs Enjoy the sources with a sampling frequency higher than 48 kHz are input, this unit....
.../ h repeatedly (or press 5AMP and then BPROG l / h repeatedly) to select the desired input source. The respective speaker indicators lights up in the front panel display. 3 Press RINPUT l / h repeatedly (or press one of the program. • When you play back CDs encoded in DTS. Movie Dramatic Currently ...-quality sound Adjust the tonal quality of the front speakers Adjust the parameters of the currently selected input source appears in the front panel display. The name of sound field programs Enjoy the sources with a sampling frequency higher than 48 kHz are input, this unit....
Owner's Manual
Page 40
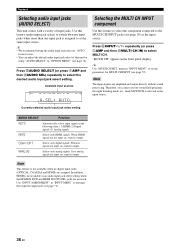
...) as the same input source. y • We recommend setting the audio input jack select to as the input source. Use "INPUT ASSIGNMENT" in the front panel display. Press SAUDIO SELECT (or press 5AMP and then FAUDIO SEL) repeatedly to select MULTI CH. If no analog signals are input, no sound is...
...) as the same input source. y • We recommend setting the audio input jack select to as the input source. Use "INPUT ASSIGNMENT" in the front panel display. Press SAUDIO SELECT (or press 5AMP and then FAUDIO SEL) repeatedly to select MULTI CH. If no analog signals are input, no sound is...
Owner's Manual
Page 41
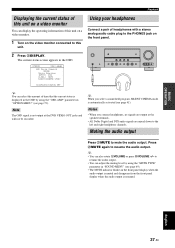
... (MID) [DISPLAY]:STATUS OFF y You can select the amount of this unit. to this unit on a video monitor. 1 Turn on the front panel. 2 Press ODISPLAY. Press JMUTE again to the PHONES jack on the video monitor connected to resume the audio output. • You can also rotate ...LVOLUME or press NVOLUME +/- The current status screen appears in the front panel display when the audio output is muted and disappears from the front panel display when the audio output is resumed. Using your headphones Connect a pair of headphones with a stereo analog...
... (MID) [DISPLAY]:STATUS OFF y You can select the amount of this unit. to this unit on a video monitor. 1 Turn on the front panel. 2 Press ODISPLAY. Press JMUTE again to the PHONES jack on the video monitor connected to resume the audio output. • You can also rotate ...LVOLUME or press NVOLUME +/- The current status screen appears in the front panel display when the audio output is muted and disappears from the front panel display when the audio output is resumed. Using your headphones Connect a pair of headphones with a stereo analog...
Owner's Manual
Page 43
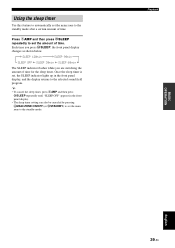
... zone to the standby mode. y • To cancel the sleep timer, press 5AMP and then press NSLEEP repeatedly until "SLEEP OFF" appears in the front panel display. • The sleep timer setting can also be canceled by pressing AMAIN ZONE ON/OFF (or ISTANDBY) to set , the SLEEP indicator lights up... set the amount of time. SLEEP 120min SLEEP 90min SLEEP OFF SLEEP 30min SLEEP 60min The SLEEP indicator flashes while you press NSLEEP, the front panel display changes as shown below. Press 5AMP and then press TSLEEP repeatedly to set the main zone to the standby mode after a certain amount of...
... zone to the standby mode. y • To cancel the sleep timer, press 5AMP and then press NSLEEP repeatedly until "SLEEP OFF" appears in the front panel display. • The sleep timer setting can also be canceled by pressing AMAIN ZONE ON/OFF (or ISTANDBY) to set , the SLEEP indicator lights up... set the amount of time. SLEEP 120min SLEEP 90min SLEEP OFF SLEEP 30min SLEEP 60min The SLEEP indicator flashes while you press NSLEEP, the front panel display changes as shown below. Press 5AMP and then press TSLEEP repeatedly to set the main zone to the standby mode after a certain amount of...
Owner's Manual
Page 44
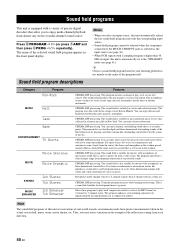
... are in the actual concert hall, music venue, movie theater, etc. Thus, you play back compression artifacts (such as the MP3 format) in the front panel display. Sound field program descriptions Notes • When you select an input source, this unit automatically selects the last sound field program used with the...
... are in the actual concert hall, music venue, movie theater, etc. Thus, you play back compression artifacts (such as the MP3 format) in the front panel display. Sound field program descriptions Notes • When you select an input source, this unit automatically selects the last sound field program used with the...
Owner's Manual
Page 45
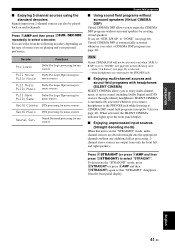
...automatically activated whenever you select a CINEMA DSP program (see page 66) in the following decoders depending on multi-channels. SILENT CINEMA is in the front panel display. ■ Enjoying unprocessed input sources (Straight decoding mode) When this unit is automatically activated whenever you to select "STRAIGHT". English 41 En ... from only the front left and right speakers. BASIC OPERATION ■ Enjoying 2-channel sources using the standard decoders Signals input from the front panel display. L/ R SP" is selected. - DECODE repeatedly to select a decoder.
...automatically activated whenever you select a CINEMA DSP program (see page 66) in the following decoders depending on multi-channels. SILENT CINEMA is in the front panel display. ■ Enjoying unprocessed input sources (Straight decoding mode) When this unit is automatically activated whenever you to select "STRAIGHT". English 41 En ... from only the front left and right speakers. BASIC OPERATION ■ Enjoying 2-channel sources using the standard decoders Signals input from the front panel display. L/ R SP" is selected. - DECODE repeatedly to select a decoder.
