
Owner's Manual
Page 1
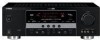
U RX-V563 AV Receiver OWNER'S MANUAL
U RX-V563 AV Receiver OWNER'S MANUAL
Owner's Manual
Page 3
... reminder is grounded so as indicated in the instructions contained in this product to use the product. 2 IMPORTANT: When connecting this manual, meets FCC requirements. IMPORTANT SAFETY INSTRUCTIONS 24 Outdoor Antenna Grounding - PART H) FCC INFORMATION (for service. 20 Replacement Parts - Compliance...this type of the following the operating instructions. The product should be mounted to its subsidiaries. Modifications not expressly approved by Yamaha may result in fire, electric shock, or other hazards. 21 Safety Check - If this product is in proper operating ...
... reminder is grounded so as indicated in the instructions contained in this product to use the product. 2 IMPORTANT: When connecting this manual, meets FCC requirements. IMPORTANT SAFETY INSTRUCTIONS 24 Outdoor Antenna Grounding - PART H) FCC INFORMATION (for service. 20 Replacement Parts - Compliance...this type of the following the operating instructions. The product should be mounted to its subsidiaries. Modifications not expressly approved by Yamaha may result in fire, electric shock, or other hazards. 21 Safety Check - If this product is in proper operating ...
Owner's Manual
Page 4
... must be held responsible for your unit. 1 To assure the finest performance, please read the "Troubleshooting" section on the rear of this Owner's Manual in a well ventilated, cool, dry, clean place - Allow ventilation space of at least 30 cm on the top, 20 cm on the left... unit where foreign object may cause an electrical shock, fire, damage to the wall outlet, even if this unit upside-down. Contact qualified Yamaha service personnel when any reasons. 15 When not planning to this unit with high humidity (i.e. This state is faulty. 18 Before moving this unit...
... must be held responsible for your unit. 1 To assure the finest performance, please read the "Troubleshooting" section on the rear of this Owner's Manual in a well ventilated, cool, dry, clean place - Allow ventilation space of at least 30 cm on the top, 20 cm on the left... unit where foreign object may cause an electrical shock, fire, damage to the wall outlet, even if this unit upside-down. Contact qualified Yamaha service personnel when any reasons. 15 When not planning to this unit with high humidity (i.e. This state is faulty. 18 Before moving this unit...
Owner's Manual
Page 5
...79 Controlling Zone 2 80 Advanced setup 82 ADDITIONAL INFORMATION Troubleshooting 84 Glossary 94 Specifications 97 Index 98 APPENDIX (at the end of this manual for your Bluetooth™ component 61 Playback of the Bluetooth™ component 61 Recording 62 ADVANCED OPERATION SET MENU 63 Using SET MENU... on HDMI 14 Audio and video signal flow 15 Connecting video components 16 Connecting other components 17 Connecting audio components 19 Connecting a Yamaha iPod™ universal dock or Bluetooth™ adapter 20 Using REMOTE IN/OUT jacks 20 Using the VIDEO AUX jacks on the ...
...79 Controlling Zone 2 80 Advanced setup 82 ADDITIONAL INFORMATION Troubleshooting 84 Glossary 94 Specifications 97 Index 98 APPENDIX (at the end of this manual for your Bluetooth™ component 61 Playback of the Bluetooth™ component 61 Recording 62 ADVANCED OPERATION SET MENU 63 Using SET MENU... on HDMI 14 Audio and video signal flow 15 Connecting video components 16 Connecting other components 17 Connecting audio components 19 Connecting a Yamaha iPod™ universal dock or Bluetooth™ adapter 20 Using REMOTE IN/OUT jacks 20 Using the VIDEO AUX jacks on the ...
Owner's Manual
Page 11
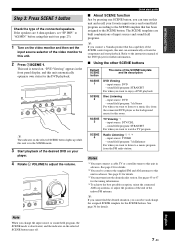
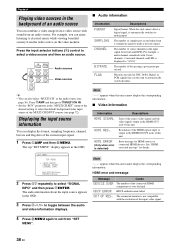
Quick start playback. Refer to the instruction manual of the DVD player for further information. ■ Using the other SCENE buttons Default SCENE button SCENE 1 SCENE 2 SCENE 3 SCENE 4 The name of the indoor ... to adjust the volume. English Note When you can turn on . See page 21 for details. sound field program: 7ch Enhancer For when you connect a Yamaha product that has been assigned to this room.
Quick start playback. Refer to the instruction manual of the DVD player for further information. ■ Using the other SCENE buttons Default SCENE button SCENE 1 SCENE 2 SCENE 3 SCENE 4 The name of the indoor ... to adjust the volume. English Note When you can turn on . See page 21 for details. sound field program: 7ch Enhancer For when you connect a Yamaha product that has been assigned to this room.

Owner's Manual
Page 12
... templates ☞ P. 33 This unit is set this unit from the remote control. See page 23 for your listening room (AUTO SETUP) ☞ P. 26 • Manually adjusting various parameters of this unit ☞ P. 63 • Setting the remote control ☞ P. 76 • Adjusting the advanced parameters ☞ P. 82 ■... on this unit to the standby mode. Quick start guide ■ After using this unit consumes a small amount of power in order to receive infrared signals from the standby mode, press AMAIN ZONE ON/OFF (or HPOWER). In the standby mode, this unit...
... templates ☞ P. 33 This unit is set this unit from the remote control. See page 23 for your listening room (AUTO SETUP) ☞ P. 26 • Manually adjusting various parameters of this unit ☞ P. 63 • Setting the remote control ☞ P. 76 • Adjusting the advanced parameters ☞ P. 82 ■... on this unit to the standby mode. Quick start guide ■ After using this unit consumes a small amount of power in order to receive infrared signals from the standby mode, press AMAIN ZONE ON/OFF (or HPOWER). In the standby mode, this unit...
Owner's Manual
Page 16
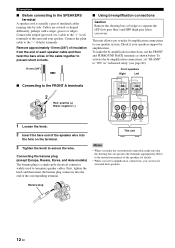
.... • When you use bi-amplification connections, you make the conventional connection, make the bi-amplification connections, use surround back speakers. Refer to the instruction manuals of the speaker wire into the end of insulated cables running side by side.
.... • When you use bi-amplification connections, you make the conventional connection, make the bi-amplification connections, use surround back speakers. Refer to the instruction manuals of the speaker wire into the end of insulated cables running side by side.

Owner's Manual
Page 24
...Connect a Yamaha iPod universal dock or Bluetooth adapter to the DOCK terminal on the rear panel that allows you use one of the SCENE buttons. Remote control out Remote control in the advanced setup menu to "OFF" (see page 83). 20 En Refer to the owner's manuals for ..., set "SCENE IR" in XM PB SIRIUS DTV/CBL Y B DVR C DOCK ANTENNA AM GND SURROUND BAC R Yamaha iPod universal dock or Bluetooth adapter Infrared signal receiver or Yamaha component Yamaha component (CD or DVD player, etc.) y • If the components have the capability of the transmission of the remote control...
...Connect a Yamaha iPod universal dock or Bluetooth adapter to the DOCK terminal on the rear panel that allows you use one of the SCENE buttons. Remote control out Remote control in the advanced setup menu to "OFF" (see page 83). 20 En Refer to the owner's manuals for ..., set "SCENE IR" in XM PB SIRIUS DTV/CBL Y B DVR C DOCK ANTENNA AM GND SURROUND BAC R Yamaha iPod universal dock or Bluetooth adapter Infrared signal receiver or Yamaha component Yamaha component (CD or DVD player, etc.) y • If the components have the capability of the transmission of the remote control...
Owner's Manual
Page 30
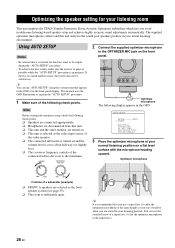
...to about half way (or slightly less). ❏ The crossover frequency controls of the connected subwoofer is set to the maximum. This manual uses the OSD illustrations to explain the "AUTO SETUP" procedure. 1 Make sure of the following check points. ❏ Speakers are ...]/[ ]:Up/Down [p]/[[]:Select 3 Place the optimizer microphone at the same height as your listening room This unit employs the YPAO (Yamaha Parametric Room Acoustic Optimizer) technology which lets you avoid troublesome listening-based speaker setup and achieves highly accurate sound adjustments automatically. If ...
...to about half way (or slightly less). ❏ The crossover frequency controls of the connected subwoofer is set to the maximum. This manual uses the OSD illustrations to explain the "AUTO SETUP" procedure. 1 Make sure of the following check points. ❏ Speakers are ...]/[ ]:Up/Down [p]/[[]:Select 3 Place the optimizer microphone at the same height as your listening room This unit employs the YPAO (Yamaha Parametric Room Acoustic Optimizer) technology which lets you avoid troublesome listening-based speaker setup and achieves highly accurate sound adjustments automatically. If ...

Owner's Manual
Page 32
... "If an error screen appears" on the characteristics of the speaker output level y If you selected "RELOAD" in detail. 8 Press 8l / h repeatedly to manually adjust each parameter, run "MANUAL SETUP" (see page 29). Results of your listening room The display changes as follows. Note The distances displayed in the "DISTANCE" results may...
... "If an error screen appears" on the characteristics of the speaker output level y If you selected "RELOAD" in detail. 8 Press 8l / h repeatedly to manually adjust each parameter, run "MANUAL SETUP" (see page 29). Results of your listening room The display changes as follows. Note The distances displayed in the "DISTANCE" results may...
Owner's Manual
Page 33
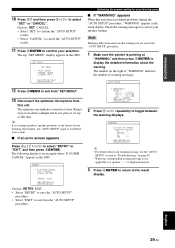
... an example where "E-8:USER CANCEL" appears in the OSD. PREPARATION p p 10 Press 8n and then press 8l / h to heat. SET MENU TOP MENU . ;AUTO SETUP ;MANUAL SETUP .A;SIGNAL INFO [ ]/[ ]:Up/Down [ENTER]:Enter Optimizing the speaker setting for your selection.
... an example where "E-8:USER CANCEL" appears in the OSD. PREPARATION p p 10 Press 8n and then press 8l / h to heat. SET MENU TOP MENU . ;AUTO SETUP ;MANUAL SETUP .A;SIGNAL INFO [ ]/[ ]:Up/Down [ENTER]:Enter Optimizing the speaker setting for your selection.
Owner's Manual
Page 42
... select "MULTI CH" as "3/2/0.1". Press the input selector buttons (4) control to toggle between the audio and video information displays. SET MENU TOP MENU . ;AUTO SETUP ;MANUAL SETUP .A;SIGNAL INFO [ ]/[ ]:Up/Down [ENTER]:Enter 2 Press 8n repeatedly to classical music while viewing beautiful scenery from "SET MENU". 38 En p p ■ Audio information...
... select "MULTI CH" as "3/2/0.1". Press the input selector buttons (4) control to toggle between the audio and video information displays. SET MENU TOP MENU . ;AUTO SETUP ;MANUAL SETUP .A;SIGNAL INFO [ ]/[ ]:Up/Down [ENTER]:Enter 2 Press 8n repeatedly to classical music while viewing beautiful scenery from "SET MENU". 38 En p p ■ Audio information...
Owner's Manual
Page 49
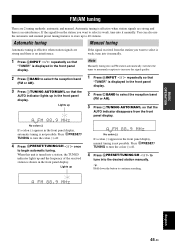
... up 1 Press RINPUT l / h repeatedly so that the AUTO indicator lights up and the frequency of the received station is not possible. You can also use the automatic and manual preset tuning features to select the reception band (FM or AM). 3 Press ITUNING AUTO/MAN'L so that "...colon (:) off . 4 Press GPRESET/TUNING/CH l / h to select is weak, tune into the desired station manually. If the signal received from the station you want to tune into it manually. TUNED A FM 88.9 MHz English 45 En Automatic tuning is effective when station signals are 2 tuning methods: automatic...
... up 1 Press RINPUT l / h repeatedly so that the AUTO indicator lights up and the frequency of the received station is not possible. You can also use the automatic and manual preset tuning features to select the reception band (FM or AM). 3 Press ITUNING AUTO/MAN'L so that "...colon (:) off . 4 Press GPRESET/TUNING/CH l / h to select is weak, tune into the desired station manually. If the signal received from the station you want to tune into it manually. TUNED A FM 88.9 MHz English 45 En Automatic tuning is effective when station signals are 2 tuning methods: automatic...
Owner's Manual
Page 50
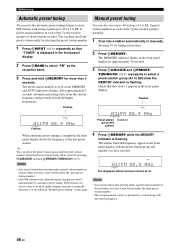
... number 4 Press HMEMORY while the MEMORY indicator is completed, the front panel display shows the frequency of the 5 preset station groups) manually. 1 Tune into it manually and store it as A1. Notes • Any stored station data existing under a preset station number is cleared when you store a...the 5 preset station groups) of those stations in order. You can select the preset station group and the preset station number where the first received station will be stored by pressing FA/B/C/D/E and then GPRESET/TUNING/CH l / h. Check that "TUNER" is displayed in the front panel display...
... number 4 Press HMEMORY while the MEMORY indicator is completed, the front panel display shows the frequency of the 5 preset station groups) manually. 1 Tune into it manually and store it as A1. Notes • Any stored station data existing under a preset station number is cleared when you store a...the 5 preset station groups) of those stations in order. You can select the preset station group and the preset station number where the first received station will be stored by pressing FA/B/C/D/E and then GPRESET/TUNING/CH l / h. Check that "TUNER" is displayed in the front panel display...
Owner's Manual
Page 57
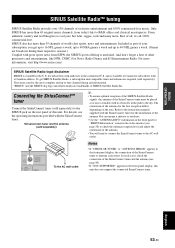
... SIRIUS Satellite Radio provides over 130 channels of other great news and entertainment, like NPR, CNBC, Fox News, Radio Disney and E! Refer to the instruction manuals supplied with the SiriusConnect tuner for subscribers with no obstacles in the video monitor (see the operating instructions provided with great sports news from today...
... SIRIUS Satellite Radio provides over 130 channels of other great news and entertainment, like NPR, CNBC, Fox News, Radio Disney and E! Refer to the instruction manuals supplied with the SiriusConnect tuner for subscribers with no obstacles in the video monitor (see the operating instructions provided with great sports news from today...
Owner's Manual
Page 60
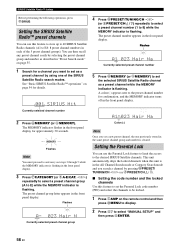
... remote control and then press MMENU to E8: 8 preset channel numbers in each of the SIRIUS Satellite Radio search modes. A colon (:) appears next to select "MANUAL SETUP" and then press 8ENTER. 56 En Setting the Parental Lock You can use the Parental Lock feature to limit the access to E) while the...
... remote control and then press MMENU to E8: 8 preset channel numbers in each of the SIRIUS Satellite Radio search modes. A colon (:) appears next to select "MANUAL SETUP" and then press 8ENTER. 56 En Setting the Parental Lock You can use the Parental Lock feature to limit the access to E) while the...
Owner's Manual
Page 67
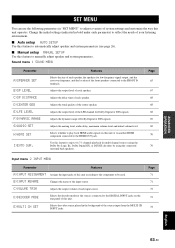
... 68 68 68 69 69 70 70 Input menu 2 INPUT MENU Parameter Features A)INPUT ASSIGNMENT Assigns the input jacks of this feature to manually adjust speaker and system parameters. Change the initial settings (indicated in bold under each speaker. Use this unit or on the rear panel ...your listening environment. ■ Auto setup AUTO SETUP Use this feature to automatically adjust speaker and system parameters (see page 26). ■ Manual setup MANUAL SETUP Use this unit according to the component to be used. Selects whether to play back HDMI audio signals on this feature to enjoy ...
... 68 68 68 69 69 70 70 Input menu 2 INPUT MENU Parameter Features A)INPUT ASSIGNMENT Assigns the input jacks of this feature to manually adjust speaker and system parameters. Change the initial settings (indicated in bold under each speaker. Use this unit or on the rear panel ...your listening environment. ■ Auto setup AUTO SETUP Use this feature to automatically adjust speaker and system parameters (see page 26). ■ Manual setup MANUAL SETUP Use this unit according to the component to be used. Selects whether to play back HDMI audio signals on this feature to enjoy ...
Owner's Manual
Page 68
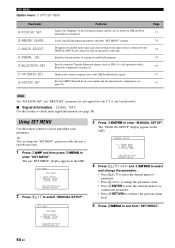
...Canada models. ■ Signal information SIGNAL INFO Use this unit is displayed. p p p p Using SET MENU Use the remote control to enter "MANUAL SETUP". y You can change the parameter value. • Press 8ENTER to enter the selected menu or to confirm the parameter. • Press ...MENU". 64 En Displays the current reception level of sound field programs. Pair the connected Yamaha Bluetooth adapter (such as YBA-10, sold separately) with a Bluetooth component (see page 56). SET MENU TOPAMENU ;AUTO SETUP .A;MANUAL SETUP ;SIGNAL INFO [ ]/[ ]:Up/Down [ENTER]:Enter p p 3 Press 8ENTER...
...Canada models. ■ Signal information SIGNAL INFO Use this unit is displayed. p p p p Using SET MENU Use the remote control to enter "MANUAL SETUP". y You can change the parameter value. • Press 8ENTER to enter the selected menu or to confirm the parameter. • Press ...MENU". 64 En Displays the current reception level of sound field programs. Pair the connected Yamaha Bluetooth adapter (such as YBA-10, sold separately) with a Bluetooth component (see page 56). SET MENU TOPAMENU ;AUTO SETUP .A;MANUAL SETUP ;SIGNAL INFO [ ]/[ ]:Up/Down [ENTER]:Enter p p 3 Press 8ENTER...
Owner's Manual
Page 69
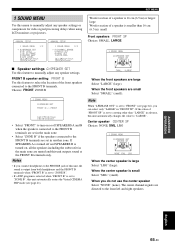
...to "ZONE B". • If a DSP program is selected when "FRONT B" is turned on or off and SPEAKERS B is set to manually adjust any speaker settings. SET MENU 1 SOUND MENU Use this feature to select the location of the front speakers connected to the FRONT B ...terminals. When the front speakers are large Select "LARGE" (large). A)SPEAKER SET B)SP LEVEL C)SP DISTANCE D)CENTER GEQ E)LFE LEVEL [ ]/[ ]:Up/Down [ENTER]:Enter ;MANUAL SETUP 1 SOUND MENU 2/2 . Choices: FRONT, ZONE B 1 SOUND MENU A)SPEAKER SET FRONT B;;;;FRONT [ ]/[ ]:Up/Down [p]/[[]:Select • Select "FRONT" to turn ...
...to "ZONE B". • If a DSP program is selected when "FRONT B" is turned on or off and SPEAKERS B is set to manually adjust any speaker settings. SET MENU 1 SOUND MENU Use this feature to select the location of the front speakers connected to the FRONT B ...terminals. When the front speakers are large Select "LARGE" (large). A)SPEAKER SET B)SP LEVEL C)SP DISTANCE D)CENTER GEQ E)LFE LEVEL [ ]/[ ]:Up/Down [ENTER]:Enter ;MANUAL SETUP 1 SOUND MENU 2/2 . Choices: FRONT, ZONE B 1 SOUND MENU A)SPEAKER SET FRONT B;;;;FRONT [ ]/[ ]:Up/Down [p]/[[]:Select • Select "FRONT" to turn ...
Owner's Manual
Page 71
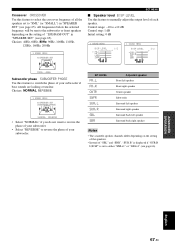
...: 40Hz, 60Hz, 80Hz, 90Hz, 100Hz, 110Hz, 120Hz, 160Hz, 200Hz 1 SOUND MENU A)SPEAKER SET CROSSOVER SET MENU ■ Speaker level B)SP LEVEL Use this feature to manually adjust the output level of your subwoofer. Choices: NORMAL, REVERSE 1 SOUND MENU A)SPEAKER SET SUBWOOFER PHASE >NORMAL REVERSE • Select "NORMAL" if you do not...
...: 40Hz, 60Hz, 80Hz, 90Hz, 100Hz, 110Hz, 120Hz, 160Hz, 200Hz 1 SOUND MENU A)SPEAKER SET CROSSOVER SET MENU ■ Speaker level B)SP LEVEL Use this feature to manually adjust the output level of your subwoofer. Choices: NORMAL, REVERSE 1 SOUND MENU A)SPEAKER SET SUBWOOFER PHASE >NORMAL REVERSE • Select "NORMAL" if you do not...


