User Manual
Page 8
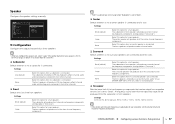
... up when Adaptive DRC (p.52) is working. 5 STEREO Lights up when HDMI signals are output. A Front speaker (L) S Front speaker (R) D Center speaker F Surround speaker (L) G Surround speaker (R) L Subwoofer FEATURES ➤ Part names and functions En 8
... up when Adaptive DRC (p.52) is working. 5 STEREO Lights up when HDMI signals are output. A Front speaker (L) S Front speaker (R) D Center speaker F Surround speaker (L) G Surround speaker (R) L Subwoofer FEATURES ➤ Part names and functions En 8
User Manual
Page 9
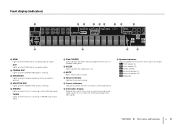
...the switch position according to speakers (p.15). A SPEAKERS terminals For connecting to your local voltage (p.27). C Power cable For connecting to a subwoofer (with built-in amplifier) (p.15). When using ARC, TV audio signal can also be input through the HDMI OUT jack. 2 HDMI 1-4...prevent improper connections. 9 MONITOR OUT (composite video) jack For connecting to a TV that supports composite video and outputting video signals (p.22). 0 SUBWOOFER jack For connecting to an AC wall outlet (p.27). FEATURES ➤ Part names and functions En 9 Rear panel 1 2 3 COMPONENT VIDEO ...
...the switch position according to speakers (p.15). A SPEAKERS terminals For connecting to your local voltage (p.27). C Power cable For connecting to a subwoofer (with built-in amplifier) (p.15). When using ARC, TV audio signal can also be input through the HDMI OUT jack. 2 HDMI 1-4...prevent improper connections. 9 MONITOR OUT (composite video) jack For connecting to a TV that supports composite video and outputting video signals (p.22). 0 SUBWOOFER jack For connecting to an AC wall outlet (p.27). FEATURES ➤ Part names and functions En 9 Rear panel 1 2 3 COMPONENT VIDEO ...
User Manual
Page 12
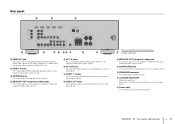
This section describes the representative speaker layout examples. Speaker type Front (L) Front (R) Center Surround (L) Surround (R) Subwoofer Abbr. 1 Speaker placement 2 3 4 5 6 7 8 9 1 Placing speakers Select the speaker layout for the number of speakers that you can also use... 4-ohm speakers as the front speakers. In this case, you are using and place the speakers and subwoofer (with an impedance of channels) 5.1 4.1 3.1 2.1 ●●●● ●●●● ● ● ●● ●● ...
This section describes the representative speaker layout examples. Speaker type Front (L) Front (R) Center Surround (L) Surround (R) Subwoofer Abbr. 1 Speaker placement 2 3 4 5 6 7 8 9 1 Placing speakers Select the speaker layout for the number of speakers that you can also use... 4-ohm speakers as the front speakers. In this case, you are using and place the speakers and subwoofer (with an impedance of channels) 5.1 4.1 3.1 2.1 ●●●● ●●●● ● ● ●● ●● ...
User Manual
Page 15
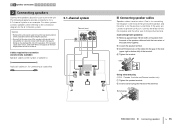
... terminal. (Connecting front speakers) a Remove approximately 10 mm (3/8") of insulation from an AC wall outlet and turn off the subwoofer before connecting the speakers. • Ensure that the core wires of the speaker cable do not touch one another or come ...turned on the side (upper right or bottom left) of speakers) + + - - Audio pin cable (x1: for connecting a subwoofer) 5.1-channel system The unit (rear) SPEAKERS SURROUND CENTER FRONT SUBWOOFER 1 2 9 3 4 5 ■ Connecting speaker cables Speaker cables have two wires. b Loosen the speaker terminal. For other ...
... terminal. (Connecting front speakers) a Remove approximately 10 mm (3/8") of insulation from an AC wall outlet and turn off the subwoofer before connecting the speakers. • Ensure that the core wires of the speaker cable do not touch one another or come ...turned on the side (upper right or bottom left) of speakers) + + - - Audio pin cable (x1: for connecting a subwoofer) 5.1-channel system The unit (rear) SPEAKERS SURROUND CENTER FRONT SUBWOOFER 1 2 9 3 4 5 ■ Connecting speaker cables Speaker cables have two wires. b Loosen the speaker terminal. For other ...
User Manual
Page 16
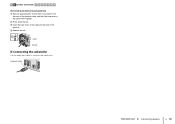
b Press down the tab. a ROUND CENTER d b + (red) c - (black) ■ Connecting the subwoofer Use an audio pin cable to connect the subwoofer. Audio pin cable PREPARATIONS ➤ Connecting speakers En 16 d Release the tab. c Insert the bare wires of the cable firmly together. 1 2 Speaker connections 3 4 5 6 7 8 9 (Connecting center/surround speakers) a Remove approximately 10 mm (3/8") of insulation from the ends of the speaker cable, and twist the bare wires of the cable into the hole in the terminal.
b Press down the tab. a ROUND CENTER d b + (red) c - (black) ■ Connecting the subwoofer Use an audio pin cable to connect the subwoofer. Audio pin cable PREPARATIONS ➤ Connecting speakers En 16 d Release the tab. c Insert the bare wires of the cable firmly together. 1 2 Speaker connections 3 4 5 6 7 8 9 (Connecting center/surround speakers) a Remove approximately 10 mm (3/8") of insulation from the ends of the speaker cable, and twist the bare wires of the cable into the hole in the terminal.
User Manual
Page 26
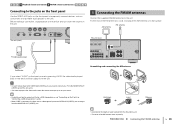
... The unit (rear) HDMI 2 HDMI 3 HDMI 4 MONITOR OUT ANTENNA AM FM SPEAKERS SURROUND CENTER FRONT OPTICAL ( TV ) AV 4 AV 5 AV OUT AUDIO 1 AUDIO 2 AUDIO OUT SUBWOOFER Camcorder If you need to connect your TV to the MONITOR OUT (VIDEO) jack of the AM antenna have no polarity. 1 2 3 4 Playback device connections 5 FM...
... The unit (rear) HDMI 2 HDMI 3 HDMI 4 MONITOR OUT ANTENNA AM FM SPEAKERS SURROUND CENTER FRONT OPTICAL ( TV ) AV 4 AV 5 AV OUT AUDIO 1 AUDIO 2 AUDIO OUT SUBWOOFER Camcorder If you need to connect your TV to the MONITOR OUT (VIDEO) jack of the AM antenna have no polarity. 1 2 3 4 Playback device connections 5 FM...
User Manual
Page 27
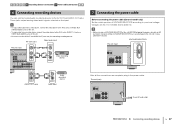
... power cable into an AC wall outlet. Voltages are complete, plug in the power cable. The unit (rear) ANTENNA AM FM SPEAKERS SURROUND CENTER FRONT SUBWOOFER To an AC wall outlet PREPARATIONS ➤ Connecting recording devices En 27 VOLTAGE SELECTOR The unit (rear) VOLTAGE SELECTOR ANTENNA AM FM SPEAKERS SURROUND CENTER...
... power cable into an AC wall outlet. Voltages are complete, plug in the power cable. The unit (rear) ANTENNA AM FM SPEAKERS SURROUND CENTER FRONT SUBWOOFER To an AC wall outlet PREPARATIONS ➤ Connecting recording devices En 27 VOLTAGE SELECTOR The unit (rear) VOLTAGE SELECTOR ANTENNA AM FM SPEAKERS SURROUND CENTER...
User Manual
Page 29
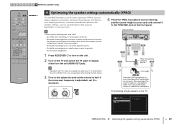
...). DECODE STRAIGHT ENHANCER BD DVD SETUP SCENE TV CD RADIO OPTION RECEIVER z ENTER RETURN VOLUME MUTE 9 Optimizing the speaker settings automatically (YPAO) The Yamaha Parametric room Acoustic Optimizer (YPAO) function detects speaker connections, measures the distances from the unit (HDMI OUT jack). 1 2 9 3 4 YPAO...Auto Setup Start Exit Press SETUP key to half. The unit (front) • Please note the following screen appears on the subwoofer and set it to the unit via HDMI. Use YPAO after connecting a TV and speakers to stabilize the microphone. We recommend the...
...). DECODE STRAIGHT ENHANCER BD DVD SETUP SCENE TV CD RADIO OPTION RECEIVER z ENTER RETURN VOLUME MUTE 9 Optimizing the speaker settings automatically (YPAO) The Yamaha Parametric room Acoustic Optimizer (YPAO) function detects speaker connections, measures the distances from the unit (HDMI OUT jack). 1 2 9 3 4 YPAO...Auto Setup Start Exit Press SETUP key to half. The unit (front) • Please note the following screen appears on the subwoofer and set it to the unit via HDMI. Use YPAO after connecting a TV and speakers to stabilize the microphone. We recommend the...

User Manual
Page 30
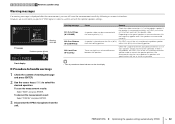
... to select "Start" and press SETUP. Auto Setup Start Exit Measurement Finished Result 3 / 2 / 0.1 ch 3.0 / 10.5 m -3.0 / 10.0 dB 1 2 3 4 1 The number of speakers (front side/rear side/ subwoofer) 2 Speaker distance (nearest/farthest) 3 Adjustment range of speaker output level 4 Warning message (if available) • A speaker with a problem is sensitive to heat, so should not...
... to select "Start" and press SETUP. Auto Setup Start Exit Measurement Finished Result 3 / 2 / 0.1 ch 3.0 / 10.5 m -3.0 / 10.0 dB 1 2 3 4 1 The number of speakers (front side/rear side/ subwoofer) 2 Speaker distance (nearest/farthest) 3 Adjustment range of speaker output level 4 Warning message (if available) • A speaker with a problem is sensitive to heat, so should not...
User Manual
Page 32
... speakers or room environment, this message may be connected with specifications that are significant volume differences between the speakers. within 24 m (80 ft) of the subwoofer. PREPARATIONS ➤ Optimizing the speaker settings automatically (YPAO) En 32 To save the measurement results by following on-screen instructions. SW L CR SL SR Front...
... speakers or room environment, this message may be connected with specifications that are significant volume differences between the speakers. within 24 m (80 ft) of the subwoofer. PREPARATIONS ➤ Optimizing the speaker settings automatically (YPAO) En 32 To save the measurement results by following on-screen instructions. SW L CR SL SR Front...
User Manual
Page 51
... (Enhancer) Enables/disables Compressed Music Enhancer. 52 Volume Trim Input Trim (In.Trim) Corrects volume differences between input sources. 52 (Volume Trim) Subwoofer Trim (SW.Trim) Fine-adjusts the subwoofer volume during playback. 53 Lipsync (Lipsync) Enables/disables the "Lipsync" setting in parentheses denotes indicators on the TV screen), allowing you to...
... (Enhancer) Enables/disables Compressed Music Enhancer. 52 Volume Trim Input Trim (In.Trim) Corrects volume differences between input sources. 52 (Volume Trim) Subwoofer Trim (SW.Trim) Fine-adjusts the subwoofer volume during playback. 53 Lipsync (Lipsync) Enables/disables the "Lipsync" setting in parentheses denotes indicators on the TV screen), allowing you to...

User Manual
Page 52
... adjusts the dynamic range. Default USB, TUNER: On (On) Others: Off (Off) ■ Volume Trim (Volume Trim) Fine-adjusts volume difference between input sources or subwoofer volume. ❑ Input Trim (In.Trim) Corrects volume differences between input sources, use ENHANCER on the remote control to minimum) is automatically adjusted when the...
... adjusts the dynamic range. Default USB, TUNER: On (On) Others: Off (Off) ■ Volume Trim (Volume Trim) Fine-adjusts volume difference between input sources or subwoofer volume. ❑ Input Trim (In.Trim) Corrects volume differences between input sources, use ENHANCER on the remote control to minimum) is automatically adjusted when the...

User Manual
Page 53
... (Video Out) Selects a video to each input source. Enables the "Lipsync" adjustment. ■ Signal Info (Signal Info) Displays information about the video/audio signal. ❑ Subwoofer Trim (SW.Trim) Fine-adjusts the...
... (Video Out) Selects a video to each input source. Enables the "Lipsync" adjustment. ■ Signal Info (Signal Info) Displays information about the video/audio signal. ❑ Subwoofer Trim (SW.Trim) Fine-adjusts the...
User Manual
Page 55
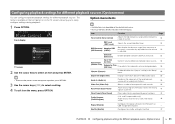
...Sound ECO Item Configuration Distance Level Equalizer Test Tone Configuration DSP Parameter Lipsync Volume Auto Power Down ECO Mode Subwoofer Front Center Surround Crossover Subwoofer Phase Extra Bass HDMI Control Audio Output TV Audio Input Standby Sync ARC SCENE Panorama Center Width Dimension ...Center Image Select Adjustment Dynamic Range Max Volume Initial Volume Function Selects whether or not a subwoofer is connected and its size. Sets the phase of each speaker and listening position. Enables/disables SCENE link playback. Selects whether...
...Sound ECO Item Configuration Distance Level Equalizer Test Tone Configuration DSP Parameter Lipsync Volume Auto Power Down ECO Mode Subwoofer Front Center Surround Crossover Subwoofer Phase Extra Bass HDMI Control Audio Output TV Audio Input Standby Sync ARC SCENE Panorama Center Width Dimension ...Center Image Select Adjustment Dynamic Range Max Volume Initial Volume Function Selects whether or not a subwoofer is connected and its size. Sets the phase of each speaker and listening position. Enables/disables SCENE link playback. Selects whether...
User Manual
Page 57
...whether or not a center speaker is set the volume to half and crossover frequency to "Small". Select this option when no subwoofer is connected. Select this option for large speakers. Speaker Configures the speaker settings manually. The front speakers will produce center channel ...the output characteristics of the speakers. • When you select a sound program. ❑ Crossover Sets the lower limit of your subwoofer, set to maximum. The front speakers will produce LFE (low-frequency effect) channel audio and low-frequency components from other channels. A...
...whether or not a center speaker is set the volume to half and crossover frequency to "Small". Select this option when no subwoofer is connected. Select this option for large speakers. Speaker Configures the speaker settings manually. The front speakers will produce center channel ...the output characteristics of the speakers. • When you select a sound program. ❑ Crossover Sets the lower limit of your subwoofer, set to maximum. The front speakers will produce LFE (low-frequency effect) channel audio and low-frequency components from other channels. A...
User Manual
Page 58
...None", or when "Front" is lacking or unclear, switch the subwoofer phase. Settings Off (default) On Depending on the size of the subwoofer. ❑ Subwoofer Phase Sets the phase of the front speakers, either the subwoofer or front speakers produce the front channel low-frequency components. Choices... speakers reach the listening position at the same time. Both the front speakers and subwoofer produce the front channel lowfrequency components. • This setting is not available when "Subwoofer" is set to adjust the equalizer manually. Settings PEQ GEQ (default) Off Applies...
...None", or when "Front" is lacking or unclear, switch the subwoofer phase. Settings Off (default) On Depending on the size of the subwoofer. ❑ Subwoofer Phase Sets the phase of the front speakers, either the subwoofer or front speakers produce the front channel low-frequency components. Choices... speakers reach the listening position at the same time. Both the front speakers and subwoofer produce the front channel lowfrequency components. • This setting is not available when "Subwoofer" is set to adjust the equalizer manually. Settings PEQ GEQ (default) Off Applies...
User Manual
Page 68
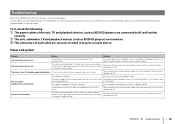
...activated because of each speaker cable firmly and reconnect to the table below do not help, turn off (standby mode) immediately. b The unit, subwoofer, TV and playback devices (such as BD/DVD players) are connected to a drop in the "Setup" menu for the specified time. The ... to initialize and reboot the unit. The power does not turn off the unit, disconnect the power cable, and contact the nearest authorized Yamaha dealer or service center. The internal microcomputer has frozen, due to an external electric shock (such as lightning or excessive static electricity) or...
...activated because of each speaker cable firmly and reconnect to the table below do not help, turn off (standby mode) immediately. b The unit, subwoofer, TV and playback devices (such as BD/DVD players) are connected to a drop in the "Setup" menu for the specified time. The ... to initialize and reboot the unit. The power does not turn off the unit, disconnect the power cable, and contact the nearest authorized Yamaha dealer or service center. The internal microcomputer has frozen, due to an external electric shock (such as lightning or excessive static electricity) or...
User Manual
Page 69
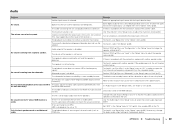
... "Setup" menu to use "Configuration" in the "Option" menu (p.53). Also, enable ARC on multichannel audio. The playback device is coming from the subwoofer (p.58). No sound. The playback source does not contain a signal for the TV and check the TV's specifications. To check it , select "5ch Stereo..., set "Extra Bass" in the "Setup" menu to "On", in the "Setup" menu to output the front channel low-frequency components from the subwoofer. Only the front speakers work on the TV. If there is coming from the TV speakers. Set "ARC" in the "Option" menu (p.53). ...
... "Setup" menu to use "Configuration" in the "Option" menu (p.53). Also, enable ARC on multichannel audio. The playback device is coming from the subwoofer (p.58). No sound. The playback source does not contain a signal for the TV and check the TV's specifications. To check it , select "5ch Stereo..., set "Extra Bass" in the "Setup" menu to "On", in the "Setup" menu to output the front channel low-frequency components from the subwoofer. Only the front speakers work on the TV. If there is coming from the TV speakers. Set "ARC" in the "Option" menu (p.53). ...

User Manual
Page 77
APPENDIX ➤ Reference diagram (rear panel) En 77 Reference diagram (rear panel) COMPONENT VIDEO PR ARC HDMI OUT PR (BD/DVD) HDMI 1 HDMI 2 PB PB Y MONITOR OUT Y COMPONENT VIDEO VIDEO HDMI 3 HDMI 4 MONITOR OUT ANTENNA AM FM SPEAKERS SURROUND CENTER FRONT OPTICAL AV 1 COAXIAL AV 2 COAXIAL (CD) AV 3 OPTICAL ( TV ) AV 4 AV 5 AV OUT AUDIO 1 AUDIO 2 AUDIO OUT SUBWOOFER • The area around the video/audio output jacks is marked in white on the actual product to prevent improper connections.
APPENDIX ➤ Reference diagram (rear panel) En 77 Reference diagram (rear panel) COMPONENT VIDEO PR ARC HDMI OUT PR (BD/DVD) HDMI 1 HDMI 2 PB PB Y MONITOR OUT Y COMPONENT VIDEO VIDEO HDMI 3 HDMI 4 MONITOR OUT ANTENNA AM FM SPEAKERS SURROUND CENTER FRONT OPTICAL AV 1 COAXIAL AV 2 COAXIAL (CD) AV 3 OPTICAL ( TV ) AV 4 AV 5 AV OUT AUDIO 1 AUDIO 2 AUDIO OUT SUBWOOFER • The area around the video/audio output jacks is marked in white on the actual product to prevent improper connections.
User Manual
Page 79
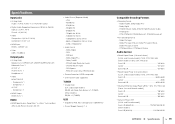
...; Video Composite x 4 (AV 3-5, V-AUX) Component x 2 (AV 1-2) • HDMI Input HDMI x 4 (HDMI 1-4) • Other USB x 1 (USB2.0) Output jacks • Analog Audio Speaker out x 5 (FRONT L/R, CENTER, SURROUND L/R) Subwoofer Out x 1 AV OUT x 1 AUDIO OUT x 1 Headphone x 1 • Video MONITOR OUT - Specifications Input jacks • Analog Audio Audio x 4 (AV 5, AUDIO 1-2, V-AUX [Mini Jack]) • Digital Audio...
...; Video Composite x 4 (AV 3-5, V-AUX) Component x 2 (AV 1-2) • HDMI Input HDMI x 4 (HDMI 1-4) • Other USB x 1 (USB2.0) Output jacks • Analog Audio Speaker out x 5 (FRONT L/R, CENTER, SURROUND L/R) Subwoofer Out x 1 AV OUT x 1 AUDIO OUT x 1 Headphone x 1 • Video MONITOR OUT - Specifications Input jacks • Analog Audio Audio x 4 (AV 5, AUDIO 1-2, V-AUX [Mini Jack]) • Digital Audio...


