User Manual
Page 2
...26 6 Connecting recording devices 27 7 Connecting the power cable 27 8 Selecting an on-screen menu language 28 9 Optimizing the speaker settings automatically (YPAO 29 Error messages 31 Warning messages 32 PLAYBACK 33 Basic playback procedure 33 Switching information on the front display 33 Selecting ...the input source and favorite settings with one touch (SCENE 34 Configuring scene assignments 34 Selecting the sound mode 35 Enjoying sound field effects (CINEMA DSP ...
...26 6 Connecting recording devices 27 7 Connecting the power cable 27 8 Selecting an on-screen menu language 28 9 Optimizing the speaker settings automatically (YPAO 29 Error messages 31 Warning messages 32 PLAYBACK 33 Basic playback procedure 33 Switching information on the front display 33 Selecting ...the input source and favorite settings with one touch (SCENE 34 Configuring scene assignments 34 Selecting the sound mode 35 Enjoying sound field effects (CINEMA DSP ...
User Manual
Page 3
... items 55 Speaker 57 HDMI 59 Sound 61 ECO 62 Function 63 Language 64 Configuring the system settings (ADVANCED SETUP menu 65 ADVANCED SETUP menu items 65 Changing the speaker impedance setting (SP IMP 65 Selecting the remote control ID (REMOTE ID 65 Changing the FM/AM tuning ... 66 Switching the video signal type (TV FORMAT 66 Restoring the default settings (INIT 66 Updating the firmware (UPDATE 66 Checking the firmware version (VERSION 66 APPENDIX 67 HDMI and video information 74 Yamaha technologies 74 Video signal flow 75 Information on HDMI 75 HDMI Control 75 HDMI ...
... items 55 Speaker 57 HDMI 59 Sound 61 ECO 62 Function 63 Language 64 Configuring the system settings (ADVANCED SETUP menu 65 ADVANCED SETUP menu items 65 Changing the speaker impedance setting (SP IMP 65 Selecting the remote control ID (REMOTE ID 65 Changing the FM/AM tuning ... 66 Switching the video signal type (TV FORMAT 66 Restoring the default settings (INIT 66 Updating the firmware (UPDATE 66 Checking the firmware version (VERSION 66 APPENDIX 67 HDMI and video information 74 Yamaha technologies 74 Video signal flow 75 Information on HDMI 75 HDMI Control 75 HDMI ...
User Manual
Page 5
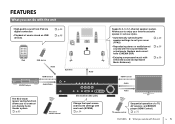
... (CINEMA DSP) . p.75 FEATURES ➤ What you to enjoy your favorite acoustic spaces in various styles. • Automatically optimizing the speaker settings to suit your room (YPAO) . p.29 • Reproducing stereo or multichannel sounds with enhanced sound (Compressed Music Enhancer) . p.48 iPod ...you can do with one touch (SCENE) . p.63 The unit's remote control AV receiver (the unit) Change the input source and favorite settings with the unit • High-quality sound from iPod via digital connection • Playback of a TV, AV receiver, and BD/DVD player ...
... (CINEMA DSP) . p.75 FEATURES ➤ What you to enjoy your favorite acoustic spaces in various styles. • Automatically optimizing the speaker settings to suit your room (YPAO) . p.29 • Reproducing stereo or multichannel sounds with enhanced sound (Compressed Music Enhancer) . p.48 iPod ...you can do with one touch (SCENE) . p.63 The unit's remote control AV receiver (the unit) Change the input source and favorite settings with the unit • High-quality sound from iPod via digital connection • Playback of a TV, AV receiver, and BD/DVD player ...
User Manual
Page 6
...ARC) (p.18) When using an ARC -compatible TV, you can operate the iPod or USB storage device, view information, or easily configure the settings using the on -screen menu language... Use "Lipsync" in FM/AM tuner. The HDMI jacks supports 3D and 4K video transmission (through output). ... "Option" menu to connect video devices (such as BD/DVD players), audio devices (such as CD players), game consoles, camcorders, and other settings are not synchronized... Use "Language" in the "ADVANCED SETUP" menu to select a language from the TV, and the transmission of video/audio input...
...ARC) (p.18) When using an ARC -compatible TV, you can operate the iPod or USB storage device, view information, or easily configure the settings using the on -screen menu language... Use "Lipsync" in FM/AM tuner. The HDMI jacks supports 3D and 4K video transmission (through output). ... "Option" menu to connect video devices (such as BD/DVD players), audio devices (such as CD players), game consoles, camcorders, and other settings are not synchronized... Use "Language" in the "ADVANCED SETUP" menu to select a language from the TV, and the transmission of video/audio input...
User Manual
Page 10
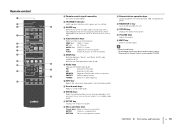
... VOLUME MUTE C D E F 1 Remote control signal transmitter Transmits infrared signals. 2 TRANSMIT indicator Lights up when remote control signals are transmitted. 3 SLEEP key Switches the unit to set the time (120 min, 90 min, 60 min, 30 min, off (standby) the unit. B External device operation keys Control playback of time has elapsed (sleep...
... VOLUME MUTE C D E F 1 Remote control signal transmitter Transmits infrared signals. 2 TRANSMIT indicator Lights up when remote control signals are transmitted. 3 SLEEP key Switches the unit to set the time (120 min, 90 min, 60 min, 30 min, off (standby) the unit. B External device operation keys Control playback of time has elapsed (sleep...
User Manual
Page 11
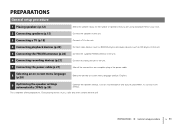
... the power cable. 8 Selecting an on-screen menu language (p.28) Select the desired on-screen menu language (default: English). 9 Optimizing the speaker settings automatically (YPAO) (p.29) Optimize the speaker settings, such as CD players) to the unit. 5 Connecting the FM/AM antennas (p.26) Connect the supplied FM/AM antennas to the unit...
... the power cable. 8 Selecting an on-screen menu language (p.28) Select the desired on-screen menu language (default: English). 9 Optimizing the speaker settings automatically (YPAO) (p.29) Optimize the speaker settings, such as CD players) to the unit. 5 Connecting the FM/AM antennas (p.26) Connect the supplied FM/AM antennas to the unit...
User Manual
Page 12
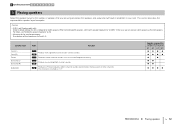
...8 9 1 Placing speakers Select the speaker layout for the number of at least 6 . and Canada models only) Under its default settings, the unit is counted as "0.1". Caution • (U.S.A. and Canada models) Use speakers with built-in amplifier) in your room. Speaker ...Front (L) Front (R) Center Surround (L) Surround (R) Subwoofer Abbr. Speaker system (the number of other channels. When connecting 6-ohm speakers, set the unit's speaker impedance to "6 MIN". This channel is configured for U.S.A. Function 1 Produce front right/left channel sounds...
...8 9 1 Placing speakers Select the speaker layout for the number of at least 6 . and Canada models only) Under its default settings, the unit is counted as "0.1". Caution • (U.S.A. and Canada models) Use speakers with built-in amplifier) in your room. Speaker ...Front (L) Front (R) Center Surround (L) Surround (R) Subwoofer Abbr. Speaker system (the number of other channels. When connecting 6-ohm speakers, set the unit's speaker impedance to "6 MIN". This channel is configured for U.S.A. Function 1 Produce front right/left channel sounds...
User Manual
Page 14
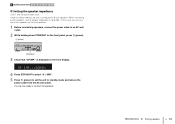
... unit is displayed on the front panel, press z (power). SP IMP. 8 MIN 4 Press STRAIGHT to select "6 MIN". 5 Press z (power) to set the speaker impedance to standby mode and remove the power cable from the AC wall outlet. You are now ready to an AC wall outlet. 2 ...While holding down STRAIGHT on the front display. When connecting 6-ohm speakers, set the unit to "6 MIN". is configured for 8-ohm speakers. In this case, you can also use 4-ohm speakers as the front speakers. 1 Before...
... unit is displayed on the front panel, press z (power). SP IMP. 8 MIN 4 Press STRAIGHT to select "6 MIN". 5 Press z (power) to set the speaker impedance to standby mode and remove the power cable from the AC wall outlet. You are now ready to an AC wall outlet. 2 ...While holding down STRAIGHT on the front display. When connecting 6-ohm speakers, set the unit to "6 MIN". is configured for 8-ohm speakers. In this case, you can also use 4-ohm speakers as the front speakers. 1 Before...
User Manual
Page 18
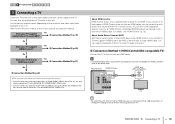
... an HDMI cable. • The following explanation is based on the assumption that you can control your iPod or USB storage device, or configure the settings of the unit with the TV's remote control. If you connect a TV that supports HDMI Control and ARC to the unit with an analog video...
... an HDMI cable. • The following explanation is based on the assumption that you can control your iPod or USB storage device, or configure the settings of the unit with the TV's remote control. If you connect a TV that supports HDMI Control and ARC to the unit with an analog video...
User Manual
Page 19
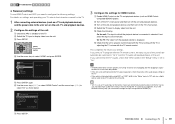
...function (p.34), you cannot hear the TV's audio, check that "ARC" (p.60) in again) the devices. e Check the following settings. This completes the necessary settings. a Check that the unit is properly synchronized with the TV by turning off the TV or adjusting the TV volume with the TV...again. g Press SETUP. Configuration HDMI Control Audio Output TV Audio Input Standby Sync ARC SCENE On AV4 Auto On Back: RETURN 3 Configure the settings for the TV. 1 After connecting external devices (such as TV audio input at the factory. SETUP OPTION ENTER RETURN VOLUME SETUP Cursor keys ...
...function (p.34), you cannot hear the TV's audio, check that "ARC" (p.60) in again) the devices. e Check the following settings. This completes the necessary settings. a Check that the unit is properly synchronized with the TV by turning off the TV or adjusting the TV volume with the TV...again. g Press SETUP. Configuration HDMI Control Audio Output TV Audio Input Standby Sync ARC SCENE On AV4 Auto On Back: RETURN 3 Configure the settings for the TV. 1 After connecting external devices (such as TV audio input at the factory. SETUP OPTION ENTER RETURN VOLUME SETUP Cursor keys ...
User Manual
Page 20
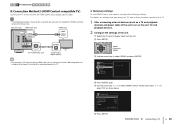
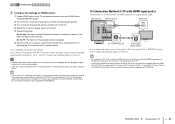
...9 ■ Connection Method 2 (HDMI Control-compatible TV) Connect the TV to the unit with an HDMI cable and a digital optical cable. • The following settings. b Press SETUP. SETUP OPTION ENTER RETURN VOLUME SETUP Cursor keys ENTER c Use the cursor keys to display video from the unit. e Use the cursor keys...On" as a TV and playback devices) and power cable of the unit, turn on the unit, TV, and playback devices. 2 Configure the settings of the unit with an HDMI cable, you have not changed the "HDMI" parameters (p.59) in the "Setup" menu. Setup Speaker HDMI Sound...
...9 ■ Connection Method 2 (HDMI Control-compatible TV) Connect the TV to the unit with an HDMI cable and a digital optical cable. • The following settings. b Press SETUP. SETUP OPTION ENTER RETURN VOLUME SETUP Cursor keys ENTER c Use the cursor keys to display video from the unit. e Use the cursor keys...On" as a TV and playback devices) and power cable of the unit, turn on the unit, TV, and playback devices. 2 Configure the settings of the unit with an HDMI cable, you have not changed the "HDMI" parameters (p.59) in the "Setup" menu. Setup Speaker HDMI Sound...
User Manual
Page 21
... AV 4 (TV) AV 4 AV 4 (OPTICAL) jack HDMI HDMI OPTICAL O TV Audio output (digital optical) If you switch the input source of the audio output setting on the TV. • If you have connected any external device to the AV 4 jacks or if you can control your iPod or USB storage... Method 3 (TV with the TV by turning off the unit and playback devices. PREPARATIONS ➤ Connecting a TV En 21 1 2 3 TV connection 4 5 6 7 8 9 3 Configure the settings for SCENE(TV). b Turn off the TV's main power and then turn on (or unplugging and then plugging in the "Setup" menu to the unit...
... AV 4 (TV) AV 4 AV 4 (OPTICAL) jack HDMI HDMI OPTICAL O TV Audio output (digital optical) If you switch the input source of the audio output setting on the TV. • If you have connected any external device to the AV 4 jacks or if you can control your iPod or USB storage... Method 3 (TV with the TV by turning off the unit and playback devices. PREPARATIONS ➤ Connecting a TV En 21 1 2 3 TV connection 4 5 6 7 8 9 3 Configure the settings for SCENE(TV). b Turn off the TV's main power and then turn on (or unplugging and then plugging in the "Setup" menu to the unit...
User Manual
Page 23
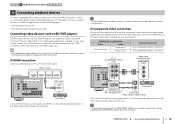
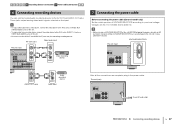
... digital coaxial). Depending on the video/audio output jacks available on how to connect an iPod or a USB storage device, see the following connections. Choose a set -top boxes (STBs) and game consoles to the unit. 1 2 3 4 Playback device connections 5 6 7 8 9 4 Connecting playback devices The unit is equipped with a...8226; Connecting a USB storage device (p.48) Connecting video devices (such as BD/DVD players) Connect video devices such as BD/DVD players, set of input jacks (on the unit) depending on the audio output jacks available on the unit does not match your video device, change its ...
... digital coaxial). Depending on the video/audio output jacks available on how to connect an iPod or a USB storage device, see the following connections. Choose a set -top boxes (STBs) and game consoles to the unit. 1 2 3 4 Playback device connections 5 6 7 8 9 4 Connecting playback devices The unit is equipped with a...8226; Connecting a USB storage device (p.48) Connecting video devices (such as BD/DVD players) Connect video devices such as BD/DVD players, set of input jacks (on the unit) depending on the audio output jacks available on the unit does not match your video device, change its ...
User Manual
Page 24
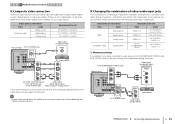
...OPTICAL) AV 4 (OPTICAL) HDMI 1-4 AV 2-3 (COAXIAL) HDMI 1-4 AV 5 (AUDIO) AUDIO 1-2 AV 1-2 (COMPONENT VIDEO) AV 5 (AUDIO) AUDIO 1-2 ❑ Necessary setting For example, if you have connected a video device to AV 2 (COMPONENT VIDEO) and AV 5 (AUDIO) jacks of the unit, change its combination according to the... coaxial Analog stereo Component video Analog stereo Input jacks on the unit does not match your video device, change the combination setting as follows. Choose a set of your device. AV 2 (COMPONENT VIDEO) jacks The unit (rear) PR PB Y ARC COMPONENT VIDEO PR HDMI ...
...OPTICAL) AV 4 (OPTICAL) HDMI 1-4 AV 2-3 (COAXIAL) HDMI 1-4 AV 5 (AUDIO) AUDIO 1-2 AV 1-2 (COMPONENT VIDEO) AV 5 (AUDIO) AUDIO 1-2 ❑ Necessary setting For example, if you have connected a video device to AV 2 (COMPONENT VIDEO) and AV 5 (AUDIO) jacks of the unit, change its combination according to the... coaxial Analog stereo Component video Analog stereo Input jacks on the unit does not match your video device, change the combination setting as follows. Choose a set of your device. AV 2 (COMPONENT VIDEO) jacks The unit (rear) PR PB Y ARC COMPONENT VIDEO PR HDMI ...
User Manual
Page 25
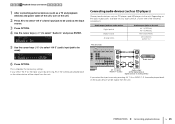
AV5 6 Press OPTION. This completes the necessary settings. Connecting audio devices (such as CD players) Connect audio devices such as CD players and MD players to the unit. Depending on the audio output ...
AV5 6 Press OPTION. This completes the necessary settings. Connecting audio devices (such as CD players) Connect audio devices such as CD players and MD players to the unit. Depending on the audio output ...
User Manual
Page 27
...CENTER FRONT 110V 120V 220V 240V After all the connections are AC 110-120/220-240 V, 50/60 Hz. • Make sure you set VOLTAGE SELECTOR of VOLTAGE SELECTOR according to use the AV OUT and AUDIO OUT jacks only for connecting recording devices. AV OUT jacks The unit... OUT L R AUDIO OUT AUDIO OUT jacks L L R R AUDIO Audio recording device Audio input 7 Connecting the power cable Before connecting the power cable (General model only) Set the switch position of the unit BEFORE plugging the power cable into an AC wall outlet. The unit (rear) ANTENNA AM FM SPEAKERS SURROUND CENTER...
...CENTER FRONT 110V 120V 220V 240V After all the connections are AC 110-120/220-240 V, 50/60 Hz. • Make sure you set VOLTAGE SELECTOR of VOLTAGE SELECTOR according to use the AV OUT and AUDIO OUT jacks only for connecting recording devices. AV OUT jacks The unit... OUT L R AUDIO OUT AUDIO OUT jacks L L R R AUDIO Audio recording device Audio input 7 Connecting the power cable Before connecting the power cable (General model only) Set the switch position of the unit BEFORE plugging the power cable into an AC wall outlet. The unit (rear) ANTENNA AM FM SPEAKERS SURROUND CENTER...
User Manual
Page 28
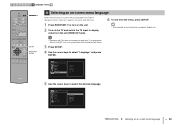
... Setup Speaker HDMI Sound ECO Function Language English Français Deutsch Español 5 Use the cursor keys to the unit via HDMI. 1 2 3 4 5 6 7 8 Language setting 9 TRANSMIT SLEEP RECEIVER HDMI 1 2 3 4 AV 1 2 3 4 AUDIO 5 1 2 USB V-AUX MODE FM INFO TUNER AM MEMORY PRESET TUNING MOVIE MUSIC SUR. If not, carry out operations while...
... Setup Speaker HDMI Sound ECO Function Language English Français Deutsch Español 5 Use the cursor keys to the unit via HDMI. 1 2 3 4 5 6 7 8 Language setting 9 TRANSMIT SLEEP RECEIVER HDMI 1 2 3 4 AV 1 2 3 4 AUDIO 5 1 2 USB V-AUX MODE FM INFO TUNER AM MEMORY PRESET TUNING MOVIE MUSIC SUR. If not, carry out operations while...
User Manual
Page 29
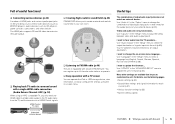
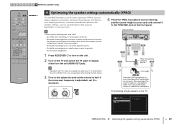
... 5 • Operations with TV screen are output at night when it to Start PREPARATIONS ➤ Optimizing the speaker settings automatically (YPAO) En 29 DECODE STRAIGHT ENHANCER BD DVD SETUP SCENE TV CD RADIO OPTION RECEIVER z ENTER RETURN VOLUME MUTE 9 ...Optimizing the speaker settings automatically (YPAO) The Yamaha Parametric room Acoustic Optimizer (YPAO) function detects speaker connections, measures the distances from them to your listening position(s), and then automatically optimizes the speaker settings, such as volume balance and acoustic...
... 5 • Operations with TV screen are output at night when it to Start PREPARATIONS ➤ Optimizing the speaker settings automatically (YPAO) En 29 DECODE STRAIGHT ENHANCER BD DVD SETUP SCENE TV CD RADIO OPTION RECEIVER z ENTER RETURN VOLUME MUTE 9 ...Optimizing the speaker settings automatically (YPAO) The Yamaha Parametric room Acoustic Optimizer (YPAO) function detects speaker connections, measures the distances from them to your listening position(s), and then automatically optimizes the speaker settings, such as volume balance and acoustic...

User Manual
Page 30
... "SAVE" and press ENTER. Auto Setup Start Exit SAVE Measurement Finished Result 3 / 2 / 0.1 ch 3.0 / 10.5 m -3.0 / 10.0 dB The adjusted speaker settings are given (when operating with a problem is sensitive to heat, so should not be placed anywhere where it could be exposed to start in "Error... messages" (p.31). PREPARATIONS ➤ Optimizing the speaker settings automatically (YPAO) En 30 Press ENTER to direct sunlight or high temperatures (such as on the TV when the measurement finishes. Caution ...
... "SAVE" and press ENTER. Auto Setup Start Exit SAVE Measurement Finished Result 3 / 2 / 0.1 ch 3.0 / 10.5 m -3.0 / 10.0 dB The adjusted speaker settings are given (when operating with a problem is sensitive to heat, so should not be placed anywhere where it could be exposed to start in "Error... messages" (p.31). PREPARATIONS ➤ Optimizing the speaker settings automatically (YPAO) En 30 Press ENTER to direct sunlight or high temperatures (such as on the TV when the measurement finishes. Caution ...
User Manual
Page 31
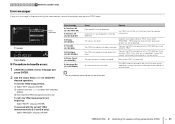
... the front display. Connect the YPAO microphone to select "Exit" and press ENTER. An internal error has occurred. PREPARATIONS ➤ Optimizing the speaker settings automatically (YPAO) En 31 1 2 3 4 5 6 7 8 9 Automatic speaker setup Error messages If any noise detected. To exit the...YPAO measurement: a Select "EXIT" and press ENTER. The measurement has been canceled. If this error occurs repeatedly, contact the nearest authorized Yamaha dealer or service center. SP (E-2:NO SUR SP) E-5:Noisy (E-5:NOISY) E-7:No MIC (E-7:NO MIC) E-8:No Signal (E-8:NO SIGNAL) E-9:...
... the front display. Connect the YPAO microphone to select "Exit" and press ENTER. An internal error has occurred. PREPARATIONS ➤ Optimizing the speaker settings automatically (YPAO) En 31 1 2 3 4 5 6 7 8 9 Automatic speaker setup Error messages If any noise detected. To exit the...YPAO measurement: a Select "EXIT" and press ENTER. The measurement has been canceled. If this error occurs repeatedly, contact the nearest authorized Yamaha dealer or service center. SP (E-2:NO SUR SP) E-5:Noisy (E-5:NOISY) E-7:No MIC (E-7:NO MIC) E-8:No Signal (E-8:NO SIGNAL) E-9:...

