User Manual
Page 2
... 11 General setup procedure 11 1 Placing speakers 12 2 Connecting speakers 15 Input/output jacks and cables 17 3 Connecting a TV 18 4 Connecting playback devices 23 Connecting video devices (such as BD/DVD players 23 Connecting audio devices (such as CD players 25 Connecting to the jacks on the front panel 26 5 Connecting...
... 11 General setup procedure 11 1 Placing speakers 12 2 Connecting speakers 15 Input/output jacks and cables 17 3 Connecting a TV 18 4 Connecting playback devices 23 Connecting video devices (such as BD/DVD players 23 Connecting audio devices (such as CD players 25 Connecting to the jacks on the front panel 26 5 Connecting...
User Manual
Page 3
... FORMAT 66 Restoring the default settings (INIT 66 Updating the firmware (UPDATE 66 Checking the firmware version (VERSION 66 APPENDIX 67 HDMI and video information 74 Yamaha technologies 74 Video signal flow 75 Information on HDMI 75 HDMI Control 75 HDMI signal compatibility 76 Reference diagram (rear panel 77 Trademarks 78 Specifications 79...
... FORMAT 66 Restoring the default settings (INIT 66 Updating the firmware (UPDATE 66 Checking the firmware version (VERSION 66 APPENDIX 67 HDMI and video information 74 Yamaha technologies 74 Video signal flow 75 Information on HDMI 75 HDMI Control 75 HDMI signal compatibility 76 Reference diagram (rear panel 77 Trademarks 78 Specifications 79...
User Manual
Page 5
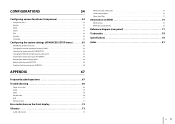
p.36 • Enjoying compressed music with one touch (SCENE) . p.39 HDMI Control Audio Video TV TV remote control Sequential operation of music stored on USB devices . p.63 The unit's remote control AV receiver (the unit) Change the input source...digital connection • Playback of a TV, AV receiver, and BD/DVD player (HDMI Control) . p.48 iPod USB device Audio BD/DVD player HDMI Control Audio/Video Speakers Audio The ECO mode (power saving function) allows you to enjoy your favorite acoustic spaces in various styles. • Automatically optimizing the speaker settings...
p.36 • Enjoying compressed music with one touch (SCENE) . p.39 HDMI Control Audio Video TV TV remote control Sequential operation of music stored on USB devices . p.63 The unit's remote control AV receiver (the unit) Change the input source...digital connection • Playback of a TV, AV receiver, and BD/DVD player (HDMI Control) . p.48 iPod USB device Audio BD/DVD player HDMI Control Audio/Video Speakers Audio The ECO mode (power saving function) allows you to enjoy your favorite acoustic spaces in various styles. • Automatically optimizing the speaker settings...
User Manual
Page 6
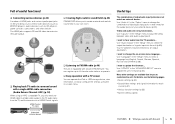
...HDMI cable connection (Audio Return Channel: ARC) (p.18) When using the on -screen menu language... I want to adjust the delay between video and audio output (p.61). Many other settings are not synchronized... Full of useful functions! ❑ Connecting various devices (p.23) A number ...as CD players), game consoles, camcorders, and other devices. For details, see the following pages. • Scene settings (p.34) • Sound/video settings and signal information for each source (p.51) • Various function settings (p.55) • System settings (p.65) FEATURES ➤ What ...
...HDMI cable connection (Audio Return Channel: ARC) (p.18) When using the on -screen menu language... I want to adjust the delay between video and audio output (p.61). Many other settings are not synchronized... Full of useful functions! ❑ Connecting various devices (p.23) A number ...as CD players), game consoles, camcorders, and other devices. For details, see the following pages. • Scene settings (p.34) • Sound/video settings and signal information for each source (p.51) • Various function settings (p.55) • System settings (p.65) FEATURES ➤ What ...
User Manual
Page 7
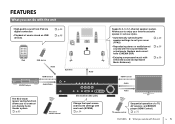
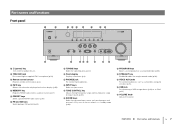
...2 345 6 7 89 YPAO MIC PHONES SILENT CINEMA INFO MEMORY PRESET FM AM TUNING INPUT BD DVD SCENE TV CD TONE CONTROL PROGRAM RADIO STRAIGHT VIDEO AUX USB AUDIO VIDEO iPod/iPhone 5V 1A VOLUME : 1 z (power) key Turns on/off (standby) the unit. 2 YPAO MIC jack For connecting the supplied...decode mode (p.38). Also, turns on the front display (p.33). 5 MEMORY key Registers FM/AM radio stations as camcorders and game consoles (p.26). F VIDEO AUX jacks For connecting devices, such as preset stations (p.41). 6 PRESET keys Select a preset FM/AM radio station (p.42). 7 FM and AM ...
...2 345 6 7 89 YPAO MIC PHONES SILENT CINEMA INFO MEMORY PRESET FM AM TUNING INPUT BD DVD SCENE TV CD TONE CONTROL PROGRAM RADIO STRAIGHT VIDEO AUX USB AUDIO VIDEO iPod/iPhone 5V 1A VOLUME : 1 z (power) key Turns on/off (standby) the unit. 2 YPAO MIC jack For connecting the supplied...decode mode (p.38). Also, turns on the front display (p.33). 5 MEMORY key Registers FM/AM radio stations as camcorders and game consoles (p.26). F VIDEO AUX jacks For connecting devices, such as preset stations (p.41). 6 PRESET keys Select a preset FM/AM radio station (p.42). 7 FM and AM ...
User Manual
Page 9
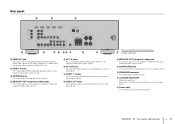
... your local voltage (p.27). A SPEAKERS terminals For connecting to an HDMI-compatible TV and outputting video/audio signals (p.18). Rear panel 1 2 3 COMPONENT VIDEO PR ARC HDMI OUT PR (BD/DVD) HDMI 1 HDMI 2 PB PB Y MONITOR OUT Y COMPONENT VIDEO VIDEO HDMI 3 HDMI 4 MONITOR OUT ANTENNA AM FM SPEAKERS SURROUND CENTER FRONT 4 OPTICAL AV 1 COAXIAL AV...
... your local voltage (p.27). A SPEAKERS terminals For connecting to an HDMI-compatible TV and outputting video/audio signals (p.18). Rear panel 1 2 3 COMPONENT VIDEO PR ARC HDMI OUT PR (BD/DVD) HDMI 1 HDMI 2 PB PB Y MONITOR OUT Y COMPONENT VIDEO VIDEO HDMI 3 HDMI 4 MONITOR OUT ANTENNA AM FM SPEAKERS SURROUND CENTER FRONT 4 OPTICAL AV 1 COAXIAL AV...
User Manual
Page 10
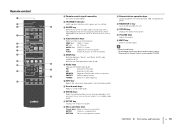
.... 3 SLEEP key Switches the unit to AM radio. HDMI 1-4 HDMI 1-4 jacks AV 1-5 AV 1-5 jacks AUDIO 1-2 AUDIO 1-2 jacks USB USB jack (on the front panel) V-AUX VIDEO AUX jacks (on the front panel) 5 MODE key Switches between "Stereo" and "Mono" for Remote Control" on the supplied CD-ROM. AM Switches to standby...
.... 3 SLEEP key Switches the unit to AM radio. HDMI 1-4 HDMI 1-4 jacks AV 1-5 AV 1-5 jacks AUDIO 1-2 AUDIO 1-2 jacks USB USB jack (on the front panel) V-AUX VIDEO AUX jacks (on the front panel) 5 MODE key Switches between "Stereo" and "Mono" for Remote Control" on the supplied CD-ROM. AM Switches to standby...
User Manual
Page 11
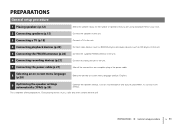
... suit your room. 2 Connecting speakers (p.15) Connect the speakers to the unit. 3 Connecting a TV (p.18) Connect a TV to the unit. 4 Connecting playback devices (p.23) Connect video devices (such as BD/DVD players) and audio devices (such as CD players) to the unit. 5 Connecting the FM/AM antennas (p.26) Connect the supplied...
... suit your room. 2 Connecting speakers (p.15) Connect the speakers to the unit. 3 Connecting a TV (p.18) Connect a TV to the unit. 4 Connecting playback devices (p.23) Connect video devices (such as BD/DVD players) and audio devices (such as CD players) to the unit. 5 Connecting the FM/AM antennas (p.26) Connect the supplied...
User Manual
Page 17
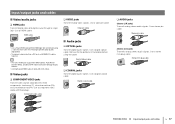
...analog stereo audio signals. Use a stereo mini-plug cable. Stereo mini-plug cable PREPARATIONS ➤ Input/output jacks and cables En 17 Video pin cable ■ Audio jacks ❑ OPTICAL jacks Transmit digital audio signals. Digital Optical cable OPTICAL ( TV ) AV 4 ❑...tip protector (if available) before using a cable less than 5.0 m (16.4 ft) long to enjoy 3D or 4K videos. ■ Video jacks ❑ COMPONENT VIDEO jacks Transmit video signals separated into three components: luminance (Y), chrominance blue (PB), and chrominance red (PR). Use an HDMI cable. Use...
...analog stereo audio signals. Use a stereo mini-plug cable. Stereo mini-plug cable PREPARATIONS ➤ Input/output jacks and cables En 17 Video pin cable ■ Audio jacks ❑ OPTICAL jacks Transmit digital audio signals. Digital Optical cable OPTICAL ( TV ) AV 4 ❑...tip protector (if available) before using a cable less than 5.0 m (16.4 ft) long to enjoy 3D or 4K videos. ■ Video jacks ❑ COMPONENT VIDEO jacks Transmit video signals separated into three components: luminance (Y), chrominance blue (PB), and chrominance red (PR). Use an HDMI cable. Use...
User Manual
Page 18
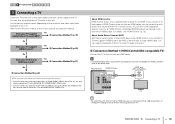
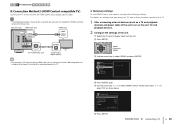
...with a single HDMI cable, you also need to connect the TV to the MONITOR OUT (COMPONENT VIDEO) jacks. • If you will connect any video device to the AV 1-2 (COMPONENT VIDEO) jacks of the unit, you can output video/audio to the TV or input TV audio to the unit. ■ Connection Method 1 (...playback devices (such as an HDMI Control-compatible BD/DVD player) connected to the unit with an analog video output • If you will connect any video device to the AV 3-5 (VIDEO) jacks or the VIDEO AUX (VIDEO) of the unit, you also need to connect the TV to the unit with the TV's remote...
...with a single HDMI cable, you also need to connect the TV to the MONITOR OUT (COMPONENT VIDEO) jacks. • If you will connect any video device to the AV 1-2 (COMPONENT VIDEO) jacks of the unit, you can output video/audio to the TV or input TV audio to the unit. ■ Connection Method 1 (...playback devices (such as an HDMI Control-compatible BD/DVD player) connected to the unit with an analog video output • If you will connect any video device to the AV 3-5 (VIDEO) jacks or the VIDEO AUX (VIDEO) of the unit, you also need to connect the TV to the unit with the TV's remote...
User Manual
Page 19
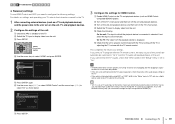
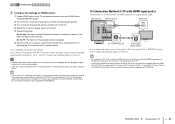
...8226; If HDMI Control does not work properly, try turning off the unit and playback devices. e Check the following settings. On the TV: The video from the unit. If you select a TV program with the TV remote control. SETUP OPTION ENTER RETURN VOLUME SETUP Cursor keys ENTER d Use the cursor... keys to display video from the unit. f Use the cursor keys (q/w) to select "HDMI Control" and the cursor keys (e/r) to select "On" as TV audio input ...
...8226; If HDMI Control does not work properly, try turning off the unit and playback devices. e Check the following settings. On the TV: The video from the unit. If you select a TV program with the TV remote control. SETUP OPTION ENTER RETURN VOLUME SETUP Cursor keys ENTER d Use the cursor... keys to display video from the unit. f Use the cursor keys (q/w) to select "HDMI Control" and the cursor keys (e/r) to select "On" as TV audio input ...
User Manual
Page 20
... 2 Configure the settings of the unit. e Use the cursor keys (q/w) to select "HDMI Control" and the cursor keys (e/r) to display video from the unit. Configuration HDMI Control Audio Output TV Audio Input Standby Sync ARC SCENE On AV4 Auto On Back: RETURN f Press SETUP. ... digital optical cable. • The following settings. The unit (rear) HDMI OUT jack HDMI input COMPONENT VIDEO PR ARC HDMI OUT PR ARC (BD/DVD) HDMI 1 HDMI 2 HDMI OUT PB PB Y MONITOR OUT Y COMPONENT VIDEO VIDEO HDMI O OPTICAL COAXIAL COAXIAL (CD) OPTICAL ( TV ) OPTICAL AV 1 AV 2 AV 3 AV 4...
... 2 Configure the settings of the unit. e Use the cursor keys (q/w) to select "HDMI Control" and the cursor keys (e/r) to display video from the unit. Configuration HDMI Control Audio Output TV Audio Input Standby Sync ARC SCENE On AV4 Auto On Back: RETURN f Press SETUP. ... digital optical cable. • The following settings. The unit (rear) HDMI OUT jack HDMI input COMPONENT VIDEO PR ARC HDMI OUT PR ARC (BD/DVD) HDMI 1 HDMI 2 HDMI OUT PB PB Y MONITOR OUT Y COMPONENT VIDEO VIDEO HDMI O OPTICAL COAXIAL COAXIAL (CD) OPTICAL ( TV ) OPTICAL AV 1 AV 2 AV 3 AV 4...
User Manual
Page 21
.... e Check the following. This completes the necessary settings. The unit (rear) HDMI OUT jack HDMI input COMPONENT VIDEO PR ARC HDMI OUT PR ARC (BD/DVD) HDMI 1 HDMI 2 HDMI OUT PB PB Y MONITOR OUT Y COMPONENT VIDEO VIDEO HDMI O OPTICAL COAXIAL COAXIAL (CD) OPTICAL ( TV ) OPTICAL AV 1 AV 2 AV 3 AV 4 (TV) AV...(p.34), you also need to the TV's power operations, check the priority of the AV 1-5 and AUDIO 1-2 jacks. On the TV: The video from the unit. It may solve the problem. • If the unit is displayed. d Switch the TV input to change the input assignment for...
.... e Check the following. This completes the necessary settings. The unit (rear) HDMI OUT jack HDMI input COMPONENT VIDEO PR ARC HDMI OUT PR ARC (BD/DVD) HDMI 1 HDMI 2 HDMI OUT PB PB Y MONITOR OUT Y COMPONENT VIDEO VIDEO HDMI O OPTICAL COAXIAL COAXIAL (CD) OPTICAL ( TV ) OPTICAL AV 1 AV 2 AV 3 AV 4 (TV) AV...(p.34), you also need to the TV's power operations, check the priority of the AV 1-5 and AUDIO 1-2 jacks. On the TV: The video from the unit. It may solve the problem. • If the unit is displayed. d Switch the TV input to change the input assignment for...
User Manual
Page 22
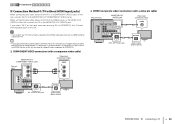
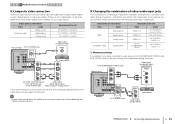
...34), you connect your TV to one of the AV 1-5 and AUDIO 1-2 jacks. When connecting any video device to the AV 3-5 (VIDEO) jacks or the VIDEO AUX (VIDEO) of the unit, connect the TV to the MONITOR OUT (COMPONENT VIDEO) jacks. 1 2 3 TV connection 4 5 6 7 8 9 ■ Connection Method 4 (...If you also need to change the input assignment for SCENE(TV). ❑ COMPONENT VIDEO connection (with a component video cable) MONITOR OUT (COMPONENT VIDEO) jacks The unit COMPONENT VIDEO (rear) PR PR PB PB ARC Y COMPONENT VIDEO PR HDMI OUT PR (BD/DVD) HDMI 1 HDMI 2 Y MONITOR OUT PB PB...
...34), you connect your TV to one of the AV 1-5 and AUDIO 1-2 jacks. When connecting any video device to the AV 3-5 (VIDEO) jacks or the VIDEO AUX (VIDEO) of the unit, connect the TV to the MONITOR OUT (COMPONENT VIDEO) jacks. 1 2 3 TV connection 4 5 6 7 8 9 ■ Connection Method 4 (...If you also need to change the input assignment for SCENE(TV). ❑ COMPONENT VIDEO connection (with a component video cable) MONITOR OUT (COMPONENT VIDEO) jacks The unit COMPONENT VIDEO (rear) PR PR PB PB ARC Y COMPONENT VIDEO PR HDMI OUT PR (BD/DVD) HDMI 1 HDMI 2 Y MONITOR OUT PB PB...
User Manual
Page 23
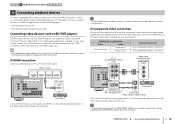
... Digital coaxial Input jacks on the unit AV 1 (COMPONENT VIDEO + OPTICAL) AV 2 (COMPONENT VIDEO + COAXIAL) AV 1-2 (COMPONENT VIDEO) jacks Video output (component video) COMPONENT VIDEO The unit (rear) PR PR COMPONENT VIDEO PR PB Y MONITOR OUT ARC HDMI OUT (BD/DVD) HDMI 1 PB HDMI 2 PR PB Y COMPONENT VIDEO Y COMPONENT VIDEO VIDEO PR PB Y PR PB PB Y Y O O OPTICAL COAXIAL COAXIAL (CD...
... Digital coaxial Input jacks on the unit AV 1 (COMPONENT VIDEO + OPTICAL) AV 2 (COMPONENT VIDEO + COAXIAL) AV 1-2 (COMPONENT VIDEO) jacks Video output (component video) COMPONENT VIDEO The unit (rear) PR PR COMPONENT VIDEO PR PB Y MONITOR OUT ARC HDMI OUT (BD/DVD) HDMI 1 PB HDMI 2 PR PB Y COMPONENT VIDEO Y COMPONENT VIDEO VIDEO PR PB Y PR PB PB Y Y O O OPTICAL COAXIAL COAXIAL (CD...
User Manual
Page 24
... stereo) PREPARATIONS ➤ Connecting playback devices En 24 Output jacks on video device Video Audio Digital coaxial Composite video Digital optical Analog stereo Input jacks on the unit AV 3 (VIDEO + COAXIAL) AV 4 (VIDEO + OPTICAL) AV 5 (VIDEO + AUDIO) The unit (rear) AV 3-5 (VIDEO) jack Video output (composite video) VIDEO V ARC V COMPONENT VIDEO PR HDMI OUT PR (BD/DVD) HDMI 1 HDMI V2 IDEO...
... stereo) PREPARATIONS ➤ Connecting playback devices En 24 Output jacks on video device Video Audio Digital coaxial Composite video Digital optical Analog stereo Input jacks on the unit AV 3 (VIDEO + COAXIAL) AV 4 (VIDEO + OPTICAL) AV 5 (VIDEO + AUDIO) The unit (rear) AV 3-5 (VIDEO) jack Video output (composite video) VIDEO V ARC V COMPONENT VIDEO PR HDMI OUT PR (BD/DVD) HDMI 1 HDMI V2 IDEO...
User Manual
Page 25
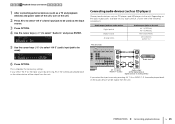
...) AV 4 (OPTICAL) AV 2-3 (COAXIAL) AV 5 (AUDIO) AUDIO 1-2 The unit (rear) ARC HDMI OUT (BD/DVD) HDMI 1 HDMI 2 ENT PR PR PB PB Y ITOR OUT Y COMPONENT VIDEO VIDEO HDMI 3 HDMI 4 MONITOR OUT OPTICAL COAXIAL L OPTICAL COAXIAL COAXIAL (CD) OPTICAL ( TV ) AV OUT A R AV 1 AV 2 AV 3 AV 4 AV 5 AUDIO 1 AUDIO 2 O C L R O C L R ... output jacks on your audio device, choose one of the unit, turn on the unit. 2 Press AV 2 to select "AV 2" (video input jack to the unit. Connecting audio devices (such as CD players) Connect audio devices such as CD players and MD players to be...
...) AV 4 (OPTICAL) AV 2-3 (COAXIAL) AV 5 (AUDIO) AUDIO 1-2 The unit (rear) ARC HDMI OUT (BD/DVD) HDMI 1 HDMI 2 ENT PR PR PB PB Y ITOR OUT Y COMPONENT VIDEO VIDEO HDMI 3 HDMI 4 MONITOR OUT OPTICAL COAXIAL L OPTICAL COAXIAL COAXIAL (CD) OPTICAL ( TV ) AV OUT A R AV 1 AV 2 AV 3 AV 4 AV 5 AUDIO 1 AUDIO 2 O C L R O C L R ... output jacks on your audio device, choose one of the unit, turn on the unit. 2 Press AV 2 to select "AV 2" (video input jack to the unit. Connecting audio devices (such as CD players) Connect audio devices such as CD players and MD players to be...
User Manual
Page 26
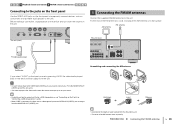
Before making a connection, stop playback on the device and turn down Insert Release • Unwind only the length of cable needed from the MONITOR OUT (VIDEO) jack. PREPARATIONS ➤ Connecting the FM/AM antennas En 26 1 2 3 4 Playback device connections 5 FM/AM antenna connections 6 7 8 9 Connecting to ... an iPod" (p.44) or "Connecting a USB storage device" (p.48). • When "USB" is selected as the input source, video signals input to the VIDEO AUX (VIDEO) jack are output from the AM antenna unit. • The wires of the FM antenna to a wall, and place the AM antenna...
Before making a connection, stop playback on the device and turn down Insert Release • Unwind only the length of cable needed from the MONITOR OUT (VIDEO) jack. PREPARATIONS ➤ Connecting the FM/AM antennas En 26 1 2 3 4 Playback device connections 5 FM/AM antenna connections 6 7 8 9 Connecting to ... an iPod" (p.44) or "Connecting a USB storage device" (p.48). • When "USB" is selected as the input source, video signals input to the VIDEO AUX (VIDEO) jack are output from the AM antenna unit. • The wires of the FM antenna to a wall, and place the AM antenna...
User Manual
Page 27
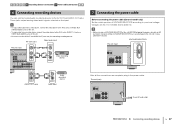
...the unit. • To copy audio from an audio device, connect the audio device to the AV 5 jacks, AUDIO 1-2 jacks, or VIDEO AUX (AUDIO) jacks of the unit BEFORE plugging the power cable into an AC wall outlet. VOLTAGE SELECTOR The unit (rear) VOLTAGE SELECTOR ... the unit. • Be sure to your local voltage. AV OUT jacks The unit (rear) V Video/audio input VIDEO V L ARC HDMI OUT (BD/DVD) HDMI 1 HDMI 2 HDMI 3 HDMI 4 PR R PB Y COMPONENT VIDEO VIDEO AV OUT MONITOR OUT L L R R AUDIO Video recording device OPTICAL AV 1 COAXIAL AV 2 COAXIAL (CD) AV 3 OPTICAL ( TV ) AV 4 ...
...the unit. • To copy audio from an audio device, connect the audio device to the AV 5 jacks, AUDIO 1-2 jacks, or VIDEO AUX (AUDIO) jacks of the unit BEFORE plugging the power cable into an AC wall outlet. VOLTAGE SELECTOR The unit (rear) VOLTAGE SELECTOR ... the unit. • Be sure to your local voltage. AV OUT jacks The unit (rear) V Video/audio input VIDEO V L ARC HDMI OUT (BD/DVD) HDMI 1 HDMI 2 HDMI 3 HDMI 4 PR R PB Y COMPONENT VIDEO VIDEO AV OUT MONITOR OUT L L R R AUDIO Video recording device OPTICAL AV 1 COAXIAL AV 2 COAXIAL (CD) AV 3 OPTICAL ( TV ) AV 4 ...
User Manual
Page 28
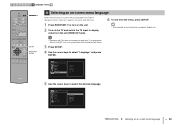
... (default), French, German, Spanish, Russian and Chinese. 1 Press RECEIVER z to turn on the unit. 2 Turn on the TV and switch the TV input to display video from the unit (HDMI OUT jack). 6 To exit from the menu, press SETUP. • The information on -screen menu language En 28 Setup Speaker HDMI...
... (default), French, German, Spanish, Russian and Chinese. 1 Press RECEIVER z to turn on the unit. 2 Turn on the TV and switch the TV input to display video from the unit (HDMI OUT jack). 6 To exit from the menu, press SETUP. • The information on -screen menu language En 28 Setup Speaker HDMI...


