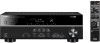

User Manual
Page 1
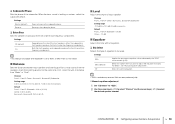
AV Receiver Owner's Manual English Read the supplied booklet "Safety Brochure" before using the unit.
AV Receiver Owner's Manual English Read the supplied booklet "Safety Brochure" before using the unit.
User Manual
Page 4
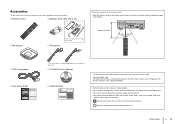
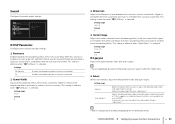
...on the supplied CD-ROM. • Some features are not available in this manual are subject to change without notice. • This manual explains operations using the supplied remote control. • This manual describes both "iPod" and "iPhone", unless otherwise specified. • indicates ...appearance are of the U.S.A. model. • (Australia model only) For information on the region of purchase. CD-ROM (Owner's Manual) Safety Brochure • The illustrations of the remote control used in certain regions. • Due to control external devices with the...
...on the supplied CD-ROM. • Some features are not available in this manual are subject to change without notice. • This manual explains operations using the supplied remote control. • This manual describes both "iPod" and "iPhone", unless otherwise specified. • indicates ...appearance are of the U.S.A. model. • (Australia model only) For information on the region of purchase. CD-ROM (Owner's Manual) Safety Brochure • The illustrations of the remote control used in certain regions. • Due to control external devices with the...
User Manual
Page 18
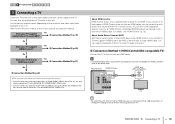
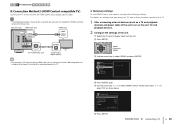
... is based on the assumption that you to operate external devices via HDMI. About Audio Return Channel (ARC) ARC allows audio signals to the instruction manual of the TV and choose a connection method. The connection method varies depending on the functions and video input jacks available on your TV have not...
... is based on the assumption that you to operate external devices via HDMI. About Audio Return Channel (ARC) ARC allows audio signals to the instruction manual of the TV and choose a connection method. The connection method varies depending on the functions and video input jacks available on your TV have not...
User Manual
Page 19
... will be played back on the TV's main power. e Check the following settings. For details on settings and operating your TV, refer to the instruction manual for the TV. 1 After connecting external devices (such as a TV and playback devices) and the power cable to "AV 4" and the TV audio will be... Back: RETURN 3 Configure the settings for SCENE(TV). On the unit: The input to select "HDMI" and press ENTER. If not, select the input source manually. f Check that ARC is displayed. This completes the necessary settings. PREPARATIONS ➤ Connecting a TV En 19
... will be played back on the TV's main power. e Check the following settings. For details on settings and operating your TV, refer to the instruction manual for the TV. 1 After connecting external devices (such as a TV and playback devices) and the power cable to "AV 4" and the TV audio will be... Back: RETURN 3 Configure the settings for SCENE(TV). On the unit: The input to select "HDMI" and press ENTER. If not, select the input source manually. f Check that ARC is displayed. This completes the necessary settings. PREPARATIONS ➤ Connecting a TV En 19
User Manual
Page 20
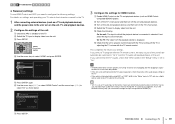
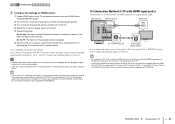
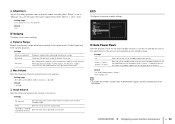
... use HDMI Control, you need to configure the following explanation is based on the assumption that you can control your TV, refer to the instruction manual for the TV. 1 After connecting external devices (such as shown below. Setup Speaker HDMI Sound ECO Function Language Configuration d Press ENTER again. Configuration HDMI Control...
... use HDMI Control, you need to configure the following explanation is based on the assumption that you can control your TV, refer to the instruction manual for the TV. 1 After connecting external devices (such as shown below. Setup Speaker HDMI Sound ECO Function Language Configuration d Press ENTER again. Configuration HDMI Control...
User Manual
Page 21
... the unit: The input to which the playback device is connected is set as a HDMI Controlcompatible BD/DVD player). If not, select the input source manually. d Switch the TV input to one of the unit with an HDMI cable and a digital optical cable. c Turn on the unit and playback devices and...
... the unit: The input to which the playback device is connected is set as a HDMI Controlcompatible BD/DVD player). If not, select the input source manually. d Switch the TV input to one of the unit with an HDMI cable and a digital optical cable. c Turn on the unit and playback devices and...
User Manual
Page 33
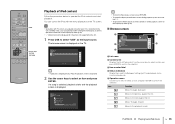
... (decoder name) TUNER Frequency (frequency), DSP Program (sound mode name), Audio Decoder (decoder name) * (U.K. The displayed item can also be applied separately to the instruction manual for the displayed item appears. PLAYBACK ➤ Basic playback procedure En 33 Press MUTE again to select an input source. TRANSMIT SLEEP RECEIVER HDMI 1 2 3 4 AV...
... (decoder name) TUNER Frequency (frequency), DSP Program (sound mode name), Audio Decoder (decoder name) * (U.K. The displayed item can also be applied separately to the instruction manual for the displayed item appears. PLAYBACK ➤ Basic playback procedure En 33 Press MUTE again to select an input source. TRANSMIT SLEEP RECEIVER HDMI 1 2 3 4 AV...

User Manual
Page 41
... to select "TUNER" as presets. SW L CR SL SR "Empty" (not in 5 seconds. Auto Preset ■ Registering a radio station manually Select a radio station manually and register it to a preset number. 1 Follow "Selecting a frequency for 5 seconds). • To cancel the Auto Preset process, press RETURN...2 Press OPTION. 3 Use the cursor keys to 40 stations). • To register AM radio stations, follow "Registering a radio station manually". • (U.K. VOL. STEREO TUNED 02:Empty VOL. VOL. DECODE STRAIGHT ENHANCER BD DVD SETUP SCENE TV CD RADIO OPTION FM AM ...
... to select "TUNER" as presets. SW L CR SL SR "Empty" (not in 5 seconds. Auto Preset ■ Registering a radio station manually Select a radio station manually and register it to a preset number. 1 Follow "Selecting a frequency for 5 seconds). • To cancel the Auto Preset process, press RETURN...2 Press OPTION. 3 Use the cursor keys to 40 stations). • To register AM radio stations, follow "Registering a radio station manually". • (U.K. VOL. STEREO TUNED 02:Empty VOL. VOL. DECODE STRAIGHT ENHANCER BD DVD SETUP SCENE TV CD RADIO OPTION FM AM ...
User Manual
Page 44
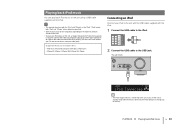
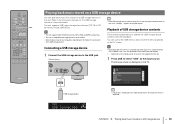
... music En 44 Playing back iPod music You can play back iPod videos on the unit using a USB cable supplied with the iPod. • This manual describes both the "iPod" and "iPhone" as of the unit, and connect your iPod to the USB jack. The unit (front) VOLUME RADIO STRAIGHT VIDEO...
... music En 44 Playing back iPod music You can play back iPod videos on the unit using a USB cable supplied with the iPod. • This manual describes both the "iPod" and "iPhone" as of the unit, and connect your iPod to the USB jack. The unit (front) VOLUME RADIO STRAIGHT VIDEO...
User Manual
Page 45
... the previous screen, press RETURN. • To switch the display to the browse screen during playback, press the cursor key (e). • To operate the iPod manually to select content or control playback, switch to the simple play /pause). 5 Operation menu Use the cursor keys to select an icon and press ENTER...
... the previous screen, press RETURN. • To switch the display to the browse screen during playback, press the cursor key (e). • To operate the iPod manually to select content or control playback, switch to the simple play /pause). 5 Operation menu Use the cursor keys to select an icon and press ENTER...
User Manual
Page 48
... ongoing on the model or manufacturer of up to 48 kHz. • Some features may take time to load the them. Refer to the instruction manuals for the USB storage device for characters not supported by the unit. 1 Press USB to the unit via HDMI. Follow the procedure below to the...
... ongoing on the model or manufacturer of up to 48 kHz. • Some features may take time to load the them. Refer to the instruction manuals for the USB storage device for characters not supported by the unit. 1 Press USB to the unit via HDMI. Follow the procedure below to the...
User Manual
Page 55
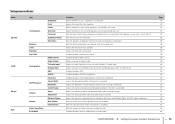
... the amount of the front sound field. Sets the distance between video and audio output. Adjusts the difference in level between video and audio output manually. Enables/disables ARC. Selects the method to produce the front channel low-frequency components. Enables/disables the eco mode (power saving mode). Page 57 57...
... the amount of the front sound field. Sets the distance between video and audio output. Adjusts the difference in level between video and audio output manually. Enables/disables ARC. Selects the method to produce the front channel low-frequency components. Enables/disables the eco mode (power saving mode). Page 57 57...
User Manual
Page 57
... from other channels. ❑ Front Selects the size of the low-frequency components that can be produced from other channels. Speaker Configures the speaker settings manually. The subwoofer will produce center channel audio. ❑ Surround Selects whether or not surround speakers are adjustable on your speaker is 16 cm (6-1/4") or larger...
... from other channels. ❑ Front Selects the size of the low-frequency components that can be produced from other channels. Speaker Configures the speaker settings manually. The subwoofer will produce center channel audio. ❑ Surround Selects whether or not surround speakers are adjustable on your speaker is 16 cm (6-1/4") or larger...
User Manual
Page 58
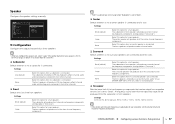
... phase. Settings PEQ GEQ (default) Off Applies the parametric equalizer values obtained by the YPAO measurement (p.29). For details, see "Manual equalizer adjustment". CONFIGURATIONS ➤ Configuring various functions (Setup menu) En 58 Both the front speakers and subwoofer produce the front channel lowfrequency...to produce the front channel low-frequency components. When the bass sound is available only when the YPAO has been performed (p.29). ■ Manual equalizer adjustment 1 Set "EQ Select" to "GEQ". 2 Use the cursor keys (q/w) to select "Channel" and the cursor keys (e/r) ...
... phase. Settings PEQ GEQ (default) Off Applies the parametric equalizer values obtained by the YPAO measurement (p.29). For details, see "Manual equalizer adjustment". CONFIGURATIONS ➤ Configuring various functions (Setup menu) En 58 Both the front speakers and subwoofer produce the front channel lowfrequency...to produce the front channel low-frequency components. When the bass sound is available only when the YPAO has been performed (p.29). ■ Manual equalizer adjustment 1 Set "EQ Select" to "GEQ". 2 Use the cursor keys (q/w) to select "Channel" and the cursor keys (e/r) ...
User Manual
Page 61
...to the unit via HDMI. Higher to strengthen the center orientation level (less broadening effect) and lower to center). Setting range Manual Auto (default) Select this function is connected to the unit. If necessary, you can enable/disable the Lipsync function by input ...0.0 to 7 Default 3 ❑ Dimension Adjusts the difference in "Adjustment". Adjust the audio output timing in level between video and audio output manually. CONFIGURATIONS ➤ Configuring various functions (Setup menu) En 61 Higher to strengthen the front sound field and lower to +3 Default 0 ❑...
...to the unit via HDMI. Higher to strengthen the center orientation level (less broadening effect) and lower to center). Setting range Manual Auto (default) Select this function is connected to the unit. If necessary, you can enable/disable the Lipsync function by input ...0.0 to 7 Default 3 ❑ Dimension Adjusts the difference in "Adjustment". Adjust the audio output timing in level between video and audio output manually. CONFIGURATIONS ➤ Configuring various functions (Setup menu) En 61 Higher to strengthen the front sound field and lower to +3 Default 0 ❑...
User Manual
Page 62
❑ Adjustment Adjusts the delay between video and audio output manually when "Select" is set to "Auto". Sets the dynamic range for bitstream audio (Dolby Digital and DTS signals) playback. For example, when "2 hours" is turned ... TrueHD signals, the dynamic range is set to standby mode when you have not operated the unit for regular home use. Sets the unit to "Manual". Optimizes the dynamic range for the specified time. CONFIGURATIONS ➤ Configuring various functions (Setup menu) En 62 Default U.K. and Europe models: 8 hours Other models: Off...
❑ Adjustment Adjusts the delay between video and audio output manually when "Select" is set to "Auto". Sets the dynamic range for bitstream audio (Dolby Digital and DTS signals) playback. For example, when "2 hours" is turned ... TrueHD signals, the dynamic range is set to standby mode when you have not operated the unit for regular home use. Sets the unit to "Manual". Optimizes the dynamic range for the specified time. CONFIGURATIONS ➤ Configuring various functions (Setup menu) En 62 Default U.K. and Europe models: 8 hours Other models: Off...
User Manual
Page 67
...I am occasionally startled by utilizing "Memory Guard" in the "Setup" menu (p.64). If you need to set limitations on another Yamaha product or another Yamaha product as well as speaker settings) by a sudden loud sound when turning on the front display when selecting an input source... This ... 67 If you add a new HDMI Control-compatible device to your TV and playback devices, refer to the instruction manuals for the devices that you want to adjust the speaker settings manually, use "Input Rename" (p.63) in advance (p.62). You can also select a name from the presets (such...
...I am occasionally startled by utilizing "Memory Guard" in the "Setup" menu (p.64). If you need to set limitations on another Yamaha product or another Yamaha product as well as speaker settings) by a sudden loud sound when turning on the front display when selecting an input source... This ... 67 If you add a new HDMI Control-compatible device to your TV and playback devices, refer to the instruction manuals for the devices that you want to adjust the speaker settings manually, use "Input Rename" (p.63) in advance (p.62). You can also select a name from the presets (such...
User Manual
Page 69
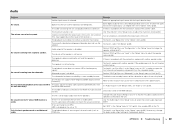
... input setting does not match the actual connection. (p.60). (If you are being input. Signals that the TV audio is set "Amp" to the instruction manuals for the channel. The volume cannot be malfunctioning. No sound is disabled. Subwoofer output is coming from a specific speaker. No sound. The playback source does...
... input setting does not match the actual connection. (p.60). (If you are being input. Signals that the TV audio is set "Amp" to the instruction manuals for the channel. The volume cannot be malfunctioning. No sound is disabled. Subwoofer output is coming from a specific speaker. No sound. The playback source does...
User Manual
Page 70
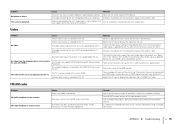
...Content Protection). To check the information about the current video signal (resolution), use an HDMI cable to connect them (p.18 to the instruction manuals for the TV. Refer to 21). APPENDIX ➤ Troubleshooting En 70 Another input source is selected on the TV. Another input source... Cause Another input source is defective. Disconnect some of AV receivers.) Turn on the unit. It may happen due to the instruction manuals for the TV and check the TV's specifications. For information about video signals supported by the TV, refer to the nature of ...
...Content Protection). To check the information about the current video signal (resolution), use an HDMI cable to connect them (p.18 to the instruction manuals for the TV. Refer to 21). APPENDIX ➤ Troubleshooting En 70 Another input source is selected on the TV. Another input source... Cause Another input source is defective. Disconnect some of AV receivers.) Turn on the unit. It may happen due to the instruction manuals for the TV and check the TV's specifications. For information about video signals supported by the TV, refer to the nature of ...
User Manual
Page 71
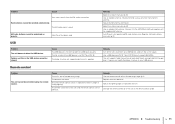
... with new batteries. Radio stations cannot be registered as presets. AM radio stations cannot be selected automatically. Remedy Select the station manually (p.40). Select the station manually (p.40). Register AM radio stations manually (p.41). If necessary, modify the folder structure on again. The batteries are not identical. The remote control IDs of the...
... with new batteries. Radio stations cannot be registered as presets. AM radio stations cannot be selected automatically. Remedy Select the station manually (p.40). Select the station manually (p.40). Register AM radio stations manually (p.41). If necessary, modify the folder structure on again. The batteries are not identical. The remote control IDs of the...


