
User Manual
Page 1
AV Receiver Owner's Manual English Read the supplied booklet "Safety Brochure" before using the unit.
AV Receiver Owner's Manual English Read the supplied booklet "Safety Brochure" before using the unit.
User Manual
Page 4
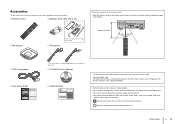
...are supplied with the remote control, refer to "Supplement for Remote Control" on the region of purchase. CD-ROM (Owner's Manual) Safety Brochure • The illustrations of the remote control used in certain regions. • Due to control external devices with ...on the supplied CD-ROM. • Some features are not available in this manual are subject to change without notice. • This manual explains operations using the supplied remote control. • This manual describes both "iPod" and "iPhone", unless otherwise specified. • indicates precautions...
...are supplied with the remote control, refer to "Supplement for Remote Control" on the region of purchase. CD-ROM (Owner's Manual) Safety Brochure • The illustrations of the remote control used in certain regions. • Due to control external devices with ...on the supplied CD-ROM. • Some features are not available in this manual are subject to change without notice. • This manual explains operations using the supplied remote control. • This manual describes both "iPod" and "iPhone", unless otherwise specified. • indicates precautions...
User Manual
Page 18
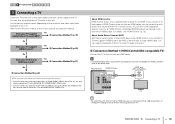
.... • The following explanation is based on the unit. About Audio Return Channel (ARC) ARC allows audio signals to the TV. Refer to the instruction manual of the unit, you also need to connect the TV to the AV 3-5 (VIDEO) jacks or the VIDEO AUX (VIDEO) of the TV and choose...
.... • The following explanation is based on the unit. About Audio Return Channel (ARC) ARC allows audio signals to the TV. Refer to the instruction manual of the unit, you also need to connect the TV to the AV 3-5 (VIDEO) jacks or the VIDEO AUX (VIDEO) of the TV and choose...
User Manual
Page 19
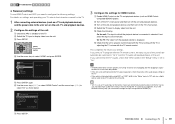
... properly, try turning off and on (or unplugging and then plugging in again) the devices. e Check the following settings. If not, select the input source manually. If you also need to configure the following . To use a digital optical cable to input TV audio to the unit (p.20). • "AV 4" is enabled... and then turn on the TV and playback devices (such as TV audio input at the factory. On the unit: The input to the instruction manual for the TV. 1 After connecting external devices (such as shown below. It may solve the problem. • If the unit is set as HDMI ...
... properly, try turning off and on (or unplugging and then plugging in again) the devices. e Check the following settings. If not, select the input source manually. If you also need to configure the following . To use a digital optical cable to input TV audio to the unit (p.20). • "AV 4" is enabled... and then turn on the TV and playback devices (such as TV audio input at the factory. On the unit: The input to the instruction manual for the TV. 1 After connecting external devices (such as shown below. It may solve the problem. • If the unit is set as HDMI ...
User Manual
Page 20
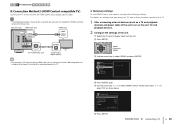
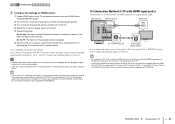
... O TV Audio output (digital optical) • By connecting a TV to the unit with an HDMI cable, you can control your TV, refer to the instruction manual for the TV. 1 After connecting external devices (such as shown below.
... O TV Audio output (digital optical) • By connecting a TV to the unit with an HDMI cable, you can control your TV, refer to the instruction manual for the TV. 1 After connecting external devices (such as shown below.
User Manual
Page 21
... remote control, the input source of the AV 1-5 and AUDIO 1-2 jacks. e Check the following. This completes the necessary settings. If not, select the input source manually. a Enable HDMI Control on the TV. b Turn off the TV's main power and then turn on the TV and playback devices (such as TV audio...
... remote control, the input source of the AV 1-5 and AUDIO 1-2 jacks. e Check the following. This completes the necessary settings. If not, select the input source manually. a Enable HDMI Control on the TV. b Turn off the TV's main power and then turn on the TV and playback devices (such as TV audio...
User Manual
Page 33
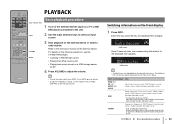
... the unit is tuned into a Radio Data System broadcasting station (p.43). VOLUME MUTE 3 Start playback on a USB storage device (p.48) 4 Press VOLUME to the instruction manual for the displayed item appears. Switching information on the front panel (p.52). Press MUTE again to the unit. Each time you press the key, the...
... the unit is tuned into a Radio Data System broadcasting station (p.43). VOLUME MUTE 3 Start playback on a USB storage device (p.48) 4 Press VOLUME to the instruction manual for the displayed item appears. Switching information on the front panel (p.52). Press MUTE again to the unit. Each time you press the key, the...

User Manual
Page 41
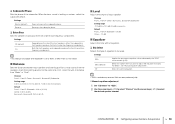
...To specify the preset number from which to 40 stations). • To register AM radio stations, follow "Registering a radio station manually". • (U.K. The first time that you can register up to start the registration immediately. The registration will start the Auto Preset... SR Preset number • To select a preset number for more than 2 seconds. Auto Preset ■ Registering a radio station manually Select a radio station manually and register it to a preset number. 1 Follow "Selecting a frequency for reception" (p.40) to tune into the desired radio station...
...To specify the preset number from which to 40 stations). • To register AM radio stations, follow "Registering a radio station manually". • (U.K. The first time that you can register up to start the registration immediately. The registration will start the Auto Preset... SR Preset number • To select a preset number for more than 2 seconds. Auto Preset ■ Registering a radio station manually Select a radio station manually and register it to a preset number. 1 Follow "Selecting a frequency for reception" (p.40) to tune into the desired radio station...
User Manual
Page 44
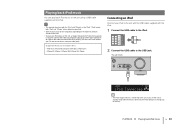
... and VIDEO AUX (VIDEO) jack of the unit, and connect your iPod to the unit with the USB cable supplied with the iPod. • This manual describes both "iPod" and "iPhone" unless otherwise specified. • Some features may not be compatible, depending on the model or software version of the iPod...
... and VIDEO AUX (VIDEO) jack of the unit, and connect your iPod to the unit with the USB cable supplied with the iPod. • This manual describes both "iPod" and "iPhone" unless otherwise specified. • Some features may not be compatible, depending on the model or software version of the iPod...
User Manual
Page 45
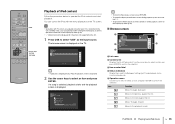
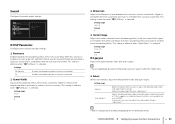
... the previous screen, press RETURN. • To switch the display to the browse screen during playback, press the cursor key (e). • To operate the iPod manually to select content or control playback, switch to confirm the selection. 3 Item number/total 4 Status indicators Display the current shuffle/repeat settings (p.47) and playback...
... the previous screen, press RETURN. • To switch the display to the browse screen during playback, press the cursor key (e). • To operate the iPod manually to select content or control playback, switch to confirm the selection. 3 Item number/total 4 Status indicators Display the current shuffle/repeat settings (p.47) and playback...
User Manual
Page 48
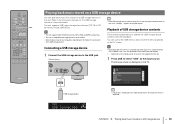
Refer to the instruction manuals for the USB storage device for characters not supported by the unit. 1 Press USB to select "USB" as the input source. appears in the front ...
Refer to the instruction manuals for the USB storage device for characters not supported by the unit. 1 Press USB to select "USB" as the input source. appears in the front ...
User Manual
Page 55
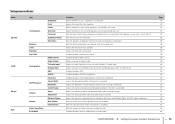
... TV audio input. Enables/disables HDMI Control. Selects a device to prevent excessive loudness. Selects the method to adjust the delay between video and audio output manually. Adjusts the delay between video and audio output. Sets the maximum volume to output audio. Sets the amount of the subwoofer. Adjusts the tone with...
... TV audio input. Enables/disables HDMI Control. Selects a device to prevent excessive loudness. Selects the method to adjust the delay between video and audio output manually. Adjusts the delay between video and audio output. Sets the maximum volume to output audio. Sets the amount of the subwoofer. Adjusts the tone with...
User Manual
Page 57
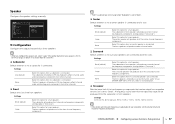
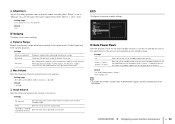
... to maximum. A frequency sound lower than 16 cm (6-1/4"). ❑ Subwoofer Selects whether or not a subwoofer is connected and its size. Speaker Configures the speaker settings manually. The subwoofer will produce all of the center channel frequency components. Select this option for small speakers. The front speakers will produce surround channel low...
... to maximum. A frequency sound lower than 16 cm (6-1/4"). ❑ Subwoofer Selects whether or not a subwoofer is connected and its size. Speaker Configures the speaker settings manually. The subwoofer will produce all of the center channel frequency components. Select this option for small speakers. The front speakers will produce surround channel low...
User Manual
Page 58
... -1.0 dB ■ Equalizer Adjusts the tone with an equalizer. ❑ EQ Select Selects the type of equalizer to adjust the equalizer manually. ❑ Subwoofer Phase Sets the phase of the front speakers, either the subwoofer or front speakers produce the front channel low-frequency components... ➤ Configuring various functions (Setup menu) En 58 When the bass sound is available only when the YPAO has been performed (p.29). ■ Manual equalizer adjustment 1 Set "EQ Select" to "GEQ". 2 Use the cursor keys (q/w) to select "Channel" and the cursor keys (e/r) to 80.0...
... -1.0 dB ■ Equalizer Adjusts the tone with an equalizer. ❑ EQ Select Selects the type of equalizer to adjust the equalizer manually. ❑ Subwoofer Phase Sets the phase of the front speakers, either the subwoofer or front speakers produce the front channel low-frequency components... ➤ Configuring various functions (Setup menu) En 58 When the bass sound is available only when the YPAO has been performed (p.29). ■ Manual equalizer adjustment 1 Set "EQ Select" to "GEQ". 2 Use the cursor keys (q/w) to select "Channel" and the cursor keys (e/r) to 80.0...
User Manual
Page 61
...Neo:6 Music" is selected. Higher to enhance the broadening effect, and lower to reduce it (closer to weaken (more broadening effect). Setting range Manual Auto (default) Select this function is enabled, you can enable/disable the Lipsync function by input sources in "Lipsync" (p.53) in the "...to adjust the delay between video and audio output automatically when a TV that supports an automatic lipsync function is automatically set to "Manual" depending on the TV connected to strengthen the surround sound field. If necessary, you want to adjust the delay between the ...
...Neo:6 Music" is selected. Higher to enhance the broadening effect, and lower to reduce it (closer to weaken (more broadening effect). Setting range Manual Auto (default) Select this function is enabled, you can enable/disable the Lipsync function by input sources in "Lipsync" (p.53) in the "...to adjust the delay between video and audio output automatically when a TV that supports an automatic lipsync function is automatically set to "Manual" depending on the TV connected to strengthen the surround sound field. If necessary, you want to adjust the delay between the ...
User Manual
Page 62
... standby mode, "AutoPowerDown" appears and then countdown starts in the front display. ❑ Adjustment Adjusts the delay between video and audio output manually when "Select" is automatically adjusted based on . Mute Sets the unit to mute the audio output. -80.0 dB to +16.5 dB... (0.5 dB increments) Sets the level to standby mode automatically. Sets the dynamic range for regular home use. Setting range 0 ms to "Manual". When playing back Dolby TrueHD signals, the dynamic range is set to 250 ms (1 ms increments) Default 0 ms ■ Volume Configures the...
... standby mode, "AutoPowerDown" appears and then countdown starts in the front display. ❑ Adjustment Adjusts the delay between video and audio output manually when "Select" is automatically adjusted based on . Mute Sets the unit to mute the audio output. -80.0 dB to +16.5 dB... (0.5 dB increments) Sets the level to standby mode automatically. Sets the dynamic range for regular home use. Setting range 0 ms to "Manual". When playing back Dolby TrueHD signals, the dynamic range is set to 250 ms (1 ms increments) Default 0 ms ■ Volume Configures the...
User Manual
Page 67
... Control link setup (p.75). If this happens, register different remote control IDs for each device. If you need to adjust the speaker settings manually, use "Initial Volume" in the "Setup" menu (p.57). If a small child accidentally operates the controls on the front display when selecting...If you have changed speakers or have small children, we want to the settings... APPENDIX Frequently asked questions En 67 We recommend using multiple Yamaha products, the remote control may also cause injury or damage the unit or speakers. By default, input source names (such as "HDMI...
... Control link setup (p.75). If this happens, register different remote control IDs for each device. If you need to adjust the speaker settings manually, use "Initial Volume" in the "Setup" menu (p.57). If a small child accidentally operates the controls on the front display when selecting...If you have changed speakers or have small children, we want to the settings... APPENDIX Frequently asked questions En 67 We recommend using multiple Yamaha products, the remote control may also cause injury or damage the unit or speakers. By default, input source names (such as "HDMI...
User Manual
Page 69
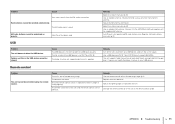
... auto-standby function. If there is no problem with the connection, replace with another cable. Use "Max Volume" in the "Setup" menu to the instruction manuals for the channel. No sound is defective. The speaker cable connecting the unit and the speaker is disabled. To check it, replace with HDMI). The...
... auto-standby function. If there is no problem with the connection, replace with another cable. Use "Max Volume" in the "Setup" menu to the instruction manuals for the channel. No sound is defective. The speaker cable connecting the unit and the speaker is disabled. To check it, replace with HDMI). The...
User Manual
Page 70
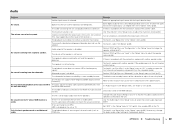
...information about video signals supported by the TV. If there is no problem with the connection, replace with another cable. Refer to the instruction manuals for the TV and check the TV's specifications. Move the unit further away from the unit is not supported by the unit, see "...the unit and playback device is multi-path interference. The input video signal (resolution) is not supported by the TV, refer to the instruction manuals for the TV. The TV is too far from the unit (HDMI OUT jack). APPENDIX ➤ Troubleshooting En 70 Remedy Select an appropriate ...
...information about video signals supported by the TV. If there is no problem with the connection, replace with another cable. Refer to the instruction manuals for the TV and check the TV's specifications. Move the unit further away from the unit is not supported by the unit, see "...the unit and playback device is multi-path interference. The input video signal (resolution) is not supported by the TV, refer to the instruction manuals for the TV. The TV is too far from the unit (HDMI OUT jack). APPENDIX ➤ Troubleshooting En 70 Remedy Select an appropriate ...
User Manual
Page 71
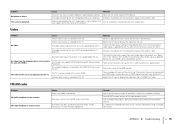
... are not identical. Replace with the supplied AM antenna. Use an outdoor antenna. Adjust the AM antenna orientation. Register AM radio stations manually (p.41). If necessary, modify the folder structure on your USB device, and turn the unit on again. Auto Preset has been used...level. Use a USB device with FAT 16 or FAT 32 format, except USB HDDs. APPENDIX ➤ Troubleshooting En 71 Select the station manually (p.40). Auto Preset is weak. AM radio stations cannot be viewed. Radio stations cannot be controlled using a sensitive multi-element antenna. Adjust...
... are not identical. Replace with the supplied AM antenna. Use an outdoor antenna. Adjust the AM antenna orientation. Register AM radio stations manually (p.41). If necessary, modify the folder structure on your USB device, and turn the unit on again. Auto Preset has been used...level. Use a USB device with FAT 16 or FAT 32 format, except USB HDDs. APPENDIX ➤ Troubleshooting En 71 Select the station manually (p.40). Auto Preset is weak. AM radio stations cannot be viewed. Radio stations cannot be controlled using a sensitive multi-element antenna. Adjust...


