User Manual
Page 2
... 8 Rear panel 9 Remote control 10 PREPARATIONS 11 General setup procedure 11 1 Placing speakers 12 2 Connecting speakers 15 Input/output jacks and cables 17 3 Connecting a TV 18 4 Connecting playback devices 23 Connecting video devices (such as BD/DVD players 23 Connecting audio devices (such as CD players 25 Connecting to the jacks on the front panel 26 5 Connecting the FM/AM antennas 26 6 Connecting recording devices 27 7 Connecting the power cable 27 8 Selecting an on-screen menu language 28 9 Optimizing the speaker settings automatically (YPAO 29 Error...
... 8 Rear panel 9 Remote control 10 PREPARATIONS 11 General setup procedure 11 1 Placing speakers 12 2 Connecting speakers 15 Input/output jacks and cables 17 3 Connecting a TV 18 4 Connecting playback devices 23 Connecting video devices (such as BD/DVD players 23 Connecting audio devices (such as CD players 25 Connecting to the jacks on the front panel 26 5 Connecting the FM/AM antennas 26 6 Connecting recording devices 27 7 Connecting the power cable 27 8 Selecting an on-screen menu language 28 9 Optimizing the speaker settings automatically (YPAO 29 Error...
User Manual
Page 5
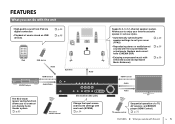
... Audio BD/DVD player HDMI Control Audio/Video Speakers Audio The ECO mode (power saving function) allows you to suit your favorite acoustic spaces in various styles. • Automatically optimizing the speaker settings to create an eco-friendly home theater system . Allows you to enjoy your room (YPAO) . to 5.1-channel speaker system. p.29 • Reproducing stereo or multichannel sounds with one touch (SCENE) . p.63 The unit's remote control AV receiver (the unit) Change the input source...
... Audio BD/DVD player HDMI Control Audio/Video Speakers Audio The ECO mode (power saving function) allows you to suit your favorite acoustic spaces in various styles. • Automatically optimizing the speaker settings to create an eco-friendly home theater system . Allows you to enjoy your room (YPAO) . to 5.1-channel speaker system. p.29 • Reproducing stereo or multichannel sounds with one touch (SCENE) . p.63 The unit's remote control AV receiver (the unit) Change the input source...
User Manual
Page 6
...). You can operate the iPod or USB storage device, view information, or easily configure the settings using the on-screen menu. Use "Audio In" in the "ADVANCED SETUP" menu to update the unit's firmware (p.66). Your TV speakers may be selected as presets. ❑ Easy operation with the unit En 6 I want to change the combination of video/audio input jacks so that let you to connect video devices (such as BD/DVD players), audio devices (such...
...). You can operate the iPod or USB storage device, view information, or easily configure the settings using the on-screen menu. Use "Audio In" in the "ADVANCED SETUP" menu to update the unit's firmware (p.66). Your TV speakers may be selected as presets. ❑ Easy operation with the unit En 6 I want to change the combination of video/audio input jacks so that let you to connect video devices (such as BD/DVD players), audio devices (such...
User Manual
Page 10
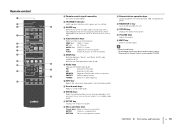
... Switches to the previous screen. A Menu operation keys Cursor keys Select a menu or a parameter. MEMORY Registers FM/AM radio stations as presets. TUNING Select the radio frequency. 7 INFO key Selects the information displayed on the unit when it is in standby mode (p.34). 0 SETUP key Displays the setup menu (p.54). Also, turns on the front display (p.33). 8 Sound mode keys Select a sound mode (p.35). 9 SCENE keys Select the registered input source and sound program with one touch. RETURN Returns to FM radio. HDMI 1-4 HDMI 1-4 jacks AV 1-5 AV 1-5 jacks AUDIO...
... Switches to the previous screen. A Menu operation keys Cursor keys Select a menu or a parameter. MEMORY Registers FM/AM radio stations as presets. TUNING Select the radio frequency. 7 INFO key Selects the information displayed on the unit when it is in standby mode (p.34). 0 SETUP key Displays the setup menu (p.54). Also, turns on the front display (p.33). 8 Sound mode keys Select a sound mode (p.35). 9 SCENE keys Select the registered input source and sound program with one touch. RETURN Returns to FM radio. HDMI 1-4 HDMI 1-4 jacks AV 1-5 AV 1-5 jacks AUDIO...
User Manual
Page 19
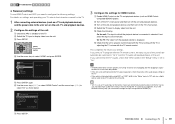
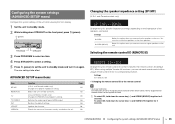
.... 1 2 3 TV connection 4 5 6 7 8 9 ❑ Necessary settings To use HDMI Control and ARC, you need to change the TV audio input assignment. Configuration HDMI Control Audio Output TV Audio Input Standby Sync ARC SCENE On AV4 Auto On Back: RETURN 3 Configure the settings for the TV. 1 After connecting external devices (such as TV audio input at the factory. g Press SETUP. b Turn off the TV's main power and then turn on the TV. PREPARATIONS ➤ Connecting a TV En 19 Setup Speaker HDMI Sound ECO Function Language...
.... 1 2 3 TV connection 4 5 6 7 8 9 ❑ Necessary settings To use HDMI Control and ARC, you need to change the TV audio input assignment. Configuration HDMI Control Audio Output TV Audio Input Standby Sync ARC SCENE On AV4 Auto On Back: RETURN 3 Configure the settings for the TV. 1 After connecting external devices (such as TV audio input at the factory. g Press SETUP. b Turn off the TV's main power and then turn on the TV. PREPARATIONS ➤ Connecting a TV En 19 Setup Speaker HDMI Sound ECO Function Language...
User Manual
Page 21
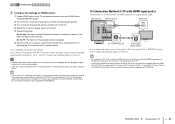
... then plugging in the "Setup" menu to change the input assignment for HDMI Control. e Check the following. If not, select the input source manually. The unit (rear) HDMI OUT jack HDMI input COMPONENT VIDEO PR ARC HDMI OUT PR ARC (BD/DVD) HDMI 1 HDMI 2 HDMI OUT PB PB Y MONITOR OUT Y COMPONENT VIDEO VIDEO HDMI O OPTICAL COAXIAL COAXIAL (CD) OPTICAL ( TV ) OPTICAL AV 1 AV 2 AV 3 AV 4 (TV) AV 4 AV 4 (OPTICAL) jack HDMI HDMI OPTICAL O TV Audio output (digital optical) If you want to use the SCENE function (p.34), you also need to the TV's power operations...
... then plugging in the "Setup" menu to change the input assignment for HDMI Control. e Check the following. If not, select the input source manually. The unit (rear) HDMI OUT jack HDMI input COMPONENT VIDEO PR ARC HDMI OUT PR ARC (BD/DVD) HDMI 1 HDMI 2 HDMI OUT PB PB Y MONITOR OUT Y COMPONENT VIDEO VIDEO HDMI O OPTICAL COAXIAL COAXIAL (CD) OPTICAL ( TV ) OPTICAL AV 1 AV 2 AV 3 AV 4 (TV) AV 4 AV 4 (OPTICAL) jack HDMI HDMI OPTICAL O TV Audio output (digital optical) If you want to use the SCENE function (p.34), you also need to the TV's power operations...
User Manual
Page 29
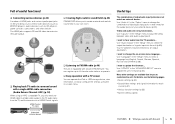
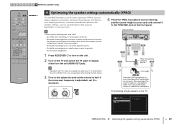
... switch the TV input to display video from them to your listening position(s), and then automatically optimizes the speaker settings, such as volume balance and acoustic parameters, to half. Do not connect headphones. 1 Press RECEIVER z to turn on the unit. 2 Turn on the TV. We recommend the use the tripod screws to others. - 1 2 3 4 5 6 7 8 9 Automatic speaker setup TRANSMIT SLEEP RECEIVER HDMI 1 2 3 4 AV 1 2 3 4 AUDIO 5 1 2 USB V-AUX MODE FM INFO TUNER AM MEMORY PRESET TUNING MOVIE MUSIC...
... switch the TV input to display video from them to your listening position(s), and then automatically optimizes the speaker settings, such as volume balance and acoustic parameters, to half. Do not connect headphones. 1 Press RECEIVER z to turn on the unit. 2 Turn on the TV. We recommend the use the tripod screws to others. - 1 2 3 4 5 6 7 8 9 Automatic speaker setup TRANSMIT SLEEP RECEIVER HDMI 1 2 3 4 AV 1 2 3 4 AUDIO 5 1 2 USB V-AUX MODE FM INFO TUNER AM MEMORY PRESET TUNING MOVIE MUSIC...
User Manual
Page 33
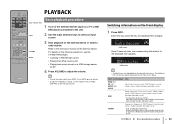
... (sound mode name), Audio Decoder (decoder name) * During simple playback of iPod: Input (input source name), DSP Program (sound mode name), Audio Decoder (decoder name) TUNER Frequency (frequency), DSP Program (sound mode name), Audio Decoder (decoder name) * (U.K. Pro Logic VOL. TRANSMIT SLEEP RECEIVER HDMI 1 2 3 4 AV 1 2 3 4 AUDIO 5 1 2 USB V-AUX MODE FM INFO TUNER AM MEMORY PRESET TUNING MOVIE MUSIC SUR. DECODE STRAIGHT ENHANCER BD DVD SETUP SCENE TV CD RADIO OPTION ENTER RETURN VOLUME MUTE PLAYBACK Input selection keys Basic playback procedure 1 Turn...
... (sound mode name), Audio Decoder (decoder name) * During simple playback of iPod: Input (input source name), DSP Program (sound mode name), Audio Decoder (decoder name) TUNER Frequency (frequency), DSP Program (sound mode name), Audio Decoder (decoder name) * (U.K. Pro Logic VOL. TRANSMIT SLEEP RECEIVER HDMI 1 2 3 4 AV 1 2 3 4 AUDIO 5 1 2 USB V-AUX MODE FM INFO TUNER AM MEMORY PRESET TUNING MOVIE MUSIC SUR. DECODE STRAIGHT ENHANCER BD DVD SETUP SCENE TV CD RADIO OPTION ENTER RETURN VOLUME MUTE PLAYBACK Input selection keys Basic playback procedure 1 Turn...
User Manual
Page 39
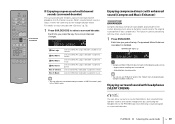
... audio sources. - Uses the Dolby Pro Logic II decoder suitable for movies. Pro Logic VOL. Uses the Dolby Pro Logic II decoder suitable for games. "ENHANCER" lights up ENHANCER Enhancer On VOL. Enjoying surround sound with headphones (SILENT CINEMA) You can be used along with stereo headphones by connecting the headphones to select a surround decoder. TRANSMIT SLEEP RECEIVER HDMI 1 2 3 4 AV 1 2 3 4 AUDIO 5 1 2 USB V-AUX MODE FM INFO TUNER AM MEMORY PRESET TUNING MOVIE MUSIC SUR. When a multichannel source is input...
... audio sources. - Uses the Dolby Pro Logic II decoder suitable for movies. Pro Logic VOL. Uses the Dolby Pro Logic II decoder suitable for games. "ENHANCER" lights up ENHANCER Enhancer On VOL. Enjoying surround sound with headphones (SILENT CINEMA) You can be used along with stereo headphones by connecting the headphones to select a surround decoder. TRANSMIT SLEEP RECEIVER HDMI 1 2 3 4 AV 1 2 3 4 AUDIO 5 1 2 USB V-AUX MODE FM INFO TUNER AM MEMORY PRESET TUNING MOVIE MUSIC SUR. When a multichannel source is input...
User Manual
Page 40
... FM radio reception by selecting the video input jack in "Video Out" (p.53) in U.K. Setting the frequency steps (Asia and General models only) At the factory, the frequency step setting is received. The explanation of the FM/AM antennas. STEREO TUNED 98.50MHz SW L CR SL SR "TUNED" lights up when a stereo signal is set the unit to radio by pressing MODE. TRANSMIT SLEEP RECEIVER HDMI 1 2 3 4 AV 1 2 3 4 AUDIO 5 1 2 USB V-AUX MODE FM INFO TUNER AM MEMORY PRESET TUNING MOVIE MUSIC SUR. z (power) Selecting a frequency for...
... FM radio reception by selecting the video input jack in "Video Out" (p.53) in U.K. Setting the frequency steps (Asia and General models only) At the factory, the frequency step setting is received. The explanation of the FM/AM antennas. STEREO TUNED 98.50MHz SW L CR SL SR "TUNED" lights up when a stereo signal is set the unit to radio by pressing MODE. TRANSMIT SLEEP RECEIVER HDMI 1 2 3 4 AV 1 2 3 4 AUDIO 5 1 2 USB V-AUX MODE FM INFO TUNER AM MEMORY PRESET TUNING MOVIE MUSIC SUR. z (power) Selecting a frequency for...
User Manual
Page 51
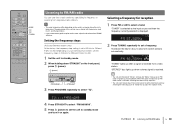
...Signal Info (Signal Info) Displays information about the video/audio signal. 53 Audio In (Audio In) Combines the video jack of the selected input source with an audio jack of sounds. 52 DSP Level (DSP Level) Adjusts the sound field effect level. 52 DSP/Surround Adaptive DRC (DSP/Surround) (A.DRC) Sets whether the dynamic range (from the menu, press OPTION. Item Function Page Tone Control (Tone Control) Adjusts the high-frequency range and low-frequency range of others. 53 Video Out (Video Out) Selects a video to be output with radio sounds. 53 Auto Preset (Auto Preset...
...Signal Info (Signal Info) Displays information about the video/audio signal. 53 Audio In (Audio In) Combines the video jack of the selected input source with an audio jack of sounds. 52 DSP Level (DSP Level) Adjusts the sound field effect level. 52 DSP/Surround Adaptive DRC (DSP/Surround) (A.DRC) Sets whether the dynamic range (from the menu, press OPTION. Item Function Page Tone Control (Tone Control) Adjusts the high-frequency range and low-frequency range of others. 53 Video Out (Video Out) Selects a video to be output with radio sounds. 53 Auto Preset (Auto Preset...
User Manual
Page 55
... auto-standby function. Sets the amount of the low-frequency component that can be used for when this receiver is connected. Sets the lower limit of time for bitstream audio (Dolby Digital and DTS signals) playback. Selects a device to prevent excessive loudness. Enables/disables ARC. Adjusts the tone with an equalizer. Sets the maximum volume to output audio. Sets the initial volume for TV audio input. Enables/disables the eco mode (power saving mode). Selects whether to use HDMI control to adjust the delay between the front and surround sound...
... auto-standby function. Sets the amount of the low-frequency component that can be used for when this receiver is connected. Sets the lower limit of time for bitstream audio (Dolby Digital and DTS signals) playback. Selects a device to prevent excessive loudness. Enables/disables ARC. Adjusts the tone with an equalizer. Sets the maximum volume to output audio. Sets the initial volume for TV audio input. Enables/disables the eco mode (power saving mode). Selects whether to use HDMI control to adjust the delay between the front and surround sound...
User Manual
Page 57
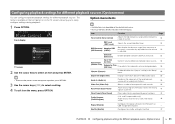
... speakers are connected and their sizes. The center speaker will produce LFE (low-frequency effect) channel audio and low-frequency components from a speaker whose size is set to "Small". The subwoofer or front speakers will produce surround channel audio. Settings Small (default) Large None Select this option for small speakers. Virtual CINEMA DSP works when you configure the speaker size, select "Large" if the woofer diameter of the center channel frequency components. Setup Speaker HDMI Sound ECO Function Language Configuration Distance Level Equalizer Test Tone...
... speakers are connected and their sizes. The center speaker will produce LFE (low-frequency effect) channel audio and low-frequency components from a speaker whose size is set to "Small". The subwoofer or front speakers will produce surround channel audio. Settings Small (default) Large None Select this option for small speakers. Virtual CINEMA DSP works when you configure the speaker size, select "Large" if the woofer diameter of the center channel frequency components. Setup Speaker HDMI Sound ECO Function Language Configuration Distance Level Equalizer Test Tone...
User Manual
Page 60
... functions (Setup menu) En 60 On Sets the unit to its built-in tuner. We recommend using ARC to input TV audio to the unit, you cannot use the input jacks selected here for connecting an external device because the input will be used for TV audio input when "HDMI Control" is turned off. The unit's input source automatically switches to TV audio when the TV input is switched to standby mode when the TV is set to the HDMI...
... functions (Setup menu) En 60 On Sets the unit to its built-in tuner. We recommend using ARC to input TV audio to the unit, you cannot use the input jacks selected here for connecting an external device because the input will be used for TV audio input when "HDMI Control" is turned off. The unit's input source automatically switches to TV audio when the TV input is switched to standby mode when the TV is set to the HDMI...
User Manual
Page 62
... initial volume when the receiver is turned on the input signal information. ❑ Max Volume Sets the maximum volume to prevent excessive loudness. Setup Speaker HDMI Sound ECO Function Language Auto Power Down ECO Mode ■ Auto Power Down Sets the amount of the unit when it for the auto-standby function. For example, when "2 hours" is automatically adjusted based on . Optimizes the dynamic range for bitstream audio (Dolby Digital and DTS signals) playback. Sets the dynamic range for the specified time. Settings...
... initial volume when the receiver is turned on the input signal information. ❑ Max Volume Sets the maximum volume to prevent excessive loudness. Setup Speaker HDMI Sound ECO Function Language Auto Power Down ECO Mode ■ Auto Power Down Sets the amount of the unit when it for the auto-standby function. For example, when "2 hours" is automatically adjusted based on . Optimizes the dynamic range for bitstream audio (Dolby Digital and DTS signals) playback. Sets the dynamic range for the specified time. Settings...
User Manual
Page 65
... Change the unit's remote control ID so that it on the front panel, press z (power). and Canada models only) Changes the speaker impedance setting. When using multiple Yamaha AV receivers, you connect 6-ohm speakers to the unit. ADVANCED SETUP menu items Item SP IMP. You can set the unit to standby mode and turn it matches the remote control's ID (default: ID1). z (power) PROGRAM STRAIGHT 3 Press PROGRAM to select an item. 4 Press STRAIGHT to select a setting. 5 Press z (power) to set each remote control with a unique remote control...
... Change the unit's remote control ID so that it on the front panel, press z (power). and Canada models only) Changes the speaker impedance setting. When using multiple Yamaha AV receivers, you connect 6-ohm speakers to the unit. ADVANCED SETUP menu items Item SP IMP. You can set the unit to standby mode and turn it matches the remote control's ID (default: ID1). z (power) PROGRAM STRAIGHT 3 Press PROGRAM to select an item. 4 Press STRAIGHT to select a setting. 5 Press z (power) to set each remote control with a unique remote control...
User Manual
Page 67
... to set the maximum volume level for the unit in the "Setup" menu (p.57). I made HDMI connections but HDMI Control does not work on each remote control (p.65). I want to the unit, enable HDMI Control on the unit. You can also select a name from the presets (such as the unit... After connecting HDMI Control-compatible devices (such as speaker settings) by a sudden loud sound when turning on the unit (such as BD/DVD players) to control...
... to set the maximum volume level for the unit in the "Setup" menu (p.57). I made HDMI connections but HDMI Control does not work on each remote control (p.65). I want to the unit, enable HDMI Control on the unit. You can also select a name from the presets (such as the unit... After connecting HDMI Control-compatible devices (such as speaker settings) by a sudden loud sound when turning on the unit (such as BD/DVD players) to control...
User Manual
Page 68
... your speakers (p.65). The unit was not used To disable the auto-standby function, set "Auto Power Down" in the power supply voltage. Set the speaker impedance to match your nearest Yamaha dealer or service center to request repair. The unit is incorrect. Troubleshooting Refer to the table below do not help, turn off the unit, disconnect the power cable, and contact the nearest authorized Yamaha dealer or service center. The power does not turn on...
... your speakers (p.65). The unit was not used To disable the auto-standby function, set "Auto Power Down" in the power supply voltage. Set the speaker impedance to match your nearest Yamaha dealer or service center to request repair. The unit is incorrect. Troubleshooting Refer to the table below do not help, turn off the unit, disconnect the power cable, and contact the nearest authorized Yamaha dealer or service center. The power does not turn on...
User Manual
Page 69
... volume of the input signal, use ARC) ARC is set . No sound is set to "On" (p.59). Perform YPAO (p.29) or set "Amp" to output audio from a specific speaker. Disable the auto-standby function of the unit. The TV does not support HDCP (High-bandwidth Digital Content Protection). In "Audio Output" in the "Setup" menu, set "Subwoofer" in the "Option" menu (p.53). Change the audio output setting on the unit or TV. Set "ARC" in order to output the front channel low-frequency components from the speakers connected...
... volume of the input signal, use ARC) ARC is set . No sound is set to "On" (p.59). Perform YPAO (p.29) or set "Amp" to output audio from a specific speaker. Disable the auto-standby function of the unit. The TV does not support HDCP (High-bandwidth Digital Content Protection). In "Audio Output" in the "Setup" menu, set "Subwoofer" in the "Option" menu (p.53). Change the audio output setting on the unit or TV. Set "ARC" in order to output the front channel low-frequency components from the speakers connected...
User Manual
Page 76
... audio bitstream signals on the unit, set "HDMI Control" (p.59) in Step 3. For details, refer to "On" and configure the related items ("TV Audio Input", "Standby Sync", "ARC", and "SCENE"). 3 Turn off the TV or adjusting the TV volume with the video signals of the following HDMI Control link setup after connecting the TV and playback devices. • This setup is required every time you add a new HDMI Control-compatible device to display...
... audio bitstream signals on the unit, set "HDMI Control" (p.59) in Step 3. For details, refer to "On" and configure the related items ("TV Audio Input", "Standby Sync", "ARC", and "SCENE"). 3 Turn off the TV or adjusting the TV volume with the video signals of the following HDMI Control link setup after connecting the TV and playback devices. • This setup is required every time you add a new HDMI Control-compatible device to display...


