

Canadian English Manual
Page 6
... instructed to the Left Upright (15) with the warning decal facing up as shown. Attach the Frame (2) to Right Upright (1) in the box above. Press a 50mm x 50mm Square Inner Cap (36) into the end of the base of the Right Upright (1). Attach the Crossbar (3) to the welded bracket ... as shown in a cleared area and remove the packing materials; Assembly will be more convenient if you assemble the weight bench, be oriented as grease or petroleum jelly plus soapy water. Press a 45mm x 45mm Square Inner Cap (50) into the lower end of each Upright (1, 15). Before assembling this ...
... instructed to the Left Upright (15) with the warning decal facing up as shown. Attach the Frame (2) to Right Upright (1) in the box above. Press a 50mm x 50mm Square Inner Cap (36) into the end of the base of the Right Upright (1). Attach the Crossbar (3) to the welded bracket ... as shown in a cleared area and remove the packing materials; Assembly will be more convenient if you assemble the weight bench, be oriented as grease or petroleum jelly plus soapy water. Press a 45mm x 45mm Square Inner Cap (50) into the lower end of each Upright (1, 15). Before assembling this ...

Canadian English Manual
Page 7
... Tube 32 4 21 6 30 29 8 4 29 26-Lubricate 7 Tap a 25.4mm Round Inner Cap (21) into each Upright (1, 15) and tap them in the Upright. Press a 50mm Square Bushing (31) onto each end of the Weight Rest. Attach the Leg Lever (4) to the Crossbar (3) with an M8 Washer (17) and an...
... Tube 32 4 21 6 30 29 8 4 29 26-Lubricate 7 Tap a 25.4mm Round Inner Cap (21) into each Upright (1, 15) and tap them in the Upright. Press a 50mm Square Bushing (31) onto each end of the Weight Rest. Attach the Leg Lever (4) to the Crossbar (3) with an M8 Washer (17) and an...

Canadian English Manual
Page 8
...the Long Pad Tube (28) into a Fly Arm Pad Tube (54). Lubricate the M10 x 130mm Bolt (9). Press a 25.4mm Round Inner Cap (21) into the middle set of the Fly Arm. Attach the Fly Arm Pad...18 17 27 Do not tighten the four Bolts yet. 17 6 5 9. Rest the Backrest (6) on the Uprights (1, 15). Press two 19mm Round Inner Caps into the holes in the same manner. 8 9 18 7 1 6 9 29 5 2 10... and an M10 Nylon Locknut (30). Slide two Foam Pads (22) onto each Short Pad Tube (10). 7. Press two 19mm Round Inner Caps (33) into each end of the Left Fly Arm (52). Slide a Foam Pad ...
...the Long Pad Tube (28) into a Fly Arm Pad Tube (54). Lubricate the M10 x 130mm Bolt (9). Press a 25.4mm Round Inner Cap (21) into the middle set of the Fly Arm. Attach the Fly Arm Pad...18 17 27 Do not tighten the four Bolts yet. 17 6 5 9. Rest the Backrest (6) on the Uprights (1, 15). Press two 19mm Round Inner Caps into the holes in the same manner. 8 9 18 7 1 6 9 29 5 2 10... and an M10 Nylon Locknut (30). Slide two Foam Pads (22) onto each Short Pad Tube (10). 7. Press two 19mm Round Inner Caps (33) into each end of the Left Fly Arm (52). Slide a Foam Pad ...

Canadian English Manual
Page 9
Press a 2" Fly Arm Bumper (53) onto the Left Upright (15) and the Right Upright (1, not shown). Attach the Curl Pad (12) to the Right Upright... 17 2 18 13. Note: The Lat Tower (see below) can be attached in the same manner. 11 52 56 57 57 15 53 12. Press a 1" Square Inner Cap (18) into the adjustment hole in the Lat Tower (23) with the adjustment hole in the Lat Tower (23) from the...Tighten the Small Threaded Knob (19) into each end of the Pulley (39) and attach the Pulley inside the slot in the Front Leg. Press a 38mm Square Inner Cap (32) into the Front Leg (8).
Press a 2" Fly Arm Bumper (53) onto the Left Upright (15) and the Right Upright (1, not shown). Attach the Curl Pad (12) to the Right Upright... 17 2 18 13. Note: The Lat Tower (see below) can be attached in the same manner. 11 52 56 57 57 15 53 12. Press a 1" Square Inner Cap (18) into the adjustment hole in the Lat Tower (23) with the adjustment hole in the Lat Tower (23) from the...Tighten the Small Threaded Knob (19) into each end of the Pulley (39) and attach the Pulley inside the slot in the Front Leg. Press a 38mm Square Inner Cap (32) into the Front Leg (8).
Canadian English Manual
Page 10
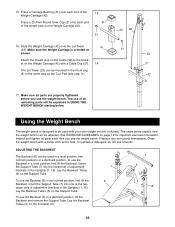
Press a 25.4mm Round Inner Cap (21) into each end of the weight tube on the Support Tube. The Lat Tower (23) can be mounted in the Front Leg (8) in a level position, first lift the Backrest. Clean the weight bench with a Cable Clip (37). ADJUSTING THE BACKREST The Backrest (6) can...42 17. To use of adjustment brackets in a declined position, lift the Backrest and remove the Support Tube. 15. Press a Carriage Bushing (41) onto each time you use the weight bench. The use the Backrest (6) in the Uprights (1, 15). See EXERCISE GUIDELINES on the Support Tube. do not use the...
Press a 25.4mm Round Inner Cap (21) into each end of the weight tube on the Support Tube. The Lat Tower (23) can be mounted in the Front Leg (8) in a level position, first lift the Backrest. Clean the weight bench with a Cable Clip (37). ADJUSTING THE BACKREST The Backrest (6) can...42 17. To use of adjustment brackets in a declined position, lift the Backrest and remove the Support Tube. 15. Press a Carriage Bushing (41) onto each time you use the weight bench. The use the Backrest (6) in the Uprights (1, 15). See EXERCISE GUIDELINES on the Support Tube. do not use the...


