
English Manual
Page 2
Remove the PART IDENTIFICATION CHART and PART LIST/EXPLODED DRAWING before beginning assembly. TABLE OF CONTENTS WARNING DECAL PLACEMENT 3 IMPORTANT PRECAUTIONS 4 BEFORE YOU BEGIN 5 ASSEMBLY 6 ADJUSTMENTS 16 CONSOLE OPERATION 21 TROUBLESHOOTING 23 EXERCISE GUIDELINES 24 ORDERING REPLACEMENT PARTS Back Cover LIMITED WARRANTY Back Cover Note: A PART IDENTIFICATION CHART and a PART LIST/EXPLODED DRAWING are attached in the center of ICON IP, Inc. 2 WEIDER is a registered trademark of this manual.
Remove the PART IDENTIFICATION CHART and PART LIST/EXPLODED DRAWING before beginning assembly. TABLE OF CONTENTS WARNING DECAL PLACEMENT 3 IMPORTANT PRECAUTIONS 4 BEFORE YOU BEGIN 5 ASSEMBLY 6 ADJUSTMENTS 16 CONSOLE OPERATION 21 TROUBLESHOOTING 23 EXERCISE GUIDELINES 24 ORDERING REPLACEMENT PARTS Back Cover LIMITED WARRANTY Back Cover Note: A PART IDENTIFICATION CHART and a PART LIST/EXPLODED DRAWING are attached in the center of ICON IP, Inc. 2 WEIDER is a registered trademark of this manual.

English Manual
Page 4
...The resistance system is enough clearance around the resistance system to support a maximum user weight of all users of the resistance system are exercising, stop immediately and begin cooling down. Pull on the lower cable only while sitting on the bench or standing on the cables while... through the use of resistance. 13. Do not use only. Keep children under 12 and pets away from the high cables when performing an exercise that the cables remain on the resistance system before using the resistance system. 1. Make sure that all precautions. 3. This is being adjusted....
...The resistance system is enough clearance around the resistance system to support a maximum user weight of all users of the resistance system are exercising, stop immediately and begin cooling down. Pull on the lower cable only while sitting on the bench or standing on the cables while... through the use of resistance. 13. Do not use only. Keep children under 12 and pets away from the high cables when performing an exercise that the cables remain on the resistance system before using the resistance system. 1. Make sure that all precautions. 3. This is being adjusted....
English Manual
Page 16
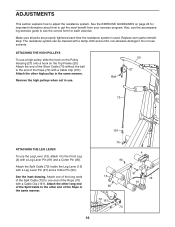
ADJUSTMENTS This section explains how to get the most benefit from your exercise program. The resistance system can be cleaned with a Leg Lever Pin (91) and a ...to the other end of the Rope in the same manner. ATTACHING THE HIGH PULLEYS To use solvents. See the EXERCISE GUIDELINES on the Top Frame (20). Attach the other long end of the Split Cable to one end of ... Pin (91) and a Cotter Pin (90). Replace worn parts immediately. Make sure all parts are properly tightened each exercise. Attach the other high pulley in the same manner. 70 90 13 90 72 161 70 16 4 91 72 91...
ADJUSTMENTS This section explains how to get the most benefit from your exercise program. The resistance system can be cleaned with a Leg Lever Pin (91) and a ...to the other end of the Rope in the same manner. ATTACHING THE HIGH PULLEYS To use solvents. See the EXERCISE GUIDELINES on the Top Frame (20). Attach the other long end of the Split Cable to one end of ... Pin (91) and a Cotter Pin (90). Replace worn parts immediately. Make sure all parts are properly tightened each exercise. Attach the other high pulley in the same manner. 70 90 13 90 72 161 70 16 4 91 72 91...

English Manual
Page 17
... the Curl Pad (26), insert the Curl Post (12) into the Front Leg (4). Remove the Curl Pad (26) from the resistance system when performing an exercise that does not require it. 26 12 45 4 ATTACHING THE CURL BAR To use the Curl Bar (43), first attach the leg lever to the...
... the Curl Pad (26), insert the Curl Post (12) into the Front Leg (4). Remove the Curl Pad (26) from the resistance system when performing an exercise that does not require it. 26 12 45 4 ATTACHING THE CURL BAR To use the Curl Bar (43), first attach the leg lever to the...

English Manual
Page 18
... Upright (3). To use the Backrest in a level position, secure the Seat Carriage (16) at one of the slot (see ADJUSTING THE BACKREST below). For row exercises, remove the Backrest Frame (17) from the Seat Carriage (16).
... Upright (3). To use the Backrest in a level position, secure the Seat Carriage (16) at one of the slot (see ADJUSTING THE BACKREST below). For row exercises, remove the Backrest Frame (17) from the Seat Carriage (16).

English Manual
Page 19
...) into an adjustment hole in the Rail. First, remove the backrest from the seat carriage (see ATTACHING THE ACCESSORIES on page 18). To perform row exercises, the hip strap must be able to the rope (see ADJUSTING THE BACKREST on page 17), and the Seat Carriage (16) must be attached to...
...) into an adjustment hole in the Rail. First, remove the backrest from the seat carriage (see ATTACHING THE ACCESSORIES on page 18). To perform row exercises, the hip strap must be able to the rope (see ADJUSTING THE BACKREST on page 17), and the Seat Carriage (16) must be attached to...
English Manual
Page 21
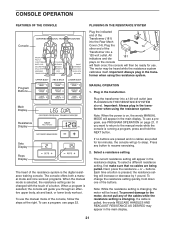
... steps at the right. Select a resistance setting. Each time a button is changing. To prevent damage to the motor, do not pull any button to resume exercising. 2. Important: Always plug in the resistance display. Sets Display Reps Display The heart of the cables while the resistance setting is pressed, the resistance setting...
... steps at the right. Select a resistance setting. Each time a button is changing. To prevent damage to the motor, do not pull any button to resume exercising. 2. Important: Always plug in the resistance display. Sets Display Reps Display The heart of the cables while the resistance setting is pressed, the resistance setting...

English Manual
Page 22
... high or too low, select a different resistance setting by pressing the + or - The recommended resistance setting and the recommended numbers of an exercise in the main display. When you complete during your workout. 4. It is on such factors as your body size and your workout, unplug... complete your physical condition. Row for example, press the LOSE WEIGHT button below the words UPPER BODY. 3. When a program is to exercise your upper body and if your workout, unplug the transformer from the 120-volt outlet. 22 After you have completed. When you have completed...
... high or too low, select a different resistance setting by pressing the + or - The recommended resistance setting and the recommended numbers of an exercise in the main display. When you complete during your workout. 4. It is on such factors as your body size and your workout, unplug... complete your physical condition. Row for example, press the LOSE WEIGHT button below the words UPPER BODY. 3. When a program is to exercise your upper body and if your workout, unplug the transformer from the 120-volt outlet. 22 After you have completed. When you have completed...

English Manual
Page 24
...that is the highest. WARMING UP Begin each set . Schedule your workouts for a maximum of resistance. Once you . On the exercise guide accompanying this manual you feeling exhausted. Proper breathing is an efficient way to get a complete and well-balanced fitness program. Your... muscles will leave you will reshape and strengthen your body, plus develop your exercise program. Exercise for 20 to 30 minutes, resting for the time of day when your exercise. Cross Training Cross training is important. It is a series of repetitions.) The proper...
...that is the highest. WARMING UP Begin each set . Schedule your workouts for a maximum of resistance. Once you . On the exercise guide accompanying this manual you feeling exhausted. Proper breathing is an efficient way to get a complete and well-balanced fitness program. Your... muscles will leave you will reshape and strengthen your body, plus develop your exercise program. Exercise for 20 to 30 minutes, resting for the time of day when your exercise. Cross Training Cross training is important. It is a series of repetitions.) The proper...
English Manual
Page 25
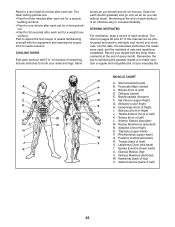
...weeks familiarizing yourself with 5 to schedule and record your weight and key body measurements at the end of each exercise. Quadriceps (front of thigh) J. Posterior Deltoid (shoulder) R. Gluteus Medius (hip) V. The ideal resting...T U V W X MUSCLE CHART A. Rectus Abdominus (stomach) N. Spinae Erectors (lower back) U. Include stretches for both your everyday life. List the date, the exercises performed, the resistance used to 10 minutes of stretching. Hip Flexors (upper thigh) G. Trapezius (upper back) P. Latissimus Dorsi (mid back) T. STAYING MOTIVATED For motivation...
...weeks familiarizing yourself with 5 to schedule and record your weight and key body measurements at the end of each exercise. Quadriceps (front of thigh) J. Posterior Deltoid (shoulder) R. Gluteus Medius (hip) V. The ideal resting...T U V W X MUSCLE CHART A. Rectus Abdominus (stomach) N. Spinae Erectors (lower back) U. Include stretches for both your everyday life. List the date, the exercises performed, the resistance used to 10 minutes of stretching. Hip Flexors (upper thigh) G. Trapezius (upper back) P. Latissimus Dorsi (mid back) T. STAYING MOTIVATED For motivation...

English Manual
Page 26
MONDAY Date: // EXERCISE WEIGHT SETS REPS TUESDAY Date: // AEROBIC EXERCISE WEDNESDAY Date: // EXERCISE WEIGHT SETS REPS THURSDAY Date: // AEROBIC EXERCISE FRIDAY Date: // EXERCISE WEIGHT SETS REPS Make photocopies of this page for scheduling and recording your workouts. 26
MONDAY Date: // EXERCISE WEIGHT SETS REPS TUESDAY Date: // AEROBIC EXERCISE WEDNESDAY Date: // EXERCISE WEIGHT SETS REPS THURSDAY Date: // AEROBIC EXERCISE FRIDAY Date: // EXERCISE WEIGHT SETS REPS Make photocopies of this page for scheduling and recording your workouts. 26

English Manual
Page 27
MONDAY Date: // EXERCISE WEIGHT SETS REPS TUESDAY Date: // AEROBIC EXERCISE WEDNESDAY Date: // EXERCISE WEIGHT SETS REPS THURSDAY Date: // AEROBIC EXERCISE FRIDAY Date: // EXERCISE WEIGHT SETS REPS Make photocopies of this page for scheduling and recording your workouts. 27
MONDAY Date: // EXERCISE WEIGHT SETS REPS TUESDAY Date: // AEROBIC EXERCISE WEDNESDAY Date: // EXERCISE WEIGHT SETS REPS THURSDAY Date: // AEROBIC EXERCISE FRIDAY Date: // EXERCISE WEIGHT SETS REPS Make photocopies of this page for scheduling and recording your workouts. 27
English Manual
Page 30
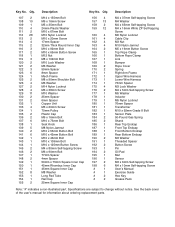
... Bottom Endcap M3 Washer Threaded Spacer Button Screw Pin Oil Pad Mat Sensor M3 x 6mm Self-tapping Screw M4 x 10mm Self-tapping Screw User's Manual Exercise Guide Hex Key Grease Pack Note: "#" indicates a non-illustrated part. Qty. Qty. Specifications are subject to change without notice. Description Key No.
... Bottom Endcap M3 Washer Threaded Spacer Button Screw Pin Oil Pad Mat Sensor M3 x 6mm Self-tapping Screw M4 x 10mm Self-tapping Screw User's Manual Exercise Guide Hex Key Grease Pack Note: "#" indicates a non-illustrated part. Qty. Qty. Specifications are subject to change without notice. Description Key No.


