
English Manual
Page 1
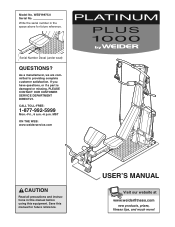
... customer satisfaction. MST ON THE WEB: www.weiderservice.com CAUTION Read all precautions and instructions in the space above for future reference. Serial Number Decal (under seat) QUESTIONS? If you have questions, or if a part is damaged or missing, PLEASE CONTACT OUR CUSTOMER SERVICE DEPARTMENT DIRECTLY. Model No. Save this equipment. CALL TOLL-FREE: 1-877-992-5999 Mon.-Fri., 6 a.m.-6 p.m. WESY9975...
... customer satisfaction. MST ON THE WEB: www.weiderservice.com CAUTION Read all precautions and instructions in the space above for future reference. Serial Number Decal (under seat) QUESTIONS? If you have questions, or if a part is damaged or missing, PLEASE CONTACT OUR CUSTOMER SERVICE DEPARTMENT DIRECTLY. Model No. Save this equipment. CALL TOLL-FREE: 1-877-992-5999 Mon.-Fri., 6 a.m.-6 p.m. WESY9975...
English Manual
Page 2
WEIDER is a registered trademark of this manual. TABLE OF CONTENTS WARNING DECAL PLACEMENT 3 IMPORTANT PRECAUTIONS 4 BEFORE YOU BEGIN 5 ASSEMBLY 6 ADJUSTMENTS 16 CONSOLE OPERATION 21 TROUBLESHOOTING 23 EXERCISE GUIDELINES 24 ORDERING REPLACEMENT PARTS Back Cover LIMITED WARRANTY Back Cover Note: A PART IDENTIFICATION CHART and a PART LIST/EXPLODED DRAWING are attached in the center of ICON IP, Inc. 2 Remove the PART IDENTIFICATION CHART and PART LIST/EXPLODED DRAWING before beginning assembly.
WEIDER is a registered trademark of this manual. TABLE OF CONTENTS WARNING DECAL PLACEMENT 3 IMPORTANT PRECAUTIONS 4 BEFORE YOU BEGIN 5 ASSEMBLY 6 ADJUSTMENTS 16 CONSOLE OPERATION 21 TROUBLESHOOTING 23 EXERCISE GUIDELINES 24 ORDERING REPLACEMENT PARTS Back Cover LIMITED WARRANTY Back Cover Note: A PART IDENTIFICATION CHART and a PART LIST/EXPLODED DRAWING are attached in the center of ICON IP, Inc. 2 Remove the PART IDENTIFICATION CHART and PART LIST/EXPLODED DRAWING before beginning assembly.

English Manual
Page 4
... the cables while the resistance level is designed to the upright base, or while standing on a level surface, with the seat in any other type of resistance. 13. Do not pull on the top frame. 11. Replace any exercise program, consult your physician. Pull on the lower cable only while sitting on the bench or standing on the pulleys at all parts regularly...
... the cables while the resistance level is designed to the upright base, or while standing on a level surface, with the seat in any other type of resistance. 13. Do not pull on the top frame. 11. Replace any exercise program, consult your physician. Pull on the lower cable only while sitting on the bench or standing on the pulleys at all parts regularly...
English Manual
Page 5
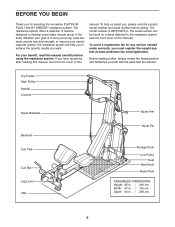
... product model number and serial number before using the resistance system. To help you to tone your body, build dramatic muscle size and strength, or improve your benefit, read this manual carefully before calling. The model number is to achieve the specific results you want. Top Frame High Pulley Handle Console Squat Backrest Backrest Curl Pad Curl Bar Leg Lever Mat Squat Arm Squat Pin Storage Knob Low Pulley Seat Seat Knob Base Plate ASSEMBLED DIMENSIONS...
... product model number and serial number before using the resistance system. To help you to tone your body, build dramatic muscle size and strength, or improve your benefit, read this manual carefully before calling. The model number is to achieve the specific results you want. Top Frame High Pulley Handle Console Squat Backrest Backrest Curl Pad Curl Bar Leg Lever Mat Squat Arm Squat Pin Storage Knob Low Pulley Seat Seat Knob Base Plate ASSEMBLED DIMENSIONS...
English Manual
Page 6
... as grease or petroleum jelly, tape, and soapy water. Before beginning assembly, make sure all parts in the box above. The included hex keys and the following information and instructions: • Assembly requires two persons. • Place all parts are required for assembly: • Two adjustable wrenches • One rubber mallet • One standard screwdriver • One Phillips screwdriver • Lubricant...
... as grease or petroleum jelly, tape, and soapy water. Before beginning assembly, make sure all parts in the box above. The included hex keys and the following information and instructions: • Assembly requires two persons. • Place all parts are required for assembly: • Two adjustable wrenches • One rubber mallet • One standard screwdriver • One Phillips screwdriver • Lubricant...
English Manual
Page 8
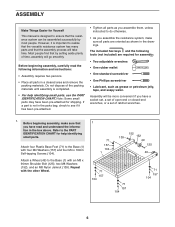
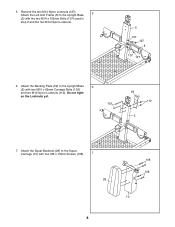
Do not tight- Attach the Squat Backrest (28) to the Squat Carriage (10) with two M10 x 65mm Carriage Bolts (103) and two M10 Nylon Locknuts (112). en the Locknuts yet. 103 59 112 2 7. Attach the Backing Plate (59) to the Upright Base (2) with the two M14 x 155mm Bolts (107) used in step 2 and the two M14 Nylon Locknuts. 2 107 127 8 107 127 6. Remove the two M14 Nylon Locknuts (127). 5 Attach the Left Arm Frame (8) to the Upright Base 6 (2) with four M6 x 16mm Screws (108). 7 28 8 108 108 10 5.
Do not tight- Attach the Squat Backrest (28) to the Squat Carriage (10) with two M10 x 65mm Carriage Bolts (103) and two M10 Nylon Locknuts (112). en the Locknuts yet. 103 59 112 2 7. Attach the Backing Plate (59) to the Upright Base (2) with the two M14 x 155mm Bolts (107) used in step 2 and the two M14 Nylon Locknuts. 2 107 127 8 107 127 6. Remove the two M14 Nylon Locknuts (127). 5 Attach the Left Arm Frame (8) to the Upright Base 6 (2) with four M6 x 16mm Screws (108). 7 28 8 108 108 10 5.

English Manual
Page 9
... Upper Wire Harnesses (172). Connect the Upper Wire Harness (172) to the Lower Wire Harness (173) extending from the Mech Frame (not shown). 8. Insert the Squat Pin (35) into place, turn it over and then insert it. Press the Front Cover (31) onto the Upright Base 9 (2). Do not tighten the Screws yet. Press the excess wire into the Upright Base. Slide the Upright (3) onto the Upright Base (2). Route...
... Upper Wire Harnesses (172). Connect the Upper Wire Harness (172) to the Lower Wire Harness (173) extending from the Mech Frame (not shown). 8. Insert the Squat Pin (35) into place, turn it over and then insert it. Press the Front Cover (31) onto the Upright Base 9 (2). Do not tighten the Screws yet. Press the excess wire into the Upright Base. Slide the Upright (3) onto the Upright Base (2). Route...
English Manual
Page 10
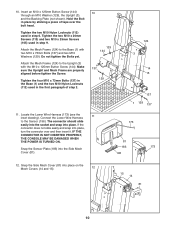
...) into the Side Mech Cover (81). 173 81 183 173 196 12. Tighten the two M10 Nylon Locknuts (112) used in step 9. Attach the Mech Frame (124) to the Upright (3) with two M10 x 73mm Bolts (137) and two M10 Washers (129). Make sure the Upright and Mech Frame are properly aligned before tighten the Screw. Locate the Lower Wire Harness (173) (see the...
...) into the Side Mech Cover (81). 173 81 183 173 196 12. Tighten the two M10 Nylon Locknuts (112) used in step 9. Attach the Mech Frame (124) to the Upright (3) with two M10 x 73mm Bolts (137) and two M10 Washers (129). Make sure the Upright and Mech Frame are properly aligned before tighten the Screw. Locate the Lower Wire Harness (173) (see the...
English Manual
Page 11
... into place, turn it over the Top Frame. 20 Mark 3 46 117 129 15. 13. IF THE CONNEC- Press the Plastic Cap (46) into the Upright (3). 21 Attach the Console (21) to the Upper Wire 16 Harness (172). Wet a Squat Arm (18) and the inside of a Small 13 Foam Pad (36) with two M10 x 65mm Button Screws (117) and...
... into place, turn it over the Top Frame. 20 Mark 3 46 117 129 15. 13. IF THE CONNEC- Press the Plastic Cap (46) into the Upright (3). 21 Attach the Console (21) to the Upper Wire 16 Harness (172). Wet a Squat Arm (18) and the inside of a Small 13 Foam Pad (36) with two M10 x 65mm Button Screws (117) and...
English Manual
Page 16
... exercise program. Also, see the accompanying exercise guide to see the correct form for important information about how to the other high pulley in the same manner. 70 90 13 90 72 161 70 16 4 91 72 91 Do not use the Leg Lever (13), attach it to adjust the resistance system. Attach the Split Cable (72) inside the Leg Lever (13) with a Cable Clip (161). Attach...
... exercise program. Also, see the accompanying exercise guide to see the correct form for important information about how to the other high pulley in the same manner. 70 90 13 90 72 161 70 16 4 91 72 91 Do not use the Leg Lever (13), attach it to adjust the resistance system. Attach the Split Cable (72) inside the Leg Lever (13) with a Cable Clip (161). Attach...

English Manual
Page 18
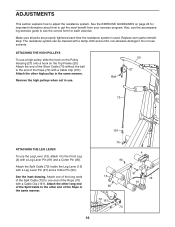
... squat arm to the forward position (see ADJUSTING THE BACKREST below). Rest the Backrest against the Upright Base (2) or the Upright (3). Then, insert 161 a Squat Pin (35) into the correct hole in a level position or an inclined position. ADJUSTING THE BACKREST The Backrest (24) can descend. For row exercises, remove the Backrest Frame (17) from the Seat Carriage (16). Finally, attach...
... squat arm to the forward position (see ADJUSTING THE BACKREST below). Rest the Backrest against the Upright Base (2) or the Upright (3). Then, insert 161 a Squat Pin (35) into the correct hole in a level position or an inclined position. ADJUSTING THE BACKREST The Backrest (24) can descend. For row exercises, remove the Backrest Frame (17) from the Seat Carriage (16). Finally, attach...

English Manual
Page 19
... will go , and turn the Seat Knob so that the pin rests at a lower resistance level again by removing the MAX PACK. 138 "L"-Slot 16 Pin 138 193 81 124 187 186 54 191 19 ADJUSTING THE SEAT The Seat (25) can be used at the end of the "L"shaped slot (see the inset drawing). 25 16 5 Adjustment Hole ATTACHING THE POWER PAK Set the Threaded Spacer...
... will go , and turn the Seat Knob so that the pin rests at a lower resistance level again by removing the MAX PACK. 138 "L"-Slot 16 Pin 138 193 81 124 187 186 54 191 19 ADJUSTING THE SEAT The Seat (25) can be used at the end of the "L"shaped slot (see the inset drawing). 25 16 5 Adjustment Hole ATTACHING THE POWER PAK Set the Threaded Spacer...
English Manual
Page 21
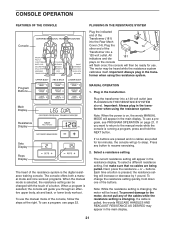
... resistance display. The console offers both a manual mode and nine workout programs. When the manual mode is selected, the resistance setting can be ready for ten minutes, the console will flash once; If no buttons are pressed and no cables are pulled for use a program, see PLUGGING IN THE RESISTANCE SYSTEM above). The current resistance setting will guide you want to return to sleep. Note: While the resistance setting is changing, the motor will then be changed...
... resistance display. The console offers both a manual mode and nine workout programs. When the manual mode is selected, the resistance setting can be ready for ten minutes, the console will flash once; If no buttons are pressed and no cables are pulled for use a program, see PLUGGING IN THE RESISTANCE SYSTEM above). The current resistance setting will guide you want to return to sleep. Note: While the resistance setting is changing, the motor will then be changed...

English Manual
Page 22
... in the transformer when using the resistance system. Press any part of the program, press the NEXT button to advance to resume exercising. 2. Note: The console offers three upper body programs, three ab and back programs, and three lower body programs. If you have completed. To warm up . Repeat steps 4 and 5 above for ten minutes, the console will count the total number of the program. buttons. Plug the transformer into a 120...
... in the transformer when using the resistance system. Press any part of the program, press the NEXT button to advance to resume exercising. 2. Note: The console offers three upper body programs, three ab and back programs, and three lower body programs. If you have completed. To warm up . Repeat steps 4 and 5 above for ten minutes, the console will count the total number of the program. buttons. Plug the transformer into a 120...
English Manual
Page 23
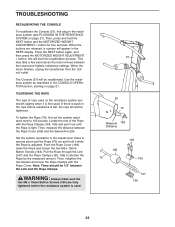
... and hold the NEXT button and the MOTORIZED WEIGHT ADJUSTMENT + button for five seconds. WARNING: Always make sure the two M5 x 16mm Button Screws (164) are released, a number will start the recalibration process. Use the resistance system as the motor moves between the Rope Cover (169) and the Swivel Arm (29). If there is slack in the REPS display. Set the system resistance to shorten the Rope by...
... and hold the NEXT button and the MOTORIZED WEIGHT ADJUSTMENT + button for five seconds. WARNING: Always make sure the two M5 x 16mm Button Screws (164) are released, a number will start the recalibration process. Use the resistance system as the motor moves between the Rope Cover (169) and the Swivel Arm (29). If there is slack in the REPS display. Set the system resistance to shorten the Rope by...

English Manual
Page 24
... of resistance used • by at your own pace and be followed by changing the number of repetitions or sets per- You should be performed smoothly and without difficulty, increase the amount of their maximum capacity. Each workout should last about half as long as the return stage. A "set . Complete as running on a treadmill or riding on an elliptical or exercise bike...
... of resistance used • by at your own pace and be followed by changing the number of repetitions or sets per- You should be performed smoothly and without difficulty, increase the amount of their maximum capacity. Each workout should last about half as long as the return stage. A "set . Complete as running on a treadmill or riding on an elliptical or exercise bike...
English Manual
Page 25
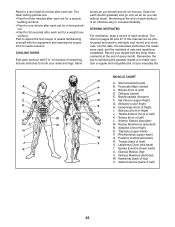
... exercise a regular and enjoyable part of thigh) I J K L M N O P Q R S T U V W X MUSCLE CHART A. The chart on pages 26 and 27 of calf) K. List the date, the exercises performed, the resistance used to increase flexibility. Remember, the key to achieving the greatest results is an effective way to schedule and record your everyday life. A B C D E F G H I . Pectoralis Major (chest) C. Biceps (front of leg) X. Tibialis Anterior (front of this manual...
... exercise a regular and enjoyable part of thigh) I J K L M N O P Q R S T U V W X MUSCLE CHART A. The chart on pages 26 and 27 of calf) K. List the date, the exercises performed, the resistance used to increase flexibility. Remember, the key to achieving the greatest results is an effective way to schedule and record your everyday life. A B C D E F G H I . Pectoralis Major (chest) C. Biceps (front of leg) X. Tibialis Anterior (front of this manual...
English Manual
Page 29
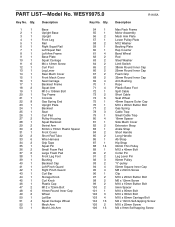
... Base Plate Squat Carriage M4 x 12mm Screw Curl Post Leg Lever Rear Mech Cover Front Mech Cover Seat Carriage Backrest Frame Squat Arm M10 x 106mm Bolt Top Frame Console Gas Spring End Upright Plate Backrest Seat Curl Pad Pulley Housing Squat Backrest Swivel Arm 50mm x 75mm Plastic Spacer Front Cover Short Pad Tube Wire Harness Grip Tape Squat Pin Small Foam Pad Large Foam Pad Front...
... Base Plate Squat Carriage M4 x 12mm Screw Curl Post Leg Lever Rear Mech Cover Front Mech Cover Seat Carriage Backrest Frame Squat Arm M10 x 106mm Bolt Top Frame Console Gas Spring End Upright Plate Backrest Seat Curl Pad Pulley Housing Squat Backrest Swivel Arm 50mm x 75mm Plastic Spacer Front Cover Short Pad Tube Wire Harness Grip Tape Squat Pin Small Foam Pad Large Foam Pad Front...
English Manual
Page 30
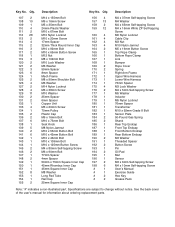
... 8 Bolt Sensor Plate 50-Pound Gas Spring Shank Rear Top Endcap Front Top Endcap Front Bottom Endcap Rear Bottom Endcap M3 Washer Threaded Spacer Button Screw Pin Oil Pad Mat Sensor M3 x 6mm Self-tapping Screw M4 x 10mm Self-tapping Screw User's Manual Exercise Guide Hex Key Grease Pack Note: "#" indicates a non-illustrated part. Key No. Specifications are subject to change without notice. See the back cover of the user's manual for information about...
... 8 Bolt Sensor Plate 50-Pound Gas Spring Shank Rear Top Endcap Front Top Endcap Front Bottom Endcap Rear Bottom Endcap M3 Washer Threaded Spacer Button Screw Pin Oil Pad Mat Sensor M3 x 6mm Self-tapping Screw M4 x 10mm Self-tapping Screw User's Manual Exercise Guide Hex Key Grease Pack Note: "#" indicates a non-illustrated part. Key No. Specifications are subject to change without notice. See the back cover of the user's manual for information about...
English Manual
Page 34
... product (PLATINUM PLUS 1000 BY WEIDER resistance system) • the SERIAL NUMBER of the product (see the front cover of this manual. products used as store display models. You may not apply to state. Some states do not allow the exclusion or limitation of incidental or consequential damages. To help us assist you specific legal rights. For in-home service, the customer will be free from state...
... product (PLATINUM PLUS 1000 BY WEIDER resistance system) • the SERIAL NUMBER of the product (see the front cover of this manual. products used as store display models. You may not apply to state. Some states do not allow the exclusion or limitation of incidental or consequential damages. To help us assist you specific legal rights. For in-home service, the customer will be free from state...


