
Weider Platinum Xp600 Support Question
Weider Platinum Xp600 Support Question
Find answers below for this question about Weider Platinum Xp600.Need a Weider Platinum Xp600 manual? We have 2 online manuals for this item!
Question posted by ashleyloveshorses on April 24th, 2013
Need Help With My Weider Platinum Xp600 Weight Adjustment
On my Weider platinum xp600 the weight on the screen always sas 10 pounds and I can increase the weight but not decrease it. So no matter how many pounds it's on the screen says it's at 10 pounds.
Current Answers
Related Weider Platinum Xp600 Manual Pages
Canadian English Manual - Page 2
... PRECAUTIONS 4 BEFORE YOU BEGIN 5 ASSEMBLY 6 UPPER CABLE ADJUSTMENT 14 ADJUSTMENTS 15 CABLE DIAGRAM 18 TROUBLESHOOTING 19 EXERCISE GUIDELINES 20 ORDERING REPLACEMENT PARTS Back Cover LIMITED WARRANTY Back Cover Note: A PART IDENTIFICATION CHART and a PART LIST/EXPLODED DRAWING are attached in the center of ICON IP, Inc.
2 WEIDER is a registered trademark of this manual. Remove...
Canadian English Manual - Page 4
...positions closest to support a maximum user weight of resistance.
13. Always wear athletic shoes for pull-up exercises. Pull
on the high cables only ...as described in any other type of 135 kg (300 lb).
10. Do not pull on a level surface. Read all instructions in...not hang on the base plate. The resistance system is being adjusted.
17. Do not use the resistance system in this manual ...
Canadian English Manual - Page 5
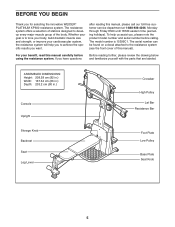
...Plate Low Pulley Base Plate Seat Knob
5 Whether your goal is 15399C1. If you for selecting the innovative WEIDER® PLATINUM XP600 resistance system.
To help you to the resistance system (see the front cover of this manual, please call our toll-free customer... with the parts that are labeled. For your cardiovascular system, the resistance system will help us assist you want.
Canadian English Manual - Page 6
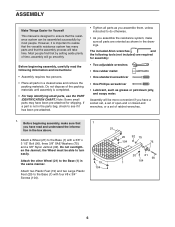
... parts may have been pre-attached for Yourself
This manual is completed.
• For help identifying small parts, use the PART IDENTIFICATION CHART.
Assembly will go smoothly. the Wheel ...requires two persons.
• Place all parts are required
for assembly:
• Two adjustable wrenches • One rubber mallet • One standard screwdriver
• One Phillips screwdriver...
Canadian English Manual - Page 9
Do not
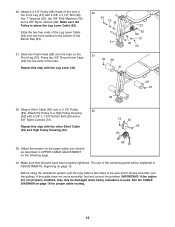
overtighten the Jamnut; Tighten the Storage Knob (26) into an adjustment hole in the Bench Rail. Attach
the Leg Lever to the Front Leg (31) with two M8 Flange Nuts (47) and the M8 x 114mm Axle (...
Canadian English Manual - Page 10
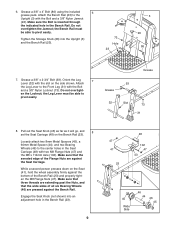
...all of the excess wire into the
Console (53). Do not tighten the Locknut yet.
74 100
82
13
53 3
82
10
96
107
76
75 50
100 74
51
49
Side View
5 51
11
49
107 76
51 5
72
80 3
17 18...
10 Attach the Lat Tower (5) to the Upright
5
with an M12 x 62mm Button Bolt (80) and an M12 Nylon Locknut ...
Canadian English Manual - Page 11
...
18
56 55 5
56
83 55 57
Metal Cover 75 83
61 B 58
55 61
73
9 93
75 10
10
72
81
17 B
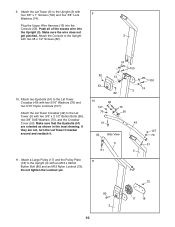
11 Attach another
3/8" x 6" Bolt (83).
Tighten the M12 Nylon Locknuts (72) used ..., the
two Bar Guides, a 3/8" SAE Washer (75), and the
two Tethers (61) to a Pulley Bracket (10) with another Large Pulley (17) between the Upright (3)
and the Pulley Plate (18). Press the metal cover on ...
Canadian English Manual - Page 12
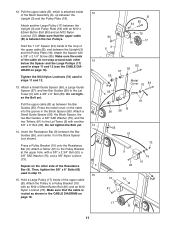
... Rod
Slot 48
62 31
12 Hold the Backrest Frame vertically over the Seat Carriage and slide the rod into the two Pulley Brackets (10) a couple of the Backrest Frame (36) with an M12 x 58mm Button Bolt (81) and an M12 Nylon Locknut (72). ... Leg (31), and attach it inside of turns. 16. Attach the two Guard Plates (63) to a Pulley Bracket (10) with four #8 x 1/2" Screws (82).
16
B 81 17
36...
Canadian English Manual - Page 13
...). IMPORTANT: If the cables are not properly installed, they may be explained in UPPER CABLE ADJUSTMENT on page 15. Wrap a Short Cable (60) over the pulleys. Adjust the tension on the upper cable (not shown) as described in ADJUSTMENTS, beginning on the following page.
24. Make sure that it moves smoothly over a 3 1/2" Pulley...
Canadian English Manual - Page 14
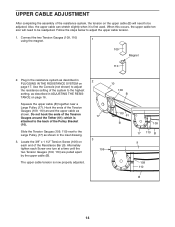
... assembly of the resistance system, the tension on the upper cable (B) will need to the highest setting, as shown in the resistance system as shown. Also, the upper cable can stretch slightly when it is now properly adjusted.
2
17 3
106
10 109 B
110 61
B
109 17 110 B 9
109 110
B
14
Slide the Tension...
Canadian English Manual - Page 15
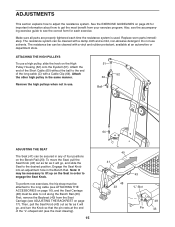
... must be cleaned with a vinyl and rubber protectant, available at the end of the "L"-shaped slot (see ADJUSTING THE BACKREST on the Seat in the same manner. First, remove the Backrest (40) from your exercise program.
Attach the other high pulley in order to lift up on page 17). ATTACHING THE HIGH...
Canadian English Manual - Page 16
... be attached to the resistance system (see
ATTACHING THE HIGH PULLEYS on the Console (53). The display will increase rapidly.
16
53 + / -
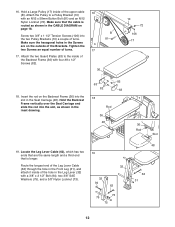
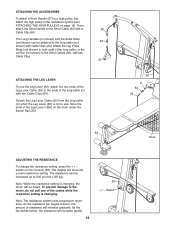
Detach the Leg Lever Cable (62) from the long cable (C) when ...pounds (109 kg). Store the ends of resistance will be increased up to bend, the amount of the Leg Lever Cable on the hook under the Bench Rail (23).
60
C 64 62
32 Hook
ADJUSTING...
Canadian English Manual - Page 17

...) to one of the other end of three inclined positions. For row exercises, remove the Backrest (40). Plug the other three adjustment holes in a level position or one of the Transformer into a 120-... To use the Backrest in a level position, secure the Seat Carriage (48) to the adjustment hole in the position closest to the new location.
STORING THE RESISTANCE SYSTEM
To store the resistance...
Canadian English Manual - Page 19
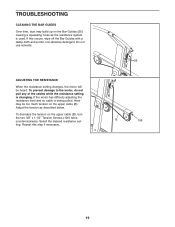
TROUBLESHOOTING
CLEANING THE BAR GUIDES Over time, dust may be heard.
If the motor has difficulty adjusting the resistance level and no cable is used. To decrease the tension on the upper cable (B). If this step if necessary.
55
B
106
19 To prevent damage to the motor, do not pull any of ...
Canadian English Manual - Page 20

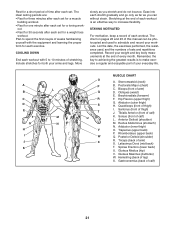
... give your body time to develop most. Exercising in each set . EXERCISE GUIDELINES
THE FOUR BASIC TYPES OF WORKOUTS
PERSONALIZING YOUR EXERCISE PROGRAM
Muscle Building To increase the size and strength of your muscles, push them to get a complete and well-balanced fitness program.
Begin with 5 to 10 minutes of rest.
If you will leave you...
Canadian English Manual - Page 21
...10 minutes of each exercise.
List the date, the exercises performed, the resistance used to schedule and record your weight and key body measurements at the end of each workout is to increase...sets and repetitions completed. Remember, the key to achieving the greatest results is an effective way to make exercise a regular and enjoyable part of calf)
21
A B
C D E
F G H I . ...
Canadian English Manual - Page 22
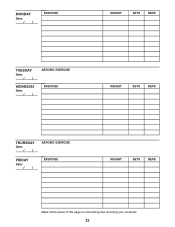
MONDAY
Date: / /
EXERCISE
WEIGHT
SETS
REPS
TUESDAY
Date: / /
WEDNESDAY
Date: / /
AEROBIC EXERCISE EXERCISE
WEIGHT
SETS
REPS
THURSDAY
Date: / /
FRIDAY
Date: / /
AEROBIC EXERCISE EXERCISE
WEIGHT
SETS
REPS
Make photocopies of this page for scheduling and recording your workouts.
22
Canadian English Manual - Page 23

MONDAY
Date: / /
EXERCISE
WEIGHT
SETS
REPS
TUESDAY
Date: / /
WEDNESDAY
Date: / /
AEROBIC EXERCISE EXERCISE
WEIGHT
SETS
REPS
THURSDAY
Date: / /
FRIDAY
Date: / /
AEROBIC EXERCISE EXERCISE
WEIGHT
SETS
REPS
Make photocopies of this page for scheduling and recording your workouts.
23
Canadian English Manual - Page 24
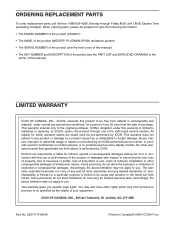
... toll-free 1-888-936-4266, Monday through one (1) year from the date of merchantability or fitness for commercial or rental purposes, or to you specific legal rights. All repairs for a period ...• The MODEL NUMBER of the product (15399C1) • The NAME of the product (WEIDER® PLATINUM XP600 resistance system) • The SERIAL NUMBER of the product (see the front cover of this ...
Canadian English Manual - Page 26
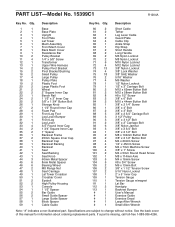
...5
1
Lat Tower
6
1
Mech Assembly
7
1
Front Mech Cover
8
1
Back Mech Cover
9
1
Resistance Bar
10
2
Pulley Bracket
11
4
1/4" x 5/8" Screw
12
1
Transformer
13
1
Upper Wire Harness
14
2
Pulley Pivot Bracket...magnet Lat Bar Handgrip Backrest Bumper User's Manual Exercise Guide Exercise Decal Large Allen Wrench Small Allen Wrench
Note: "#" indicates a non-illustrated part.
Similar Questions

I'm Looking To Order Complete Cables To The Weider Pro 9940
(Posted by Hef2324 1 year ago)

Weider Club C725
I have a weider club c725 need to order a weight carriage par
I have a weider club c725 need to order a weight carriage par
(Posted by Eduardocervantes 3 years ago)

How To Adjust The Weight Resistance
How do I vary the weight amounts for the various exercises?
How do I vary the weight amounts for the various exercises?
(Posted by plantguy 6 years ago)


Weight Resistance
the motorized weight adjustment is not moving up or down
the motorized weight adjustment is not moving up or down
(Posted by ajuniorlover88 10 years ago)