
English Manual
Page 1
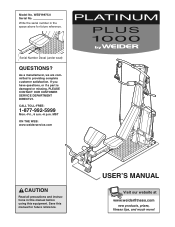
... website at www.weiderfitness.com new products, prizes, fitness tips, and much more! Serial Number Decal (under seat) QUESTIONS? If you have questions, or if a part is damaged or missing, PLEASE CONTACT OUR CUSTOMER SERVICE DEPARTMENT DIRECTLY. Model No. Write the serial number in this manual before using this manual for...
... website at www.weiderfitness.com new products, prizes, fitness tips, and much more! Serial Number Decal (under seat) QUESTIONS? If you have questions, or if a part is damaged or missing, PLEASE CONTACT OUR CUSTOMER SERVICE DEPARTMENT DIRECTLY. Model No. Write the serial number in this manual before using this manual for...
English Manual
Page 2
WEIDER is a registered trademark of this manual. TABLE OF CONTENTS WARNING DECAL PLACEMENT 3 IMPORTANT PRECAUTIONS 4 BEFORE YOU BEGIN 5 ASSEMBLY 6 ADJUSTMENTS 16 CONSOLE OPERATION 21 TROUBLESHOOTING 23 EXERCISE GUIDELINES 24 ORDERING REPLACEMENT PARTS Back Cover LIMITED WARRANTY Back Cover Note: A PART IDENTIFICATION CHART and a PART LIST/EXPLODED DRAWING are attached in the center of ICON IP, Inc. 2 Remove the PART IDENTIFICATION CHART and PART LIST/EXPLODED DRAWING before beginning assembly.
WEIDER is a registered trademark of this manual. TABLE OF CONTENTS WARNING DECAL PLACEMENT 3 IMPORTANT PRECAUTIONS 4 BEFORE YOU BEGIN 5 ASSEMBLY 6 ADJUSTMENTS 16 CONSOLE OPERATION 21 TROUBLESHOOTING 23 EXERCISE GUIDELINES 24 ORDERING REPLACEMENT PARTS Back Cover LIMITED WARRANTY Back Cover Note: A PART IDENTIFICATION CHART and a PART LIST/EXPLODED DRAWING are attached in the center of ICON IP, Inc. 2 Remove the PART IDENTIFICATION CHART and PART LIST/EXPLODED DRAWING before beginning assembly.

English Manual
Page 4
... while exercising, stop immediately and make sure the two screws in the rope clamps are on the bench, with the seat in any worn parts immediately. 6. Pull on the high cables only while sitting on the pulleys. Always wear athletic shoes for personal injury or property damage sustained...that the cables are fully tightened each time the resistance system is being adjusted. 18. Keep children under 12 and pets away from moving parts. 8. Always disconnect the lat bar from moisture and dust. Keep hands and feet away from the resistance system at all cables at least...
... while exercising, stop immediately and make sure the two screws in the rope clamps are on the bench, with the seat in any worn parts immediately. 6. Pull on the high cables only while sitting on the pulleys. Always wear athletic shoes for personal injury or property damage sustained...that the cables are fully tightened each time the resistance system is being adjusted. 18. Keep children under 12 and pets away from moving parts. 8. Always disconnect the lat bar from moisture and dust. Keep hands and feet away from the resistance system at all cables at least...
English Manual
Page 5
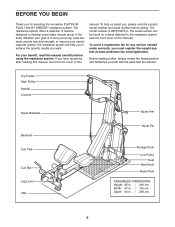
... the drawing below and familiarize yourself with the parts that are labeled. BEFORE YOU BEGIN Thank you must register the weight system at www.weiderservice.com/registration. To avoid a registration fee for any service needed under warranty, you for selecting the innovative PLATINUM PLUS 1000 BY WEIDER® resistance system. Whether your cardiovascular system, the...
... the drawing below and familiarize yourself with the parts that are labeled. BEFORE YOU BEGIN Thank you must register the weight system at www.weiderservice.com/registration. To avoid a registration fee for any service needed under warranty, you for selecting the innovative PLATINUM PLUS 1000 BY WEIDER® resistance system. Whether your cardiovascular system, the...
English Manual
Page 6
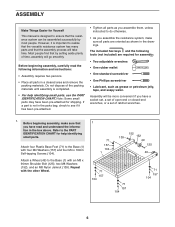
... of ratchet wrenches. 1. Repeat with four M4 Washers (157) and four M4 x 16mm Self-tapping Screws (104). Note: Some small parts may have been pre-attached for assembly: • Two adjustable wrenches • One rubber mallet • One standard screwdriver • One... Phillips screwdriver • Lubricant, such as shown in the drawings. Before beginning assembly, make sure all parts are required for shipping. Before beginning assembly, carefully read and understand the information in a cleared area and remove the packing materials. ...
... of ratchet wrenches. 1. Repeat with four M4 Washers (157) and four M4 x 16mm Self-tapping Screws (104). Note: Some small parts may have been pre-attached for assembly: • Two adjustable wrenches • One rubber mallet • One standard screwdriver • One... Phillips screwdriver • Lubricant, such as shown in the drawings. Before beginning assembly, make sure all parts are required for shipping. Before beginning assembly, carefully read and understand the information in a cleared area and remove the packing materials. ...

English Manual
Page 13
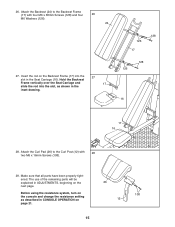
Make sure the parts are pressed against the bottom of the Rail and properly tighten the indicated M8 Nylon Jamnut (139). Attach the Leg Lever (13) to the bottom ...
Make sure the parts are pressed against the bottom of the Rail and properly tighten the indicated M8 Nylon Jamnut (139). Attach the Leg Lever (13) to the bottom ...
English Manual
Page 15
.... Before using the resistance system, turn on the console and change the resistance setting as shown in the Seat Carriage (16). Make sure that all parts have been properly tightened. Hold the Backrest Frame vertically over the Seat Carriage and 17 slide the rod into the 27 slot in the inset... drawing. 128 126 17 128 126 16 17 16 28. The use of the remaining parts will be explained in CONSOLE OPERATION on the next page. 26. Insert the rod on the Backrest Frame (17) into the slot, as described in...
.... Before using the resistance system, turn on the console and change the resistance setting as shown in the Seat Carriage (16). Make sure that all parts have been properly tightened. Hold the Backrest Frame vertically over the Seat Carriage and 17 slide the rod into the 27 slot in the inset... drawing. 128 126 17 128 126 16 17 16 28. The use of the remaining parts will be explained in CONSOLE OPERATION on the next page. 26. Insert the rod on the Backrest Frame (17) into the slot, as described in...
English Manual
Page 16
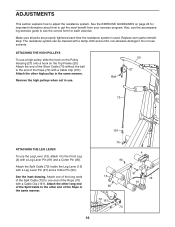
...16 4 91 72 91 Attach the Split Cable (72) inside the Leg Lever (13) with a damp cloth and a mild, non-abrasive detergent. Make sure all parts are properly tightened each exercise. Attach the end of the Short Cable (73) without the ball to the end of the Rope (70) with a Cable... the correct form for important information about how to see the accompanying exercise guide to get the most benefit from your exercise program. Replace worn parts immediately. Do not use a high pulley, slide the hook on the Pulley Housing (27) onto a hook on page 24 for each time the resistance ...
...16 4 91 72 91 Attach the Split Cable (72) inside the Leg Lever (13) with a damp cloth and a mild, non-abrasive detergent. Make sure all parts are properly tightened each exercise. Attach the end of the Short Cable (73) without the ball to the end of the Rope (70) with a Cable... the correct form for important information about how to see the accompanying exercise guide to get the most benefit from your exercise program. Replace worn parts immediately. Do not use a high pulley, slide the hook on the Pulley Housing (27) onto a hook on page 24 for each time the resistance ...

English Manual
Page 22
...and 5 above for the exercise will appear in the main display. Adjust the resistance setting and the numbers of the nine program buttons. Press any part of the program, press the NEXT button to advance to sleep. To warm up . Unplug the transformer. If desired, adjust the resistance setting and... the numbers of the next exercise will go to the next part of sets and repetitions. When a program is to exercise your upper body and if your workout, unplug the transformer from 5 minutes. As you...
...and 5 above for the exercise will appear in the main display. Adjust the resistance setting and the numbers of the nine program buttons. Press any part of the program, press the NEXT button to advance to sleep. To warm up . Unplug the transformer. If desired, adjust the resistance setting and... the numbers of the next exercise will go to the next part of sets and repetitions. When a program is to exercise your upper body and if your workout, unplug the transformer from 5 minutes. As you...

English Manual
Page 24
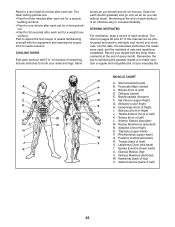
...24 Your muscles will leave you , stick with 5 to warm up . When you . Find out what is important. This requires moving only the appropriate parts of stretching and light exercise to 10 minutes of the body. Refer to the muscle chart on Monday, Wednesday, and Friday. • Plan 20 to... 20 repetitions as the number of aerobic exercise, such as you will reshape and strengthen your body, plus develop your exercise program. Rest for each set . Complete as many sets of 15 to 30 minutes of repetitions or sets completed, is one day...
...24 Your muscles will leave you , stick with 5 to warm up . When you . Find out what is important. This requires moving only the appropriate parts of stretching and light exercise to 10 minutes of the body. Refer to the muscle chart on Monday, Wednesday, and Friday. • Plan 20 to... 20 repetitions as the number of aerobic exercise, such as you will reshape and strengthen your body, plus develop your exercise program. Rest for each set . Complete as many sets of 15 to 30 minutes of repetitions or sets completed, is one day...
English Manual
Page 25
... each set for a short period of each exercise. Plan to spend the first couple of weeks familiarizing yourself with 5 to make exercise a regular and enjoyable part of your weight and key body measurements at the end of stretching. COOLING DOWN End each workout is to 10 minutes of each workout with...
... each set for a short period of each exercise. Plan to spend the first couple of weeks familiarizing yourself with 5 to make exercise a regular and enjoyable part of your weight and key body measurements at the end of stretching. COOLING DOWN End each workout is to 10 minutes of each workout with...
English Manual
Page 28
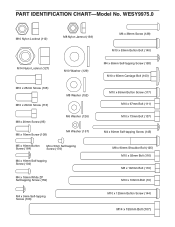
... Bolt (116) M8 x 102mm Bolt (119) M10 x 106mm Bolt (19) M4 x 9mm Self-tapping Screw (106) M10 x 125mm Button Screw (144) M14 x 155mm Bolt (107) PART IDENTIFICATION CHART-Model No.
... Bolt (116) M8 x 102mm Bolt (119) M10 x 106mm Bolt (19) M4 x 9mm Self-tapping Screw (106) M10 x 125mm Button Screw (144) M14 x 155mm Bolt (107) PART IDENTIFICATION CHART-Model No.
English Manual
Page 29
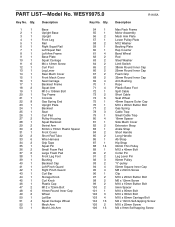
... Plastic Cap M12 x 72mm Bolt 19mm Round Inner Cap Wheel Lat Bar Squat Carriage Wheel Mech Arm Mech Link Arm Key No. WESY9975.0 Key No. PART LIST-Model No. Qty. 54 1 55 1 56 2 57 1 58 2 59 1 60 1 61 4 62 2 63 2 64 2 65 2 66 2 67 2 68 2 69 4 70 1 71 4 72 1 73 2 74...
... Plastic Cap M12 x 72mm Bolt 19mm Round Inner Cap Wheel Lat Bar Squat Carriage Wheel Mech Arm Mech Link Arm Key No. WESY9975.0 Key No. PART LIST-Model No. Qty. 54 1 55 1 56 2 57 1 58 2 59 1 60 1 61 4 62 2 63 2 64 2 65 2 66 2 67 2 68 2 69 4 70 1 71 4 72 1 73 2 74...
English Manual
Page 30
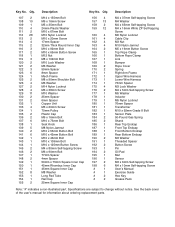
... Pad Mat Sensor M3 x 6mm Self-tapping Screw M4 x 10mm Self-tapping Screw User's Manual Exercise Guide Hex Key Grease Pack Note: "#" indicates a non-illustrated part. Specifications are subject to change without notice. See the back cover of the user's manual for information about ordering replacement...
... Pad Mat Sensor M3 x 6mm Self-tapping Screw M4 x 10mm Self-tapping Screw User's Manual Exercise Guide Hex Key Grease Pack Note: "#" indicates a non-illustrated part. Specifications are subject to change without notice. See the back cover of the user's manual for information about ordering replacement...
English Manual
Page 34
...and duration to give the following information: • the MODEL NUMBER of the product (WESY9975.0) • the NAME of the product (PLATINUM PLUS 1000 BY WEIDER resistance system) • the SERIAL NUMBER of the product (see the front cover of this product to be prepared to the terms set... manual) LIMITED WARRANTY ICON Health & Fitness, Inc. (ICON), warrants this manual) • the KEY NUMBER and DESCRIPTION of the part(s) (see the PART LIST and EXPLODED DRAWING in -home service, the customer will be pre-authorized by an ICON authorized service center; products used as store...
...and duration to give the following information: • the MODEL NUMBER of the product (WESY9975.0) • the NAME of the product (PLATINUM PLUS 1000 BY WEIDER resistance system) • the SERIAL NUMBER of the product (see the front cover of this product to be prepared to the terms set... manual) LIMITED WARRANTY ICON Health & Fitness, Inc. (ICON), warrants this manual) • the KEY NUMBER and DESCRIPTION of the part(s) (see the PART LIST and EXPLODED DRAWING in -home service, the customer will be pre-authorized by an ICON authorized service center; products used as store...


