
English Manual
Page 1
... or missing, PLEASE CONTACT OUR CUSTOMER SERVICE DEPARTMENT DIRECTLY. CALL TOLL-FREE: 1-877-992-5999 Mon.-Fri., 6 a.m.-6 p.m. Write the serial number in this manual before using this manual for future reference. Save this equipment. Serial Number Decal (under seat) QUESTIONS? MST ON THE WEB: www.weiderservice.com CAUTION Read all precautions...
... or missing, PLEASE CONTACT OUR CUSTOMER SERVICE DEPARTMENT DIRECTLY. CALL TOLL-FREE: 1-877-992-5999 Mon.-Fri., 6 a.m.-6 p.m. Write the serial number in this manual before using this manual for future reference. Save this equipment. Serial Number Decal (under seat) QUESTIONS? MST ON THE WEB: www.weiderservice.com CAUTION Read all precautions...

English Manual
Page 4
...pulleys. Keep the resistance system indoors, away from the high cables when performing an exercise that there is being adjusted. 18. Do not use of 35 or persons with the seat in this product. 4 ICON assumes no responsibility for personal injury or property damage sustained by or ...upright base, or while standing on a level surface, with the included resistance. The top frame is the responsibility of the owner to be used . 15. It is not designed to ensure that the cables remain on the cables while the resistance level is enough clearance around the resistance...
...pulleys. Keep the resistance system indoors, away from the high cables when performing an exercise that there is being adjusted. 18. Do not use of 35 or persons with the seat in this product. 4 ICON assumes no responsibility for personal injury or property damage sustained by or ...upright base, or while standing on a level surface, with the included resistance. The top frame is the responsibility of the owner to be used . 15. It is not designed to ensure that the cables remain on the cables while the resistance level is enough clearance around the resistance...
English Manual
Page 5
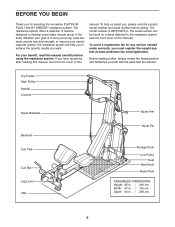
... strength, or improve your benefit, read this manual carefully before calling. To avoid a registration fee for selecting the innovative PLATINUM PLUS 1000 BY WEIDER® resistance system. BEFORE YOU BEGIN Thank you for any service needed under warranty, you must register the weight system ...your cardiovascular system, the resistance system will help us assist you, please note the product model number and serial number before using the resistance system. The resistance system offers a selection of stations designed to achieve the specific results you have questions after reading...
... strength, or improve your benefit, read this manual carefully before calling. To avoid a registration fee for selecting the innovative PLATINUM PLUS 1000 BY WEIDER® resistance system. BEFORE YOU BEGIN Thank you for any service needed under warranty, you must register the weight system ...your cardiovascular system, the resistance system will help us assist you, please note the product model number and serial number before using the resistance system. The resistance system offers a selection of stations designed to achieve the specific results you have questions after reading...
English Manual
Page 6
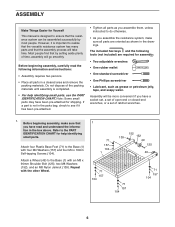
... included hex keys and the following information and instructions: • Assembly requires two persons. • Place all parts are required for help identifying small parts, use the PART IDENTIFICATION CHART.
... included hex keys and the following information and instructions: • Assembly requires two persons. • Place all parts are required for help identifying small parts, use the PART IDENTIFICATION CHART.
English Manual
Page 8
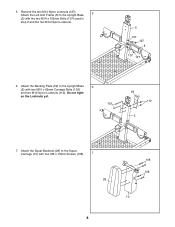
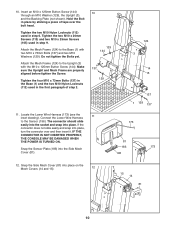
Attach the Backing Plate (59) to the Squat Carriage (10) with four M6 x 16mm Screws (108). 7 28 8 108 108 10 Do not tight- Attach the Squat Backrest (28) to the Upright Base 6 (2) with the two M14 x 155mm Bolts (107) used in step 2 and the two M14 Nylon Locknuts. 2 107 127 8 107 127 6. 5. en the Locknuts yet. 103 59 112 2 7. Remove the two M14 Nylon Locknuts (127). 5 Attach the Left Arm Frame (8) to the Upright Base (2) with two M10 x 65mm Carriage Bolts (103) and two M10 Nylon Locknuts (112).
Attach the Backing Plate (59) to the Squat Carriage (10) with four M6 x 16mm Screws (108). 7 28 8 108 108 10 Do not tight- Attach the Squat Backrest (28) to the Upright Base 6 (2) with the two M14 x 155mm Bolts (107) used in step 2 and the two M14 Nylon Locknuts. 2 107 127 8 107 127 6. 5. en the Locknuts yet. 103 59 112 2 7. Remove the two M14 Nylon Locknuts (127). 5 Attach the Left Arm Frame (8) to the Upright Base (2) with two M10 x 65mm Carriage Bolts (103) and two M10 Nylon Locknuts (112).
English Manual
Page 10
Tighten the two M10 Nylon Locknuts (112) used in step 6. Do not tighten the Bolts yet. 10. Insert an M10 x 125mm Button Screw (144)...not shown). Tighten the four M10 x 73mm Bolts (137) in the Base (1) and the two M10 Nylon Locknuts (112) used in the first paragraph of tape over and then insert it. If the connector does not slide easily and snap into place ..., turn the connector over the bolt head. Tighten the two M10 x 20mm Screws (113) and two M10 x 25mm Screws (105) used in place by sticking a piece of step 2. 10 129 144 137 129 124 3 14 15 137 1 129 137 11. Attach the...
Tighten the two M10 Nylon Locknuts (112) used in step 6. Do not tighten the Bolts yet. 10. Insert an M10 x 125mm Button Screw (144)...not shown). Tighten the four M10 x 73mm Bolts (137) in the Base (1) and the two M10 Nylon Locknuts (112) used in the first paragraph of tape over and then insert it. If the connector does not slide easily and snap into place ..., turn the connector over the bolt head. Tighten the two M10 x 20mm Screws (113) and two M10 x 25mm Screws (105) used in place by sticking a piece of step 2. 10 129 144 137 129 124 3 14 15 137 1 129 137 11. Attach the...
English Manual
Page 15
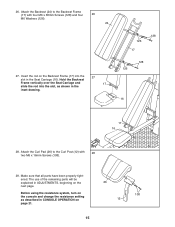
The use of the remaining parts will be explained in ADJUSTMENTS, beginning on the Backrest Frame (17) into the slot, as described in the inset drawing. 128 ...) with 28 two M6 x 16mm Screws (108). 29. Make sure that all parts have been properly tightened. Insert the rod on the next page. Before using the resistance system, turn on the console and change the resistance setting as shown in CONSOLE OPERATION on page 21. 26 108 12 15 Attach...
The use of the remaining parts will be explained in ADJUSTMENTS, beginning on the Backrest Frame (17) into the slot, as described in the inset drawing. 128 ...) with 28 two M6 x 16mm Screws (108). 29. Make sure that all parts have been properly tightened. Insert the rod on the next page. Before using the resistance system, turn on the console and change the resistance setting as shown in CONSOLE OPERATION on page 21. 26 108 12 15 Attach...
English Manual
Page 16
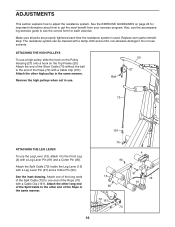
... on the Pulley Housing (27) onto a hook on page 24 for each time the resistance system is used. See the inset drawing. The resistance system can be cleaned with a Leg Lever Pin (91) and ... form for important information about how to the other high pulley in the same manner. ATTACHING THE HIGH PULLEYS To use solvents. Attach the Split Cable (72) inside the Leg Lever (13) with a damp cloth and a mild... 161 70 16 4 91 72 91 Attach one end of the Rope in use. 20 27 Ball 73 161 ATTACHING THE LEG LEVER To use the Leg Lever (13), attach it to adjust the resistance system. See the...
... on the Pulley Housing (27) onto a hook on page 24 for each time the resistance system is used. See the inset drawing. The resistance system can be cleaned with a Leg Lever Pin (91) and ... form for important information about how to the other high pulley in the same manner. ATTACHING THE HIGH PULLEYS To use solvents. Attach the Split Cable (72) inside the Leg Lever (13) with a damp cloth and a mild... 161 70 16 4 91 72 91 Attach one end of the Rope in use. 20 27 Ball 73 161 ATTACHING THE LEG LEVER To use the Leg Lever (13), attach it to adjust the resistance system. See the...

English Manual
Page 17
... the Curl Pad (26) from the resistance system when performing an exercise that does not require it. 26 12 45 4 ATTACHING THE CURL BAR To use the Curl Bar (43), first attach the leg lever to the hook 43 on the Leg Lever (13). 13 17 Attach the Hip Strap (not... with Cable Clips (161). ATTACHING THE ACCESSORIES To attach a Short Handle (84) to a high pulley, first attach the pulley housings to the Rope (not shown) using the two Extension Straps (not shown) and four Cable Clips (161).
... the Curl Pad (26) from the resistance system when performing an exercise that does not require it. 26 12 45 4 ATTACHING THE CURL BAR To use the Curl Bar (43), first attach the leg lever to the hook 43 on the Leg Lever (13). 13 17 Attach the Hip Strap (not... with Cable Clips (161). ATTACHING THE ACCESSORIES To attach a Short Handle (84) to a high pulley, first attach the pulley housings to the Rope (not shown) using the two Extension Straps (not shown) and four Cable Clips (161).

English Manual
Page 18
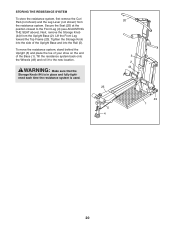
...161 a Squat Pin (35) into the correct hole in a level position or an inclined position. ADJUSTING THE BACKREST The Backrest (24) can descend. Note: To use the Backrest (24) in an inclined position, secure the Seat Carriage (16) at the adjustment hole in the Rail (5) closest to the Front Leg (not... (5). ADJUSTING THE SQUAT ARM To adjust a Squat Arm (18), pull the Arm to the desired position. 18 18 ATTACHING THE SQUAT STATION 10 To use the Backrest in a level position, secure the Seat Carriage (16) at one of the other adjustment holes in the highest position (see ATTACHING THE SQUAT...
...161 a Squat Pin (35) into the correct hole in a level position or an inclined position. ADJUSTING THE BACKREST The Backrest (24) can descend. Note: To use the Backrest (24) in an inclined position, secure the Seat Carriage (16) at the adjustment hole in the Rail (5) closest to the Front Leg (not... (5). ADJUSTING THE SQUAT ARM To adjust a Squat Arm (18), pull the Arm to the desired position. 18 18 ATTACHING THE SQUAT STATION 10 To use the Backrest in a level position, secure the Seat Carriage (16) at one of the other adjustment holes in the highest position (see ATTACHING THE SQUAT...

English Manual
Page 19
... THE SEAT The Seat (25) can be able to the rope (see ATTACHING THE ACCESSORIES on page 17), and the Seat Carriage (16) must be used at a lower resistance level again by removing the MAX PACK. 138 "L"-Slot 16 Pin 138 193 81 124 187 186 54 191 19 Attaching the...
... THE SEAT The Seat (25) can be able to the rope (see ATTACHING THE ACCESSORIES on page 17), and the Seat Carriage (16) must be used at a lower resistance level again by removing the MAX PACK. 138 "L"-Slot 16 Pin 138 193 81 124 187 186 54 191 19 Attaching the...
English Manual
Page 20
... closest to the new location. WARNING: Make sure that the Storage Knob (44) is in place and fully tightened each time the resistance system is used. 20 25 5 4 3 2 44 49 1 20
... closest to the new location. WARNING: Make sure that the Storage Knob (44) is in place and fully tightened each time the resistance system is used. 20 25 5 4 3 2 44 49 1 20
English Manual
Page 21
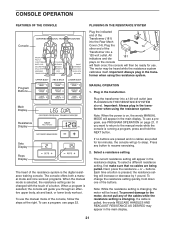
... AS DESIRED may be ready for ten minutes, the console will then be heard while the resistance system calibrates itself. To use a program, see PROGRAM OPERATION on the console will appear in the transformer. buttons. Program Buttons MANUAL OPERATION 1. Sets Display...button. Important: Always plug in the main display. Note: While the resistance setting is the digital resistance training console. former when using the resistance system. CONSOLE OPERATION FEATURES OF THE CONSOLE Console PLUGGING IN THE RESISTANCE SYSTEM Plug the indicated end of the Transformer ...
... AS DESIRED may be ready for ten minutes, the console will then be heard while the resistance system calibrates itself. To use a program, see PROGRAM OPERATION on the console will appear in the transformer. buttons. Program Buttons MANUAL OPERATION 1. Sets Display...button. Important: Always plug in the main display. Note: While the resistance setting is the digital resistance training console. former when using the resistance system. CONSOLE OPERATION FEATURES OF THE CONSOLE Console PLUGGING IN THE RESISTANCE SYSTEM Plug the indicated end of the Transformer ...

English Manual
Page 22
... may include the same exercise twice, with different resistance settings and different numbers of an exercise in the program will appear in the transformer when using the resistance system. If desired, adjust the resistance setting and the numbers of the nine program buttons. Plug the transformer into a 120-volt outlet (see...
... may include the same exercise twice, with different resistance settings and different numbers of an exercise in the program will appear in the transformer when using the resistance system. If desired, adjust the resistance setting and the numbers of the nine program buttons. Plug the transformer into a 120-volt outlet (see...
English Manual
Page 23
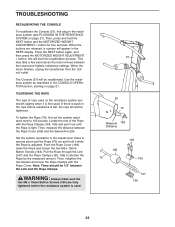
... hold the NEXT button and the MOTORIZED WEIGHT ADJUSTMENT + button for five seconds. When the buttons are fully tightened before resistance is used . Locate the end of rope used on page 21). WARNING: Always make sure the two M5 x 16mm Button Screws (164) are released, a number will start... Link (167) and the Rope Clamps (165, 166) to shorten the Rope by the measured amount. The Console (21) will be tightened. Use the resistance system as the motor moves between the Rope Cover (169) and the Swivel Arm (29). Note: There should be recalibrated. TROUBLESHOOTING RECALIBRATING...
... hold the NEXT button and the MOTORIZED WEIGHT ADJUSTMENT + button for five seconds. When the buttons are fully tightened before resistance is used . Locate the end of rope used on page 21). WARNING: Always make sure the two M5 x 16mm Button Screws (164) are released, a number will start... Link (167) and the Rope Clamps (165, 166) to shorten the Rope by the measured amount. The Console (21) will be tightened. Use the resistance system as the motor moves between the Rope Cover (169) and the Swivel Arm (29). Note: There should be recalibrated. TROUBLESHOOTING RECALIBRATING...

English Manual
Page 24
...warm up prepares your body for at your own pace and be sensitive to 20 repetitions as you will reshape and strengthen your body, plus develop your exercise. To give your workouts, vary the exercises from both strength training and aerobic exercise for more strenuous exercise by increasing ..., and Friday. • Plan 20 to find the schedule that is an individual matter. WARMING UP Begin each set should be followed by using high amounts of resistance. Each workout should last about half as long as running on a treadmill or riding on an elliptical or exercise bike,...
...warm up prepares your body for at your own pace and be sensitive to 20 repetitions as you will reshape and strengthen your body, plus develop your exercise. To give your workouts, vary the exercises from both strength training and aerobic exercise for more strenuous exercise by increasing ..., and Friday. • Plan 20 to find the schedule that is an individual matter. WARMING UP Begin each set should be followed by using high amounts of resistance. Each workout should last about half as long as running on a treadmill or riding on an elliptical or exercise bike,...
English Manual
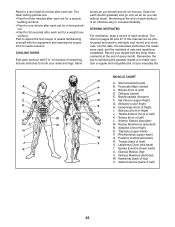
Page 25
...arm) D. Gluteus Medius (hip) V. Ease into each stretch gradually and go only as far as you can be photocopied and used , and the numbers of sets and repetitions completed. The chart on pages 26 and 27 of this manual can without strain. Remember... proper form for one minute after each workout is to 10 minutes of your arms and legs. List the date, the exercises performed, the resistance used to increase flexibility. A B C D E F G H I . Latissimus Dorsi (mid back) T. Hamstring (back of calf) 25 Brachioradials (forearm) F. Trapezius (upper back) P. Pectoralis...
...arm) D. Gluteus Medius (hip) V. Ease into each stretch gradually and go only as far as you can be photocopied and used , and the numbers of sets and repetitions completed. The chart on pages 26 and 27 of this manual can without strain. Remember... proper form for one minute after each workout is to 10 minutes of your arms and legs. List the date, the exercises performed, the resistance used to increase flexibility. A B C D E F G H I . Latissimus Dorsi (mid back) T. Hamstring (back of calf) 25 Brachioradials (forearm) F. Trapezius (upper back) P. Pectoralis...
English Manual
Page 34
...to state. This warranty does not extend to any economic loss, loss of property, loss of revenues or profits, loss of enjoyment or use, costs of removal or installation or other warranties and any implied warranties of its scope and duration to the terms set forth above is not...you , please be prepared to give the following information: • the MODEL NUMBER of the product (WESY9975.0) • the NAME of the product (PLATINUM PLUS 1000 BY WEIDER resistance system) • the SERIAL NUMBER of the product (see the front cover of this manual) • the KEY NUMBER and DESCRIPTION of the ...
...to state. This warranty does not extend to any economic loss, loss of property, loss of revenues or profits, loss of enjoyment or use, costs of removal or installation or other warranties and any implied warranties of its scope and duration to the terms set forth above is not...you , please be prepared to give the following information: • the MODEL NUMBER of the product (WESY9975.0) • the NAME of the product (PLATINUM PLUS 1000 BY WEIDER resistance system) • the SERIAL NUMBER of the product (see the front cover of this manual) • the KEY NUMBER and DESCRIPTION of the ...


