
Canadian English Manual
Page 2
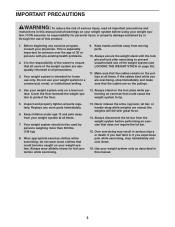
Apply the decal in the location shown. WEIDER is missing or illegible, see the front cover of this manual and request a free replacement decal. Note: The decal(s) may not be shown at actual ... OF CONTENTS WARNING DECAL PLACEMENT 2 IMPORTANT PRECAUTIONS 3 BEFORE YOU BEGIN 4 PART IDENTIFICATION CHART 5 ASSEMBLY 6 ADJUSTMENT 18 WEIGHT RESISTANCE CHART 20 CABLE DIAGRAM 21 MAINTENANCE 22 EXERCISE GUIDELINES 23 PART LIST 25 EXPLODED DRAWING 26 ORDERING REPLACEMENT PARTS Back Cover LIMITED WARRANTY Back Cover WARNING DECAL PLACEMENT This drawing shows the location...
Apply the decal in the location shown. WEIDER is missing or illegible, see the front cover of this manual and request a free replacement decal. Note: The decal(s) may not be shown at actual ... OF CONTENTS WARNING DECAL PLACEMENT 2 IMPORTANT PRECAUTIONS 3 BEFORE YOU BEGIN 4 PART IDENTIFICATION CHART 5 ASSEMBLY 6 ADJUSTMENT 18 WEIGHT RESISTANCE CHART 20 CABLE DIAGRAM 21 MAINTENANCE 22 EXERCISE GUIDELINES 23 PART LIST 25 EXPLODED DRAWING 26 ORDERING REPLACEMENT PARTS Back Cover LIMITED WARRANTY Back Cover WARNING DECAL PLACEMENT This drawing shows the location...
Canadian English Manual
Page 3
...of the weight system are adequately informed of the weight system (see LOCKING THE WEIGHT STACK on the pulleys. 4. Wear appropriate exercise clothes while exercising; Always disconnect the lat bar from the weight system before using your weight system at all precautions. 3. This is especially ...sys- Inspect and properly tighten all times. 7. Always wear athletic shoes for home use of 35 or persons with great force. 14. Over exercising may result in a commercial, rental, or institutional setting. 9. ICON assumes no responsibility for persons over the age of this manual. 3 ...
...of the weight system are adequately informed of the weight system (see LOCKING THE WEIGHT STACK on the pulleys. 4. Wear appropriate exercise clothes while exercising; Always disconnect the lat bar from the weight system before using your weight system at all precautions. 3. This is especially ...sys- Inspect and properly tighten all times. 7. Always wear athletic shoes for home use of 35 or persons with great force. 14. Over exercising may result in a commercial, rental, or institutional setting. 9. ICON assumes no responsibility for persons over the age of this manual. 3 ...
Canadian English Manual
Page 18
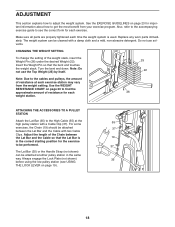
... time the weight system is 19 in the same way. Turn the bent end down. Make sure all parts are properly tightened each exercise. For some 55 exercises, the Chain (19) should be attached 37 between the Lat Bar and the Cable so that the bent end touches the weight stack... at either pulley station in the correct starting position for important information about how to see USING THE LOCK LEVER on page 23 for the exercise to the High Cable (55) at the high pulley station with a damp cloth and a mild, non-abrasive detergent. CHANGING THE WEIGHT SETTING To change ...
... time the weight system is 19 in the same way. Turn the bent end down. Make sure all parts are properly tightened each exercise. For some 55 exercises, the Chain (19) should be attached 37 between the Lat Bar and the Cable so that the bent end touches the weight stack... at either pulley station in the correct starting position for important information about how to see USING THE LOCK LEVER on page 23 for the exercise to the High Cable (55) at the high pulley station with a damp cloth and a mild, non-abrasive detergent. CHANGING THE WEIGHT SETTING To change ...
Canadian English Manual
Page 19
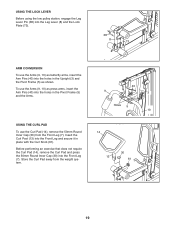
... Curl Pad (14), remove the 50mm Round Inner Cap (30) from the weight system. 40 9 3 Holes 5 10 14 30 13 61 7 19 Before performing an exercise that does not require the Curl Pad (14), remove the Curl Pad and press the 50mm Round Inner Cap (30) into the Front Leg and...
... Curl Pad (14), remove the 50mm Round Inner Cap (30) from the weight system. 40 9 3 Holes 5 10 14 30 13 61 7 19 Before performing an exercise that does not require the Curl Pad (14), remove the Curl Pad and press the 50mm Round Inner Cap (30) into the Front Leg and...
Canadian English Manual
Page 20
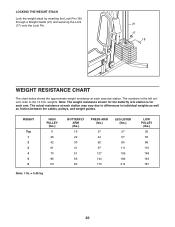
... for each arm. weights. The numbers in individual weights as well as friction between the cables, pulleys, and weight guides. The actual resistance at each exercise station. LOCKING THE WEIGHT STACK Lock the weight stack by inserting the Lock Pin (18) through a Weight Guide (21) and securing the Lock (17) onto...
... for each arm. weights. The numbers in individual weights as well as friction between the cables, pulleys, and weight guides. The actual resistance at each exercise station. LOCKING THE WEIGHT STACK Lock the weight stack by inserting the Lock Pin (18) through a Weight Guide (21) and securing the Lock (17) onto...
Canadian English Manual
Page 23
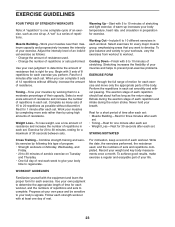
...preparation for 20 to a moderate percentage of their maximum capacity and progressively increase the intensity of each exercise. Cooling Down-Finish with 5 to prevent post-exercise problems. EXERCISE FORM Move through the full range of motion for each workout. Stretching increases the flexibility of your...of resistance. Complete as one sit-up increases your own pace and be sensitive to determine the amount of resistance that you . Exercise for exercise. Rest for a short period of time after each set: • Muscle Building-Rest for three minutes after each set. &#...
...preparation for 20 to a moderate percentage of their maximum capacity and progressively increase the intensity of each exercise. Cooling Down-Finish with 5 to prevent post-exercise problems. EXERCISE FORM Move through the full range of motion for each workout. Stretching increases the flexibility of your...of resistance. Complete as one sit-up increases your own pace and be sensitive to determine the amount of resistance that you . Exercise for exercise. Rest for a short period of time after each set: • Muscle Building-Rest for three minutes after each set. &#...
Canadian English Manual
Page 25
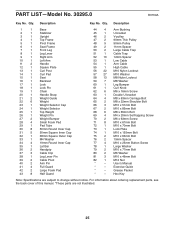
Qty. Grease Packet * - Exercise Guide * - For information about ordering replacement parts, see the back cover of this manual. *These parts are subject to change without notice. Hex Key Note: ...
Qty. Grease Packet * - Exercise Guide * - For information about ordering replacement parts, see the back cover of this manual. *These parts are subject to change without notice. Hex Key Note: ...


