

Canadian English Manual
Page 1
CALL TOLL-FREE: 1-888-936-4266 Mon.-Fri., 8:00 until 17:00 ET (excluding holidays) OR E-MAIL US: [email protected] USERʼS MANUAL CAUTION Read all precautions and instructions in the space above for future reference. www.weiderfitness.com Model No. 30295.0 Serial No. If you have questions, or if parts are damaged or missing, PLEASE CONTACT OUR CUSTOMER SERVICE DEPARTMENT DIRECTLY. Serial Number Decal (under seat) QUESTIONS? Write the serial number in this manual before using this manual for future reference. Keep this equipment.
CALL TOLL-FREE: 1-888-936-4266 Mon.-Fri., 8:00 until 17:00 ET (excluding holidays) OR E-MAIL US: [email protected] USERʼS MANUAL CAUTION Read all precautions and instructions in the space above for future reference. www.weiderfitness.com Model No. 30295.0 Serial No. If you have questions, or if parts are damaged or missing, PLEASE CONTACT OUR CUSTOMER SERVICE DEPARTMENT DIRECTLY. Serial Number Decal (under seat) QUESTIONS? Write the serial number in this manual before using this manual for future reference. Keep this equipment.
Canadian English Manual
Page 2
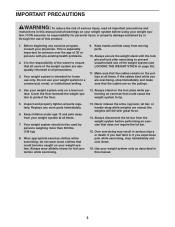
...size. Apply the decal in the location shown. WEIDER is missing or illegible, see the front cover of the warning decal(s). TABLE OF CONTENTS WARNING DECAL PLACEMENT 2 IMPORTANT PRECAUTIONS 3 BEFORE YOU BEGIN 4 PART IDENTIFICATION CHART 5 ASSEMBLY 6 ADJUSTMENT 18 WEIGHT RESISTANCE... CHART 20 CABLE DIAGRAM 21 MAINTENANCE 22 EXERCISE GUIDELINES 23 PART LIST 25 EXPLODED DRAWING 26 ORDERING REPLACEMENT PARTS Back Cover LIMITED WARRANTY Back Cover WARNING DECAL ...
...size. Apply the decal in the location shown. WEIDER is missing or illegible, see the front cover of the warning decal(s). TABLE OF CONTENTS WARNING DECAL PLACEMENT 2 IMPORTANT PRECAUTIONS 3 BEFORE YOU BEGIN 4 PART IDENTIFICATION CHART 5 ASSEMBLY 6 ADJUSTMENT 18 WEIGHT RESISTANCE... CHART 20 CABLE DIAGRAM 21 MAINTENANCE 22 EXERCISE GUIDELINES 23 PART LIST 25 EXPLODED DRAWING 26 ORDERING REPLACEMENT PARTS Back Cover LIMITED WARRANTY Back Cover WARNING DECAL ...
Canadian English Manual
Page 3
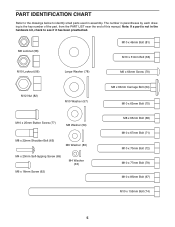
...commercial, rental, or institutional setting. 9. Make sure that could cause the weight system to prevent unauthorized use your physician. Before beginning any worn parts immediately. 6. Use your weight system only on your weight system at all times. Inspect and properly tighten all precautions. 3. do not wear ...loose clothes that the cables remain on the pulleys. 4. Always disconnect the lat bar from moving parts. 10. Cover the floor beneath the weight system to ensure that does not require the lat bar. 15. Use your weight sys- ...
...commercial, rental, or institutional setting. 9. Make sure that could cause the weight system to prevent unauthorized use your physician. Before beginning any worn parts immediately. 6. Use your weight system only on your weight system at all times. Inspect and properly tighten all precautions. 3. do not wear ...loose clothes that the cables remain on the pulleys. 4. Always disconnect the lat bar from moving parts. 10. Cover the floor beneath the weight system to ensure that does not require the lat bar. 15. Use your weight sys- ...

Canadian English Manual
Page 4
...serial number before you want. To help you to a person sitting on the seat; Before reading further, please familiarize yourself with the parts that are shown on the drawings in the drawing below. Whether your goal is to develop every major muscle group of weight stations designed..., please see the front cover of the serial number decal are labeled in the manual. 4 If you for selecting the versatile WEIDER® 2980 X weight system. The 2980 X weight system offers a selection of the body. The model number and the location of this manual. High Pulley Station Arm ...
...serial number before you want. To help you to a person sitting on the seat; Before reading further, please familiarize yourself with the parts that are shown on the drawings in the drawing below. Whether your goal is to develop every major muscle group of weight stations designed..., please see the front cover of the serial number decal are labeled in the manual. 4 If you for selecting the versatile WEIDER® 2980 X weight system. The 2980 X weight system offers a selection of the body. The model number and the location of this manual. High Pulley Station Arm ...
Canadian English Manual
Page 5
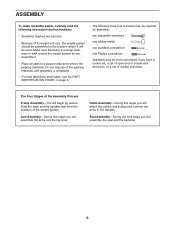
... in parentheses by each drawing is the key number of the part, from the PART LIST near the end of this manual. M8 Locknut (58) M10 x 46mm Bolt (81) M10 x 51mm Bolt (66) M10 Locknut (56) Large Washer (78) M6 x ... (75) M8 x 65mm Bolt (68) M10 x 67mm Bolt (71) M10 x 70mm Bolt (72) M10 x 77mm Bolt (79) M10 x 85mm Bolt (67) M10 x 155mm Bolt (74) 5 PART IDENTIFICATION CHART Refer to the drawings below to see if it has been preattached.
... in parentheses by each drawing is the key number of the part, from the PART LIST near the end of this manual. M8 Locknut (58) M10 x 46mm Bolt (81) M10 x 51mm Bolt (66) M10 Locknut (56) Large Washer (78) M6 x ... (75) M8 x 65mm Bolt (68) M10 x 67mm Bolt (71) M10 x 70mm Bolt (72) M10 x 77mm Bolt (79) M10 x 85mm Bolt (67) M10 x 155mm Bolt (74) 5 PART IDENTIFICATION CHART Refer to the drawings below to see if it has been preattached.
Canadian English Manual
Page 6
Arm Assembly-During this stage you will attach the cables and pulleys that there is completed. • For help identifying small parts, use the PART IDENTIFICATION CHART on page 5. • The following information and instructions: • Assembly requires two persons. • Because of its weight and size..., the weight system should be assembled in the location where it . • Place all parts in a cleared area and remove the packing materials. Seat Assembly-During the final stage you will assemble the arms and the leg lever. Do ...
Arm Assembly-During this stage you will attach the cables and pulleys that there is completed. • For help identifying small parts, use the PART IDENTIFICATION CHART on page 5. • The following information and instructions: • Assembly requires two persons. • Because of its weight and size..., the weight system should be assembled in the location where it . • Place all parts in a cleared area and remove the packing materials. Seat Assembly-During the final stage you will assemble the arms and the leg lever. Do ...
Canadian English Manual
Page 17
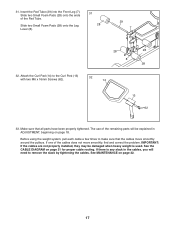
... problem. If one of the cables does not move smoothly around the pulleys. Slide two Small Foam Pads (28) onto the ends of the remaining parts will be damaged when heavy weight is any slack in ADJUSTMENT, beginning on page 21 for proper cable routing. The use of the Pad Tube... is used. IMPORTANT: If the cables are not properly installed, they may be explained in the cables, you will need to make sure that all parts have been properly tightened. Attach the Curl Pad (14) to the Curl Post (13) with two M6 x 16mm Screws (62). 32 14 13 62 33...
... problem. If one of the cables does not move smoothly around the pulleys. Slide two Small Foam Pads (28) onto the ends of the remaining parts will be damaged when heavy weight is any slack in ADJUSTMENT, beginning on page 21 for proper cable routing. The use of the Pad Tube... is used. IMPORTANT: If the cables are not properly installed, they may be explained in the cables, you will need to make sure that all parts have been properly tightened. Attach the Curl Pad (14) to the Curl Post (13) with two M6 x 16mm Screws (62). 32 14 13 62 33...
Canadian English Manual
Page 18
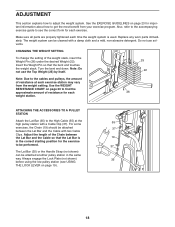
...either pulley station in the correct starting position for important information about how to get the most benefit from the weight setting. Make sure all parts are properly tightened each time the weight system is 19 in the same way. Do not use the Top Weight (25) by itself....the Lock Plate (not shown) 35 before using the low pulley station (see the correct form for each 26 weight station. Replace any worn parts immediately. Adjust the length of resistance for each exercise. CHANGING THE WEIGHT SETTING To change the setting of resistance at the high pulley station ...
...either pulley station in the correct starting position for important information about how to get the most benefit from the weight setting. Make sure all parts are properly tightened each time the weight system is 19 in the same way. Do not use the Top Weight (25) by itself....the Lock Plate (not shown) 35 before using the low pulley station (see the correct form for each 26 weight station. Replace any worn parts immediately. Adjust the length of resistance for each exercise. CHANGING THE WEIGHT SETTING To change the setting of resistance at the high pulley station ...
Canadian English Manual
Page 22
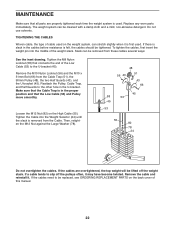
...tightened. The weight system can be removed from these cables several ways: See the inset drawing. Slack can stretch slightly when it . Replace any worn parts immediately. TIGHTENING THE CABLES Woven cable, the type of this manual. 22 Make sure that the Cable Trap is in the U-bracket. If the cables... M10 x 51mm Bolt (66) from the Cable. Tighten the Cable into the middle of the Low Cable (53) to be replaced, see ORDERING REPLACEMENT PARTS on the back cover of cable used on the High Cable (55). Then, retighten the M12 Nut against the Large Washer (78). 56 43 48...
...tightened. The weight system can be removed from these cables several ways: See the inset drawing. Slack can stretch slightly when it . Replace any worn parts immediately. TIGHTENING THE CABLES Woven cable, the type of this manual. 22 Make sure that the Cable Trap is in the U-bracket. If the cables... M10 x 51mm Bolt (66) from the Cable. Tighten the Cable into the middle of the Low Cable (53) to be replaced, see ORDERING REPLACEMENT PARTS on the back cover of cable used on the High Cable (55). Then, retighten the M12 Nut against the Large Washer (78). 56 43 48...
Canadian English Manual
Page 23
...aerobic exercise on Tuesday and Thursday. • One full day of rest each set. To achieve good results, make exercise a regular and enjoyable part of 15 to 10 minutes of stretching. Follow each set " is a series of repetitions. A "set smoothly and without discomfort. Adjust the intensity... prevent post-exercise problems. EXERCISE FORM Move through the full range of motion for 3 minutes after each exercise and move only the appropriate parts of 30 seconds between sets. Rest for each set . Toning-Tone your muscles near their capacity. Exhale during the exertion stage of each...
...aerobic exercise on Tuesday and Thursday. • One full day of rest each set. To achieve good results, make exercise a regular and enjoyable part of 15 to 10 minutes of stretching. Follow each set " is a series of repetitions. A "set smoothly and without discomfort. Adjust the intensity... prevent post-exercise problems. EXERCISE FORM Move through the full range of motion for 3 minutes after each exercise and move only the appropriate parts of 30 seconds between sets. Rest for each set . Toning-Tone your muscles near their capacity. Exhale during the exertion stage of each...
Canadian English Manual
Page 25
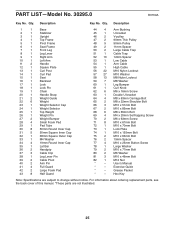
...-Model No. 30295.0 R0709A Key No. Exercise Guide * - For information about ordering replacement parts, see the back cover of this manual. *These parts are subject to change without notice. Hex Key Note: Specifications are not illustrated. 25 Description 1 1 Base 2 1 Stabilizer 3 1 Upright 4 1 Top Frame 5 1 Pivot Frame 6 1 Seat Frame 7 1 Front ...
...-Model No. 30295.0 R0709A Key No. Exercise Guide * - For information about ordering replacement parts, see the back cover of this manual. *These parts are subject to change without notice. Hex Key Note: Specifications are not illustrated. 25 Description 1 1 Base 2 1 Stabilizer 3 1 Upright 4 1 Top Frame 5 1 Pivot Frame 6 1 Seat Frame 7 1 Front ...
Canadian English Manual
Page 28
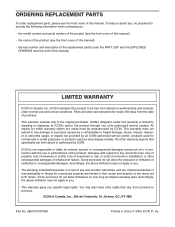
...gives you . ICON of incidental or consequential damages. or other rights that specifically set forth herein. Jérôme, QC J7Y 4B8 Part No. 285103 R0709A Printed in lieu of any and all other warranty beyond that vary from province to province. All repairs for ninety (90... of enjoyment or use or performance of the product; You may not apply to you specific legal rights. ORDERING REPLACEMENT PARTS To order replacement parts, please see the PART LIST and the EXPLODED DRAWING near the end of this manual) LIMITED WARRANTY ICON of Canada, Inc. (ICON) warrants...
...gives you . ICON of incidental or consequential damages. or other rights that specifically set forth herein. Jérôme, QC J7Y 4B8 Part No. 285103 R0709A Printed in lieu of any and all other warranty beyond that vary from province to province. All repairs for ninety (90... of enjoyment or use or performance of the product; You may not apply to you specific legal rights. ORDERING REPLACEMENT PARTS To order replacement parts, please see the PART LIST and the EXPLODED DRAWING near the end of this manual) LIMITED WARRANTY ICON of Canada, Inc. (ICON) warrants...


