
User Manual
Page 3
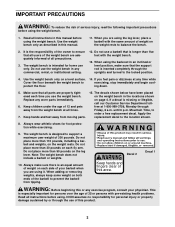
..., 6 a.m. until 6 p.m. Always wear athletic shoes for home use of this area. Do not place more than 50 pounds on the weight rests to exercising, stop immediately and begin cool- Always make sure that all times. 7. When adding or removing weights, always keep some weight on each fly arm. Use...position, make sure there is inserted completely through the use only. The decals shown below have been placed on the weight bench in any exercise program, consult your barbell when you use the weight bench in the locations shown on each time you are using it. Mountain Time, to...
..., 6 a.m. until 6 p.m. Always wear athletic shoes for home use of this area. Do not place more than 50 pounds on the weight rests to exercising, stop immediately and begin cool- Always make sure that all times. 7. When adding or removing weights, always keep some weight on each fly arm. Use...position, make sure there is inserted completely through the use only. The decals shown below have been placed on the weight bench in any exercise program, consult your barbell when you use the weight bench in the locations shown on each time you are using it. Mountain Time, to...
User Manual
Page 9
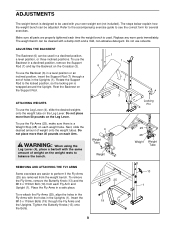
...rests to balance the bench. 1 1 6 7 3 4 Weight Tube Weight Locking Pin 25 28 Weight Weight Tube REMOVING AND ATTACHING THE FLY ARMS Some exercises are easier to perform if the Fly Arms (25) are properly tightened each Arm. Make sure all parts are removed from each weight tube. ADJUSTMENTS... The weight bench is used. Rotate the Support Rod to see the correct form for several exercises. WARNING: When using the Leg Lever (4), place a barbell with your own weight set of holes in the Uprights (1). Insert the M10 x 115mm ...
...rests to balance the bench. 1 1 6 7 3 4 Weight Tube Weight Locking Pin 25 28 Weight Weight Tube REMOVING AND ATTACHING THE FLY ARMS Some exercises are easier to perform if the Fly Arms (25) are properly tightened each Arm. Make sure all parts are removed from each weight tube. ADJUSTMENTS... The weight bench is used. Rotate the Support Rod to see the correct form for several exercises. WARNING: When using the Leg Lever (4), place a barbell with your own weight set of holes in the Uprights (1). Insert the M10 x 115mm ...
User Manual
Page 10
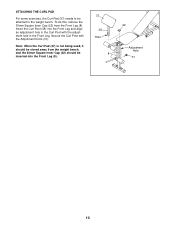
Insert the Curl Post (38) into the Front Leg (8). 37 38 Hole 8 22 Adjustment Hole 31 10 Secure the Curl Post with the adjustment hole in the Front Leg. Note: When the Curl Pad (37) is not being used, it should be attached to the weight bench. To do this, remove the 30mm Square Inner Cap (22) from the weight bench, and the 30mm Square Inner Cap (22) should be stored away from the Front Leg (8). ATTACHING THE CURL PAD For some exercises, the Curl Pad (37) needs to be inserted into the Front Leg and align an adjustment hole in the Curl Post with the Adjustment Knob (31).
Insert the Curl Post (38) into the Front Leg (8). 37 38 Hole 8 22 Adjustment Hole 31 10 Secure the Curl Post with the adjustment hole in the Front Leg. Note: When the Curl Pad (37) is not being used, it should be attached to the weight bench. To do this, remove the 30mm Square Inner Cap (22) from the weight bench, and the 30mm Square Inner Cap (22) should be stored away from the Front Leg (8). ATTACHING THE CURL PAD For some exercises, the Curl Pad (37) needs to be inserted into the Front Leg and align an adjustment hole in the Curl Post with the Adjustment Knob (31).
User Manual
Page 15
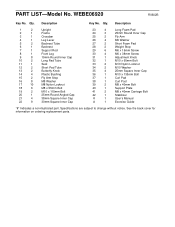
... 1 M10 x 135mm Bolt 37 1 Curl Pad 38 1 Curl Post 39 2 M8 x 40mm Bolt 40 1 Support Plate 41 2 M8 x 40mm Carriage Bolt 42 1 Stabilizer # 1 User's Manual # 1 Exercise Guide "#" Indicates a non-illustrated part. Specifications are subject to change without notice. PART LIST-Model No. Description Key No.
... 1 M10 x 135mm Bolt 37 1 Curl Pad 38 1 Curl Post 39 2 M8 x 40mm Bolt 40 1 Support Plate 41 2 M8 x 40mm Carriage Bolt 42 1 Stabilizer # 1 User's Manual # 1 Exercise Guide "#" Indicates a non-illustrated part. Specifications are subject to change without notice. PART LIST-Model No. Description Key No.


