
User Manual
Page 3
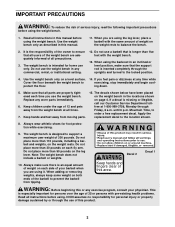
...lever. Do not use a barbell that all users of the weight bench are using it. Do not use the weight bench in any exercise program, consult your barbell when you are adequately informed of serious injury, read the following important precautions before using the backrest in this area.... Replace any time while Cover the floor beneath the weight bench to exercising, stop immediately and begin cool- The weight bench is the responsibility of the owner to balance the bench. 2. Do not place more ...
...lever. Do not use a barbell that all users of the weight bench are using it. Do not use the weight bench in any exercise program, consult your barbell when you are adequately informed of serious injury, read the following important precautions before using the backrest in this area.... Replace any time while Cover the floor beneath the weight bench to exercising, stop immediately and begin cool- The weight bench is the responsibility of the owner to balance the bench. 2. Do not place more ...
User Manual
Page 9
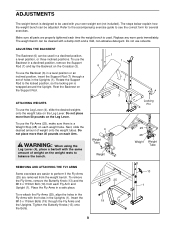
... be cleaned with your own weight set of holes in a declined position, a level position, or three inclined positions. Refer to the accompanying exercise guide to the locked position, so the locking pin is wrapped around the Upright. Replace any worn parts immediately. ADJUSTING THE BACKREST The Backrest...rests to balance the bench. 1 1 6 7 3 4 Weight Tube Weight Locking Pin 25 28 Weight Weight Tube REMOVING AND ATTACHING THE FLY ARMS Some exercises are easier to perform if the Fly Arms (25) are properly tightened each Arm. Insert the M10 x 115mm Bolts (19) through a set (not ...
... be cleaned with your own weight set of holes in a declined position, a level position, or three inclined positions. Refer to the accompanying exercise guide to the locked position, so the locking pin is wrapped around the Upright. Replace any worn parts immediately. ADJUSTING THE BACKREST The Backrest...rests to balance the bench. 1 1 6 7 3 4 Weight Tube Weight Locking Pin 25 28 Weight Weight Tube REMOVING AND ATTACHING THE FLY ARMS Some exercises are easier to perform if the Fly Arms (25) are properly tightened each Arm. Insert the M10 x 115mm Bolts (19) through a set (not ...
User Manual
Page 10
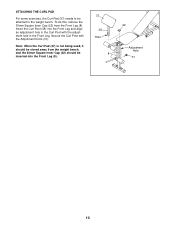
Secure the Curl Post with the adjustment hole in the Front Leg. ATTACHING THE CURL PAD For some exercises, the Curl Pad (37) needs to the weight bench. Note: When the Curl Pad (37) is not being used, it should be inserted into the Front Leg and align an adjustment hole in the Curl Post with the Adjustment Knob (31). Insert the Curl Post (38) into the Front Leg (8). 37 38 Hole 8 22 Adjustment Hole 31 10 To do this, remove the 30mm Square Inner Cap (22) from the weight bench, and the 30mm Square Inner Cap (22) should be attached to be stored away from the Front Leg (8).
Secure the Curl Post with the adjustment hole in the Front Leg. ATTACHING THE CURL PAD For some exercises, the Curl Pad (37) needs to the weight bench. Note: When the Curl Pad (37) is not being used, it should be inserted into the Front Leg and align an adjustment hole in the Curl Post with the Adjustment Knob (31). Insert the Curl Post (38) into the Front Leg (8). 37 38 Hole 8 22 Adjustment Hole 31 10 To do this, remove the 30mm Square Inner Cap (22) from the weight bench, and the 30mm Square Inner Cap (22) should be attached to be stored away from the Front Leg (8).
User Manual
Page 15
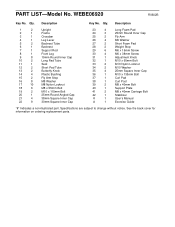
... 1 M10 x 135mm Bolt 37 1 Curl Pad 38 1 Curl Post 39 2 M8 x 40mm Bolt 40 1 Support Plate 41 2 M8 x 40mm Carriage Bolt 42 1 Stabilizer # 1 User's Manual # 1 Exercise Guide "#" Indicates a non-illustrated part. See the back cover for information on ordering replacement parts. Qty.
... 1 M10 x 135mm Bolt 37 1 Curl Pad 38 1 Curl Post 39 2 M8 x 40mm Bolt 40 1 Support Plate 41 2 M8 x 40mm Carriage Bolt 42 1 Stabilizer # 1 User's Manual # 1 Exercise Guide "#" Indicates a non-illustrated part. See the back cover for information on ordering replacement parts. Qty.


