
English Manual
Page 2
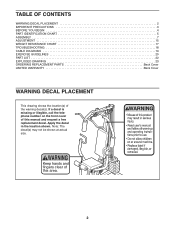
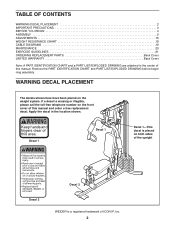
... 4 PART IDENTIFICATION CHART 5 ASSEMBLY 7 ADJUSTMENT 15 WEIGHT RESISTANCE CHART 17 TROUBLESHOOTING 18 CABLE DIAGRAMS 19 EXERCISE GUIDELINES 20 PART LIST 22 EXPLODED DRAWING 23 ORDERING REPLACEMENT PARTS Back Cover LIMITED WARRANTY Back Cover WARNING DECAL PLACEMENT This drawing shows the location(s) of this manual and request a free replacement decal. Apply the decal in the location shown. Keep hands and fingers clear of the warning decal(s). If a decal is missing or illegible, call the telephone number...
... 4 PART IDENTIFICATION CHART 5 ASSEMBLY 7 ADJUSTMENT 15 WEIGHT RESISTANCE CHART 17 TROUBLESHOOTING 18 CABLE DIAGRAMS 19 EXERCISE GUIDELINES 20 PART LIST 22 EXPLODED DRAWING 23 ORDERING REPLACEMENT PARTS Back Cover LIMITED WARRANTY Back Cover WARNING DECAL PLACEMENT This drawing shows the location(s) of this manual and request a free replacement decal. Apply the decal in the location shown. Keep hands and fingers clear of the warning decal(s). If a decal is missing or illegible, call the telephone number...

English Manual
Page 3
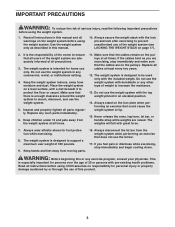
... especially important for home use your physician. The weights will fall with great force. 14. Always stand on the pulleys. 4. Replace any exercise program, consult your weight system in a commercial, rental, or institutional setting. 9. Wear appropriate exercise clothes while exercising; Never release the arms, leg lever, lat bar, or handle strap while weights are raised. If the cables bind while you feel pain or dizziness while exercising, stop immediately and...
... especially important for home use your physician. The weights will fall with great force. 14. Always stand on the pulleys. 4. Replace any exercise program, consult your weight system in a commercial, rental, or institutional setting. 9. Wear appropriate exercise clothes while exercising; Never release the arms, leg lever, lat bar, or handle strap while weights are raised. If the cables bind while you feel pain or dizziness while exercising, stop immediately and...
English Manual
Page 4
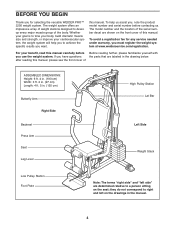
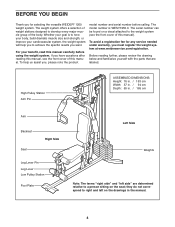
... front cover of the body. this manual. To help you to tone your body, build dramatic muscle size and strength, or improve your benefit, read this manual, please see the front cover of ASSEMBLED DIMENSIONS: Height: 6 ft. 4 in. (193 cm) Width: 3 ft. 2 in. (97 cm) Length: 4 ft. 5 in. (135 cm) Butterfly Arm Right Side Backrest Press Arm Seat Leg Lever High Pulley Station Lat Bar Left Side Weight...
... front cover of the body. this manual. To help you to tone your body, build dramatic muscle size and strength, or improve your benefit, read this manual, please see the front cover of ASSEMBLED DIMENSIONS: Height: 6 ft. 4 in. (193 cm) Width: 3 ft. 2 in. (97 cm) Length: 4 ft. 5 in. (135 cm) Butterfly Arm Right Side Backrest Press Arm Seat Leg Lever High Pulley Station Lat Bar Left Side Weight...
English Manual
Page 7
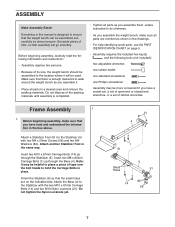
.... Attach a Stabilizer Foot (51) to ensure that assembly will be used. Before beginning assembly, carefully read and understand the information in a cleared area and remove the packing materials. Before beginning assembly, make sure all parts are on page 5. • Assembly requires the included hex key(s) and the following information and instructions: • Assembly requires two persons. • Because of its size, the weight bench should be assembled...
.... Attach a Stabilizer Foot (51) to ensure that assembly will be used. Before beginning assembly, carefully read and understand the information in a cleared area and remove the packing materials. Before beginning assembly, make sure all parts are on page 5. • Assembly requires the included hex key(s) and the following information and instructions: • Assembly requires two persons. • Because of its size, the weight bench should be assembled...
English Manual
Page 10
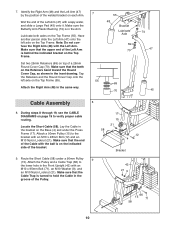
...Lubricate Axle 69 70 69 70 74 47 45 Cable Assembly 8 8. Lay the Cable in the groove of the Pulley. 42 21 9 15 66 71 58 10 Route the Short Cable (58) under the Press Frame (17). Identify the Right Arm (48) and the Left Arm (47) by the position of the bracket. 17 15 21 58 12 4 Bracket 9. Set... end of the Left Arm is in the Front Upright (42) with the ball is turned to the lower hole in the Arm. Make sure that the Cable Trap is on top of the Cable with an M10 x 95mm Bolt (71), an M10 Washer (9), and an M10 Nylon Locknut (21). Attach the Right Arm (48) in the ...
...Lubricate Axle 69 70 69 70 74 47 45 Cable Assembly 8 8. Lay the Cable in the groove of the Pulley. 42 21 9 15 66 71 58 10 Route the Short Cable (58) under the Press Frame (17). Identify the Right Arm (48) and the Left Arm (47) by the position of the bracket. 17 15 21 58 12 4 Bracket 9. Set... end of the Left Arm is in the Front Upright (42) with the ball is turned to the lower hole in the Arm. Make sure that the Cable Trap is on top of the Cable with an M10 x 95mm Bolt (71), an M10 Washer (9), and an M10 Nylon Locknut (21). Attach the Right Arm (48) in the ...
English Manual
Page 15
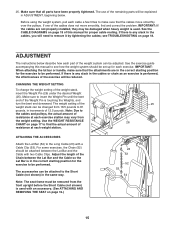
... Lat Bar is any slack in the correct starting position for proper cable routing. ADJUSTMENT The instructions below . IMPORTANT: When attaching the lat bar or handle, make sure that all parts have been properly tightened. CHANGING THE WEIGHT SETTING To change the weight setting of the exercise will need to be set up for the exercise to remove it by tightening the cables; Note: Due to the Long Cable (23) with an accessory. (See ATTACHING AND REMOVING THE SEAT...
... Lat Bar is any slack in the correct starting position for proper cable routing. ADJUSTMENT The instructions below . IMPORTANT: When attaching the lat bar or handle, make sure that all parts have been properly tightened. CHANGING THE WEIGHT SETTING To change the weight setting of the exercise will need to be set up for the exercise to remove it by tightening the cables; Note: Due to the Long Cable (23) with an accessory. (See ATTACHING AND REMOVING THE SEAT...
English Manual
Page 16
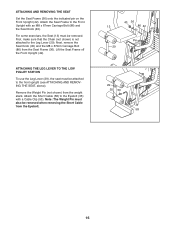
... x 67mm Carriage Bolt (86) and the Seat Knob (40). Attach the Seat Frame to the Leg Lever (29). ATTACHING AND REMOVING THE SEAT Set the Seat Frame (36) onto the indicated pin on the Front Upright (42). Remove the Weight Pin (not shown) from the Seat Frame (36). ATTACHING THE LEG LEVER TO THE LOW PULLEY STATION To use the Leg Lever (29), the seat must be removed when removing the Short Cable from the Eyebolt...
... x 67mm Carriage Bolt (86) and the Seat Knob (40). Attach the Seat Frame to the Leg Lever (29). ATTACHING AND REMOVING THE SEAT Set the Seat Frame (36) onto the indicated pin on the Front Upright (42). Remove the Weight Pin (not shown) from the Seat Frame (36). ATTACHING THE LEG LEVER TO THE LOW PULLEY STATION To use the Leg Lever (29), the seat must be removed when removing the Short Cable from the Eyebolt...
English Manual
Page 20
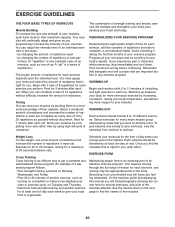
... any exercise program. Select exercises for at least one day of rest. Cross Training Cross training is right for several exercises, and a list of the muscles affected. This requires moving only the appropriate parts of the body. You must gauge your own pace and be followed by using high amounts of resistance. Toning You can tone your muscles by changing the number of an individual exercise in...
... any exercise program. Select exercises for at least one day of rest. Cross Training Cross training is right for several exercises, and a list of the muscles affected. This requires moving only the appropriate parts of the body. You must gauge your own pace and be followed by using high amounts of resistance. Toning You can tone your muscles by changing the number of an individual exercise in...

English Manual
Page 21
...set should last about half as long as the return stroke. Trapezius (upper back) P. Gluteus Maximus (buttocks) W. Gastrocnemius (back of arm) D. Proper breathing is an effective way to make exercise a regular and enjoyable part of stretching. Never hold your arms and legs. Sternomastoid (neck) B. Pectoralis Major (chest... each set for a muscle building workout. • Rest for one minute after each workout is important. Tibialis Anterior (front of leg) X. Adductor (inner thigh) O. Write the date, the exercises performed, the resistance used, and the numbers of calf...
...set should last about half as long as the return stroke. Trapezius (upper back) P. Gluteus Maximus (buttocks) W. Gastrocnemius (back of arm) D. Proper breathing is an effective way to make exercise a regular and enjoyable part of stretching. Never hold your arms and legs. Sternomastoid (neck) B. Pectoralis Major (chest... each set for a muscle building workout. • Rest for one minute after each workout is important. Tibialis Anterior (front of leg) X. Adductor (inner thigh) O. Write the date, the exercises performed, the resistance used, and the numbers of calf...
English Manual
Page 22
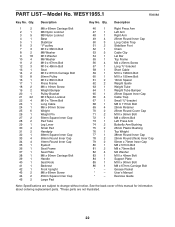
...) Inner Cap 50mm x 70mm Inner Cap M8 x 57mm Bolt M8 x 70mm Bolt M4 Washer M10 x 45mm Bolt Support Plate M10 x 90mm Bolt M8 x 67mm Carriage Bolt Grease Packet Userʼs Manual Exercise Guide Note: Specifications are not illustrated. 22 PART LIST-Model No. Description Key No. See the back cover of this manual for information about ordering replacement parts. *These parts are subject to change without notice. Description 1 2 2 1 3 9 4 1 5 1 6 3 7 3 8 2 9 18 10 4 11 2 12 3 13...
...) Inner Cap 50mm x 70mm Inner Cap M8 x 57mm Bolt M8 x 70mm Bolt M4 Washer M10 x 45mm Bolt Support Plate M10 x 90mm Bolt M8 x 67mm Carriage Bolt Grease Packet Userʼs Manual Exercise Guide Note: Specifications are not illustrated. 22 PART LIST-Model No. Description Key No. See the back cover of this manual for information about ordering replacement parts. *These parts are subject to change without notice. Description 1 2 2 1 3 9 4 1 5 1 6 3 7 3 8 2 9 18 10 4 11 2 12 3 13...
English Manual
Page 24
... purchaser. products used as store display models. No other rights that specifically set forth herein. This warranty does not extend to any implied warranties of merchantability or fitness for a particular purpose are made must be preauthorized by an ICON authorized service center; ORDERING REPLACEMENT PARTS To order replacement parts, please see the PART LIST and the EXPLODED DRAWING near the end of this manual) LIMITED WARRANTY ICON Health & Fitness, Inc. (ICON) warrants this...
... purchaser. products used as store display models. No other rights that specifically set forth herein. This warranty does not extend to any implied warranties of merchantability or fitness for a particular purpose are made must be preauthorized by an ICON authorized service center; ORDERING REPLACEMENT PARTS To order replacement parts, please see the PART LIST and the EXPLODED DRAWING near the end of this manual) LIMITED WARRANTY ICON Health & Fitness, Inc. (ICON) warrants this...
User Manual
Page 2
... a free replacement decal. Apply the decal in the center of ICON IP, Inc. 2 Remove the PART IDENTIFICATION CHART and PART LIST/EXPLODED DRAWING before beginning assembly. If a decal is placed on the weight system. TABLE OF CONTENTS WARNING DECAL PLACEMENT 2 IMPORTANT PRECAUTIONS 3 BEFORE YOU BEGIN 4 ASSEMBLY 5 ADJUSTMENTS 16 WEIGHT RESISTANCE CHART 18 CABLE DIAGRAMS 19 MAINTENANCE 20 EXERCISE GUIDELINES 21 ORDERING REPLACEMENT PARTS Back Cover LIMITED WARRANTY Back Cover Note: A PART IDENTIFICATION CHART and a PART LIST/EXPLODED DRAWING are attached...
... a free replacement decal. Apply the decal in the center of ICON IP, Inc. 2 Remove the PART IDENTIFICATION CHART and PART LIST/EXPLODED DRAWING before beginning assembly. If a decal is placed on the weight system. TABLE OF CONTENTS WARNING DECAL PLACEMENT 2 IMPORTANT PRECAUTIONS 3 BEFORE YOU BEGIN 4 ASSEMBLY 5 ADJUSTMENTS 16 WEIGHT RESISTANCE CHART 18 CABLE DIAGRAMS 19 MAINTENANCE 20 EXERCISE GUIDELINES 21 ORDERING REPLACEMENT PARTS Back Cover LIMITED WARRANTY Back Cover Note: A PART IDENTIFICATION CHART and a PART LIST/EXPLODED DRAWING are attached...
User Manual
Page 3
..., with the included weight. Keep the weight system indoors, away from moving parts. 16. Inspect and properly tighten all instructions before using. Do not use the weight system with dumbbells or any commercial, rental, or institutional setting. 4. Do not use the weight system with the top weight pinned in this manual and all times. Never release the arms, leg lever, lat bar, or handle strap while weights are exercising, stop immediately and begin...
..., with the included weight. Keep the weight system indoors, away from moving parts. 16. Inspect and properly tighten all instructions before using. Do not use the weight system with dumbbells or any commercial, rental, or institutional setting. 4. Do not use the weight system with the top weight pinned in this manual and all times. Never release the arms, leg lever, lat bar, or handle strap while weights are exercising, stop immediately and begin...
User Manual
Page 4
... BEGIN Thank you for any service needed under warranty, you must register the weight system at www.weiderservice.com/registration. The model number is to achieve the specific results you want. Whether your benefit, read this manual, see the front cover of the body. If you , please note the product model number and serial number before using the weight system. High Pulley Station Arm Pin ASSEMBLED DIMENSIONS: Height: 76 in. / 193...
... BEGIN Thank you for any service needed under warranty, you must register the weight system at www.weiderservice.com/registration. The model number is to achieve the specific results you want. Whether your benefit, read this manual, see the front cover of the body. If you , please note the product model number and serial number before using the weight system. High Pulley Station Arm Pin ASSEMBLED DIMENSIONS: Height: 76 in. / 193...

User Manual
Page 5
... the front cover of the weight system. By deciding to walk around the weight system as possible, we have a socket set, a set of open the parts package for assembly: • Two adjustable wrenches • One standard screwdriver Hire an Authorized Service Technician To hire an authorized service technician to do otherwise. Select a Location for the Weight System Because of its weight and size, the weight system should...
... the front cover of the weight system. By deciding to walk around the weight system as possible, we have a socket set, a set of open the parts package for assembly: • Two adjustable wrenches • One standard screwdriver Hire an Authorized Service Technician To hire an authorized service technician to do otherwise. Select a Location for the Weight System Because of its weight and size, the weight system should...
User Manual
Page 9
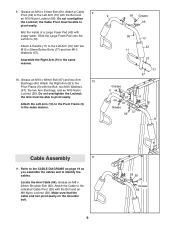
... Grease 9 44 67 5 44 57 Grease 57 56 10 Cable Assembly 11 11. 9. Grease an M10 x 51mm Bolt (66). the Cable Pivot must be able to the Pivot Frame (5) with soapy water. Slide the Large Foam Pad onto the Left Arm (10). Attach the Right Arm (9) to pivot easily. Attach the Left Arm (10) to the CABLE DIAGRAMS on the shoulder bolt. 9 58 39 54 Grease...
... Grease 9 44 67 5 44 57 Grease 57 56 10 Cable Assembly 11 11. 9. Grease an M10 x 51mm Bolt (66). the Cable Pivot must be able to the Pivot Frame (5) with soapy water. Slide the Large Foam Pad onto the Left Arm (10). Attach the Right Arm (9) to pivot easily. Attach the Left Arm (10) to the CABLE DIAGRAMS on the shoulder bolt. 9 58 39 54 Grease...
User Manual
Page 16
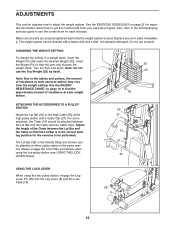
... resistance at either pulley station in the correct starting position for each exercise station may vary from your exercise program. The Lat Bar (35) or the Handle Strap (not shown) can be attached between the Lat Bar and the Cable so that the bent end touches the weight stack. Make sure all parts are properly tightened each time the weight system is in the same manner. Use the WEIGHT RESISTANCE CHART...
... resistance at either pulley station in the correct starting position for each exercise station may vary from your exercise program. The Lat Bar (35) or the Handle Strap (not shown) can be attached between the Lat Bar and the Cable so that the bent end touches the weight stack. Make sure all parts are properly tightened each time the weight system is in the same manner. Use the WEIGHT RESISTANCE CHART...
User Manual
Page 21
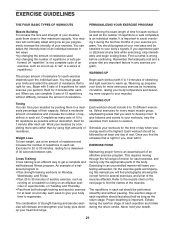
.... A "set . Weight Loss To lose weight, use a low amount of resistance and increase the number of repetitions in each exercise you find the names of the muscles. WORKING OUT Each workout should last about half as long as running on a treadmill or riding on an elliptical exerciser or exercise bike, on Tuesday and Thursday. • Rest from session to get a complete and well-balanced fitness program...
.... A "set . Weight Loss To lose weight, use a low amount of resistance and increase the number of repetitions in each exercise you find the names of the muscles. WORKING OUT Each workout should last about half as long as running on a treadmill or riding on an elliptical exerciser or exercise bike, on Tuesday and Thursday. • Rest from session to get a complete and well-balanced fitness program...
User Manual
Page 25
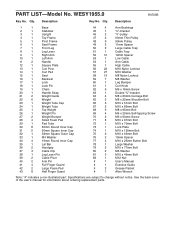
... Bolt 75 2 M10 x 63mm Bolt 76 2 19mm Spacer 77 4 M10 x 25mm Button Bolt 78 1 Large Washer 79 2 M10 x 77mm Bolt 80 2 M6 Washer 81 3 M10 x 46mm Bolt 82 1 M12 Nut # 1 User's Manual # 1 Exercise Guide # 2 Grease Packet # 1 Allen Wrench Note: "#" indicates a non-illustrated part. Qty. See the back cover of the user's manual for information about ordering replacement parts. PART LIST-Model No. Qty. Specifications are subject to change without notice. WESY1955.0 R0705B Key No...
... Bolt 75 2 M10 x 63mm Bolt 76 2 19mm Spacer 77 4 M10 x 25mm Button Bolt 78 1 Large Washer 79 2 M10 x 77mm Bolt 80 2 M6 Washer 81 3 M10 x 46mm Bolt 82 1 M12 Nut # 1 User's Manual # 1 Exercise Guide # 2 Grease Packet # 1 Allen Wrench Note: "#" indicates a non-illustrated part. Qty. See the back cover of the user's manual for information about ordering replacement parts. PART LIST-Model No. Qty. Specifications are subject to change without notice. WESY1955.0 R0705B Key No...
User Manual
Page 28
... -home service, the customer will be free from defects in workmanship and material, under this manual. the NAME of the product (WESY1955.0) 2. Accordingly, the above limitation may not apply to the original purchaser. the MODEL NUMBER of the product (WEIDER 1200 weight system) 3. This warranty extends only to you , please be pre-authorized by an ICON authorized service center; For in connection with the use...
... -home service, the customer will be free from defects in workmanship and material, under this manual. the NAME of the product (WESY1955.0) 2. Accordingly, the above limitation may not apply to the original purchaser. the MODEL NUMBER of the product (WEIDER 1200 weight system) 3. This warranty extends only to you , please be pre-authorized by an ICON authorized service center; For in connection with the use...


