Weider 8950 Support and Manuals
Get Help and Manuals for this Weider item

Popular Weider 8950 Manual Pages
Uk Manual - Page 1

....com Serial Number Decal (Under Seat)
QUESTIONS? Save this equipment. Write the serial number in this manual before using this manual for future reference. Model No. Unit 4 Revie Road Industrial Estate Revie Road Beeston Leeds, LS118JG UK email: [email protected]
CAUTION
Read all precautions and instructions in the space above for future reference.
Uk Manual - Page 2

... WEIGHT RESISTANCE CHART 16 CABLE DIAGRAM 17 TROUBLESHOOTING AND MAINTENANCE 18 ORDERING REPLACEMENT PARTS Back Cover Note: A PART IDENTIFICATION CHART and a PART LIST/EXPLODED DRAWING are attached in the centre of ICON Health & Fitness, Inc.
2 Remove the PART IDENTIFICATION CHART and the PART LIST/EXPLODED DRAWING before beginning assembly.
WEIDER is a registered trademark of this manual...
Uk Manual - Page 3

... sure that all precautions.
13. The weight system is designed to protect the floor.
5. Replace any worn parts immediately.
6. Use the weight system only on the pulleys at all instructions in this manual.
12. Cover the floor or carpet beneath the weight system to support a maximum user weight of this area. The weight system is intended for foot protection when...
Uk Manual - Page 4

... note the product model number and serial number before using the weight system. To help you to tone your body, build dramatic muscle size and strength, or improve your benefit, read this manual for selecting the versatile WEIDER® 8950 weight system. Before reading further, please review the drawing below and familiarise yourself with the parts that are...
Uk Manual - Page 5

... ensure that you assemble the weight system, make sure all parts in the drawings.
• For help identifying small parts, use the PART IDENTIFICATION CHART.
Press a 50mm Square Inner Cap (26) into the bottom of the Carriage Bolts to hold them , unless instructed to do otherwise.
• As you have a socket set, a set of open-end or...
Uk Manual - Page 6

...69) used in the Stabiliser (2). Set two Weight Bumpers (17) over the indicated
3
holes in steps 1 and 3.
58 10
17 70
57
68
37
68 2
6 Secure the
Weight Guides in place with the two
2
M8... Frame Lock (39) to pivot easily.
39 66
71 69
25 71
3
69
1
3. Insert two Weight
Guides (10) into the tube on the Upright (3). Do not overtighten the Nylon Locknut; Attach the Upright (3) ...
Uk Manual - Page 9
... the inset drawing. Make sure the Cable Trap is behind the indicated bracket on page 17 for proper cable routing. 10. Refer to the second set of holes from the
top of the two Pulley Plates (44) with the Right Arm (6).
10 6 5 Bracket
61
Post
61
72
27 Slot
29 72...
Uk Manual - Page 12

Attach the Pulley and a pair of Pulley
Covers (35) to the second set of holes from the
bottom of the Short Cable (47) to the Offset Double "U"-bracket (42)
with an M10 x 65mm Bolt
(55), two M10 Washers (...
Uk Manual - Page 13

... Upright (3) with an M10 x 52mm Bolt (52) and an M10 Nylon Locknut (68). Attach the Pulley and a pair of Pulley Covers
(35) to the lower set of holes in the indicated
position.
46 Large
Tab
3
34
70
35
35 48
70 68
29. Attach the Pulley and a pair of Pulley Covers...
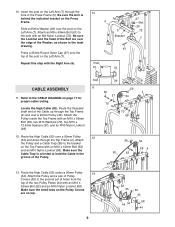
Uk Manual - Page 14

... that all remaining parts will be explained in the Seat Frame (8). See the CABLE DIAGRAM on page 17 of the Pad Tube. see TROUBLESHOOTING AND MAINTENANCE on the next page. Repeat this manual for proper cable routing. Make sure that the cables move smoothly, find and correct the problem. Before using the weight system, pull...
Uk Manual - Page 15

... (31) to see the correct form for each exercise.
Replace any worn parts immediately.
Make sure all parts are properly tightened each exercise station may vary from 6 pounds to adjust the weight system. Turn the bent end downward. The weight setting of resistance at each time the weight system is touching the Weights. Note: Due to find the approximate amount...
Uk Manual - Page 18
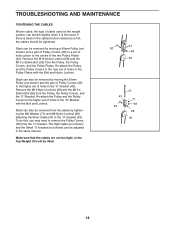
... the pair of Pulley Covers (35) to the higher set of holes closer to a set of holes in the cables before resistance is first used on the weight system, can be adjusted in the "U"-Bracket with the Bolt... Nylon Locknut (69) attaching the Short Cable (47) to the new set of holes in the same manner. TROUBLESHOOTING AND MAINTENANCE
TIGHTENING THE CABLES
Woven cable, the type of cable used .
Uk Manual - Page 20

... provide the following information when ordering replacement parts:
• The MODEL NUMBER of the product (WEEMSY18220)
• The NAME of the product (WEIDER® 8950 weight system)
• The SERIAL NUMBER of the product (see the front cover of this manual)
• The KEY NUMBER and DESCRIPTION of the part(s) (see the PART LIST and EXPLODED DRAWING attached at...
Uk Manual - Page 21
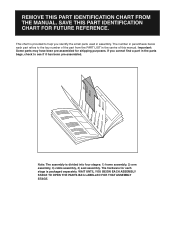
... pre-assembled. The hardware for shipping purposes. This chart is provided to help you cannot find a part in the parts bags, check to the key number of the part from the PART LIST in the centre of this manual. The number in parenthesis below each stage is divided into four stages: 1) frame assembly, 2) arm assembly...
Uk Manual - Page 25
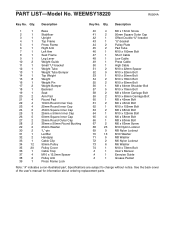
...
69
9
M8 Nylon Locknut
70
13
M10 Washer
71
5
M8 Washer
72
2
M6 Nylon Locknut
73
6
M6 Washer
74
1
M10 x 73mm Bolt
#
1
User's Manual
#
1
Exercise Guide
#
1
Grease Packet
Note: "#" indicates a non-illustrated part. See the back cover of the user's manual for information about ordering replacement parts. Specifications are subject to change without notice. Qty.
Weider 8950 Reviews
We have not received any reviews for Weider yet.