Weider 320 Support and Manuals
Get Help and Manuals for this Weider item

Popular Weider 320 Manual Pages
English Manual - Page 1
...?
MST
CAUTION
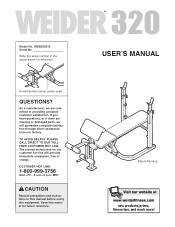
Read all precautions and instructions in the space above for future reference. Save this equipment. CUSTOMER HOT LINE:
1-800-999-3756
Mon.-Fri., 6 a.m.-6 p.m. Model No. As a manufacturer, we will provide immediate assistance, free of charge. Write the serial number in this manual before using this manual for reference. If you have questions...
English Manual - Page 2
...800-999-3756, Monday through Friday, 6 a.m. TABLE OF CONTENTS
WARNING DECAL PLACEMENT 2 IMPORTANT PRECAUTIONS 3 BEFORE YOU BEGIN 4 PART IDENTIFICATION CHART 5 ASSEMBLY 6 ADJUSTMENTS 9 EXERCISE GUIDELINES 11 PART LIST 14 EXPLODED DRAWING 15 ORDERING REPLACEMENT PARTS Back Cover LIMITED WARRANTY Back Cover
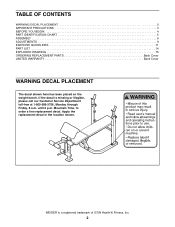
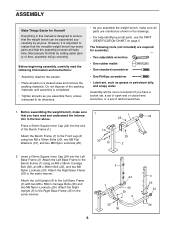
WARNING DECAL PLACEMENT
The decal shown here has been placed on the weight bench.
English Manual - Page 3

... knobs are adequately informed of all parts are using it. WARNING: Before beginning this manual.
10. This
is securely seated in this or any worn parts immediately.
7. The weight bench is longer than 130 pounds on the weight rests to prevent the barbell from the weight bench at all instructions in any exercise.
9. Replace any exercise program, consult your physician...
English Manual - Page 4
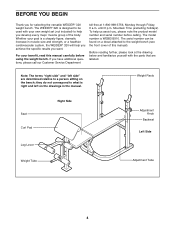
... yourself with your own weight set (not included) to a person sitting on the bench;
The WEIDER® 320 is designed to be found on the drawings in muscle size and strength, or a healthier cardiovascular system, the WEIDER® 320 will help you achieve the specific results you develop every major muscle group of this manual carefully before calling. Whether...
English Manual - Page 5
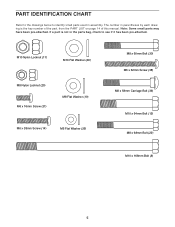
... have been pre-attached. If a part is the key number of the part, from the PART LIST on page 14 of this manual. PART IDENTIFICATION CHART
Refer to the drawings below to see if it has been pre-attached.
M10 Nylon Locknut (11)
M10 Flat ... x 64mm Bolt (12)
M8 x 68mm Bolt (22)
M10 x 168mm Bolt (8)
5 The number in parentheses by each drawing is not in the parts bag, check to identify small...
English Manual - Page 6
...set, a set of open-end or closed-end wrenches, or a set of ratchet wrenches.
1. The following information and instructions:
• Assembly requires two people.
• Place all parts in the drawings.
• For help identifying small parts, use the PART... 2
2. Before assembling the weight bench, make sure all parts as you assemble them, unless instructed to ensure that the assembly ...
English Manual - Page 7
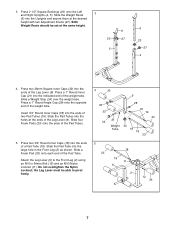
... Inner Caps (18) into the holes at the ends of the Pad Tube. Slide the Pad Tube into the ends of the weight tube. the Leg Lever must be set at the desired
height with two Adjustment Knobs (27). Press 2 1/2" Square Bushings (23) onto the Left and Right Uprights (4, 5). Press a 1" Round Angle...
English Manual - Page 8
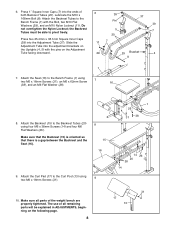
Do
not overtighten the Nylon Locknut;
Make sure all remaining parts will be able to pivot freely. 20
37 39 7
Press two 25.4mm x 38.1mm Square ...four M6 x 38mm Screws (14) and four M6 Flat Washers (26). Slide the
11 7
Adjustment Tube into the ends of the weight bench are properly tightened. Attach the Curl Pad (17) to the Backrest Tubes (20) using
9
two M6 x 16mm Screws (31).
...
English Manual - Page 9
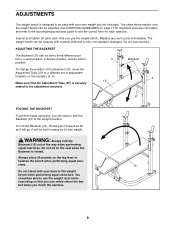
... explain how the weight bench can be held in the adjustment brackets.
37
FOLDING THE BACKREST
To perform squat exercises, you use solvents.
It will be cleaned with your own weight set of adjustment
brackets on page 11 for important exercise information and refer to the accompanying exercise guide to see the weight rests while exercising...
English Manual - Page 10
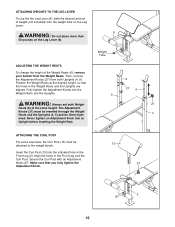
... CURL POST
For some exercises, the Curl Post (13) must be inserted through the Weight Rests and the Uprights (4, 5) and be attached to the weight bench.
Align the holes in the Front Leg (2). Make sure that the holes in the Weight Rests and the Uprights are aligned. Then, remove the Adjustment Knobs (27) from...
English Manual - Page 11
... parts of an effective exercise program. The exertion stage of weight training and aerobic exercise will leave you feeling exhausted. Rest for 3 minutes after each set " is an essential part ...an individual matter. Schedule your workouts for you perform.
On the exercise guide accompanying this manual you will continually adapt and grow as you can tone your muscles by...
English Manual - Page 12
...
J. STAYING MOTIVATED
For motivation, keep a record of each set for a toning work- The chart on page 13 of ... the weight used to 10 minutes of this manual can ...weight and key body measurements at the end of thigh)
I
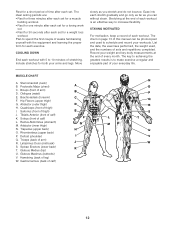
Q. Biceps (front of your arms and legs. Latissimus Dorsi (mid back)
J
S. Include stretches for each workout is to make exercise a regular and enjoyable part...
English Manual - Page 13
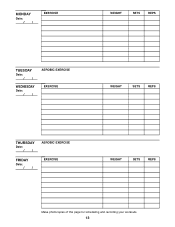
MONDAY
Date: / /
EXERCISE
WEIGHT
SETS
REPS
TUESDAY
Date: / /
WEDNESDAY
Date: / /
AEROBIC EXERCISE EXERCISE
WEIGHT
SETS
REPS
THURSDAY
Date: / /
FRIDAY
Date: / /
AEROBIC EXERCISE EXERCISE
WEIGHT
SETS
REPS
Make photocopies of this page for scheduling and recording your workouts.
13
English Manual - Page 14
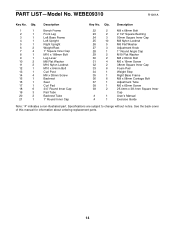
PART LIST-Model No. Qty.
1
1
2
1
3
1
4
1
5
1
6
2
7
4
8
1
9
1
10
2
11
2
12
1
13
1
14
4
15
1
16
1
17
1
18
6
19
3
20
2
21
1
Description
Bench Frame Front Leg Left Base Frame Left Upright Right Upright Weight...No. See the back cover of this manual for information about ordering replacement parts.
14 Specifications are subject to change without notice. ...
English Manual - Page 16
... the product (WEIDER® 320 weight bench)
• The SERIAL NUMBER of the product (see the front cover of this manual)
• The KEY NUMBER and DESCRIPTION of the desired part(s) (see the PART LIST and the EXPLODED DRAWING on how long an implied warranty lasts. You may also have other warranty beyond that specifically set forth herein.
All...
Weider 320 Reviews
We have not received any reviews for Weider yet.