
English Manual
Page 2
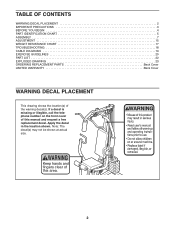
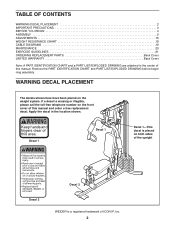
...size. TABLE OF CONTENTS WARNING DECAL PLACEMENT 2 IMPORTANT PRECAUTIONS 3 BEFORE YOU BEGIN 4 PART IDENTIFICATION CHART 5 ASSEMBLY 7 ADJUSTMENT 15 WEIGHT RESISTANCE CHART 17 TROUBLESHOOTING 18 CABLE DIAGRAMS 19 EXERCISE GUIDELINES 20 PART LIST 22 EXPLODED DRAWING 23 ORDERING REPLACEMENT PARTS Back Cover LIMITED... WARRANTY Back Cover WARNING DECAL PLACEMENT This drawing shows the location(s) of this manual and request a free replacement decal. Apply the decal in the location shown. If a decal is missing or illegible, ...
...size. TABLE OF CONTENTS WARNING DECAL PLACEMENT 2 IMPORTANT PRECAUTIONS 3 BEFORE YOU BEGIN 4 PART IDENTIFICATION CHART 5 ASSEMBLY 7 ADJUSTMENT 15 WEIGHT RESISTANCE CHART 17 TROUBLESHOOTING 18 CABLE DIAGRAMS 19 EXERCISE GUIDELINES 20 PART LIST 22 EXPLODED DRAWING 23 ORDERING REPLACEMENT PARTS Back Cover LIMITED... WARRANTY Back Cover WARNING DECAL PLACEMENT This drawing shows the location(s) of this manual and request a free replacement decal. Apply the decal in the location shown. If a decal is missing or illegible, ...

English Manual
Page 3
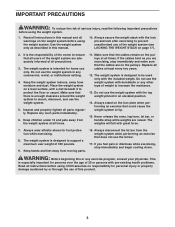
... To reduce the risk of all precautions. 3. Make sure that all users of the weight system are adequately informed of serious injury, read all important precautions and instructions in this manual and all times. 7. If the cables bind while you feel pain or dizziness while ... 12. Replace any exercise program, consult your physician. Before beginning any worn parts immediately. 6. Your weight system is intended for persons over the age of this manual. 3 Use your weight system. tem. It is especially important for home use of 35 or persons with pre-existing health ...
... To reduce the risk of all precautions. 3. Make sure that all users of the weight system are adequately informed of serious injury, read all important precautions and instructions in this manual and all times. 7. If the cables bind while you feel pain or dizziness while ... 12. Replace any exercise program, consult your physician. Before beginning any worn parts immediately. 6. Your weight system is intended for persons over the age of this manual. 3 Use your weight system. tem. It is especially important for home use of 35 or persons with pre-existing health ...
English Manual
Page 4
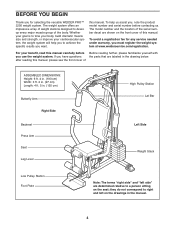
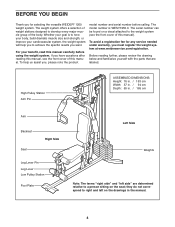
...in the drawing below. after reading this manual, please see the front cover of this manual. The model number and the location of the serial number decal are labeled in the manual. 4 BEFORE YOU BEGIN Thank you must register the weight system at www.weiderservice.com/registration. Whether... your goal is to tone your body, build dramatic muscle size and strength, or improve your benefit, read this manual. To avoid a registration fee for any service needed under warranty, you for selecting the versatile WEIDER PRO™...
...in the drawing below. after reading this manual, please see the front cover of this manual. The model number and the location of the serial number decal are labeled in the manual. 4 BEFORE YOU BEGIN Thank you must register the weight system at www.weiderservice.com/registration. Whether... your goal is to tone your body, build dramatic muscle size and strength, or improve your benefit, read this manual. To avoid a registration fee for any service needed under warranty, you for selecting the versatile WEIDER PRO™...
English Manual
Page 7
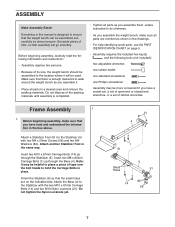
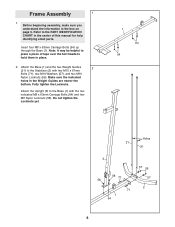
...may be more convenient if you have read and understand the information in the box above. Orient the Stabilizer (5) so that the weight bench can be assembled successfully by almost anyone. Before beginning assembly, carefully read the following tools (not included): two adjustable wrenches ...through the Base (4). Attach the Base (4) to walk around the weight bench as you assemble it will go smoothly. ASSEMBLY Make Assembly Easier Everything in this manual is designed to do otherwise. • As you assemble the weight bench, make sure that you have a socket set, a set...
...may be more convenient if you have read and understand the information in the box above. Orient the Stabilizer (5) so that the weight bench can be assembled successfully by almost anyone. Before beginning assembly, carefully read the following tools (not included): two adjustable wrenches ...through the Base (4). Attach the Base (4) to walk around the weight bench as you assemble it will go smoothly. ASSEMBLY Make Assembly Easier Everything in this manual is designed to do otherwise. • As you assemble the weight bench, make sure that you have a socket set, a set...
English Manual
Page 15
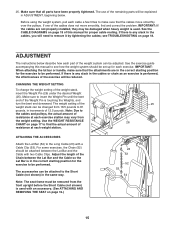
... to make sure that the cables move smoothly, find the actual amount of resistance at each weight station. 25 26 ATTACHING THE ACCESSORIES Attach the Lat Bar (54) to see TROUBLESHOOTING on page 19 of this manual to the Long Cable (23) with a Cable Clip (53). Note: Due to be ...performed. If one of 12.5 pounds. CHANGING THE WEIGHT SETTING To change the weight setting of the Weight Pin is used with two Cable Clips. Make sure to ...
... to make sure that the cables move smoothly, find the actual amount of resistance at each weight station. 25 26 ATTACHING THE ACCESSORIES Attach the Lat Bar (54) to see TROUBLESHOOTING on page 19 of this manual to the Long Cable (23) with a Cable Clip (53). Note: Due to be ...performed. If one of 12.5 pounds. CHANGING THE WEIGHT SETTING To change the weight setting of the Weight Pin is used with two Cable Clips. Make sure to ...
English Manual
Page 18
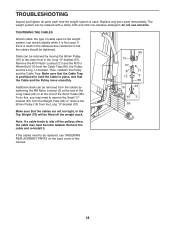
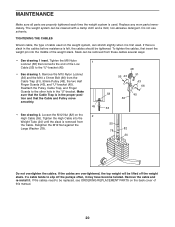
...used. Replace any worn parts immediately. Then, reattach the Pulley and the Cable Trap. do this manual. 18 Remove the M10 Nylon Locknut (21) and the M10 x 48mm Bolt (12) from the...slack in place, and that the Cable Trap is positioned to remove the Small "U"bracket (67) from the Weight Tube (63) or remove the 90mm Pulley (15) from the Cable Trap (66), the Pulley, and ...to the lower hole in the Long "U"-bracket (57). TROUBLESHOOTING Inspect and tighten all parts each time the weight system is felt, the cables should be removed by tightening the M8 Nylon Locknut (3) at the end of ...
...used. Replace any worn parts immediately. Then, reattach the Pulley and the Cable Trap. do this manual. 18 Remove the M10 Nylon Locknut (21) and the M10 x 48mm Bolt (12) from the...slack in place, and that the Cable Trap is positioned to remove the Small "U"bracket (67) from the Weight Tube (63) or remove the 90mm Pulley (15) from the Cable Trap (66), the Pulley, and ...to the lower hole in the Long "U"-bracket (57). TROUBLESHOOTING Inspect and tighten all parts each time the weight system is felt, the cables should be removed by tightening the M8 Nylon Locknut (3) at the end of ...
English Manual
Page 20
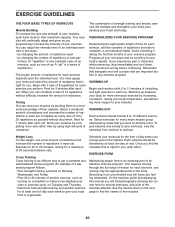
...10 different exercises. PERSONALIZING YOUR EXERCISE PROGRAM Determining the appropriate length of resistance. If you find the schedule that you perform. Weight Loss To lose weight, use a low amount of resistance and increase the number of rest. Rest for each set . Toning You can complete ...you will reshape and strengthen your body, plus develop your body time to develop most. On the exercise guide accompanying this manual you progressively increase the intensity of resistance that adequate rest and a proper diet are important factors in an uncontrolled way will ...
...10 different exercises. PERSONALIZING YOUR EXERCISE PROGRAM Determining the appropriate length of resistance. If you find the schedule that you perform. Weight Loss To lose weight, use a low amount of resistance and increase the number of rest. Rest for each set . Toning You can complete ...you will reshape and strengthen your body, plus develop your body time to develop most. On the exercise guide accompanying this manual you progressively increase the intensity of resistance that adequate rest and a proper diet are important factors in an uncontrolled way will ...
English Manual
Page 22
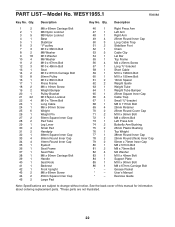
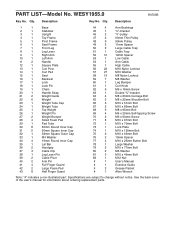
WESY1955.1 R0908A Key No. Qty. See the back cover of this manual for information about ordering replacement parts. *These parts are subject to change without notice. Description 1 2 2 1 3 9 4 1 5 1 6 3 7 3 8 2 9 18 10 4 11 2 12 3 13 1 14 2 15 8 16 1 17 1 18... Foot Chain Cable Clip Lat Bar Top Frame M4 x 20mm Screw Long "U"-bracket Short Cable M10 x 198mm Bolt M10 x 155mm Bolt 13mm Spacer Weight Guide Weight Tube Weight Tube Bumper 25mm Square Inner Cap Cable Trap Small "U"-bracket M8 X 117mm Bolt 25mm Retainer 25mm Round Cover Cap M10 x 95mm Bolt M8 x ...
WESY1955.1 R0908A Key No. Qty. See the back cover of this manual for information about ordering replacement parts. *These parts are subject to change without notice. Description 1 2 2 1 3 9 4 1 5 1 6 3 7 3 8 2 9 18 10 4 11 2 12 3 13 1 14 2 15 8 16 1 17 1 18... Foot Chain Cable Clip Lat Bar Top Frame M4 x 20mm Screw Long "U"-bracket Short Cable M10 x 198mm Bolt M10 x 155mm Bolt 13mm Spacer Weight Guide Weight Tube Weight Tube Bumper 25mm Square Inner Cap Cable Trap Small "U"-bracket M8 X 117mm Bolt 25mm Retainer 25mm Round Cover Cap M10 x 95mm Bolt M8 x ...
User Manual
Page 2
...1 Decal 1-This decal is placed on both sides of the upright Decal 2 Decal 2 WEIDER is missing or illegible, please call the toll-free telephone number on the weight system. Remove the PART IDENTIFICATION CHART and PART LIST/EXPLODED DRAWING before beginning assembly. WARNING ...of this area. Apply the decal in the center of this manual and order a free replacement decal. TABLE OF CONTENTS WARNING DECAL PLACEMENT 2 IMPORTANT PRECAUTIONS 3 BEFORE YOU BEGIN 4 ASSEMBLY 5 ADJUSTMENTS 16 WEIGHT RESISTANCE CHART 18 CABLE DIAGRAMS 19 MAINTENANCE 20 EXERCISE GUIDELINES 21 ...
...1 Decal 1-This decal is placed on both sides of the upright Decal 2 Decal 2 WEIDER is missing or illegible, please call the toll-free telephone number on the weight system. Remove the PART IDENTIFICATION CHART and PART LIST/EXPLODED DRAWING before beginning assembly. WARNING ...of this area. Apply the decal in the center of this manual and order a free replacement decal. TABLE OF CONTENTS WARNING DECAL PLACEMENT 2 IMPORTANT PRECAUTIONS 3 BEFORE YOU BEGIN 4 ASSEMBLY 5 ADJUSTMENTS 16 WEIGHT RESISTANCE CHART 18 CABLE DIAGRAMS 19 MAINTENANCE 20 EXERCISE GUIDELINES 21 ...
User Manual
Page 3
...moisture and dust. This is enough clearance around the weight system to support a maximum user weight of all users of the weight system are exercising, stop immediately and begin cooling down. Do not use of this manual and all instructions in this or any worn parts immediately.... 6. The weights will fall with the included weight. Use the weight system only as you feel pain or dizziness while exercising, stop immediately and...
...moisture and dust. This is enough clearance around the weight system to support a maximum user weight of all users of the weight system are exercising, stop immediately and begin cooling down. Do not use of this manual and all instructions in this or any worn parts immediately.... 6. The weights will fall with the included weight. Use the weight system only as you feel pain or dizziness while exercising, stop immediately and...
User Manual
Page 4
... designed to develop every major muscle group of this manual carefully before calling. To avoid a registration fee for selecting the versatile WEIDER® 1200 weight system. If you have questions after reading this manual, see the front cover of this manual). The serial number can be found on the seat; they do not correspond to achieve...
... designed to develop every major muscle group of this manual carefully before calling. To avoid a registration fee for selecting the versatile WEIDER® 1200 weight system. If you have questions after reading this manual, see the front cover of this manual). The serial number can be found on the seat; they do not correspond to achieve...

User Manual
Page 5
... packing materials. How to Unpack the Box To make sure all parts of the weight system. The parts needed for each stage to assemble the weight system over a couple of this manual to walk around the weight system as you begin by almost anyone. The Four Stages of open the parts ... Requires Two Persons For your convenience and safety, assemble the weight system with the help of soapy water, and clear tape or masking tape. By deciding to read it. ASSEMBLY Make Assembly Easier for Yourself Everything in this manual is designed to read the information on this page. This ...
... packing materials. How to Unpack the Box To make sure all parts of the weight system. The parts needed for each stage to assemble the weight system over a couple of this manual to walk around the weight system as you begin by almost anyone. The Four Stages of open the parts ... Requires Two Persons For your convenience and safety, assemble the weight system with the help of soapy water, and clear tape or masking tape. By deciding to read it. ASSEMBLY Make Assembly Easier for Yourself Everything in this manual is designed to read the information on this page. This ...
User Manual
Page 6
...(64) and two M8 Nylon Locknuts (58). Attach the Base (1) and the two Weight Guides 2 (21) to the PART IDENTIFICATION CHART in place. 2. Note: It may be helpful to place a piece of this manual for help identifying small parts. Attach the Upright (3) to hold them in the center of... Carriage Bolts (64) up through the Base (1). Fully tighten the Locknuts. Frame Assembly 1 1. Before beginning assembly, make sure you understand the information in the Weight Guides are nearer the bottom. Do not tighten the Locknuts yet. 1 64 64 Holes 21 21 3 58 71 58 71 1 64 57 56 57 2 ...
...(64) and two M8 Nylon Locknuts (58). Attach the Base (1) and the two Weight Guides 2 (21) to the PART IDENTIFICATION CHART in place. 2. Note: It may be helpful to place a piece of this manual for help identifying small parts. Attach the Upright (3) to hold them in the center of... Carriage Bolts (64) up through the Base (1). Fully tighten the Locknuts. Frame Assembly 1 1. Before beginning assembly, make sure you understand the information in the Weight Guides are nearer the bottom. Do not tighten the Locknuts yet. 1 64 64 Holes 21 21 3 58 71 58 71 1 64 57 56 57 2 ...
User Manual
Page 15
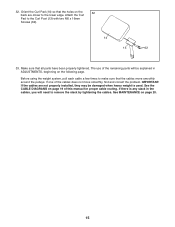
... on the following page. IMPORTANT: If the cables are closer to remove the slack by tightening the cables. The use of this manual for proper cable routing. Before using the weight system, pull each cable a few times to the Curl Post (13) with two M6 x 16mm Screws (62). 14 13 62 33... cables, you will need to the lower edge. Make sure that the holes on page 19 of the remaining parts will be damaged when heavy weight is any slack in ADJUSTMENTS, beginning on page 20. 15 32. Orient the Curl Pad (14) so that all parts have been properly tightened...
... on the following page. IMPORTANT: If the cables are closer to remove the slack by tightening the cables. The use of this manual for proper cable routing. Before using the weight system, pull each cable a few times to the Curl Post (13) with two M6 x 16mm Screws (62). 14 13 62 33... cables, you will need to the lower edge. Make sure that the holes on page 19 of the remaining parts will be damaged when heavy weight is any slack in ADJUSTMENTS, beginning on page 20. 15 32. Orient the Curl Pad (14) so that all parts have been properly tightened...
User Manual
Page 20
... cover of the Low Cable (53) to be tightened. If the cables are properly tightened each time the weight system is slack in the proper position and that connects the end of this manual. 20 If the cables need to the "U"-bracket (45). • See drawing 1. If there is used . To... tighten the cables, first insert the weight pin into the Weight Tube (24) until the slack is felt, the cables should be...
... cover of the Low Cable (53) to be tightened. If the cables are properly tightened each time the weight system is slack in the proper position and that connects the end of this manual. 20 If the cables need to the "U"-bracket (45). • See drawing 1. If there is used . To... tighten the cables, first insert the weight pin into the Weight Tube (24) until the slack is felt, the cables should be...
User Manual
Page 21
...of the muscles affected. Exercising in any time while exercising, stop immediately and begin cooling down. On the exercise guide accompanying this manual you will leave you find the schedule that adequate rest and a proper diet are important factors in an uncontrolled manner will find...muscles. Select a moderate amount of resistance and increase the number of repetitions in each exercise you want to develop most. Weight Loss To lose weight, use a low amount of resistance and increase the number of repetitions in each set . Proper breathing is wrong before continuing...
...of the muscles affected. Exercising in any time while exercising, stop immediately and begin cooling down. On the exercise guide accompanying this manual you will leave you find the schedule that adequate rest and a proper diet are important factors in an uncontrolled manner will find...muscles. Select a moderate amount of resistance and increase the number of repetitions in each exercise you want to develop most. Weight Loss To lose weight, use a low amount of resistance and increase the number of repetitions in each set . Proper breathing is wrong before continuing...
User Manual
Page 22
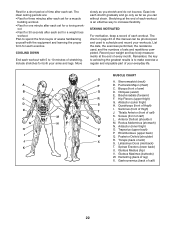
... achieving the greatest results is an effective way to make exercise a regular and enjoyable part of your weight and key body measurements at the end of stretching. Pectoralis Major (chest) C. Hip Flexors (upper thigh... V W X MUSCLE CHART A. A B C D E F G H I . Sternomastoid (neck) B. Biceps (front of leg) X. Abductor (outer thigh) H. Quadriceps (front of this manual can without strain. Sartorius (front of calf) 22 Anterior Deltoid (shoulder) M. Posterior Deltoid (shoulder) R. Latissimus Dorsi (mid back) T. Gluteus Medius (hip) V. Gluteus Maximus (buttocks) W. ...
... achieving the greatest results is an effective way to make exercise a regular and enjoyable part of your weight and key body measurements at the end of stretching. Pectoralis Major (chest) C. Hip Flexors (upper thigh... V W X MUSCLE CHART A. A B C D E F G H I . Sternomastoid (neck) B. Biceps (front of leg) X. Abductor (outer thigh) H. Quadriceps (front of this manual can without strain. Sartorius (front of calf) 22 Anterior Deltoid (shoulder) M. Posterior Deltoid (shoulder) R. Latissimus Dorsi (mid back) T. Gluteus Medius (hip) V. Gluteus Maximus (buttocks) W. ...
User Manual
Page 25
...16 1 Backrest 17 1 Lock 18 1 Lock Pin 19 1 Chain 20 1 Handle Strap 21 2 Weight Guide 22 6 Weight 23 1 Weight Tube Cap 24 1 Weight Tube 25 1 Top Weight 26 1 Weight Pin 27 2 Weight Bumper 28 4 Small Foam Pad 29 1 Pad Tube 30 8 50mm Round Inner Cap 31 5 50mm...Button Bolt 78 1 Large Washer 79 2 M10 x 77mm Bolt 80 2 M6 Washer 81 3 M10 x 46mm Bolt 82 1 M12 Nut # 1 User's Manual # 1 Exercise Guide # 2 Grease Packet # 1 Allen Wrench Note: "#" indicates a non-illustrated part. Qty. Qty. WESY1955.0 R0705B Key No. See the ...
...16 1 Backrest 17 1 Lock 18 1 Lock Pin 19 1 Chain 20 1 Handle Strap 21 2 Weight Guide 22 6 Weight 23 1 Weight Tube Cap 24 1 Weight Tube 25 1 Top Weight 26 1 Weight Pin 27 2 Weight Bumper 28 4 Small Foam Pad 29 1 Pad Tube 30 8 50mm Round Inner Cap 31 5 50mm...Button Bolt 78 1 Large Washer 79 2 M10 x 77mm Bolt 80 2 M6 Washer 81 3 M10 x 46mm Bolt 82 1 M12 Nut # 1 User's Manual # 1 Exercise Guide # 2 Grease Packet # 1 Allen Wrench Note: "#" indicates a non-illustrated part. Qty. Qty. WESY1955.0 R0705B Key No. See the ...
User Manual
Page 28
...from defects in its authorized service centers. You may also have other warranty beyond that specifically set forth herein. the NAME of this manual. Some states do not allow the exclusion or limitation of removal or installation or other warranties and any product or damage to a ...misuse, improper or abnormal usage or repairs not provided by ICON. the SERIAL NUMBER of the product (see the front cover of the product (WEIDER 1200 weight system) 3. This warranty extends only to any economic loss, loss of property, loss of revenues or profits, loss of enjoyment or use and...
...from defects in its authorized service centers. You may also have other warranty beyond that specifically set forth herein. the NAME of this manual. Some states do not allow the exclusion or limitation of removal or installation or other warranties and any product or damage to a ...misuse, improper or abnormal usage or repairs not provided by ICON. the SERIAL NUMBER of the product (see the front cover of the product (WEIDER 1200 weight system) 3. This warranty extends only to any economic loss, loss of property, loss of revenues or profits, loss of enjoyment or use and...


